22 Pantry Organization Ideas for a Clutter-Free Kitchen
You know that small moment when you open the pantry and everything tumbles out? It’s the kind of chaos that steals time and joy from cooking. These 22 pantry organization ideas for a clutter-free kitchen are meant to help you stop the spill and start enjoying your space again.
You’ll find practical, stylish solutions that fit tiny nooks and large walk-ins. I cover shelving tricks, container systems, labeling, vertical storage, and budget-friendly DIYs. Each idea shows what to buy, how to set it up step-by-step, and how to style it so your pantry looks calm and curated.
Use these pantry organization ideas for a clutter-free kitchen to match your style. Save your favorites, pin the images, and pick one project to try this weekend. Let’s make pantry time peaceful again.
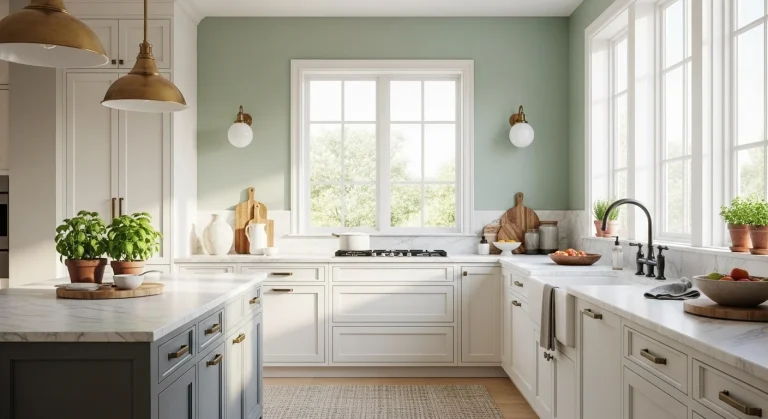
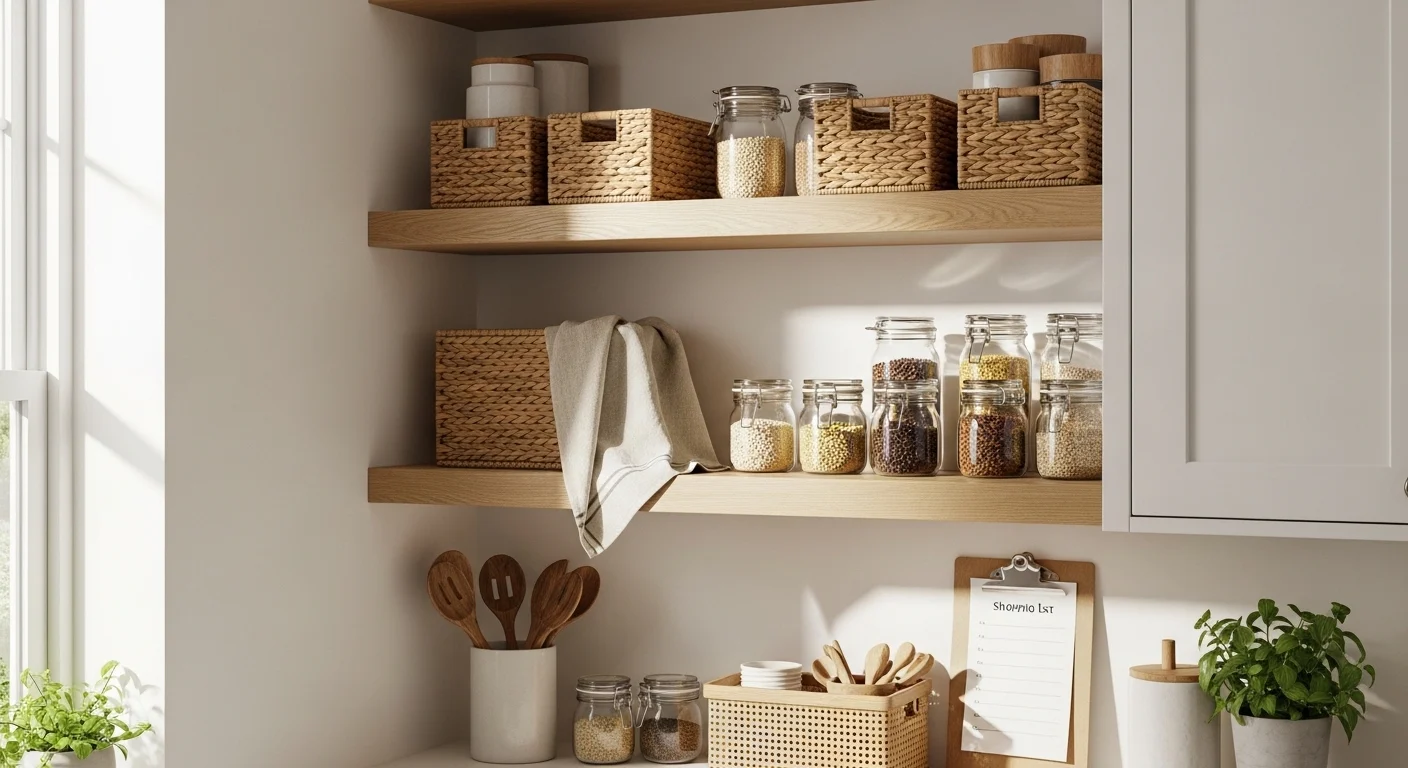
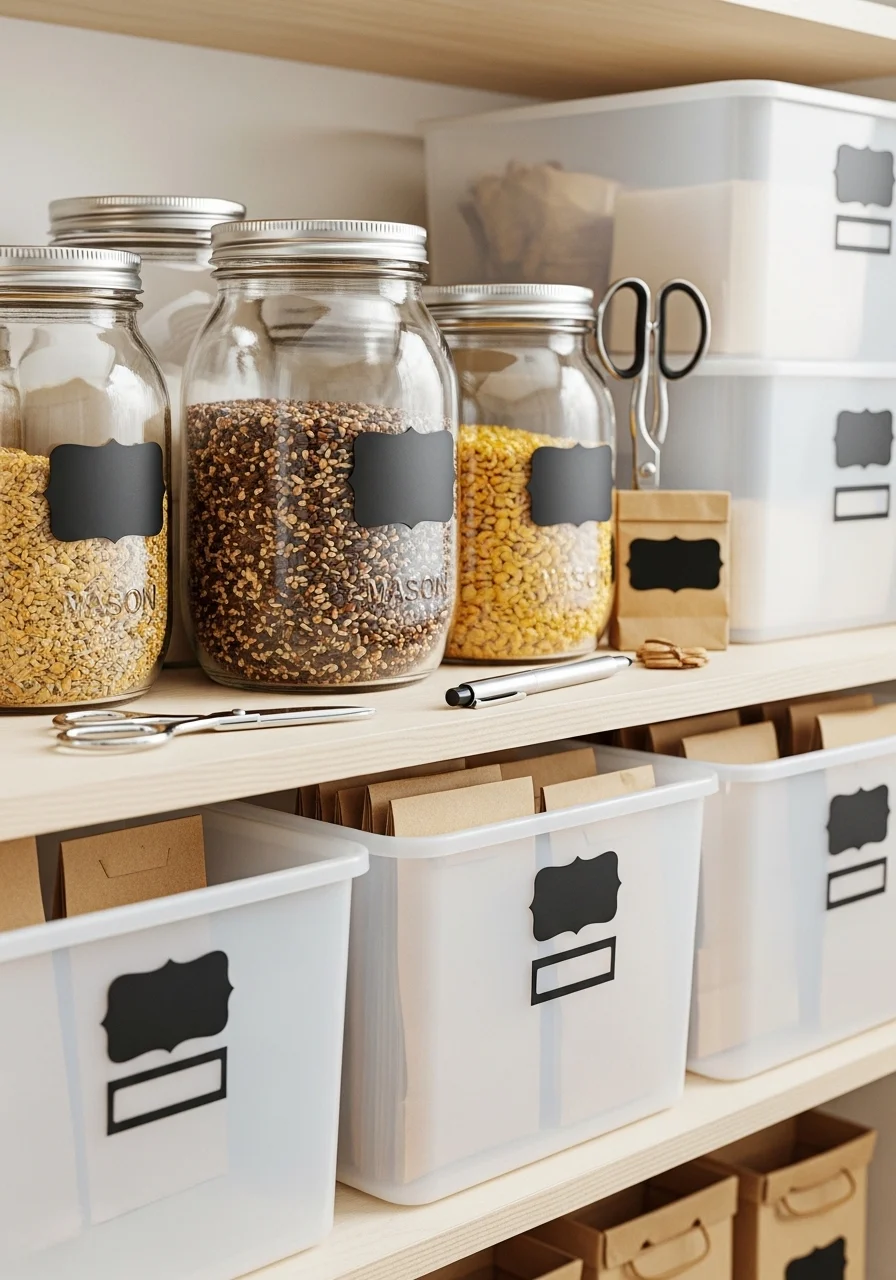
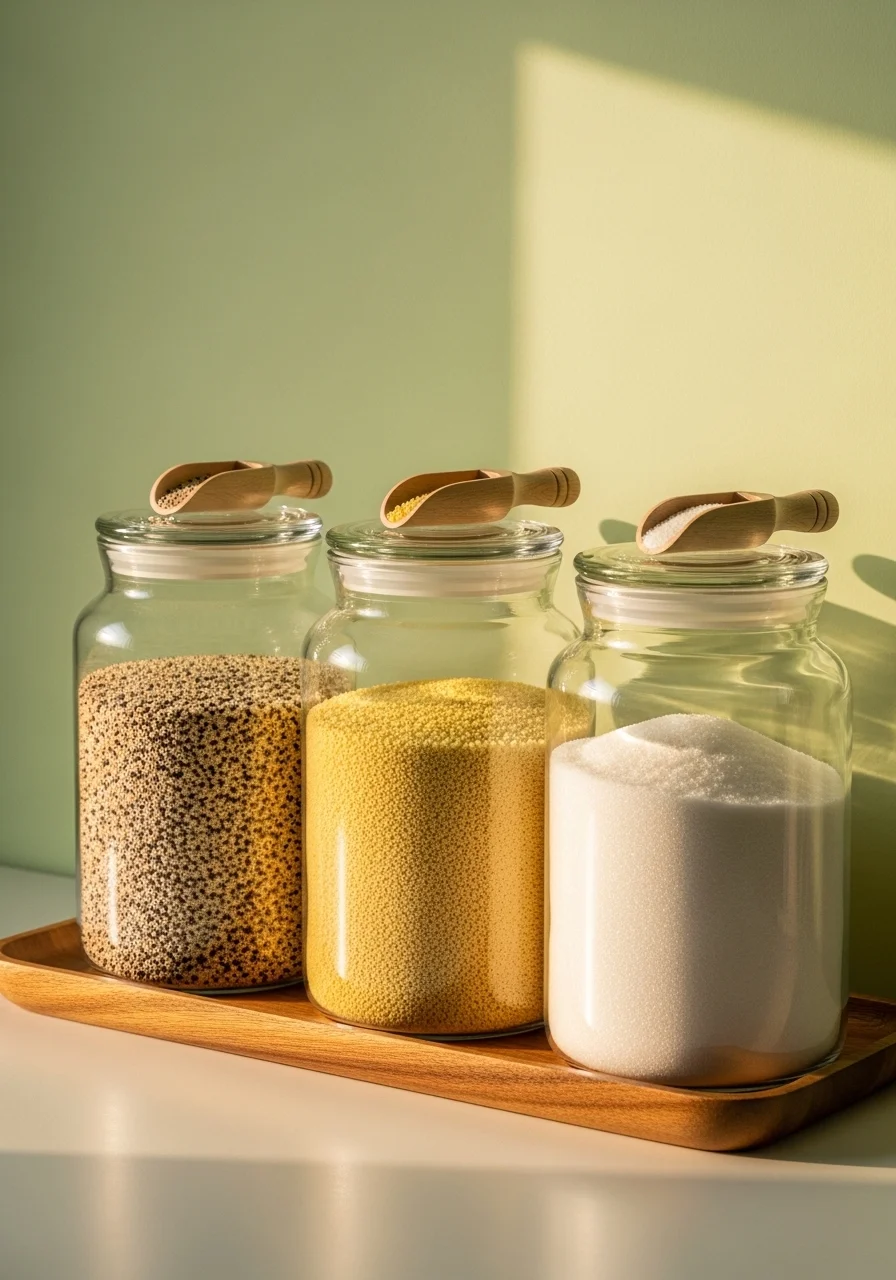
1. Categorized Clear Jars

What makes this idea pop is the visual calm of identical jars. Clear glass shows contents and colors. The uniform shapes create rhythm on the shelf. It’s perfect for dry goods and bulk buys. You’ll love how easy it is to spot ingredients. The vibe feels clean, warm, and lightly rustic.
Key Elements (storage containers, pantry shelves)
- Clear glass canisters with airtight lids, 1–2L
- Matching shapes (cylindrical or square)
- Chalkboard or black matte labels
- Wooden scoops or measuring cups
- Wooden or white laminate shelving
- Small tray for scoops and extras
- Linen napkin or cotton towel accent
- Natural light for shelf visibility
- Rotateable lazy susan for corners
- Rubber shelf liners in neutral tone
How to Achieve This Look
- Clear out pantry and group similar dry goods.
- Choose jar sizes for quantity (oats in 1.5L, rice in 2L).
- Fill jars with funnels to avoid spills.
- Label jars with content and expiry date.
- Place frequently used jars at eye level.
- Add scoops and a small tray beside jars for quick access.
- Use a lazy susan for jars in corner spaces.
- Wipe jars and shelf for a clean finish.
- Keep a small inventory list on the pantry door.
How to Style / Use It
Display jars in rows by color and size for a tidy look. Pair with wooden scoops and a neutral tray to keep things organized. Refill jars from bulk packages and wash lids monthly. Swap labels seasonally if you like a refreshed look. This system works well in both open shelving and enclosed pantry cabinets.
2. Wire Baskets for Flexible Storage
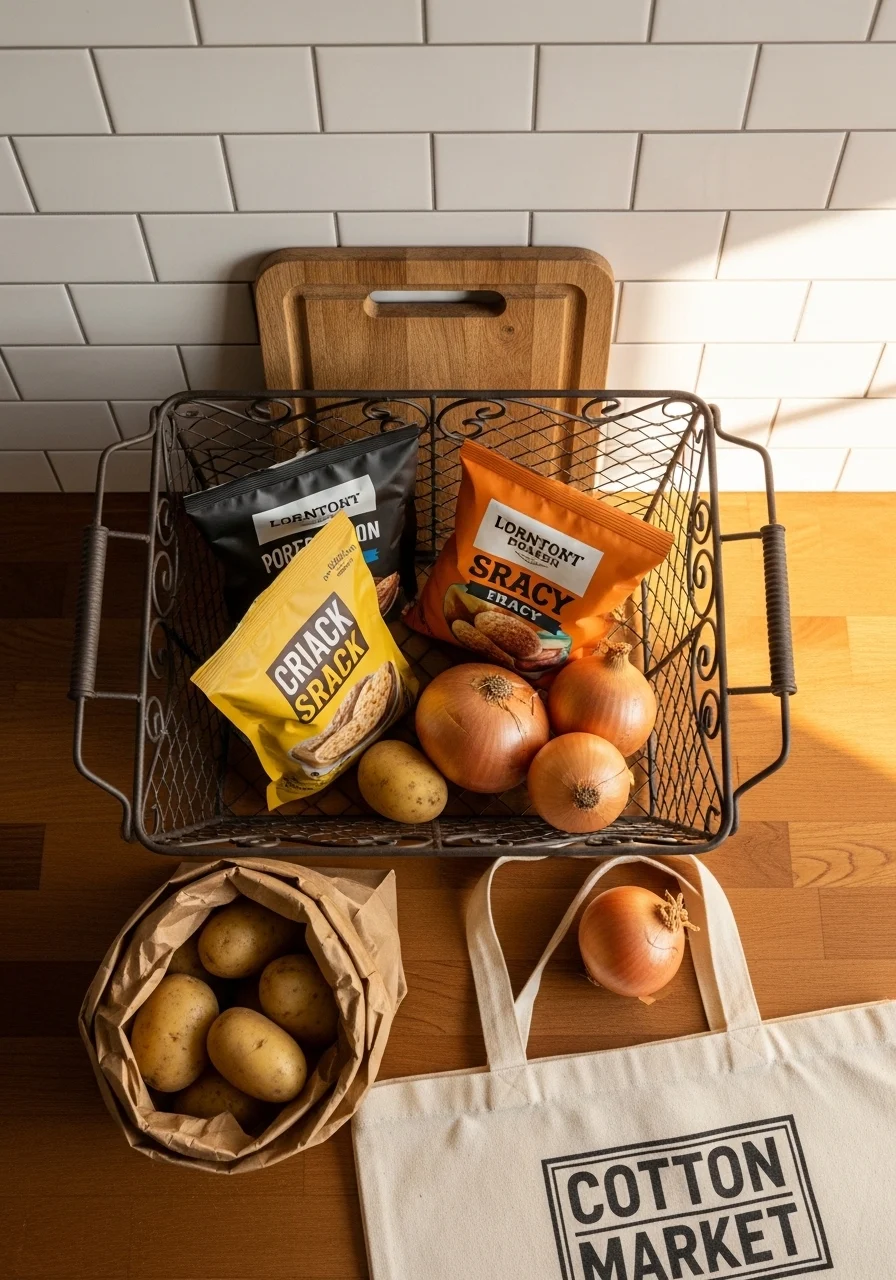
Wire baskets add texture and airflow. They keep produce ventilated and snacks tidy. The industrial look suits modern and farmhouse kitchens. You’ll enjoy easy grab-and-go access. The baskets feel practical and graphic.
Key Elements (wire baskets, pantry bins)
- Various sized wire baskets (small, medium, large)
- Rust-proof, dark or black finish
- Paper produce bags for potatoes/onions
- Small chalk labels clipped to basket rim
- Shelf liners or trays under baskets
- Cotton market tote for overflow
- Wooden cutting board nearby for prep
- Wire hooks for basket handles
- Clear bin for frequently used items
How to Achieve This Look
- Sort pantry items into produce, snacks, and odd-shaped packages.
- Assign a basket to each category.
- Place heavier items lower to prevent tipping.
- Use liners for fine crumbs or smaller items.
- Clip labels to the rim for quick ID.
- Stack baskets where shelf height allows.
- Keep a tote nearby for shopping overflow.
- Wipe baskets monthly to remove dust.
How to Style / Use It
Group baskets by function across shelves for a cohesive look. Use dark metal baskets against light shelves for contrast. Rotate seasonal snacks to the front. For long-term use, choose rust-resistant finishes and avoid wet storage inside wire baskets.
3. Tiered Shelf Risers for Visible Spices and Cans
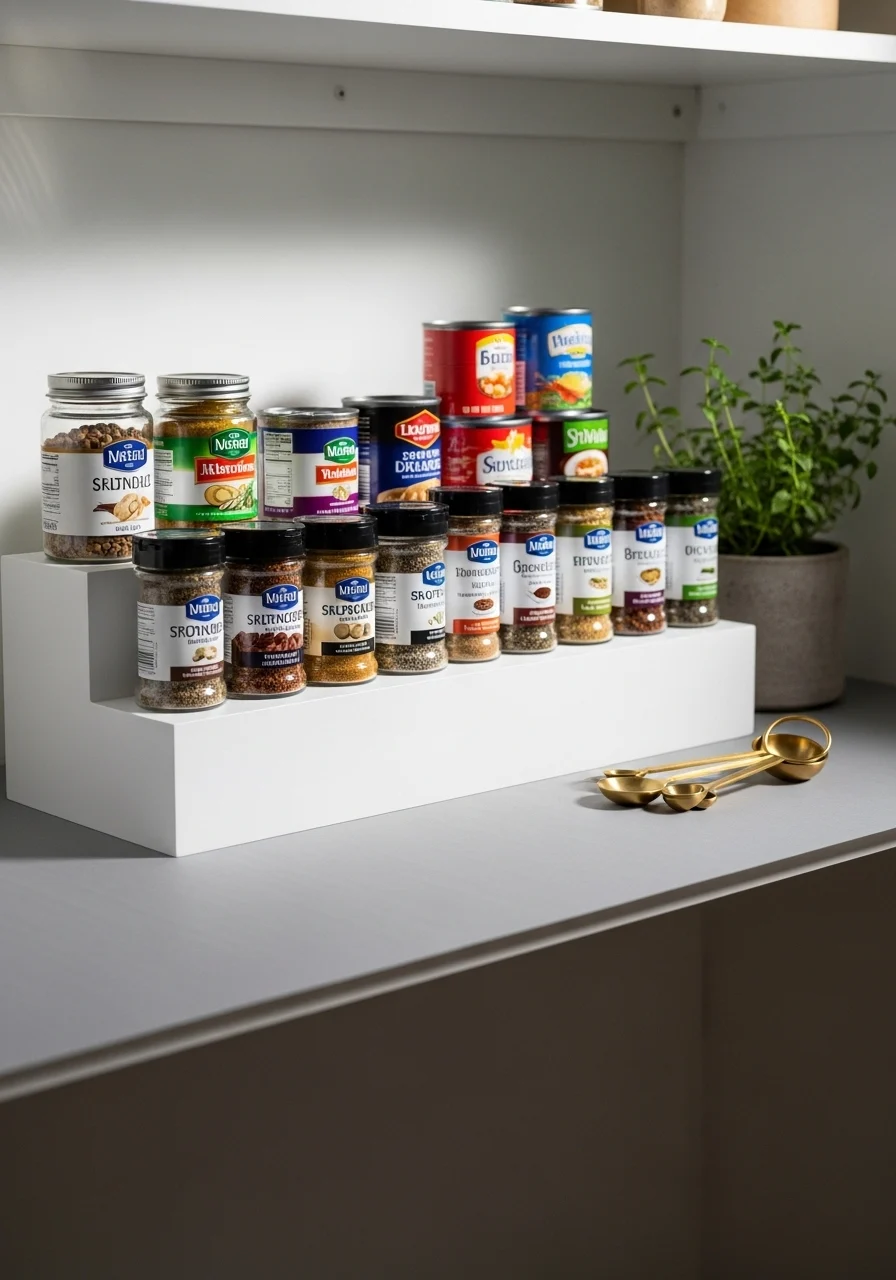
Tiered risers create sightlines so nothing hides. They work great for spices, cans, and small jars. The layered look is neat and efficient. You’ll love not digging for the back row. The result feels orderly and approachable.
Key Elements (shelf risers, spice organization)
- 2–3 tiered risers in metal or acrylic
- Matching spice jars with uniform lids
- Can organizers for soda or tomato cans
- Non-slip shelf liners
- Clear labels on spice jars
- Small measuring spoon set nearby
- Herb plant for a fresh touch
- Small basket for single-use spice packets
- Neutral shelf color to keep it calm
How to Achieve This Look
- Empty shelf and sort spices and cans.
- Place risers so front-to-back visibility improves.
- Standardize spice jars for a uniform look.
- Fill and label jars alphabetically or by cuisine.
- Line the shelf with non-slip material.
- Store multi-pack spices in a small basket.
- Keep frequently used canned goods on a middle shelf.
How to Style / Use It
Arrange spices alphabetically or by cooking style. Pair risers with clear jars for a sleek, unified shelf. Refill jars from bulk packets and mark expiry dates. Use risers in small pantries to maximize vertical space.
4. Pull-Out Drawer System for Small Items
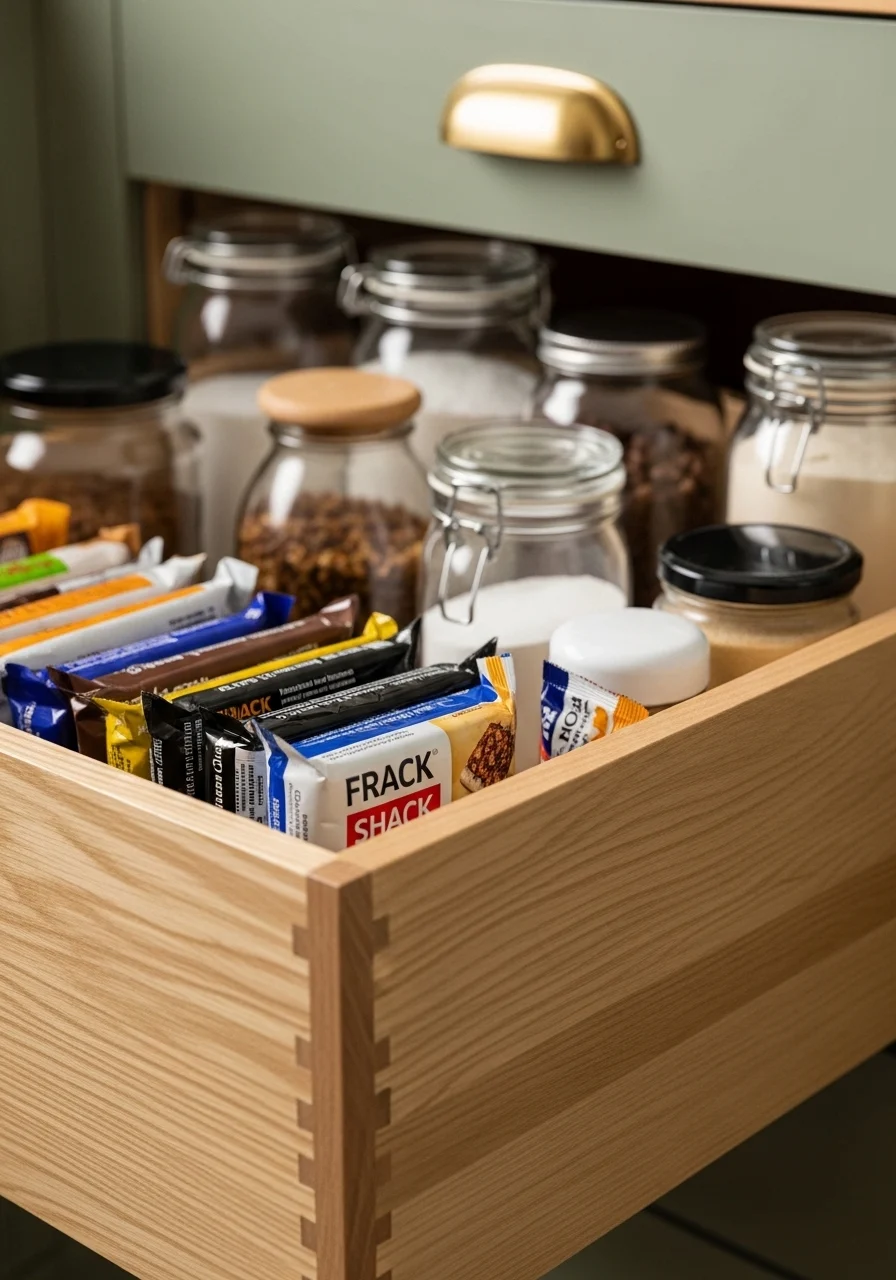
Pull-out drawers make everything reachable. They’re ideal for snack packs, baking tools, and small appliances. The neat slide-out motion feels satisfying. You’ll enjoy the full visibility and quick access.
Key Elements (pull-out drawers, hardware)
- Soft-close pull-out drawers or wire baskets
- Drawer dividers for small items
- Non-slip drawer liners
- Drawer depth matched to pantry cabinet
- Labels on dividers
- Sturdy slides rated for weight
- Small jars for baking bits
- Charging station for small appliances (optional)
- Clear front panels for view
How to Achieve This Look
- Measure pantry depth and order appropriate slides.
- Install soft-close hardware following instructions.
- Insert dividers for snack bars, packets, and jars.
- Add non-slip liners to prevent movement.
- Place heavy items in the back and lighter items front.
- Label each compartment clearly.
- Test full extension and adjust stops as needed.
- Clean drawer tracks occasionally.
How to Style / Use It
Keep snacks at kid-friendly height for self-service. Use drawer dividers for themed zones: baking, kids’ snacks, meal prep. Keep heavy jars low to reduce strain. For long-lasting slides, avoid overloading beyond weight rating.
5. Label-First System
A label-first approach brings instant calm. When everything has a name, you reduce decision fatigue. It works for families, roommates, and cooks. You’ll find items faster and keep stock under control. The result is both practical and tidy.
Key Elements (labels, labeling tools)
- Waterproof adhesive labels or chalk tags
- Label maker for uniform text
- Permanent marker for food types and dates
- Clear jars and opaque bins labeled clearly
- A small label supply drawer
- Color-coded labels for categories
- Date stickers for baked goods
- Scissors and a cleaning cloth
- Inventory list taped inside pantry door
How to Achieve This Look
- Empty pantry and group like items together.
- Decide on a labeling system (typed, chalk, color-coded).
- Label jars and bins with content and expiry.
- Place labels at eye level on shelves.
- Keep a label maker and spare labels in a drawer.
- Update labels as you refill or transfer items.
- Add a dated inventory list for staples.
- Train household members to relabel when needed.
How to Style / Use It
Use matching label fonts and sizes for a cohesive look. Color-code by category (baking, snacks, grains). Keep a label kit handy so relabeling is easy. Replace adhesive labels seasonally to keep things fresh.
6. Vertical Door Storage for Max Space
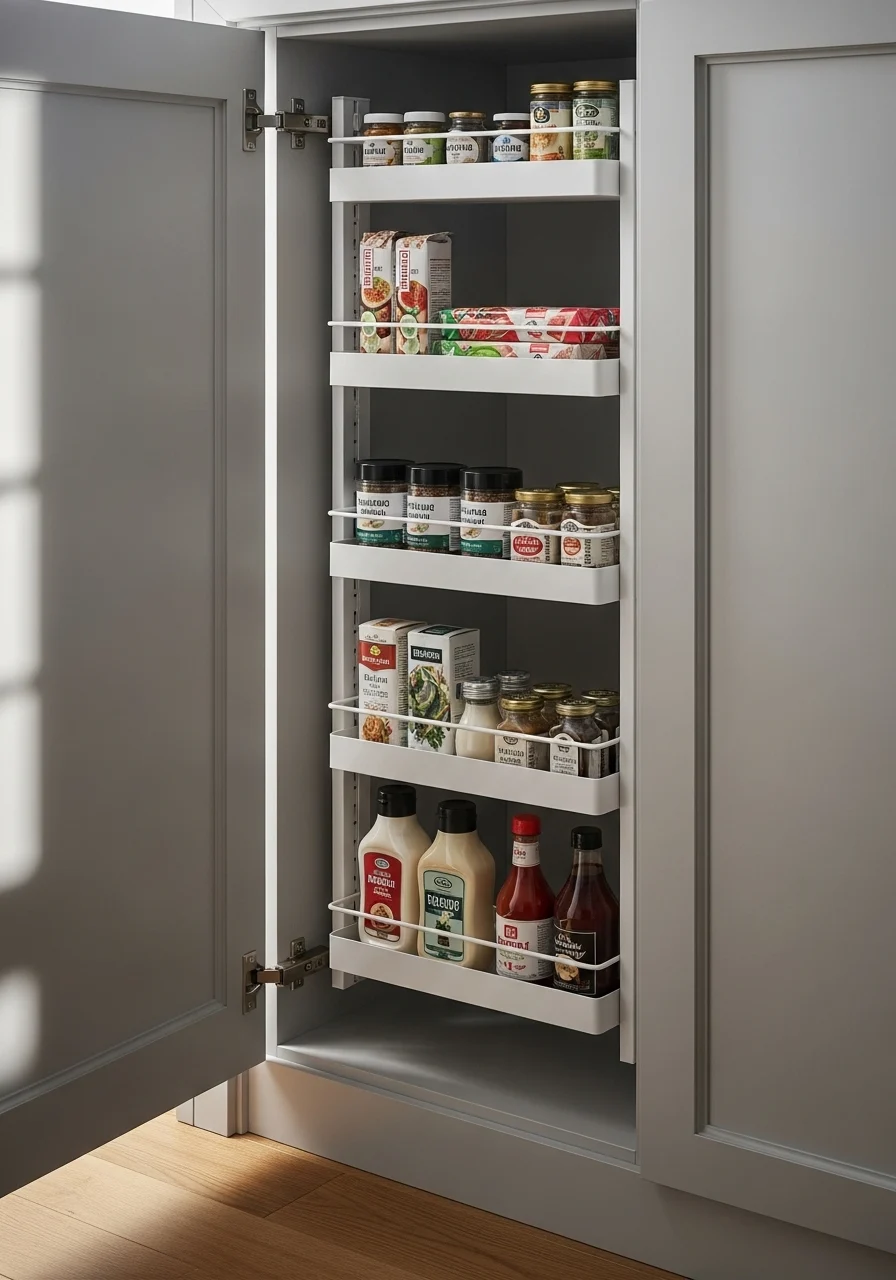
The back of the pantry door is prime real estate. Slim racks keep wraps, spices, and lids visible. This setup saves shelf space and adds function. You’ll love the instant extra storage.
Key Elements (door racks, slim organizers)
- Over-the-door slim racks or mounted rails
- Spice jar holders and wrap dispensers
- Clear pockets for coupons or lists
- Magnetic strip for small metal tools
- Hooks for aprons or oven mitts
- Soft-close door hinges
- Adhesive-backed mounting for light racks
- Labels or tags for each pocket
How to Achieve This Look
- Measure door width and clearance when open.
- Choose over-door racks that fit your space.
- Install racks at reachable heights for all users.
- Group items by use: wraps, spices, lids.
- Add a magnetic strip for small tools.
- Use clear pockets for lists or coupons.
- Test door closure for smooth operation.
- Adjust placement as you refine use.
How to Style / Use It
Keep frequently used wraps and foil at eye height. Pair with a grocery list clipped inside the door. Use door space for lightweight items only. For heavy items, choose wall-mounted solutions instead.
7. Clear, Stackable Bins for Kid-Friendly Pantries
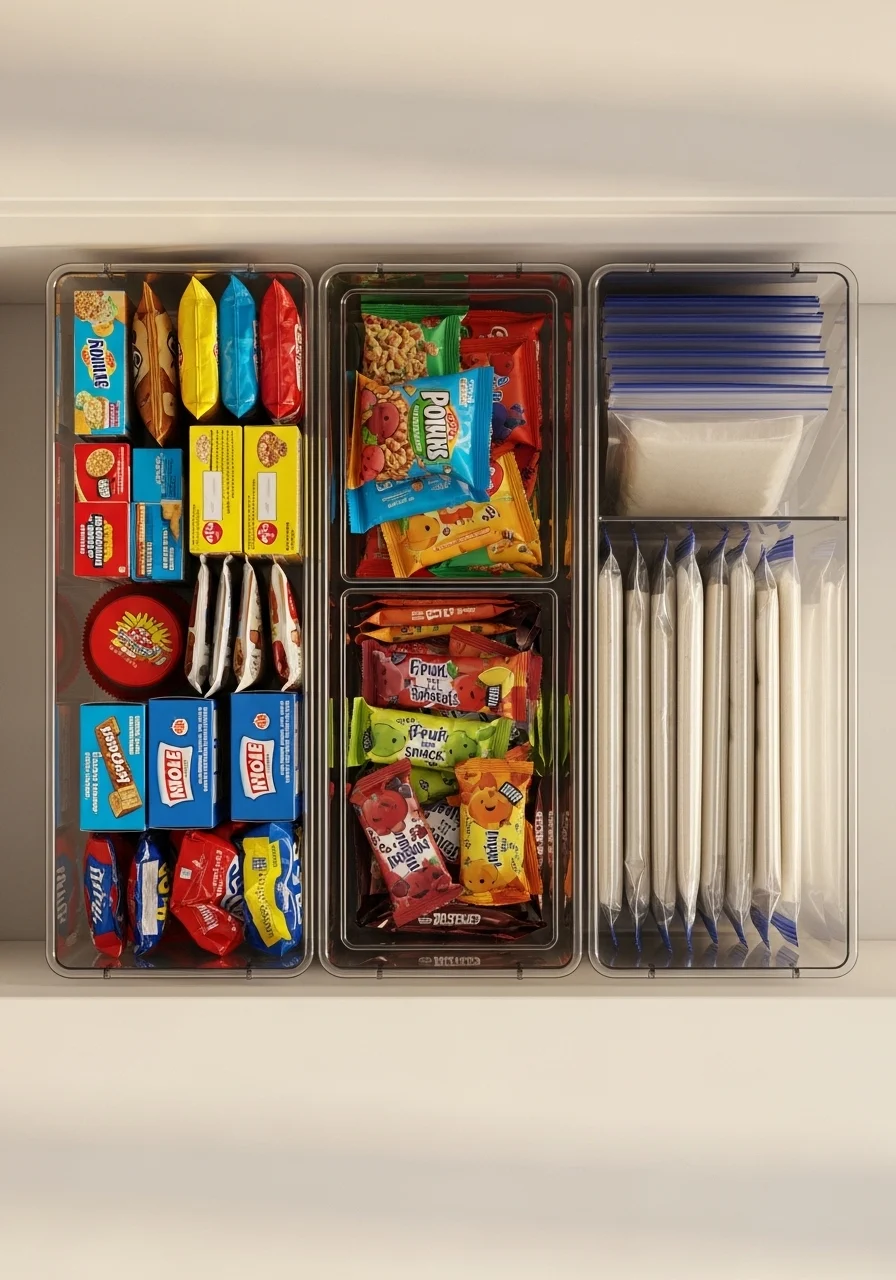
Clear stackable bins keep kid snacks organized and visible. They help kids reach what they need. The stackable design saves shelf space. You’ll like the order and the independence it gives your children.
Key Elements (stackable bins, kid access)
- Clear plastic stackable bins with lids
- Soft rounded edges for safety
- Color-coded stickers for each child
- Labels with icons for non-readers
- Lower shelving for kid access
- Lightweight containers for easy lifting
- Snack portion containers inside bins
- A child-friendly step stool nearby
How to Achieve This Look
- Reserve a low shelf for kid bins.
- Label each bin with a child’s color or icon.
- Fill bins with pre-portioned snacks.
- Stack bins for space, leaving one at the front.
- Teach kids which bin is theirs.
- Replenish weekly based on usage.
- Use clear lids to keep pests out.
- Keep healthier snacks at front to encourage choice.
How to Style / Use It
Arrange bins at kids’ eye level for independence. Rotate snacks to keep choices fresh. Use icons or photos if your child is young. Keep routine restocking as part of weekly chores.
8. Baking Station Shelf with Ingredient Zones
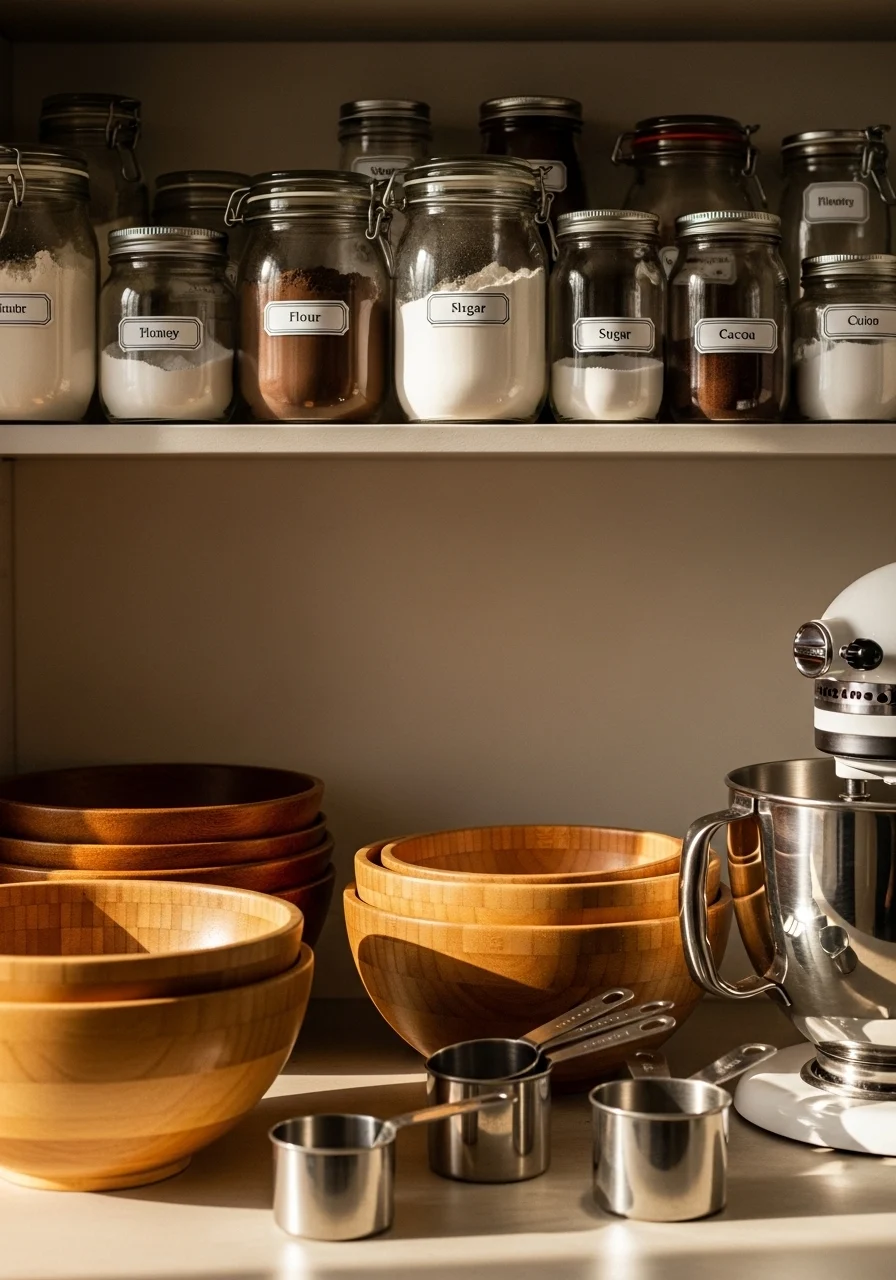
A baking station groups all baking supplies in one spot. Ingredient zones cut prep time. It’s great for the home baker. You’ll feel ready to bake with everything within reach.
Key Elements (baking shelf, tools)
- Large airtight jars for flour and sugar
- Smaller jars for baking powder and cocoa
- Measuring cups and digital scale
- Mixing bowls stacked by size
- Stand mixer or hand mixer space
- Drawer with whisks and spatulas
- Silicone baking mats and parchment rolls
- Labels with portion sizes
- Baking recipe book or cardholder
How to Achieve This Look
- Choose a dedicated shelf or drawer near the oven.
- Group dry goods in airtight jars.
- Arrange tools from largest to smallest.
- Keep measuring tools in a single drawer.
- Store sheets and mats vertically for easy pull-out.
- Place mixer on lower shelf or countertop plug-in spot.
- Add a small basket for recipe cards.
- Wipe surfaces after each baking session.
How to Style / Use It
Display wooden bowls and a few pretty tools for a curated look. Keep heavy items low to reduce strain. Refill jars after major baking sessions. Rotate seasonal baking spices to the front for holiday prep.
9. Lazy Susan Corner Organizer

A lazy susan turns corner chaos into order. It gives easy access to jars and bottles. The circular motion feels satisfying and quick. You’ll save time looking for that elusive sauce.
Key Elements (lazy susan, corner storage)
- Wooden or acrylic lazy susan with sturdy base
- Non-slip surface or grip pads
- Grouped jars and small bottles
- Low-profile containers to prevent tipping
- Clear labels on bottle tops
- Corner shelf liner for protection
- Small bins for squeeze bottles
- Keep heavy items near the base
How to Achieve This Look
- Measure corner shelf diameter for a good fit.
- Choose a lazy susan with a non-slip top.
- Group like items together (sauces, oils).
- Place frequently used items at the front edge.
- Avoid stacking tall bottles to prevent tipping.
- Add labels to lids for quick ID.
- Rotate and wipe the turntable monthly.
How to Style / Use It
Pair a wooden saucer with warm-toned shelves for cohesion. Use small containers for similar height. Keep fragile items off lazy susans. For deep corners, use two saucers stacked if shelf height allows.
10. Mesh Produce Bins with Labels
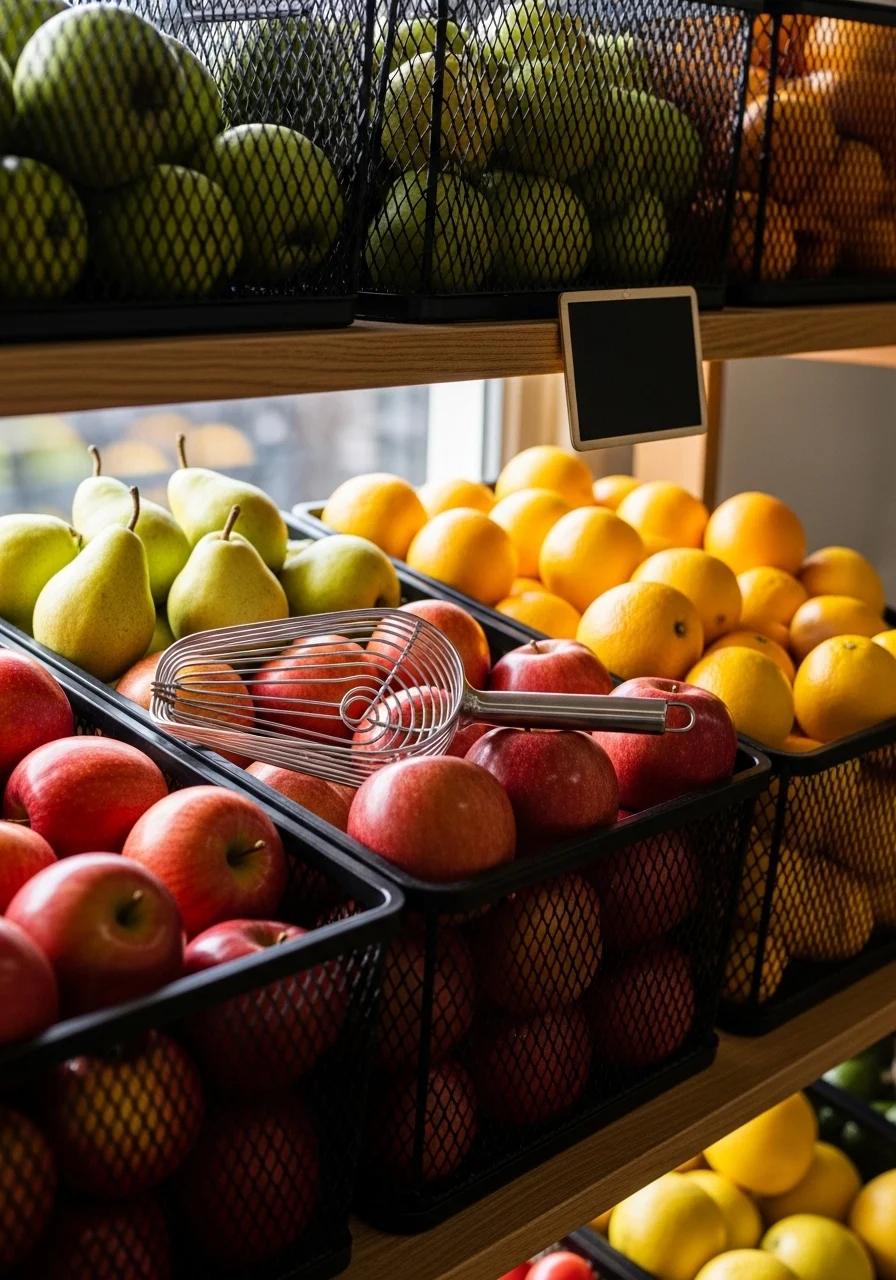
Mesh bins allow airflow to keep produce fresher. They add a modern texture to shelves. The open weave shows fruit color and ripeness. You’ll appreciate the balance between style and function.
Key Elements (mesh bins, produce care)
- Metal mesh bins in matte black or white
- Breathable design for produce
- Labeled front tabs
- Paper bags for delicate fruit
- Small produce brush in a jar
- Lower shelf placement for heavier produce
- Tray underneath for any drips
- Neutral shelf liners for contrast
How to Achieve This Look
- Assign a lower shelf for produce bins.
- Line each bin with a paper bag if needed.
- Group fruit by ripeness to plan meals.
- Place heavier fruit at the bottom of the bin.
- Label bins by type or intended use.
- Wipe bins and rotate fruit every few days.
- Use a small tray to catch any juice.
How to Style / Use It
Mix metal mesh bins with woven baskets for a layered look. Keep delicate berries in small lidded containers on top shelves. Rotate fruit from front to back to reduce waste. Use color-coded labels for produce types.
11. Chalkboard Pantry Wall for Menu Planning
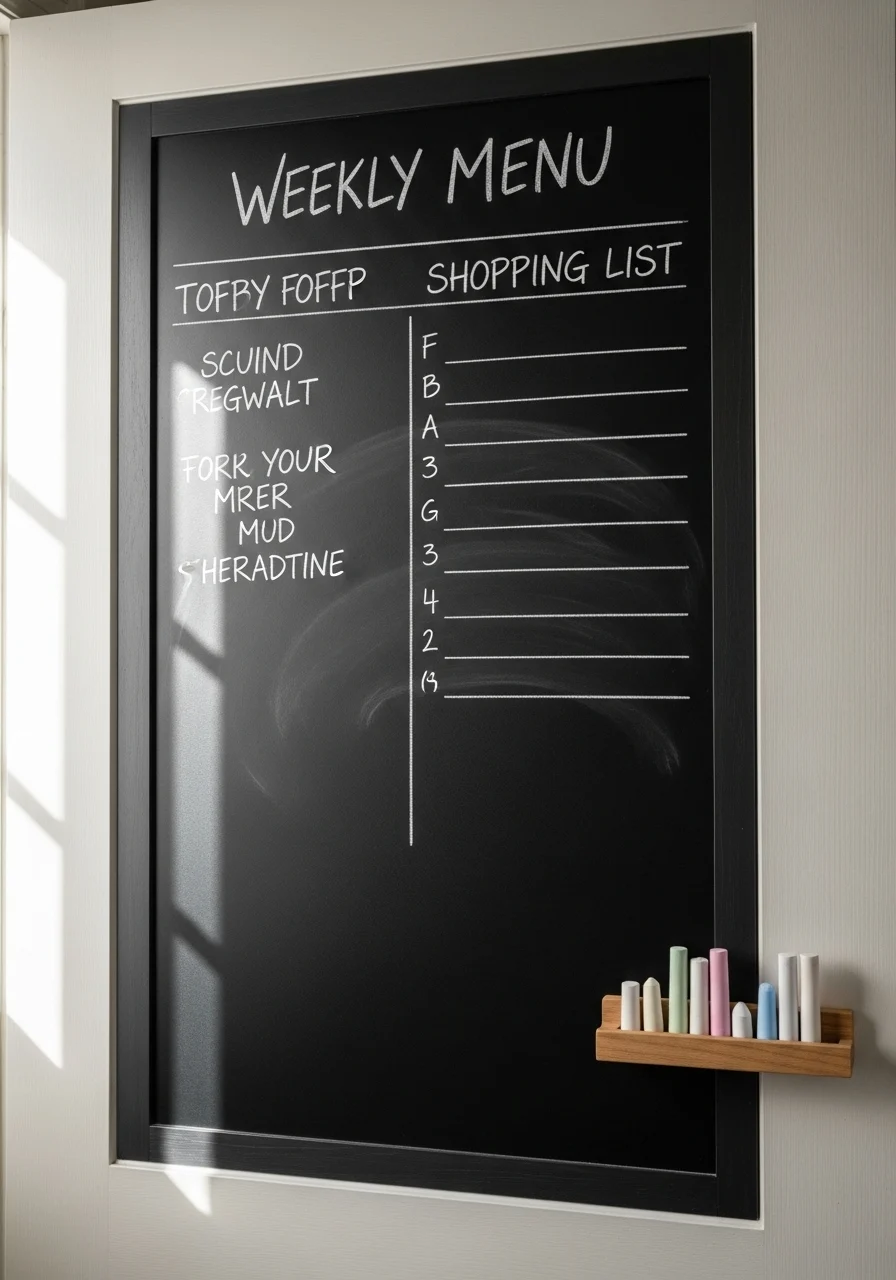
A chalkboard wall keeps your menu and rotation visible. It helps plan meals and reduces overbuying. This creative touch blends function and decor. You’ll enjoy the quick notes and easy edits.
Key Elements (chalkboard, planning tools)
- Matte chalkboard paint or panel
- Chalk pens and soft chalk
- Weekly menu grid drawn on the board
- Magnetic clips for recipes
- Small ledge for chalk storage
- Shopping list area that can be torn off
- Light-colored frame for contrast
- Calendar stickers for dates
How to Achieve This Look
- Prep the door surface and apply chalkboard paint.
- Let paint cure fully before writing.
- Sketch a weekly grid for meals and a shopping section.
- Add magnetic clips for pinned recipes.
- Keep chalk and eraser on a small ledge.
- Update the board weekly with meal plans.
- Use it to track staples to restock.
How to Style / Use It
Use colored chalk pens for categories (dinners, snacks). Hang quick recipes on clips for easy reference. Pair the board with labeled jars so the menu ties to what’s on hand. Wipe and refresh monthly.
12. Clear Drawer Inserts
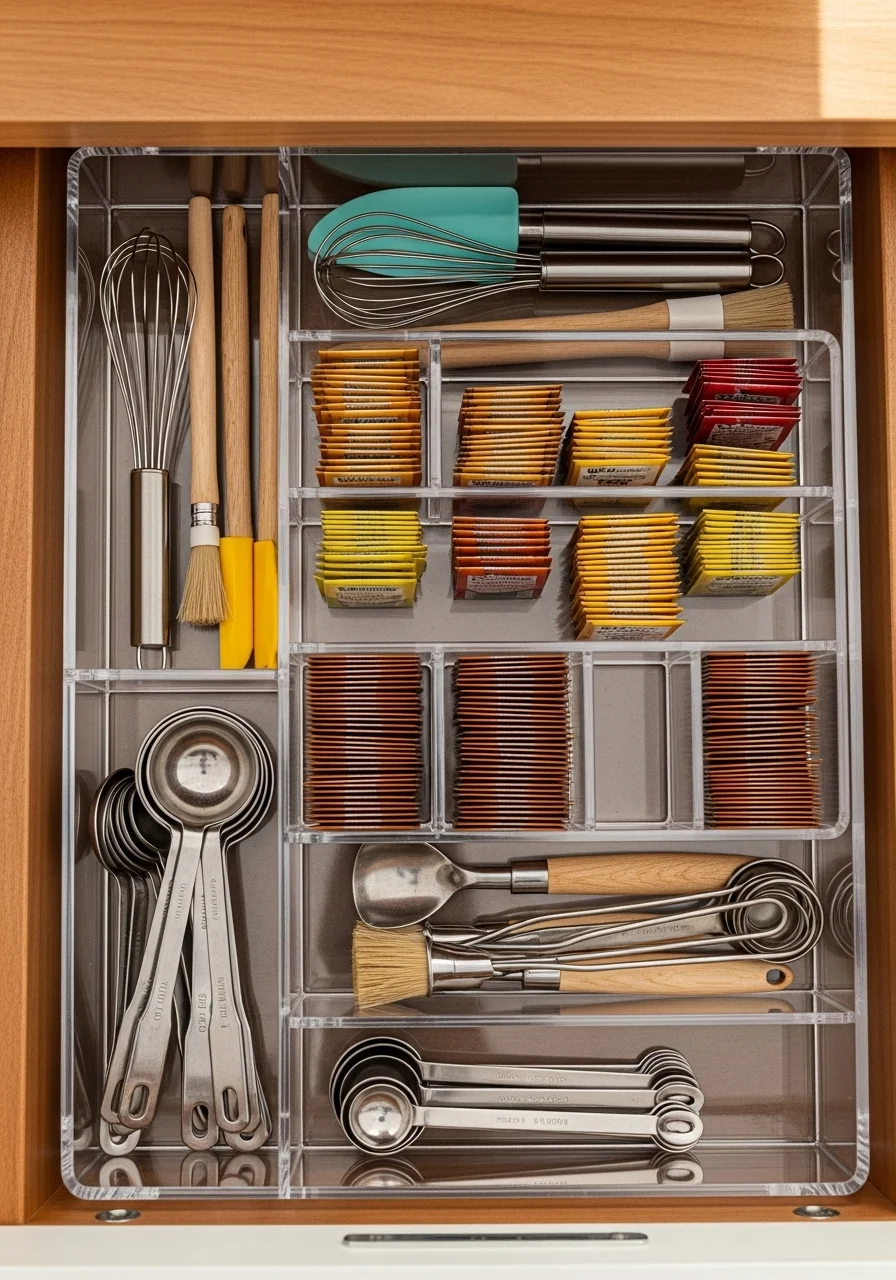
Clear drawer inserts keep little items from becoming a jumble. They give each tool a dedicated spot. This approach is tidy and looks modern. You’ll love how quickly you find measuring spoons or packets.
Key Elements (drawer inserts, small item storage)
- Clear acrylic drawer organizers
- Multiple compartment sizes
- Non-slip liners under inserts
- Drawer depth measured precisely
- Labeled sections for quick ID
- Small jars for loose bits like clips
- Soft-close drawer hardware
- Lightweight lids for hygiene
How to Achieve This Look
- Measure drawer interior accurately.
- Choose inserts that fit with small gaps.
- Place non-slip liners under inserts.
- Sort items into categories and place them in compartments.
- Label each section for clarity.
- Keep frequently used items near the front.
- Remove inserts quarterly for cleaning.
How to Style / Use It
Group tools by task: baking, prep, kids’ snacks. Use clear inserts for a minimalist look. Replace broken inserts rather than cramming drawers. Keep a small drawer dedicated to frequently used utensils.
13. Stackable Can Dispensers for Easy Rotation
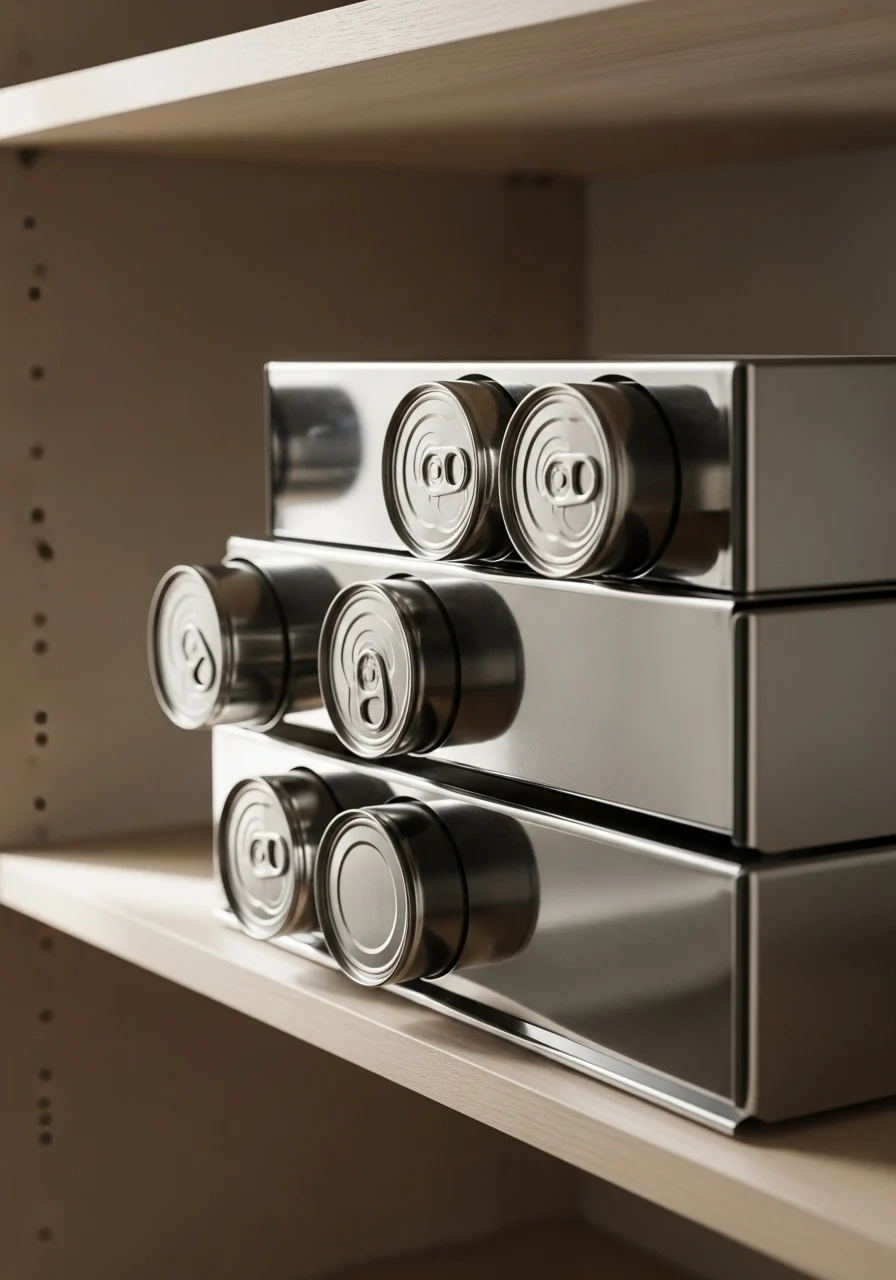
Can dispensers help rotate stock so older cans get used first. They reduce shelf clutter and make selection instant. It’s a smart, orderly solution for soup and tomato can storage. You’ll save space and avoid expired cans.
Key Elements (can dispensers, pantry rotation)
- Stackable can dispensers with gravity feed
- Non-slip pads on each unit
- Grouped by type (soup, beans)
- Labels on front edge
- Shelf depth that fits units
- Metal finish for durability
- Small trash bin nearby for pop-tops
- Inventory list taped inside pantry
How to Achieve This Look
- Measure shelf height and can diameter.
- Place dispensers on a middle shelf for easy reach.
- Head cans forward to load new cans behind.
- Label dispenser fronts by content.
- Stack units if shelf height allows.
- Check inventory monthly and remove dented cans.
- Keep a trash or recycling bin nearby for empty cans.
How to Style / Use It
Match metal dispensers to other pantry finishes for cohesion. Use units to organize holiday-specific canned goods separately. Keep dispensers at child-safe heights if kids help with meal prep.
14. Hidden Appliances Shelf with Plug-In Station
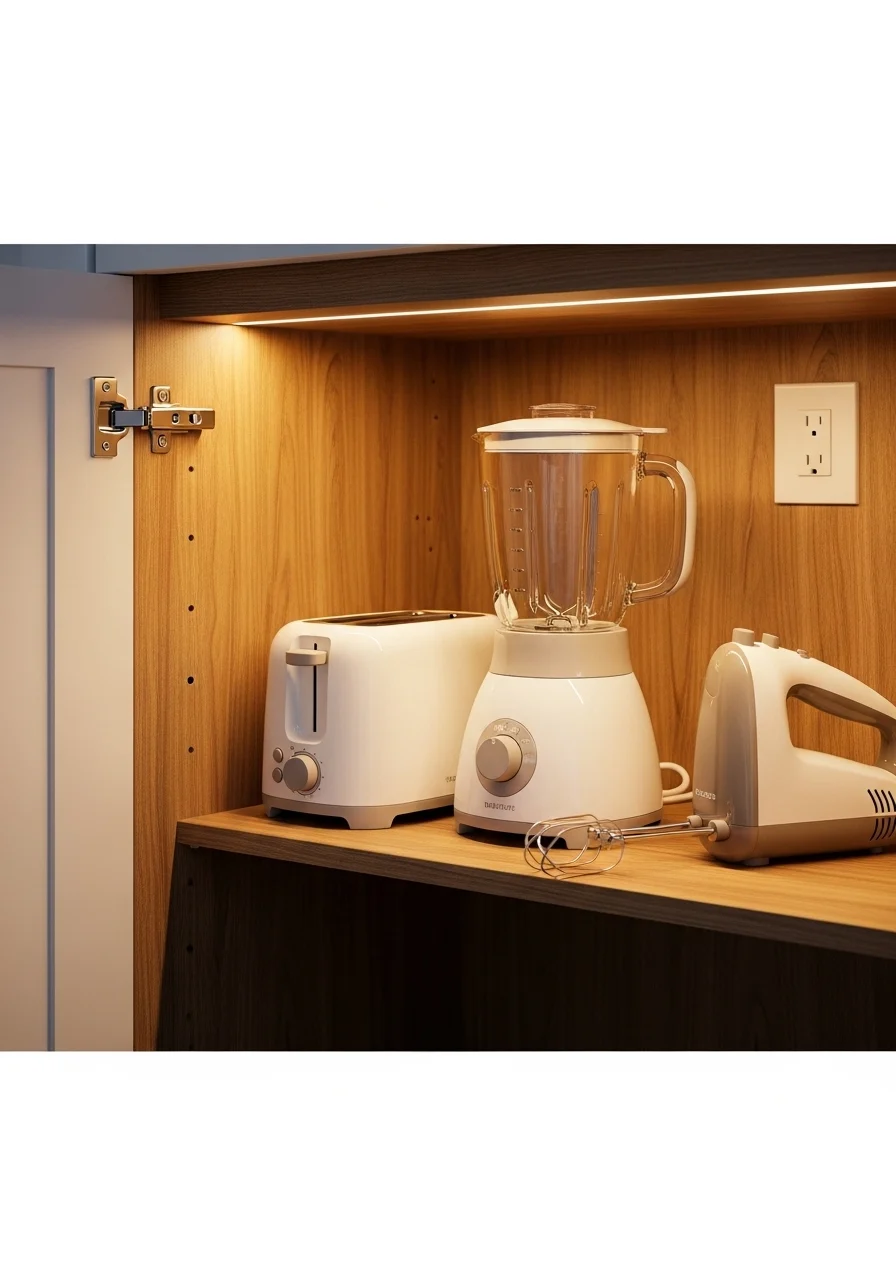
A hidden appliance shelf frees counter space. Built-in outlets let appliances be plugged in without moving them. It’s clean and efficient. You’ll like the uncluttered counters and the convenience of a ready-to-use appliance.
Key Elements (appliance shelf, electrical prep)
- Middle-depth shelf for mixers and toasters
- Built-in or nearby outlet with cable management
- Pull-out shelf for heavy mixers
- Non-slip mat under appliances
- Small appliance dust cover or cloth
- Drawer for attachments and cords
- Ventilation gaps to prevent heat build-up
- Safety switch for the outlet
How to Achieve This Look
- Choose a shelf near an electrical outlet or install one.
- Add a pull-out shelf for heavy devices.
- Use cable ties or clips for cord management.
- Store attachments in a labeled drawer.
- Keep a non-slip mat under each appliance.
- Plug devices only when in use to save energy.
- Check vents and cords regularly for safety.
How to Style / Use It
Hide appliances behind a door for a seamless kitchen look. Keep mixers and blenders accessible for weekly baking. Use dust covers when not in use for long-term care. Consider child-proof outlet covers if needed.
15. Tiered Baskets for Bread and Wraps
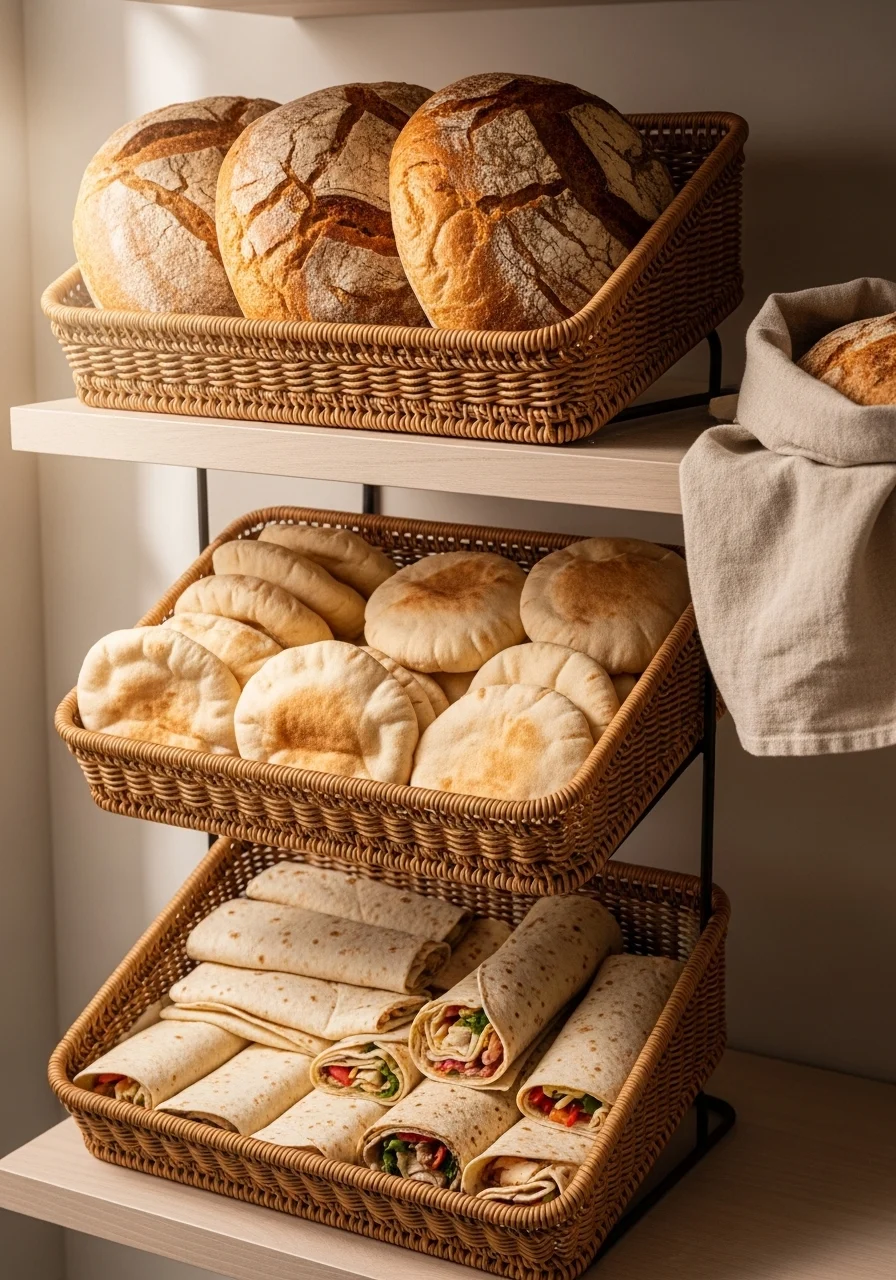
Tiered baskets create a bakery-style display for bread and wraps. They save counter space and keep items ventilated. The natural textures bring warmth to the pantry. You’ll enjoy the inviting, organized look.
Key Elements (tiered baskets, baked goods)
- Rattan or woven tiered baskets
- Linen bread bags for softer bread
- Small labels for type and date
- Tray at the bottom to catch crumbs
- Lower shelf for heavier loaves
- Airtight tin for long-term storage of bagels
- Bread knife stored nearby
- Light shelf liner for cleanliness
How to Achieve This Look
- Place tiered baskets on an accessible shelf.
- Use linen bags to protect softer breads.
- Label each basket with content and bake date.
- Store denser breads at the bottom tier.
- Replace linen periodically to prevent odor.
- Keep a crumb tray below to collect debris.
- Refresh bread stock weekly and freeze extras.
How to Style / Use It
Pair rattan baskets with warm wood shelves for a cozy look. Rotate baked goods to the front to use older items. Use airtight tins for bagels and pastries when longer life is needed.
16. Magnetic Spice Jars on the Wall
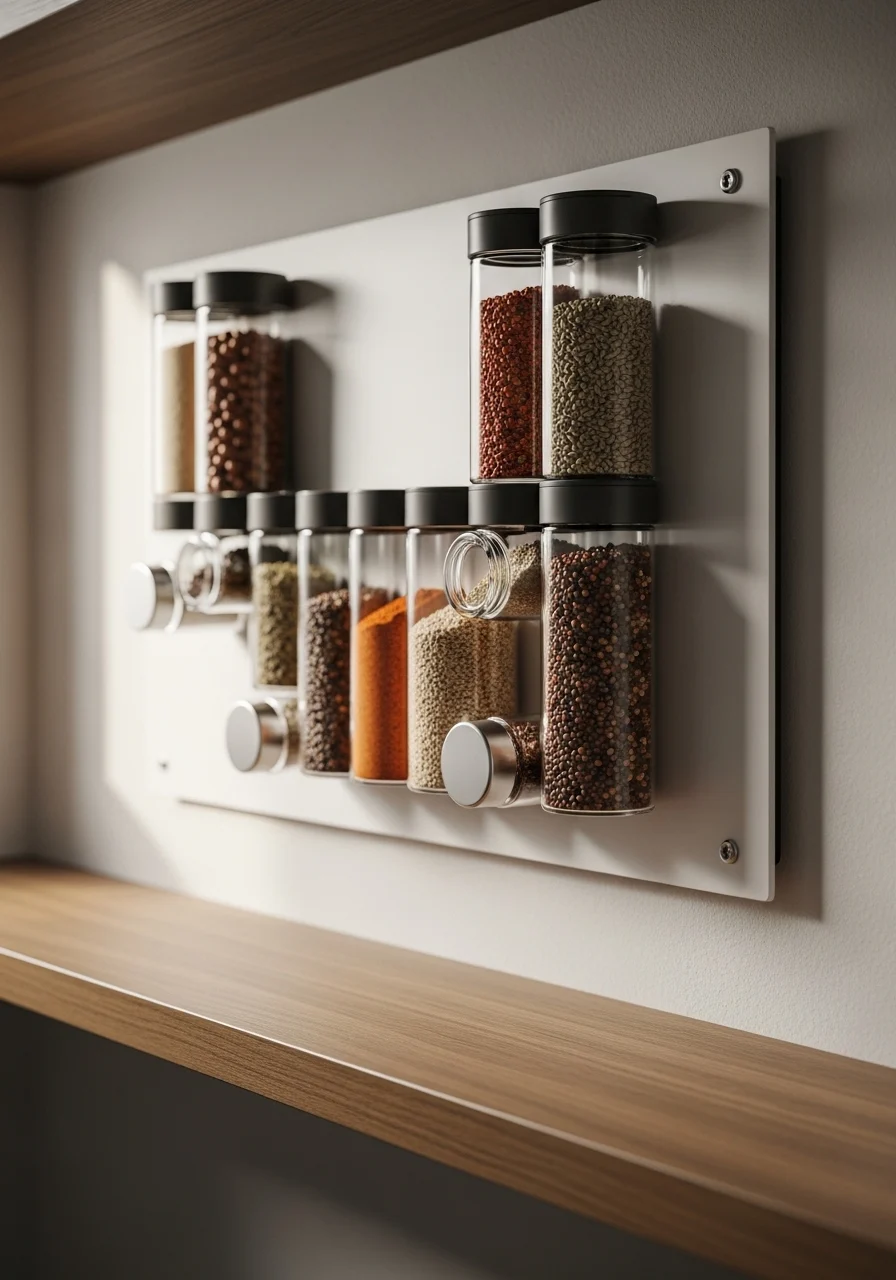
Magnetic jars on the wall free up shelf space and look modern. Spices become part of the decor. This system gives quick visual cues for what you have. You’ll love the compact and playful display.
Key Elements (magnetic jars, wall storage)
- Glass jars with magnetic lids
- Metal panel or magnetic paint on a wall
- Uniform labels on jar sides
- Small wooden shelf under the panel
- Racks for extra jars nearby
- Clear spices for color contrast
- Magnetic hooks for tools
- Soft-close cabinet nearby for backup storage
How to Achieve This Look
- Choose a magnetic panel or treat a section with magnetic paint.
- Clean and mark spacing for jars.
- Fill jars and affix magnetic lids securely.
- Place jars in order of use or color.
- Label jars on the side for readability.
- Keep a small shelf below for measuring spoons.
- Rotate spices to ensure freshness.
How to Style / Use It
Arrange spices by cuisine or color for an eye-catching grid. Use magnetic hooks for small tools. Keep fragile spices in jars near the wall to avoid falls. Replace jars if lids lose magnet strength.
17. Clear Meal Prep Bins by Day of the Week
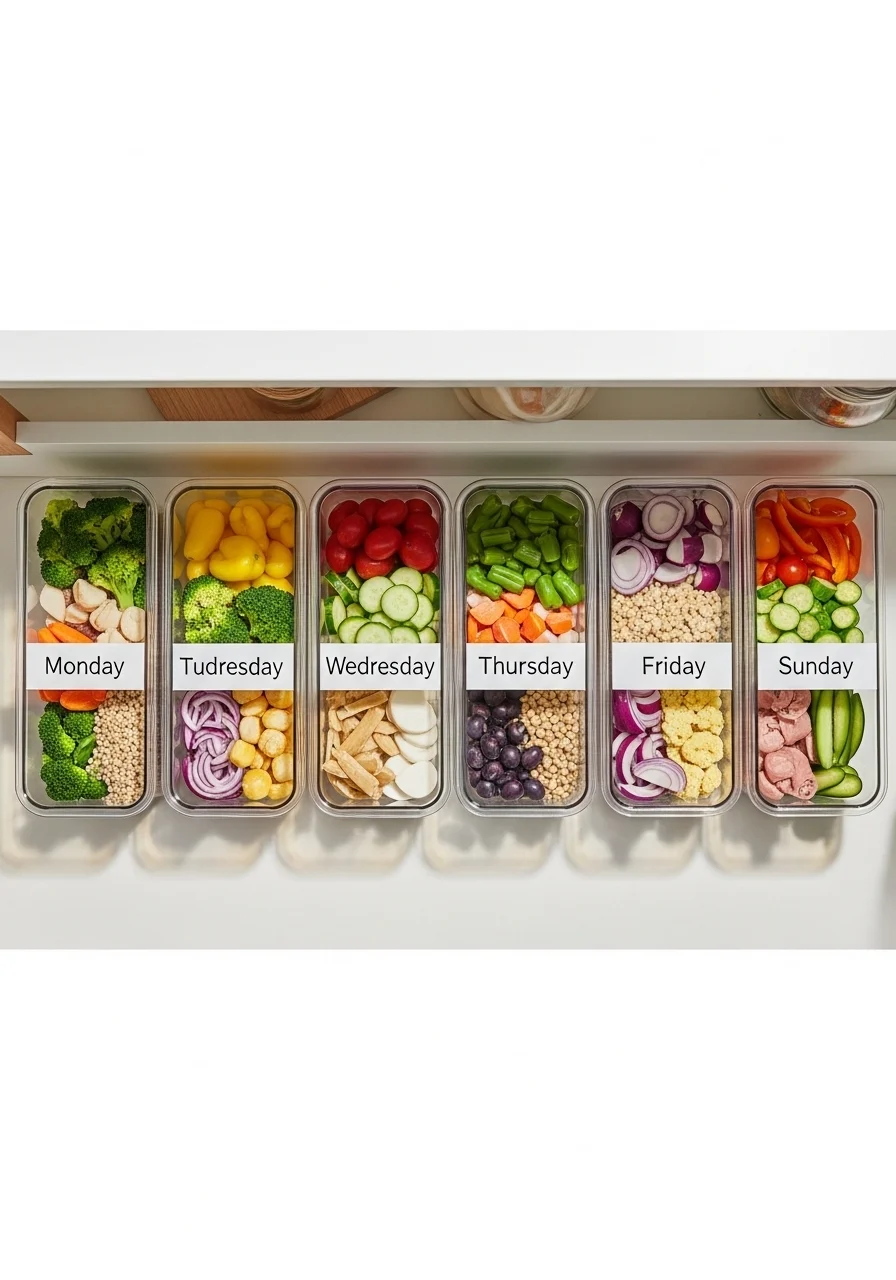
Meal prep bins make weekday cooking effortless. Each bin holds ingredients or prepped components for a meal. They speed up dinner time and reduce decision stress. You’ll feel prepared and calm during busy evenings.
Key Elements (meal prep bins, weekly planning)
- Seven clear bins labeled by day
- Airtight lids to keep prepped food fresh
- Dividers for multi-component meals
- Labels with recipe name and cook time
- Refrigerator-safe containers for perishables
- Shelf or drawer dedicated to bins
- Small utensil kit for transport
- Inventory list of contents taped inside pantry
How to Achieve This Look
- Plan weekly meals and gather recipes.
- Prep ingredients and portion into each day’s bin.
- Label bins with the day and recipe.
- Store perishable bins in the fridge if needed.
- Place non-perishables in the pantry on a dedicated shelf.
- Reheat or finish cooking on the scheduled day.
- Refill and repeat weekly.
How to Style / Use It
Keep bins uniform for a neat look. Use color-coded lids for different meal types (veg, meat). Store a small utensil kit near bins for portability. Rotate meal themes to keep variety.
18. Glass Canisters with Scoop Trays for Bulk Items
Large glass canisters with scoops make bulk items elegant and usable. Scoop trays stop spills and keep counters tidy. This setup works for grains and flours. You’ll enjoy the ritual of scooping for recipes.
Key Elements (glass canisters, scoop trays)
- Tall glass canisters with airtight lids
- Wooden scoops and matching tray
- Tray to catch stray grains
- Capacity labels with refill dates
- Clear shelf or countertop space
- Funnel for easy refilling
- Neutral shelf liner for contrast
- Small brush for tray clean-up
How to Achieve This Look
- Choose canister sizes for your bulk purchases.
- Place canisters on a tray to contain mess.
- Add scoops for each canister and tie with twine.
- Label with content and refill date.
- Use a funnel to refill from large bags.
- Wipe trays and canisters weekly.
- Keep a small brush to sweep excess.
How to Style / Use It
Group similar grains together for a cohesive look. Use wooden scoops to match warm shelves. Keep canisters off the floor to reduce pest risk. Refill before hitting the bottom to avoid running out mid-recipe.
19. Slim Baking Sheet Storage to Save Vertical Space
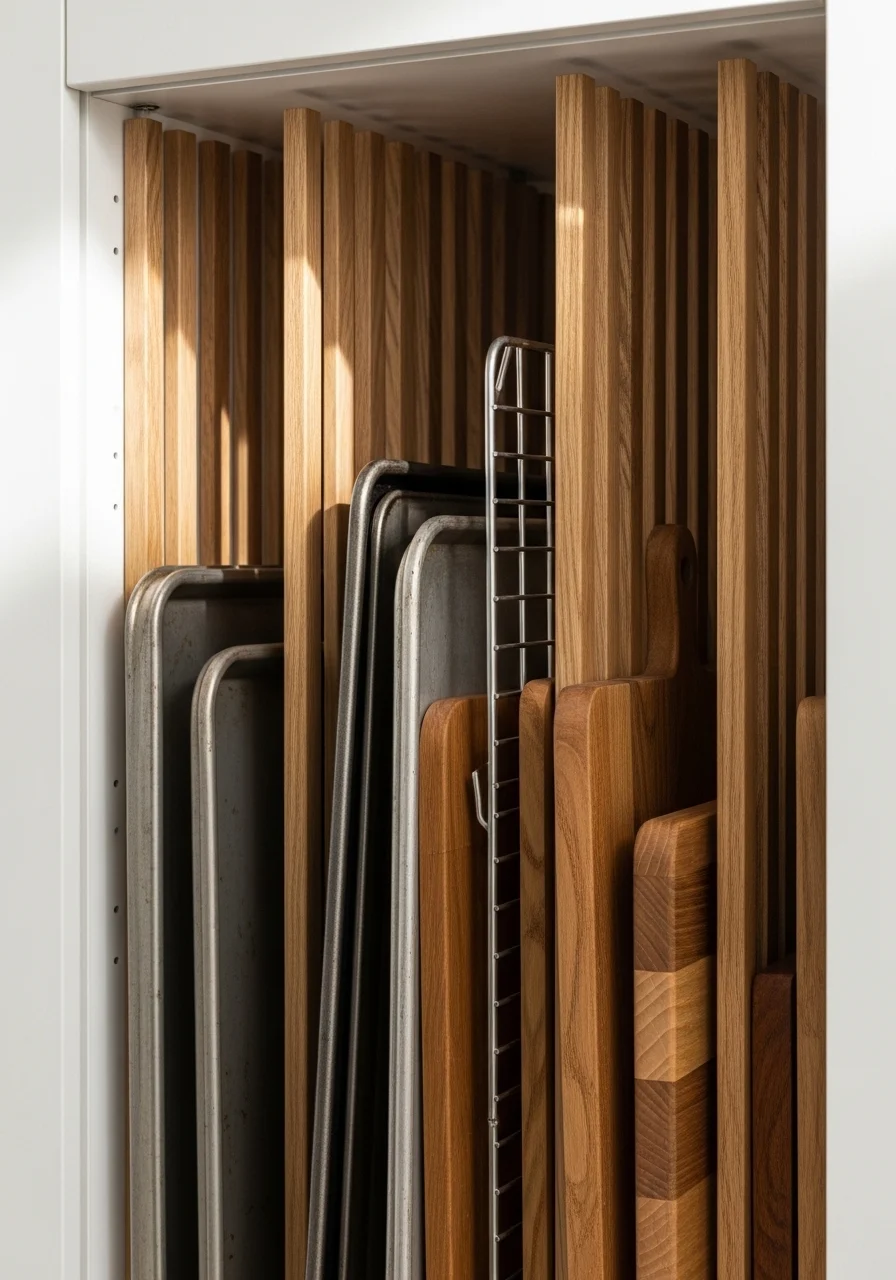
Vertical storage for baking sheets frees horizontal shelf space. It organizes trays, cutting boards, and cooling racks. The vertical lines create visual neatness. You’ll be able to grab the right pan in a snap.
Key Elements (baking sheet dividers, vertical racks)
- Thin slotted dividers or adjustable racks
- Non-slip base to prevent sliding
- Space for cutting boards and baking sheets
- Pull-out tray for cookie sheets
- Soft materials to prevent scratches
- Labels on boards for quick ID
- Lower shelf placement for heavy sheets
- Small hooks for cooling racks
How to Achieve This Look
- Measure shelf height and width for dividers.
- Insert slotted dividers at equal spacing.
- Place baking sheets, cutting boards, and trays vertically.
- Use rubber feet to prevent sliding.
- Label boards by type or size if helpful.
- Keep heavy items low.
- Wipe dividers and sheets monthly.
How to Style / Use It
Match wood dividers to shelves for a seamless look. Store similar-size pans together for balance. Use dividers in cabinets or pull-out drawers. Keep one accessible sheet for everyday baking.
20. Fridge-Adjacent Pantry Nook for Quick-Grabs
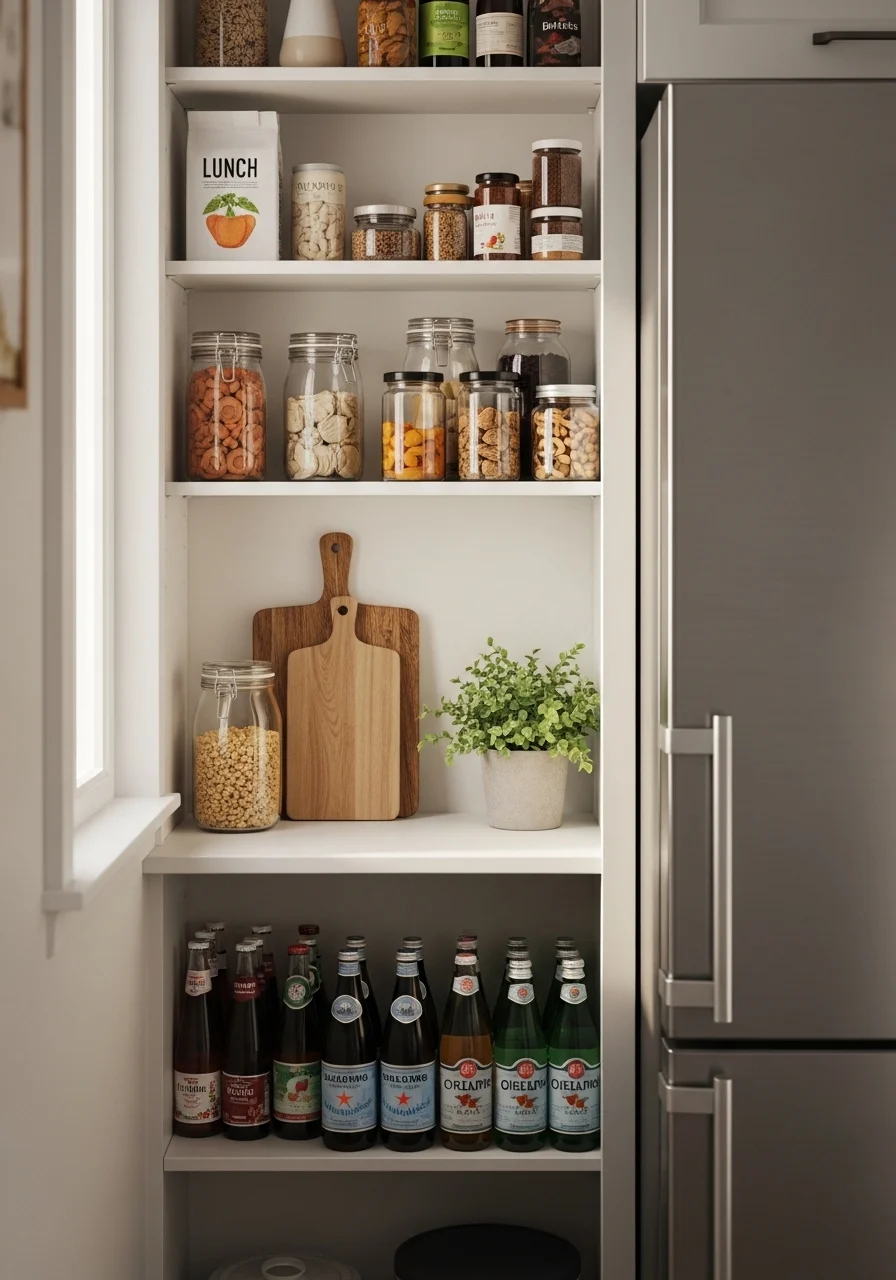
A fridge-adjacent pantry nook makes lunchtime faster. Keep grab-and-go items within arm’s reach. This placement minimizes traffic during meal prep. You’ll appreciate the streamlined flow while cooking.
Key Elements (fridge nook, quick grab)
- Narrow shelving between fridge and wall
- Clear bins for lunch items and drinks
- Wire racks for easy airflow
- Hooks for reusable bags
- Magnetic grocery list on the fridge side
- Labels on bins for quick ID
- Pull-out tray for utensils
- Soft lighting for visibility
How to Achieve This Look
- Measure the gap next to the fridge for a slim shelving unit.
- Install narrow shelves or a rolling cart.
- Assign each shelf a purpose (drinks, snacks, lunch supplies).
- Use clear bins for quick visibility.
- Keep utensils and wraps on a pull-out tray.
- Tape a shopping list to the fridge for restocking.
- Rotate items to keep fresh and reduce waste.
How to Style / Use It
Use this space for daily essentials like sandwich bread and condiments. Match container colors to the fridge finish for cohesion. Keep heavier drinks on lower shelves. Check stock during weekly meal planning.
21. Refillable Snack Station with Dispenser Jars

A refillable snack station turns pantry snacks into a tidy buffet. Dispenser jars reduce packaging clutter. It’s fun for kids and adults alike. You’ll simplify portioning and reduce waste.
Key Elements (dispenser jars, snack station)
- Gravity dispenser or lever jars
- Small bowls or cups for portions
- Labels with suggested serving sizes
- Tray to catch crumbs
- Refillable supply containers behind station
- Child-safe placement for access
- Clear lids for monitoring levels
- Spoon or scoop for larger bits
How to Achieve This Look
- Choose a stable shelf near eye level.
- Install dispenser jars with secure mounts.
- Pre-fill jars from bulk bags using a funnel.
- Place small bowls or cups underneath each dispenser.
- Label with portion sizes.
- Refill weekly based on consumption.
- Clean dispensers regularly to prevent buildup.
How to Style / Use It
Group similar snacks together for visual harmony. Use small bowls for a curated serving experience. Keep healthier options at the front to encourage good choices. Refill before levels get low to maintain the look.
22. Seasonal Rotation Shelf with Clear Bins
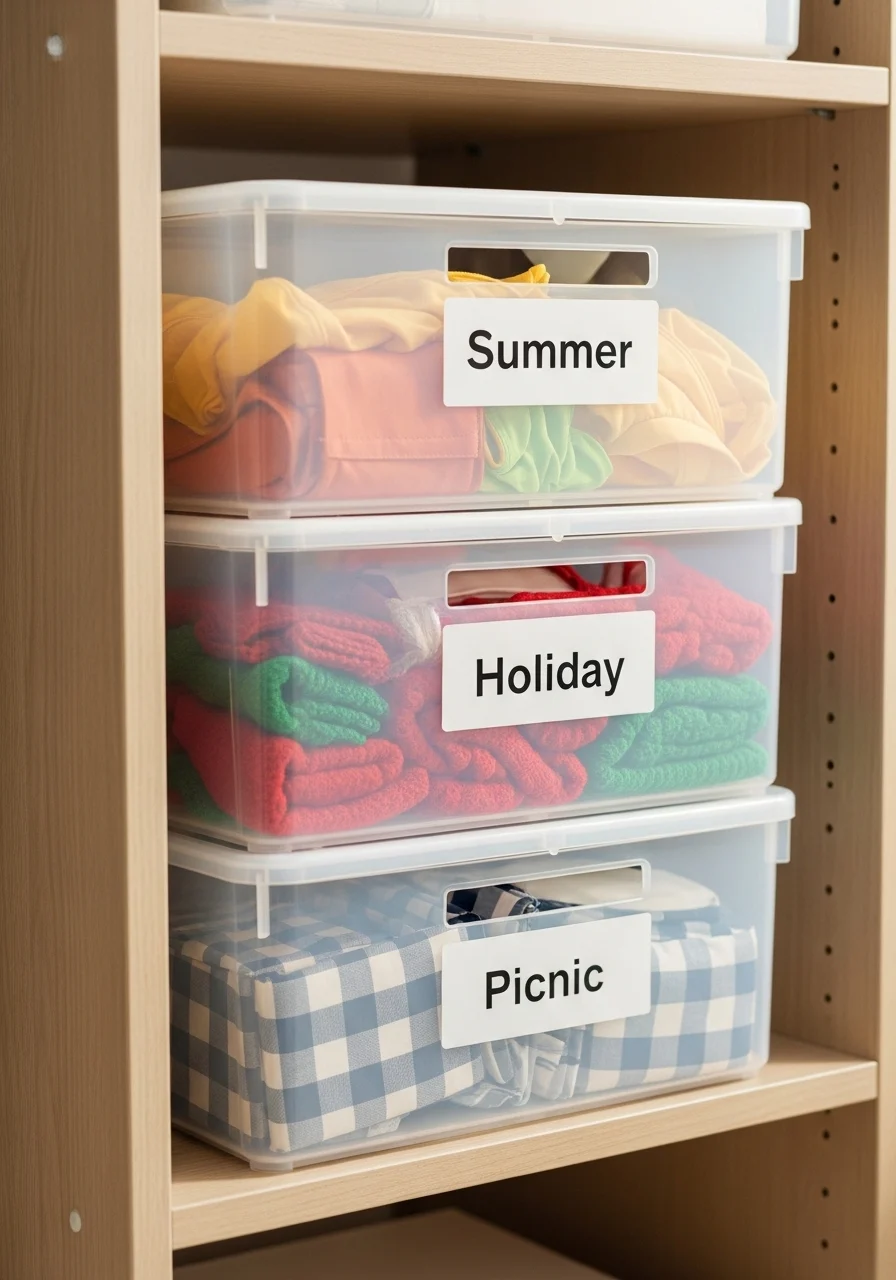
A seasonal rotation shelf keeps holiday and seasonal items tidy. Clear bins make contents obvious. Rotating items keeps the pantry relevant year-round. You’ll stay ready for gatherings without clutter.
Key Elements (seasonal bins, rotation)
- Clear plastic bins with snap lids
- Labels for each season or event
- Color-coded tissue or liners for quick ID
- Shelf dedicated to seasonal items
- Inventory list attached to the lid
- Smaller bins inside for ornaments or utensils
- Stackable design for neat storage
- Moisture absorbers for long-term storage
How to Achieve This Look
- Choose clear bins sized for seasonal items.
- Label each bin and list contents on the lid.
- Store seasonal items as they come off the shelf.
- Use liners for color-coding and padding.
- Stack bins neatly and ensure heavier bins are lower.
- Check items yearly and refresh as needed.
- Keep seasonal extras in a separate closet if oversized.
How to Style / Use It
Rotate seasonal bins to the front of the pantry when relevant. Pair clear bins with decorative covers for holiday display. Keep an inventory sheet on your phone for quick shopping. Use moisture absorbers for long-term freshness.
You’ve just read 22 practical, stylish pantry organization ideas for a clutter-free kitchen. There’s a mix of quick wins and weekend projects here. Try one small change this week and see how it shifts your daily flow.
Save or pin the ideas you love. Which idea will you try first? Share this list with a friend who needs pantry peace. Small shifts add up, and your kitchen will feel calmer before you know it.