25 Luxury Kitchen Design Ideas That Feel High-End
You want a kitchen that feels like a retreat, not just a place to cook. These 25 Luxury Kitchen Design Ideas That Feel High-End give you practical design moves that look rich without needing a mansion. You’ll find ideas that span materials, layouts, finishes, and smart styling cues.
Each idea explains what makes it special, lists the key elements you’ll need, gives step-by-step instructions, and shows how to style the final look. Whether you’re updating a rental-friendly backsplash or planning a full remodel, these luxury kitchen design ideas that feel high-end will help you plan with confidence and a clear visual goal. Pin the ones you love and try one small change this weekend.
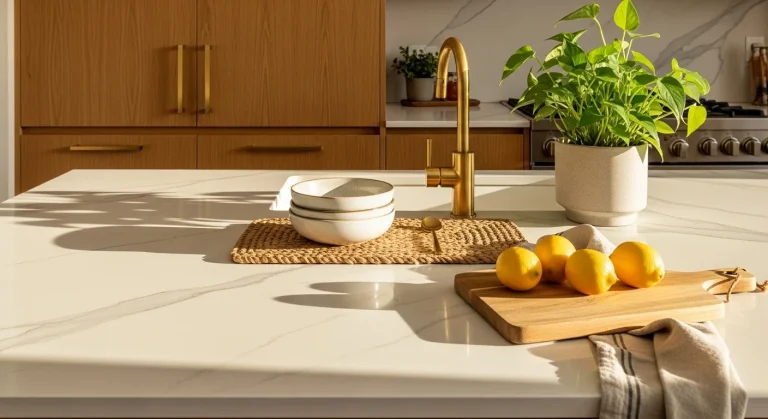
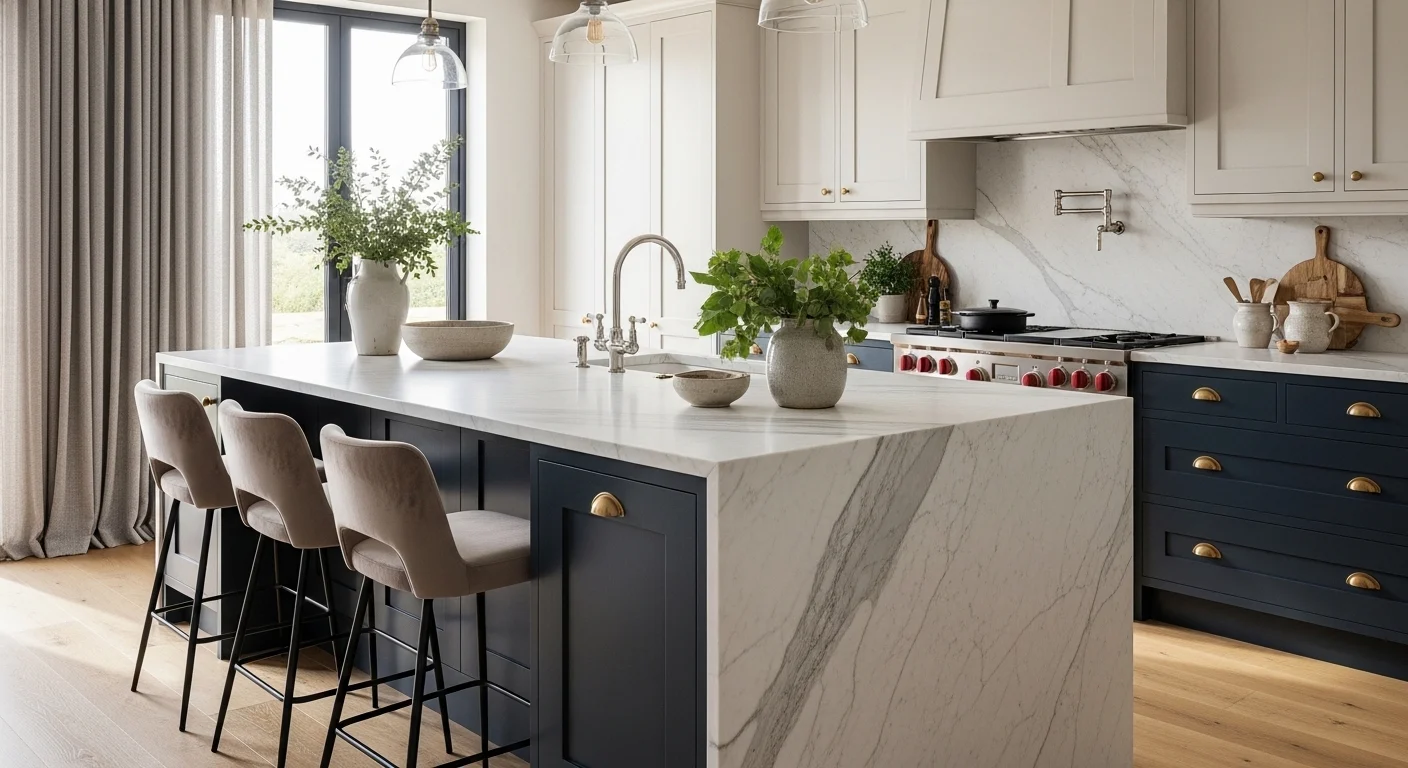
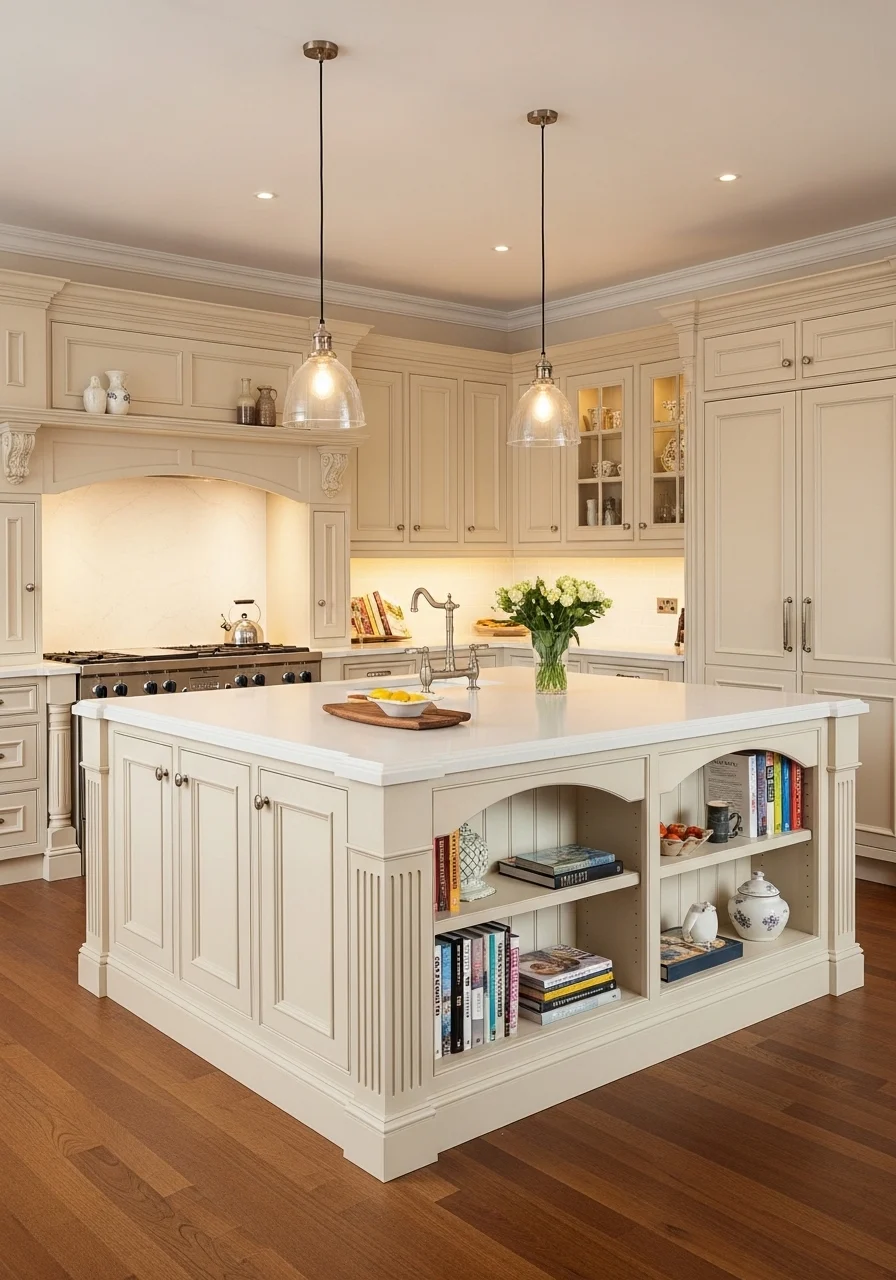
1. Marble Waterfall Island with Contrasting Cabinetry
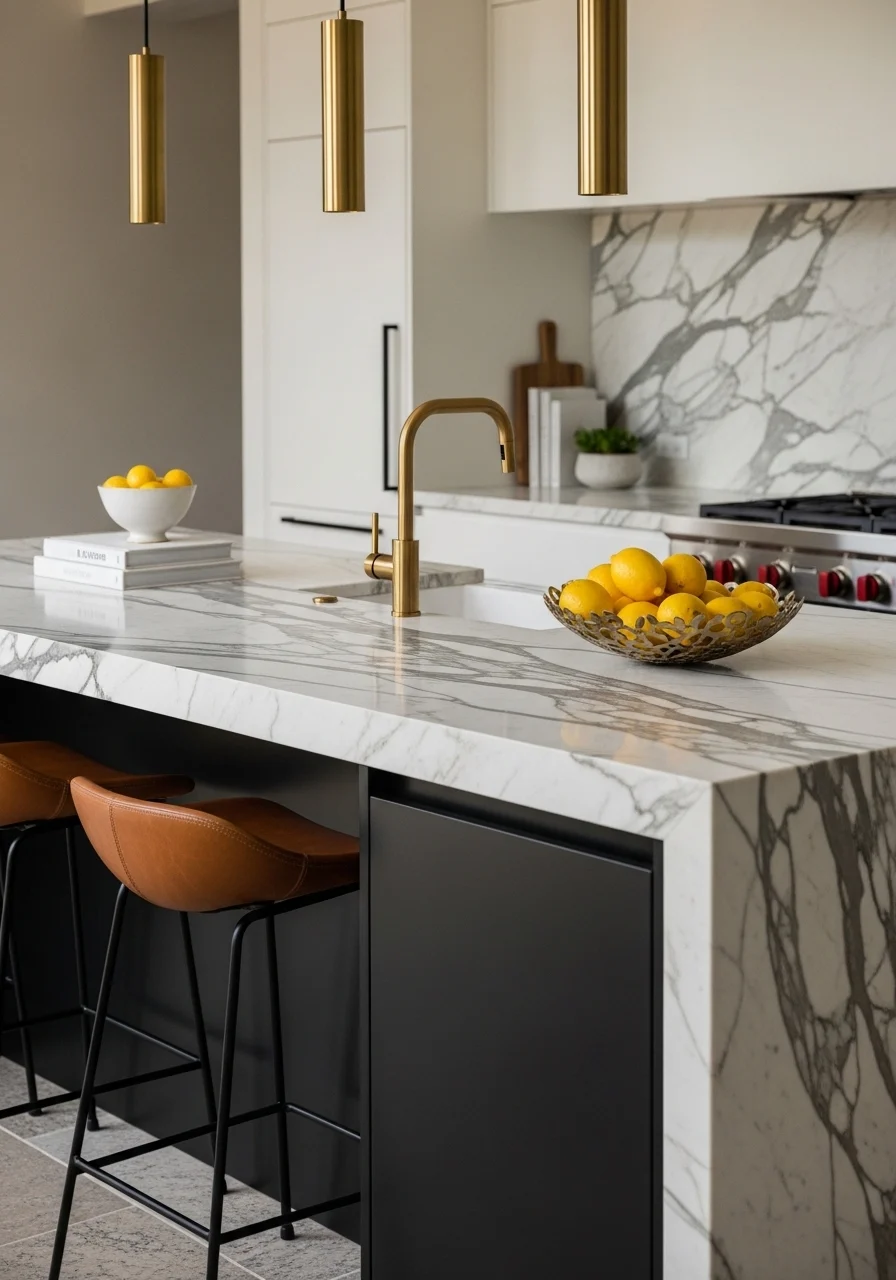
What makes it special: The continuous marble slab that flows over the island edge reads expensive and calm. Pairing white marble with dark cabinetry creates drama and balance. It suits entertaining and everyday life. You’ll love this if you want a focal point that’s both sculptural and functional. The surface feels cool and tactile under your hands.
Key Elements
- Full-height marble waterfall slab (Carrara or Calacatta)
- Matte black or deep navy island cabinets
- Leather-wrapped barstools (tan or brown)
- Brushed brass pendant lights
- Honed marble or porcelain countertops for prep areas
- Integrated undercounter sink and waterfall edge
- Soft-close drawers with hidden pulls
- Large-format floor tiles or oak plank flooring
- Minimalist faucet in brushed brass
- Fresh citrus bowl and linen napkins
How to Achieve This Look
- Choose a slab-grade marble with bold veins for the waterfall edge.
- Set the island cabinet in a dark painted finish for contrast.
- Fit a single slab to wrap from top to side with professional templating.
- Use a durable honed surface on other counters to reduce stain worry.
- Install a centered under-mount sink and a tall brass faucet.
- Add leather barstools at comfortable height.
- Hang two or three pendants above the island at 30–36 inches above the surface.
- Use soft-close hardware and concealed knobs for a sleek face.
- Seal marble professionally and schedule re-sealing every 6–12 months.
How to Style / Use It
Show the waterfall as a stage by keeping clutter minimal. Display artisanal ceramics or a tray with olive oil and pepper grinder. Pair with woven placemats and brass coasters for warmth. Clean spills promptly and use cutting boards to protect the marble. For gatherings, set up a buffet line along one side of the island.
2. Full-Height Cabinetry with Integrated Appliances
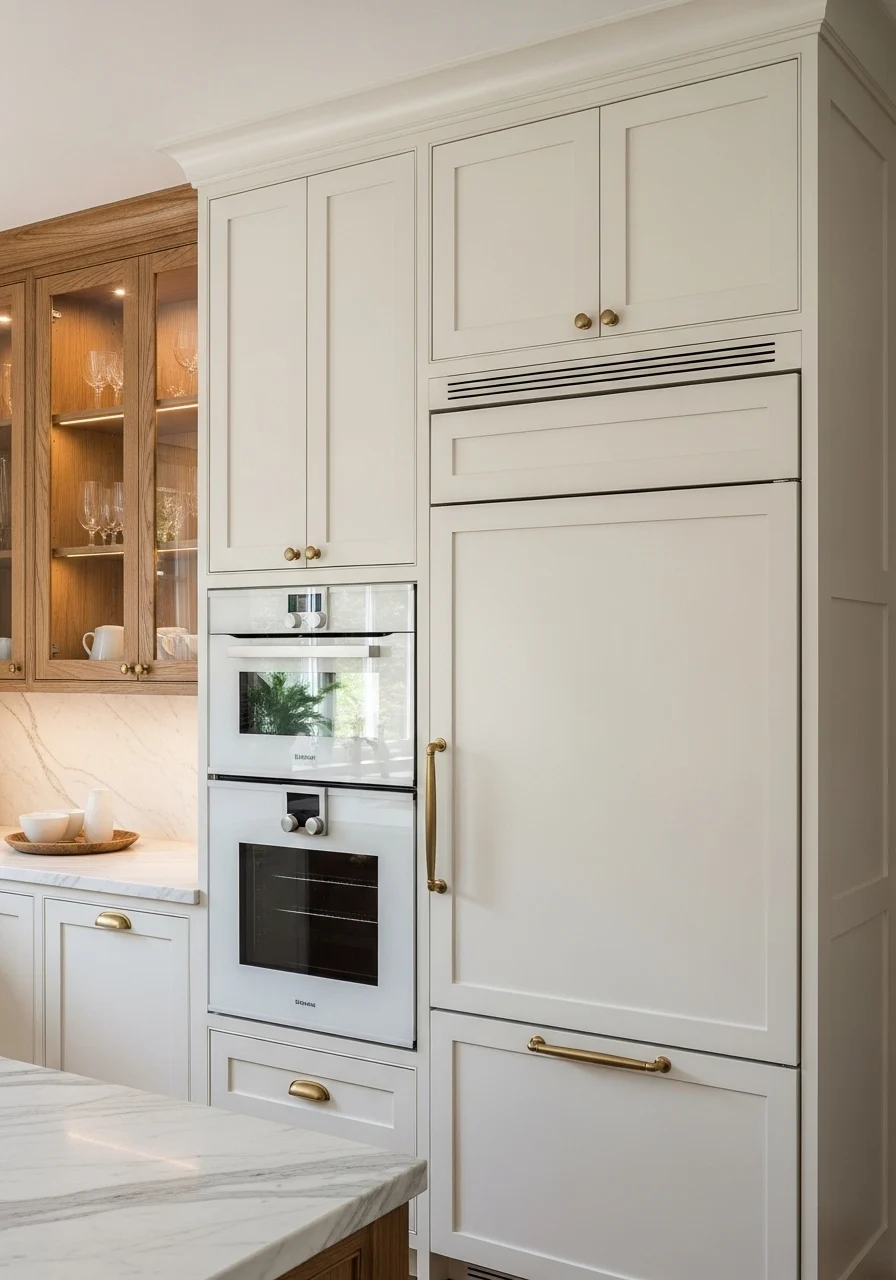
What makes it special: Concealed appliances create one smooth plane that reads custom and calm. Full-height cabinetry maximizes storage and elevates everyday functionality. This works when you want a clean, tailored kitchen that hides mess behind beautiful fronts. The result feels organized and designer.
Key Elements
- Floor-to-ceiling shaker or flat-panel cabinetry
- Panel-ready refrigerator and dishwasher
- Built-in ovens and microwave stack
- Soft-close hinge system and pull-out trays
- Integrated appliance garage for small gadgets
- Crown molding or integrated soffit detail
- Recessed cabinet lighting and toe-kick lighting
- Pull-out pantry or spice shelves
- Matte brass or black hardware
- Tempered glass display doors for curated sections
How to Achieve This Look
- Plan cabinetry to full ceiling height for a continuous look.
- Select panel-ready appliances sized to cabinet openings.
- Work with cabinetmaker to create matching door panels for the fridge and dishwasher.
- Add pull-out pantry shelves and roll-out trays for access.
- Install recessed lights inside glass-front cabinets for display.
- Use soft-close hinges and full-extension drawer slides.
- Add a tall appliance garage near prep zones.
- Finish with coordinated hardware and crown detail.
- Label internal storage to keep the system organized.
How to Style / Use It
Keep countertops clear by using hidden storage for small appliances. Curate a few display items in the glass cabinets. Use consistent jars and labels inside pantry pull-outs so it looks tidy when opened. Clean appliance panels with a soft cloth to maintain the seamless look.
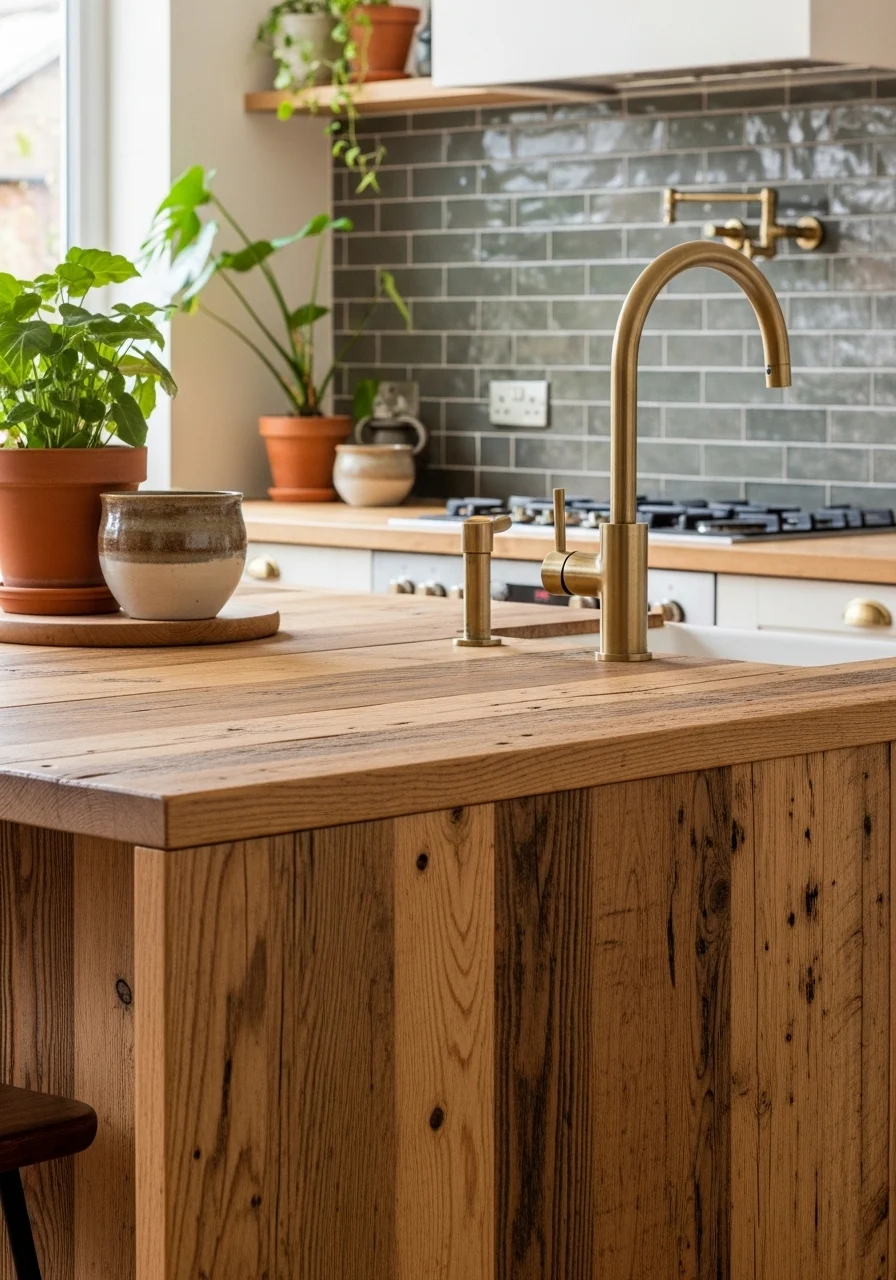
3. Statement Brass Fixtures and Hardware
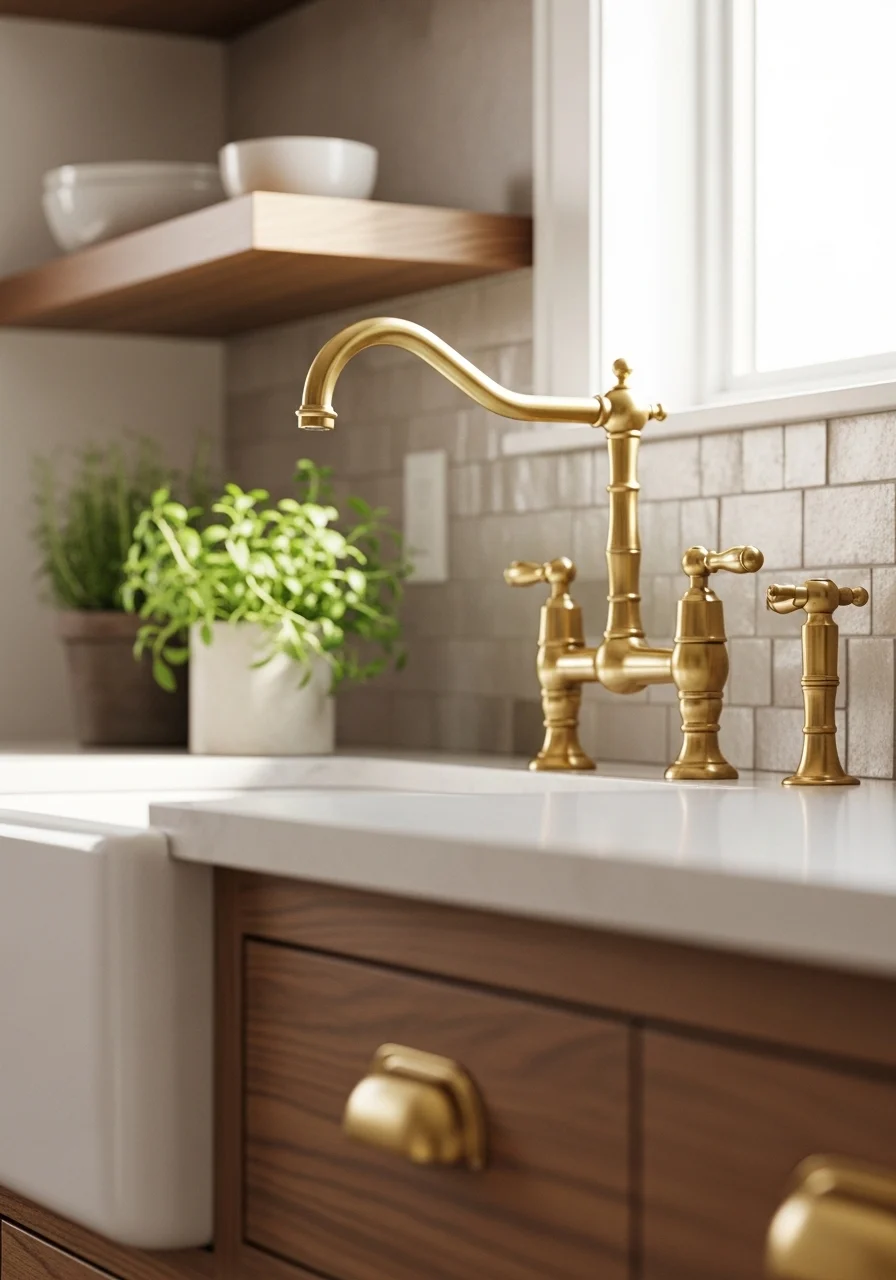
What makes it special: Brass hardware adds warmth and a lived-in luxe feeling. It pairs well with both light and dark palettes. Using brass across faucets, knobs, and lighting creates a curated look that reads high-end. This suits anyone who wants rich tones without heavy cost.
Key Elements
- Brushed or satin brass faucet
- Matching cabinet pulls and knobs
- Brass pendant or sconce lighting
- Brass towel ring or paper towel holder
- Complementary warm wood or cream cabinets
- Marble or quartz countertops with warm veining
- Brass shelf brackets or rail
- Soft matte black accents for balance
- Polishing cloth and protective clear lacquer (optional)
- Potted herbs or wooden cutting boards to soften shine
How to Achieve This Look
- Pick a brass finish and use it consistently across fixtures.
- Replace faucet first; choose a high-quality pour and spout.
- Change cabinet knobs and pulls to match the faucet tone.
- Hang brass pendants with fabric or braided cords for texture.
- Add brass shelving brackets or a rail for mugs and cookware.
- Balance with soft matte black utensils or appliances.
- Test brass finish in the room’s light before buying all pieces.
- Use mild soap and soft cloths for maintenance.
- Consider a protective clear coat on hardware in humid climates.
How to Style / Use It
Let brass be the star against a neutral backdrop. Keep the sink area tidy. A brass soap pump ties the look together. Mix in wood and linen to avoid an overly metallic feel. For seasonality, swap textiles and flowers to soften or dramatize the brass tone.
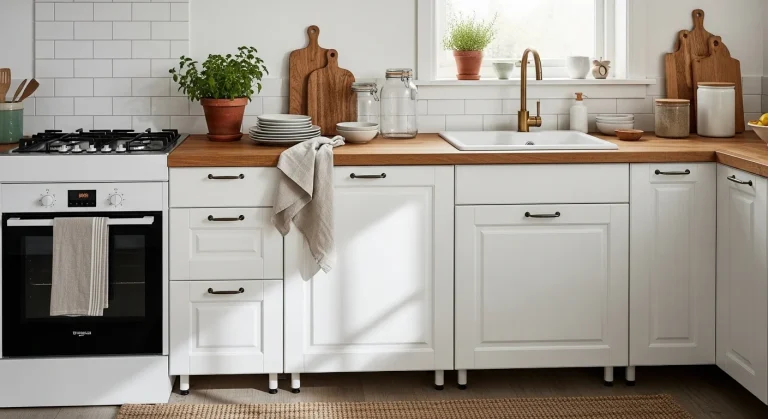
4. Dark Moody Cabinets with Warm Wood Accents
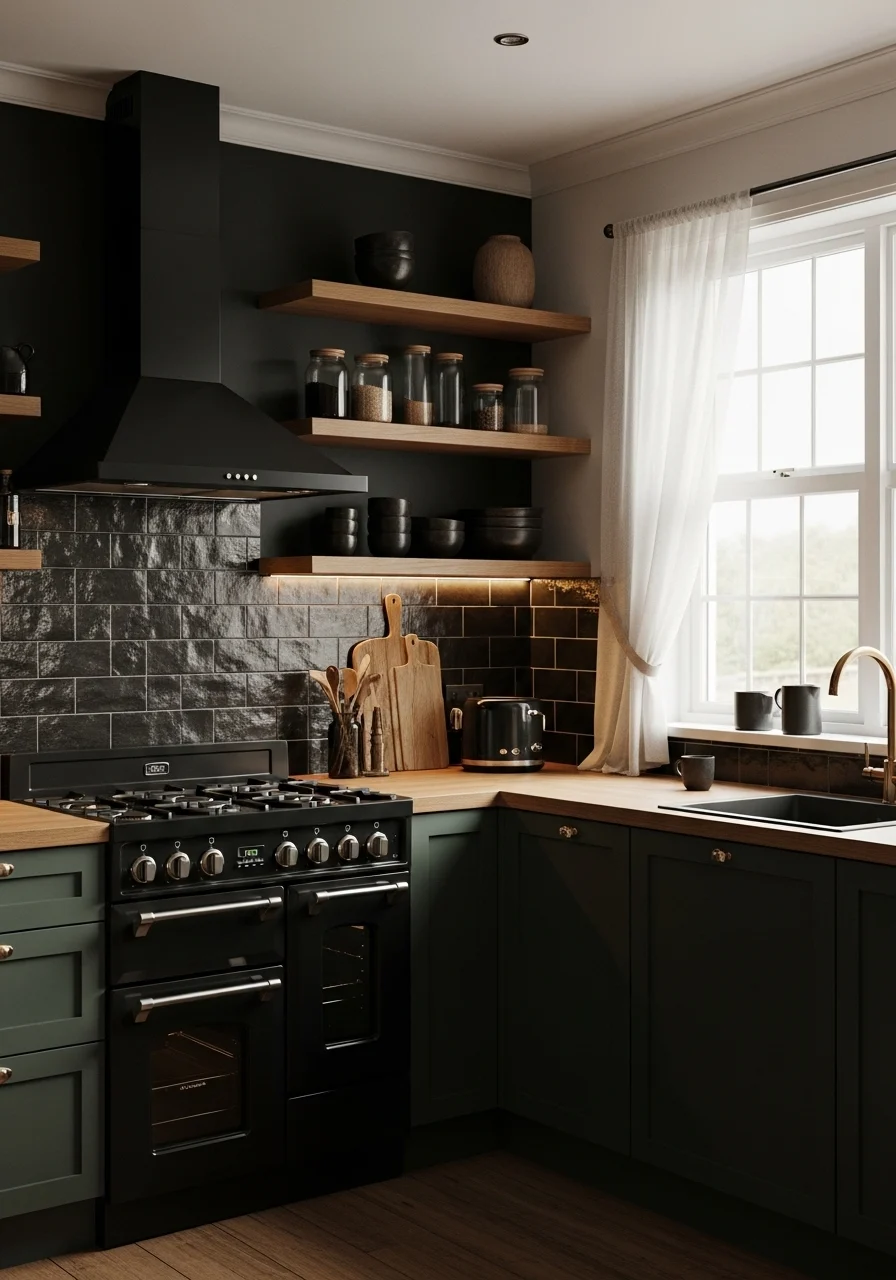
What makes it special: Deep cabinet colors make a kitchen feel intimate and curated. Warm wood shelves and floors prevent it from feeling cold. This look reads sophisticated and enveloping — great for cozy homes and dramatic statements. You’ll love the contrast and tactile mix.
Key Elements
- Deep green, navy, or charcoal painted cabinets
- Open oak or walnut shelving
- Matte black appliances and range hood
- Warm undercabinet LED lighting
- Natural oak plank flooring
- Stone or leather barstools
- Brass or aged bronze hardware
- Textured tile backsplash in neutral tone
- Woven baskets and pottery for open shelves
- Soft area rug near sink for warmth
How to Achieve This Look
- Choose a deep paint color for lower or full cabinets.
- Install open wood shelves to break up the depth.
- Use matte black appliances to blend into the palette.
- Add warm LED undercabinet lights to highlight counters.
- Lay oak or engineered wood floors for continuity.
- Add brass hardware for small bright accents.
- Style shelves with ceramics, glassware, and greenery.
- Place a textured rug by the sink for comfort.
- Keep counter surfaces streamlined to let color pop.
How to Style / Use It
Use warm wood accessories and woven pieces to keep the mood cozy. Layer in brass and linen for contrast. For smaller kitchens, use light countertops to balance depth. Maintain open shelves by rotating décor seasonally.
5. Double-Island Layout for Entertaining
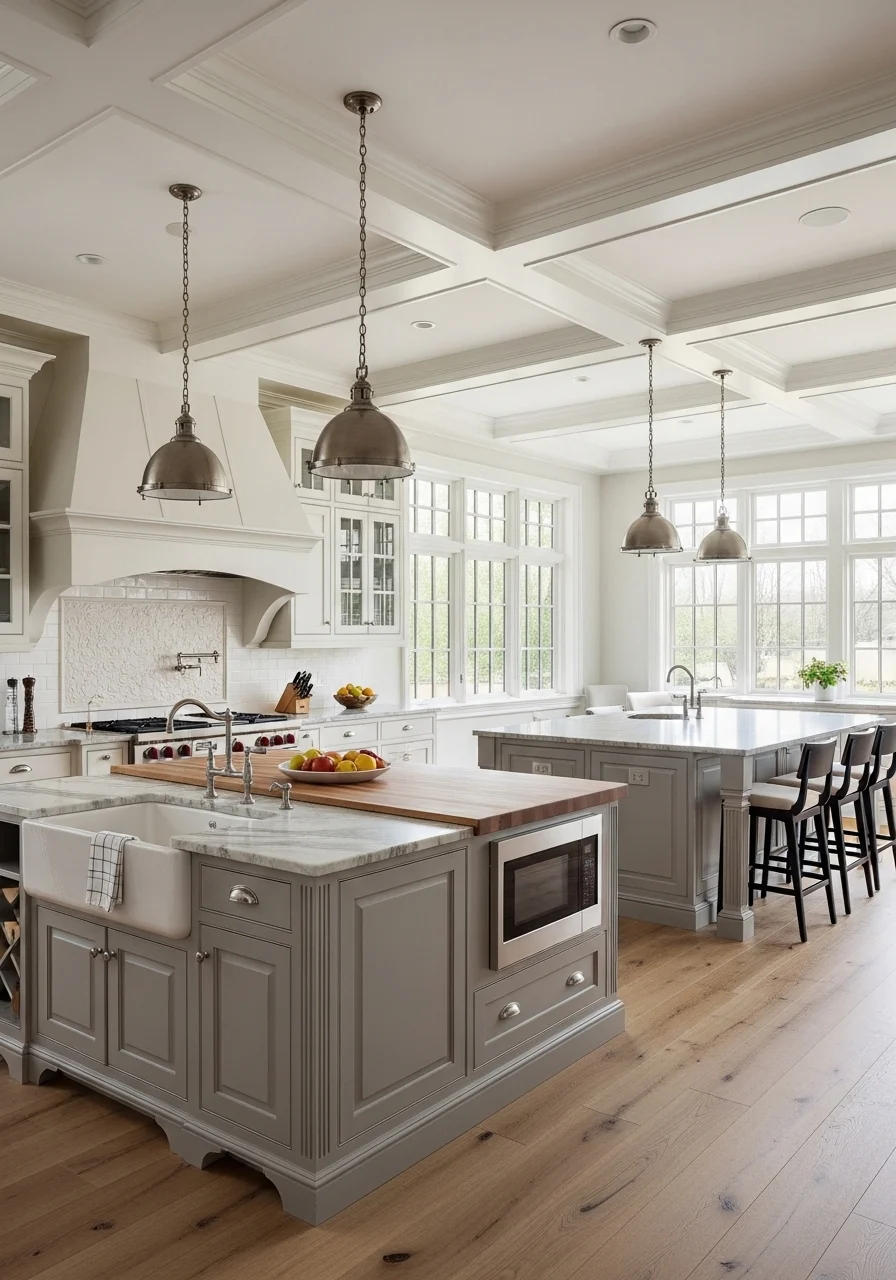
What makes it special: Two islands split work and social zones, creating a restaurant-like flow. One surface is dedicated to cooking; the other invites guests to linger. This layout feels purposeful and high-end. It’s perfect if you host often or have a large family.
Key Elements
- Primary prep island with sink and storage
- Secondary island for seating and buffet service
- Mixed surfaces (stone and wood)
- Pendant lighting set over each island
- Built-in wine cooler or beverage station in the dining island
- Electrical outlets and USB ports at seating island
- Durable flooring that bridges both islands
- Coordinated stool seating for comfort
- Trash and recycling pull-outs in prep island
- Open sightlines to living or dining area
How to Achieve This Look
- Measure space to ensure two islands fit with 42–48 inches circulation.
- Design one island as a prep zone with sink and dishwasher access.
- Make the second island lower for seating and socializing.
- Mix materials: stone for prep, warm butcher block for serving.
- Add dedicated electrical and bar cooler at seating island.
- Install pendants above each island, scaled to island length.
- Include ample storage and waste sorting in the prep island.
- Choose comfortable stools for the seating island.
- Keep pathways clear for serving and cleaning.
How to Style / Use It
Use the prep island for functional tasks and keep the seating island clutter-free for guests. Style the serving island with a runner, candles, and a fruit bowl during gatherings. Rotate serving platters and keep napkins in a drawer near the dining island for easy access.
6. Glass-Front Display Cabinets with Backlighting
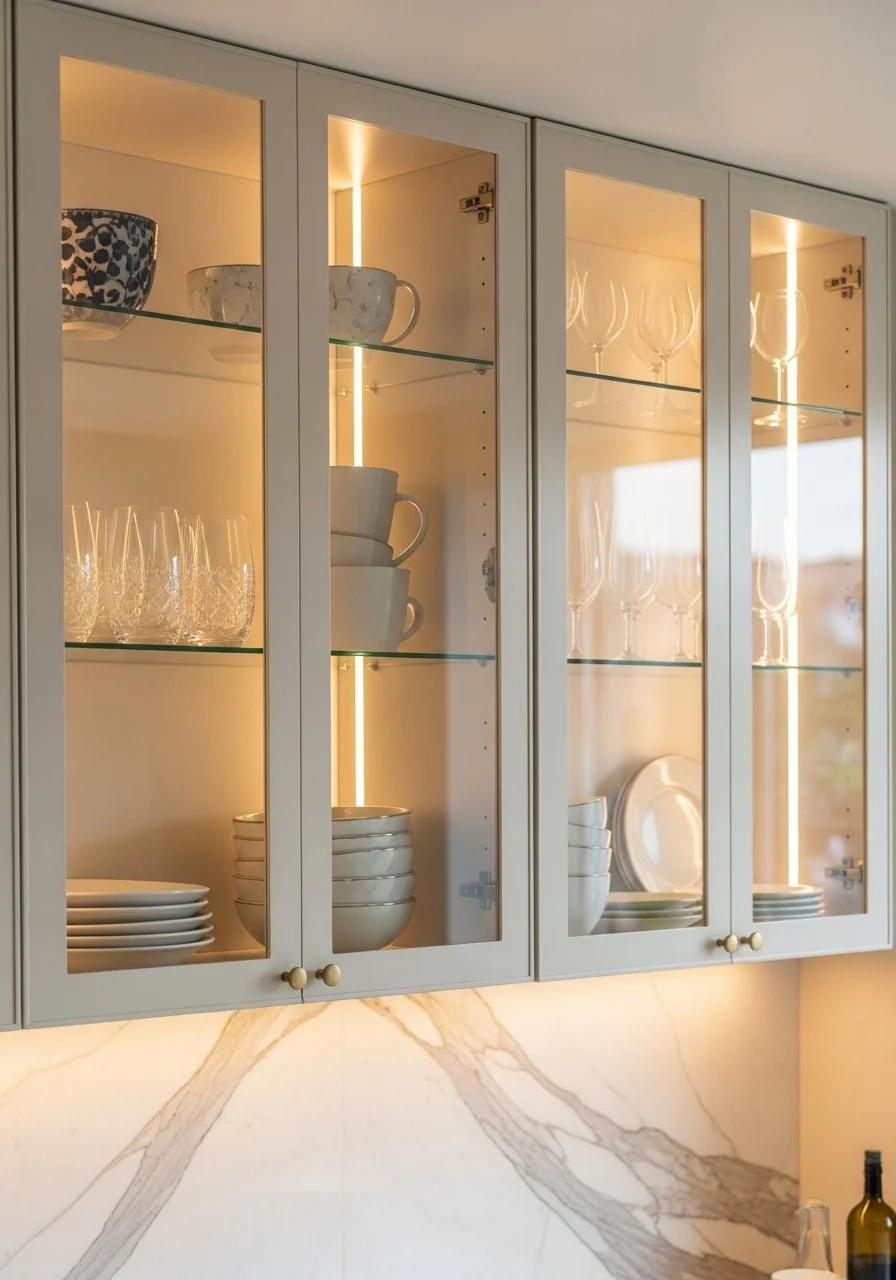
What makes it special: Backlit glass cabinets show off curated pieces and create an inviting glow. They add depth and a museum-like finish without changing layout. This fits you if you enjoy styling and want your best pieces on display.
Key Elements
- Tempered glass cabinet doors
- Integrated LED strip lighting or puck lights
- Adjustable shelving (tempered glass or wood)
- Concealed wiring and dimmer switch
- Coordinated plate racks or stemware holders
- Neutral interior paint to reflect light
- Minimalist mullion frames
- Curated ceramics, brass, and glassware
- Dustproof seals or soft-close doors
- Small accent art or cookbook display
How to Achieve This Look
- Choose cabinet sections for glass fronts—usually upper display zones.
- Install tempered glass doors and soft-close hinges.
- Add LED strip lighting behind a valance or inside the cabinet.
- Use a dimmer to control brightness.
- Paint the interior a light matte shade to reflect light.
- Arrange objects by color and height for visual rhythm.
- Include stemware racks and plate grooves to maximize space.
- Keep items dust-free and rotate pieces seasonally.
- Use professional wiring to conceal power sources.
How to Style / Use It
Keep displays edited and avoid overcrowding. Use warm light bulbs to make glassware glow. Swap items seasonally for freshness. Keep everyday glassware out of sight if you prefer a formal look.
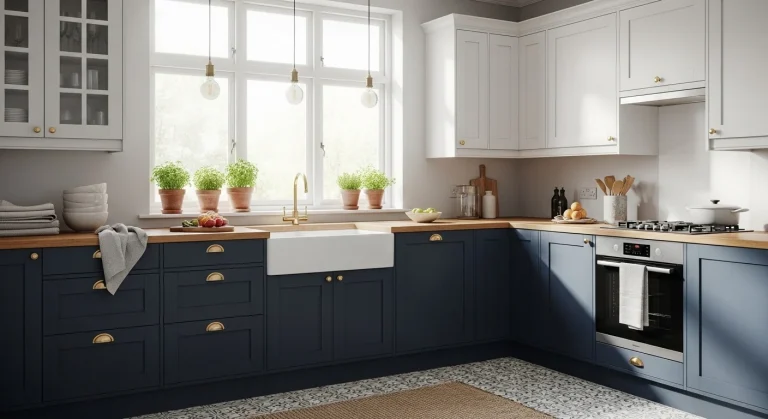
7. High-Contrast Two-Tone Cabinetry
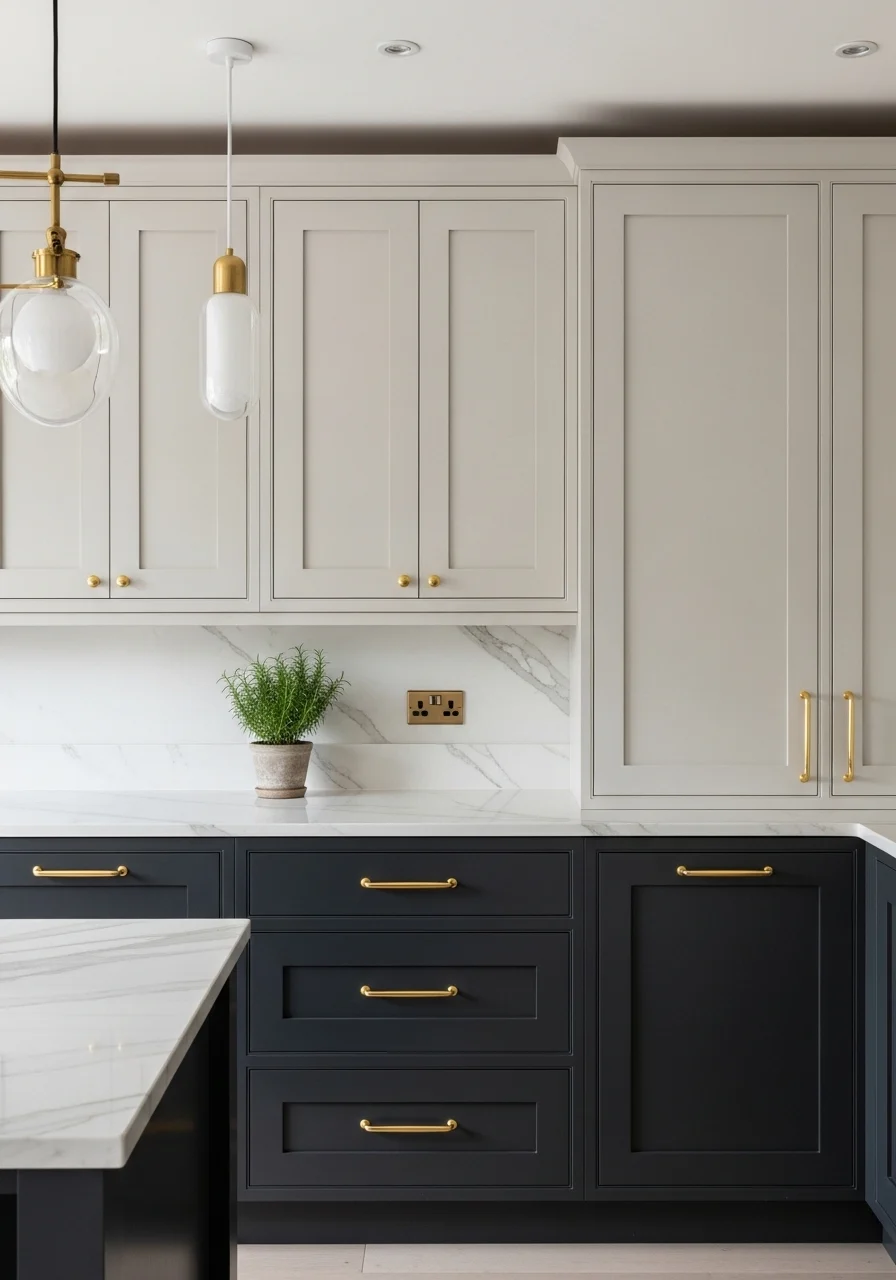
What makes it special: Two-tone cabinetry adds visual interest without extra ornament. The contrast creates depth and anchors work zones. This approach is flexible across styles, from coastal to modern luxe. You’ll love how it feels custom.
Key Elements
- Upper cabinets in light neutral (cream, soft gray)
- Lower cabinets in deep tone (charcoal, navy, forest)
- Coordinated hardware in brass or matte black
- White or veined stone countertops
- Consistent backsplash that bridges both tones
- Open shelving accents for texture
- Balanced lighting to blend both colors
- Transitional flooring that ties palette together
- Soft textiles like linen towels and woven rugs
- Under-cabinet task lighting
How to Achieve This Look
- Choose two complementary paint colors before ordering cabinetry.
- Apply lighter tone to upper cabinets to keep the room airy.
- Paint base cabinets in a rich shade to anchor the space.
- Select hardware that complements both tones.
- Use a continuous countertop and backsplash to unify.
- Add open shelves with decor bridging the palette.
- Install undercabinet lighting to show color depth.
- Choose flooring and textiles that pull both tones together.
- Keep cabinet face styles consistent for cohesion.
How to Style / Use It
Use the lighter uppers to display ceramics and glassware. Let the darker lowers hide wear from daily use. Add textiles in complementary hues like navy tea towels or cream runners. For seasonal changes, switch out decorative bowls and linens.
8. Luxe Marble Herringbone Backsplash
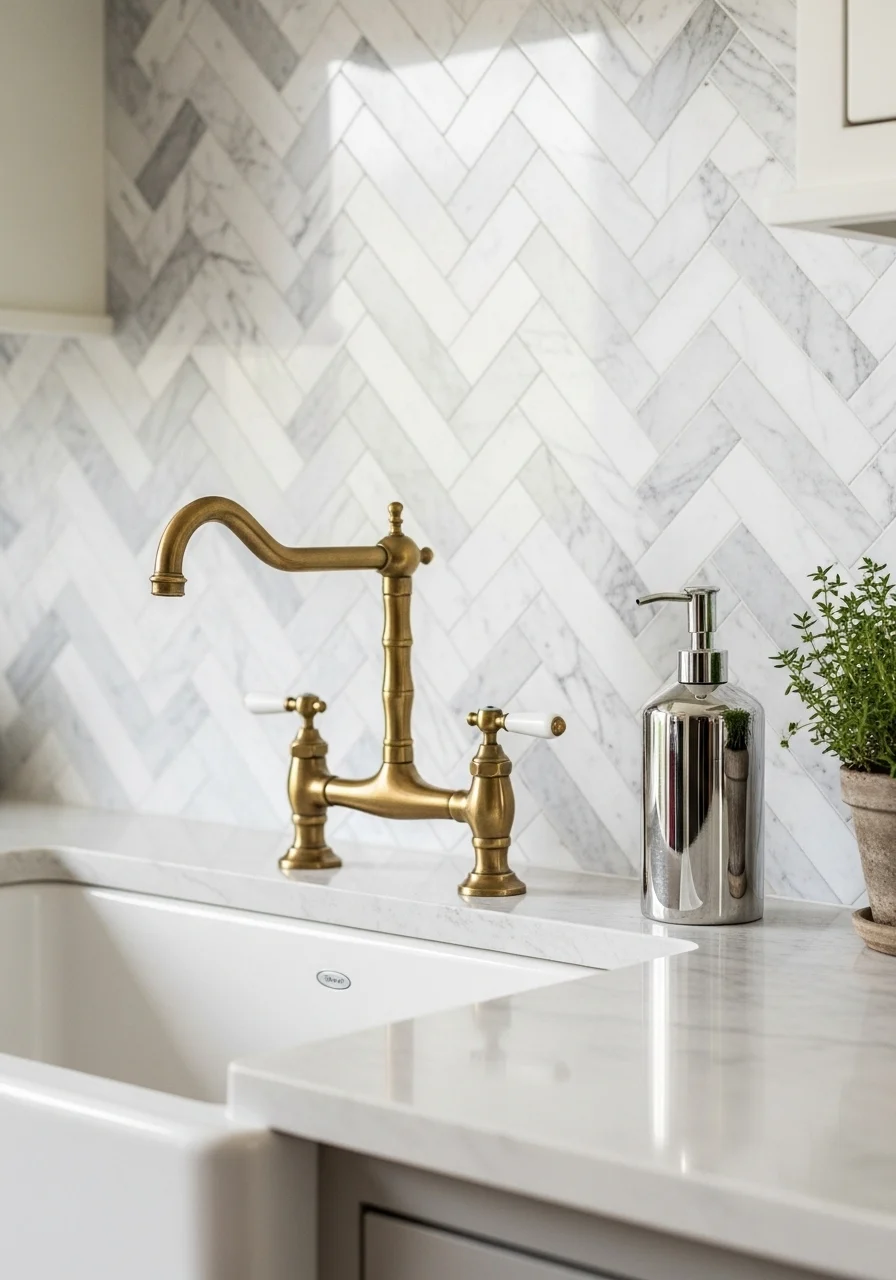
What makes it special: Herringbone tile adds motion and a handcrafted feel. Marble brings natural veining that reads expensive. Combined, they make a backsplash that’s both classic and modern. This is for you if you love subtle pattern with luxe materials.
Key Elements
- Marble herringbone tile (hon ed or polished)
- White apron-front sink or under-mount sink
- Brass or matte black faucet
- Neutral grout color to match veining
- Complementary countertop (quartz or honed marble)
- Clean-lined shelving or floating shelves nearby
- Soft task lighting to highlight pattern
- Sealing for heat and splash resistance
- Minimal metallic accents to avoid visual clutter
- Natural herbs or white ceramics to complement tile
How to Achieve This Look
- Select marble tile cut for herringbone layout.
- Prep wall with cement backer board for stability.
- Dry-fit tiles to ensure pattern lines match across edges.
- Use a grout color that blends with marble veins.
- Install with thin-set mortar and use spacers sparingly.
- Seal marble tiles and grout after installation.
- Install task lighting to enhance texture and sheen.
- Pair with complementary countertops and fixtures.
- Maintain with pH-neutral cleaner and reseal as needed.
How to Style / Use It
Let the herringbone speak by keeping counters minimal. Add a wooden cutting board and a couple of ceramic vessels. For a modern vibe, choose matte black fixtures; for a warmer look, select brass. Clean and reseal regularly to protect marble.
9. Integrated Wine Wall and Beverage Center
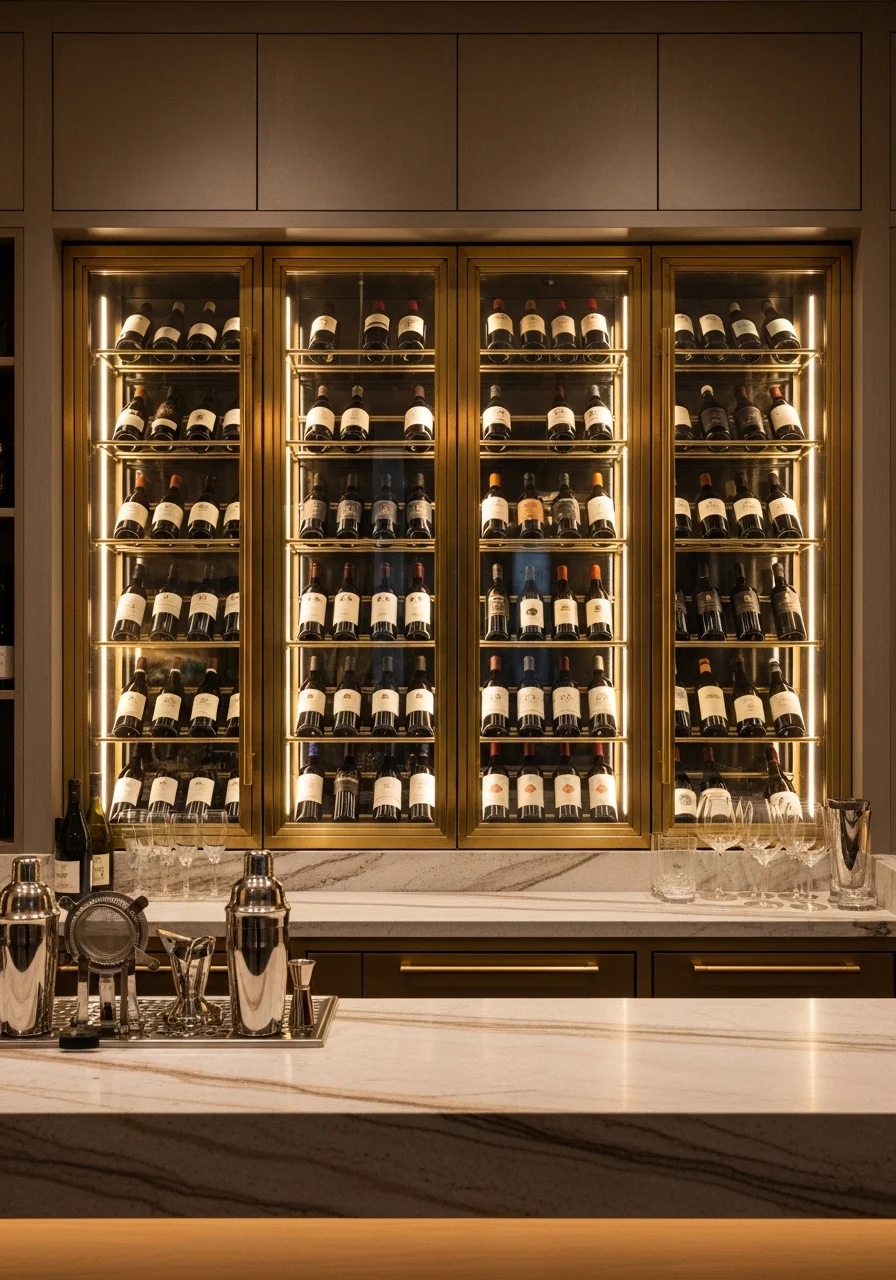
What makes it special: A dedicated wine and beverage wall reads custom and entertaining-ready. Glass-front cooling columns and a prep counter creates a home bar that feels like a high-end hotel. This is ideal if you host often or collect wine.
Key Elements
- Glass-front wine refrigerator columns
- Built-in beverage fridge for mixers
- Stone countertop for prep and pour
- Beverage sink with compact faucet
- Glassware storage (stemware racks)
- Ambient LED lighting and downlighting
- Brass or dark metal framing
- Dedicated cabinet for bar tools and mixers
- Slate or leather mat for drink prep
- Decorative back panel (stone, tile, or wood)
How to Achieve This Look
- Allocate a wall for the wine center near dining or living spaces.
- Choose wine columns sized to your collection.
- Install a small sink and prep counter for mixing.
- Add stemware racks and drawers for tools.
- Use glass-front fridges with consistent temperature zones.
- Include dimmable lights to set mood for evenings.
- Add a backsplash that resists splashes and looks refined.
- Keep chilling and storage zones separated for efficiency.
- Maintain wine fridges with regular temperature checks.
How to Style / Use It
Keep classic glassware and a curated selection of spirits. Use trays and decorative jiggers for an organized look. For parties, pre-chill mixers and set up a small cocktail recipe card. Clean glass fronts frequently to keep the display inviting.
10. Textured Plaster Walls with Minimalist Shelving
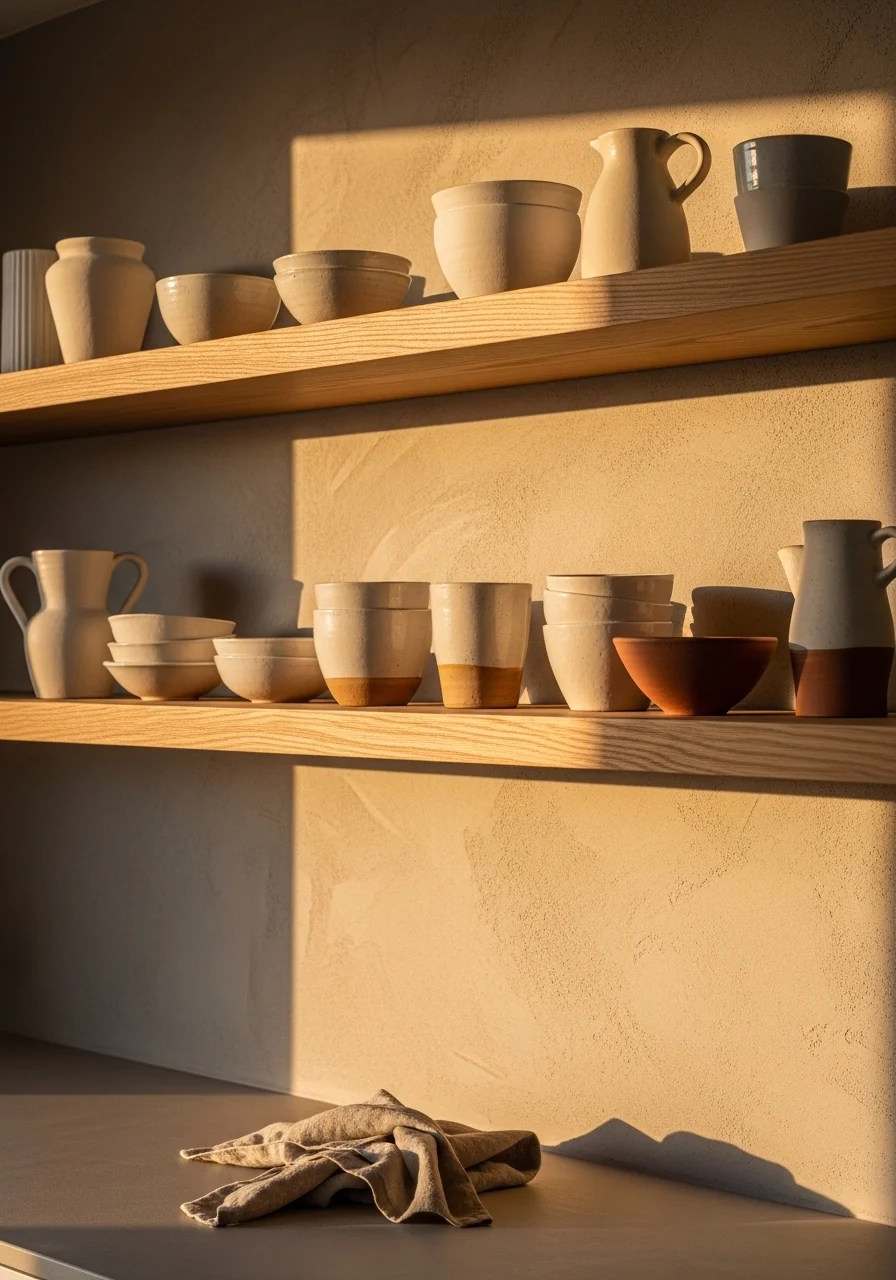
What makes it special: Plaster walls add depth and artisan warmth. Paired with clean shelving, the look feels intentional and slow-living luxe. It suits those who appreciate tactile materials and a hand-finished vibe. The texture offers subtle visual interest without clutter.
Key Elements
- Lime or Venetian plaster finish in warm tone
- Floating oak or walnut shelves
- Neutral stone or composite countertops
- Curated ceramics and earthenware
- Matte black or brass brackets (optional)
- Soft linen towels and woven baskets
- Recessed lighting to create shadow-play
- Natural wood cutting boards as decor
- Seamless edge details for counters
- Regular non-abrasive cleaning tools
How to Achieve This Look
- Choose a plaster finish suited for kitchens (lime-based for moisture resistance).
- Hire a skilled plasterer for a subtle, even texture.
- Install floating shelves with concealed brackets after walls cure.
- Keep shelf styling minimal and tactile.
- Use warm-toned countertops to complement plaster.
- Add recessed or picture lights to enhance texture.
- Use breathable materials like linen and wood for styling.
- Protect plaster near cooking zones with a discreet splash panel.
- Dust gently using soft brushes or microfiber cloths.
How to Style / Use It
Use shelves as a stage for ceramics and greenery. Swap objects seasonally to refresh the feel. Avoid hanging heavy cookware on floating shelves; reserve them for display items. Keep splatter-prone areas protected with a slim glass or tile band.
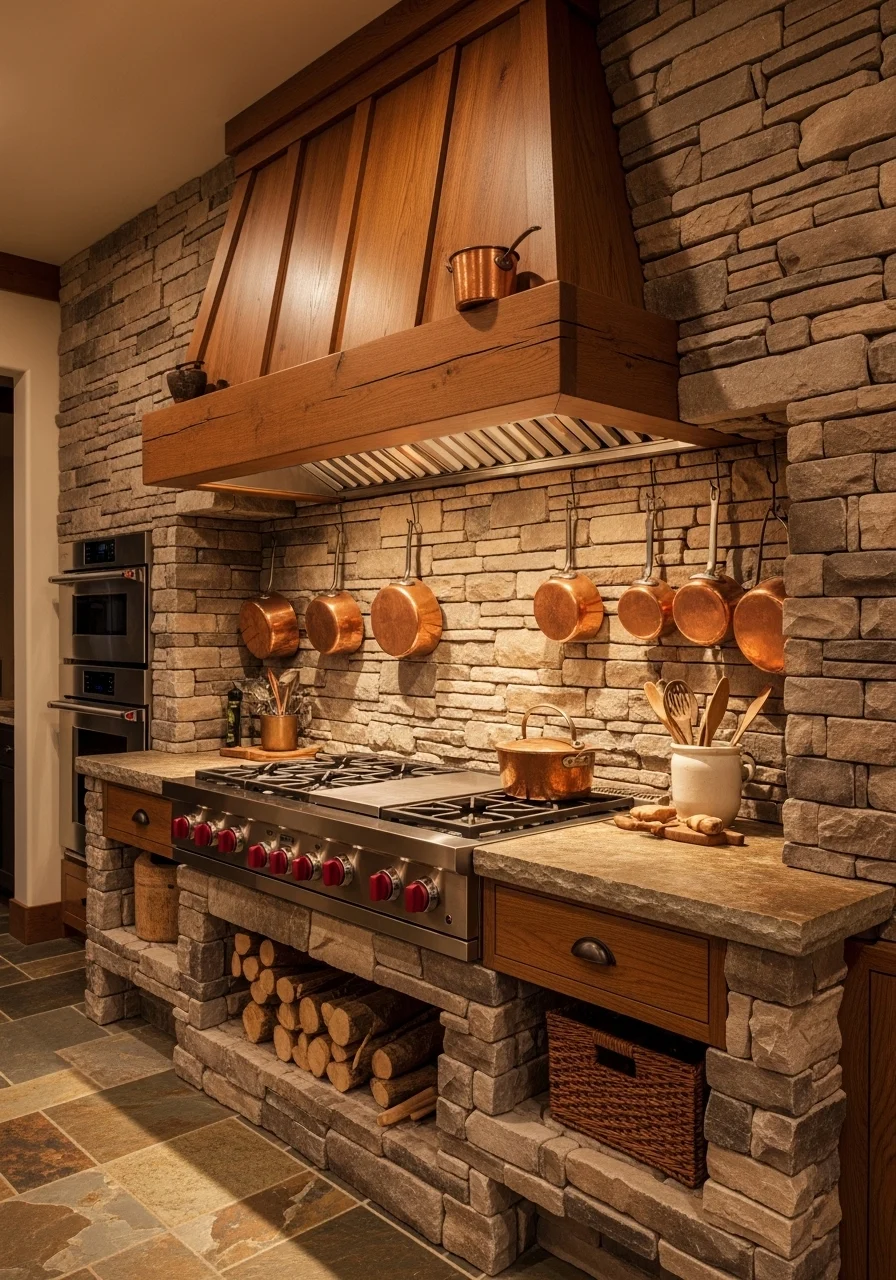
11. Chef’s Professional Range and Vent Hood
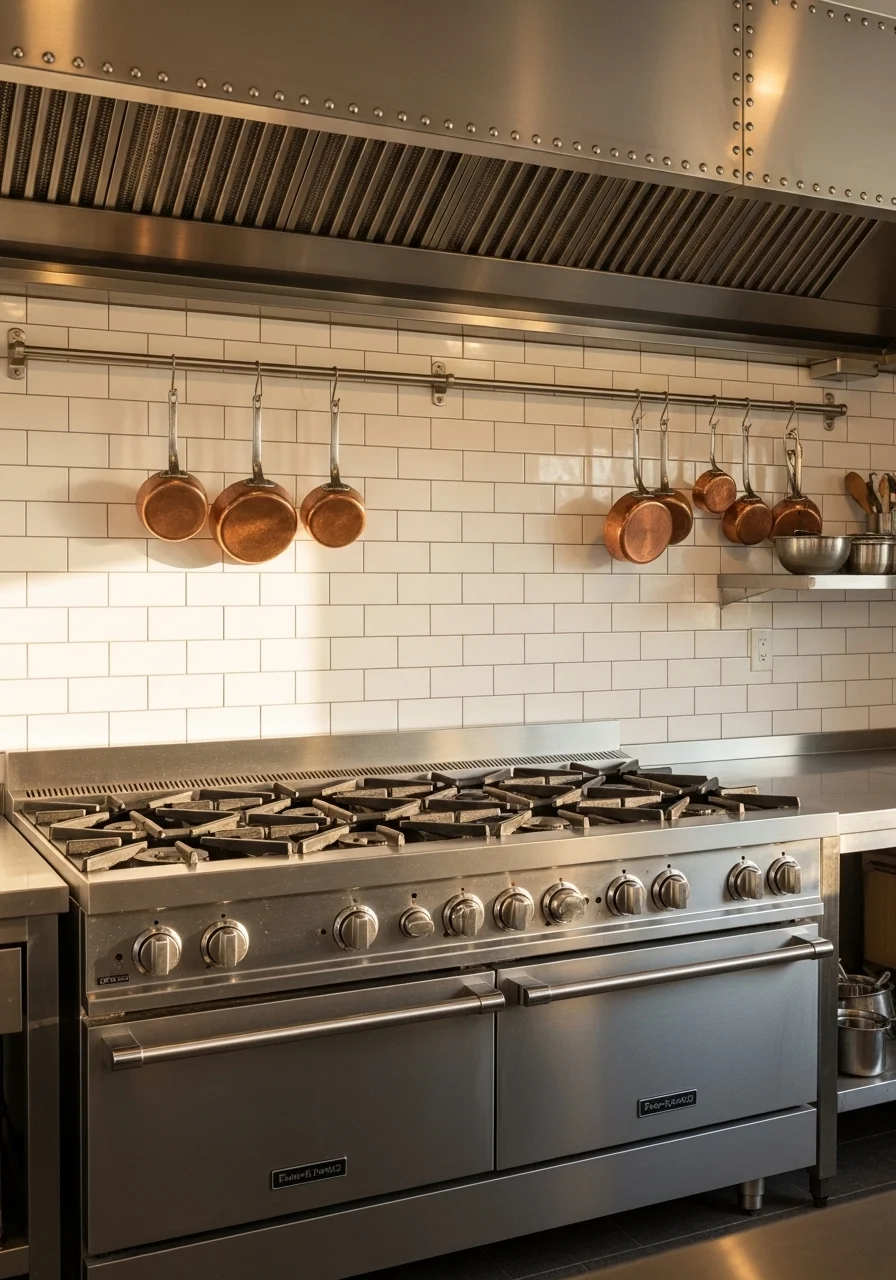
What makes it special: A professional range gives serious cooking power and a signature look. A custom hood brings architectural presence. This combo reads restaurant-quality and is ideal if you cook often and want the tools to match your skills.
Key Elements
- Professional range (gas or dual-fuel) with multiple burners
- Custom metal or wood-clad vent hood
- Durable, heat-resistant backsplash (tile or stainless)
- Heavy-duty pot filler over range
- Sturdy range grates and cast-iron accessories
- Open pot rail for copper cookware
- Commercial-grade knobs and controls
- Ample prep space near the range
- Good ventilation ducted to exterior
- Fire suppression safety and clearances
How to Achieve This Look
- Choose a range size that fits your cooking habits.
- Ensure structural and gas/electrical service meet appliance specs.
- Install a powerful ducted hood sized to the range width.
- Place a pot filler for quick water access.
- Use durable backsplash materials in high-heat zones.
- Provide adjacent prep counters for plating and mise en place.
- Add a dedicated spice rack and utensil wells nearby.
- Install proper ventilation and filtration for long-term performance.
- Schedule professional commissioning for burners and calibration.
How to Style / Use It
Keep frequently used pots and pans on an easily reachable rail. Use wooden boards and linen towels nearby for staging. Maintain clean grates and perform annual checks on gas fittings. For dinner parties, use the range as the showpiece while guests gather around an island.
12. Hidden Pantry Door That Blends With Cabinetry
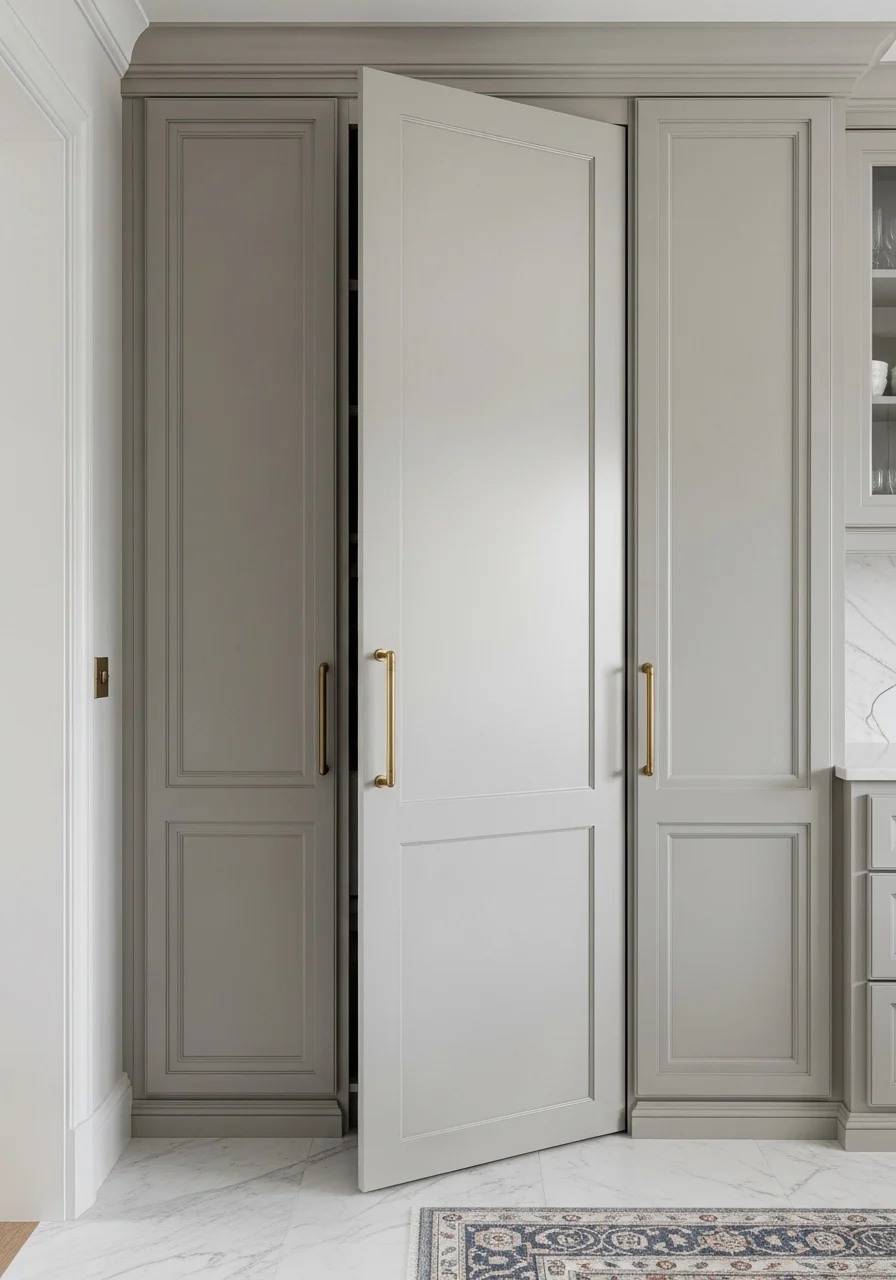
What makes it special: A hidden pantry keeps the kitchen looking sleek while offering massive storage. Matching the door to cabinets creates a built-in look that feels custom. This is great if you want organization without breaking the visual flow.
Key Elements
- Full-height pantry with integrated panel door
- Soft-close concealed hinges
- Heavy-duty shelving and pull-out drawers
- Vertical flush handle or recessed pull
- Lighting inside the pantry (motion-activated)
- Spice pull-outs and wire baskets
- Dedicated zones for dry goods, appliances, and bulk storage
- Childproofing options if needed
- Matching paint/stain to surrounding cabinetry
- Doorstop and clear swing space planning
How to Achieve This Look
- Design the pantry adjacent to main prep zones for workflow.
- Use full-height panel door framed to match cabinets.
- Install heavy-duty adjustable shelving and deep drawers.
- Add motion-sensor lighting for instant visibility.
- Include pull-out spice racks and baking trays.
- Use labeled containers to maintain order.
- Fit a dedicated appliance shelf with outlet inside pantry.
- Add a narrow broom or broom closet if space allows.
- Keep the exterior flush and clean to preserve the hidden effect.
How to Style / Use It
Use clear jars and labeled bins for an organized, designer look. Keep frequently used items at eye level. Rotate stock and check expiry dates regularly. For open pantry doors during parties, display bowls and trays to mimic shelving styling.
13. Luxe Black and Gold Glam Kitchen
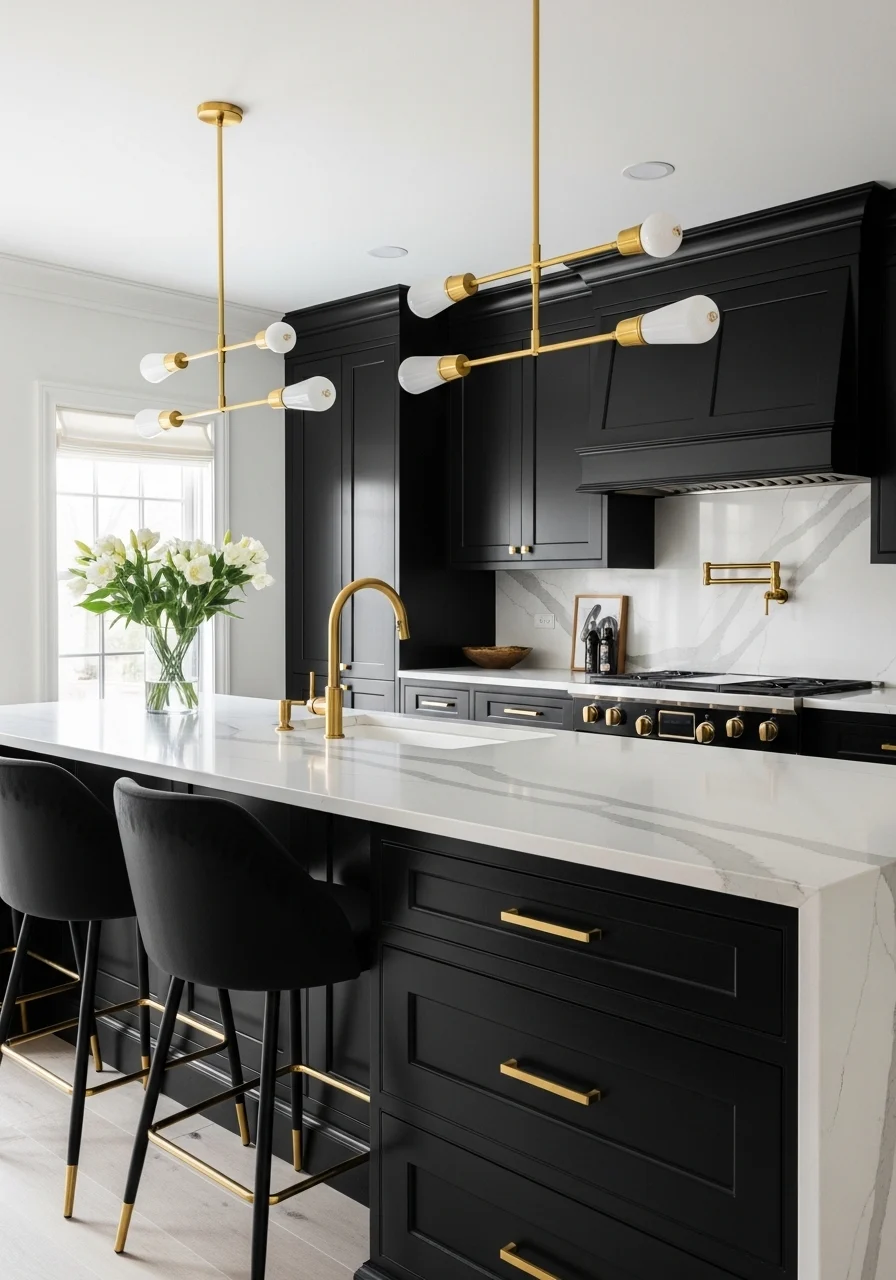
What makes it special: Black cabinetry feels decisive and modern; gold accents add warmth and glamour. This pairing reads bold and curated. It’s for you if you like dramatic contrast and a cinematic kitchen vibe.
Key Elements
- Matte or satin black cabinets
- Polished brass or gold hardware
- White veined stone countertops
- Marble or white tile backsplash
- Velvet or leather seating in jewel tones
- Gold-accented lighting and accessories
- Under-cabinet task lighting to prevent gloom
- High-contrast flooring (light wood or pale tile)
- Mirrored or metallic backsplashes for reflection
- Soft textiles like velvet cushions or silk runner
How to Achieve This Look
- Paint or specify cabinets in a rich black tone.
- Pair with high-contrast white stone surfaces.
- Select gold hardware and matching lighting.
- Add reflective finishes like mirrored splash or polished fixtures.
- Use rich textiles for seating to soften the black.
- Ensure ample task lighting to keep work zones bright.
- Add layered lights: pendants, undercabinet, and recessed.
- Keep countertops organized with black trays and gold tools.
- Maintain finishes with appropriate cleaners to keep sheen.
How to Style / Use It
Balance black with lighter floors and reflective surfaces. Use velvet or brass accents sparingly for impact. For seasonal changes, swap cushions or decorative bowls in lighter hues. Regular dusting keeps the glam finish crisp.
14. Open-Plan Kitchen That Flows Into Living Space
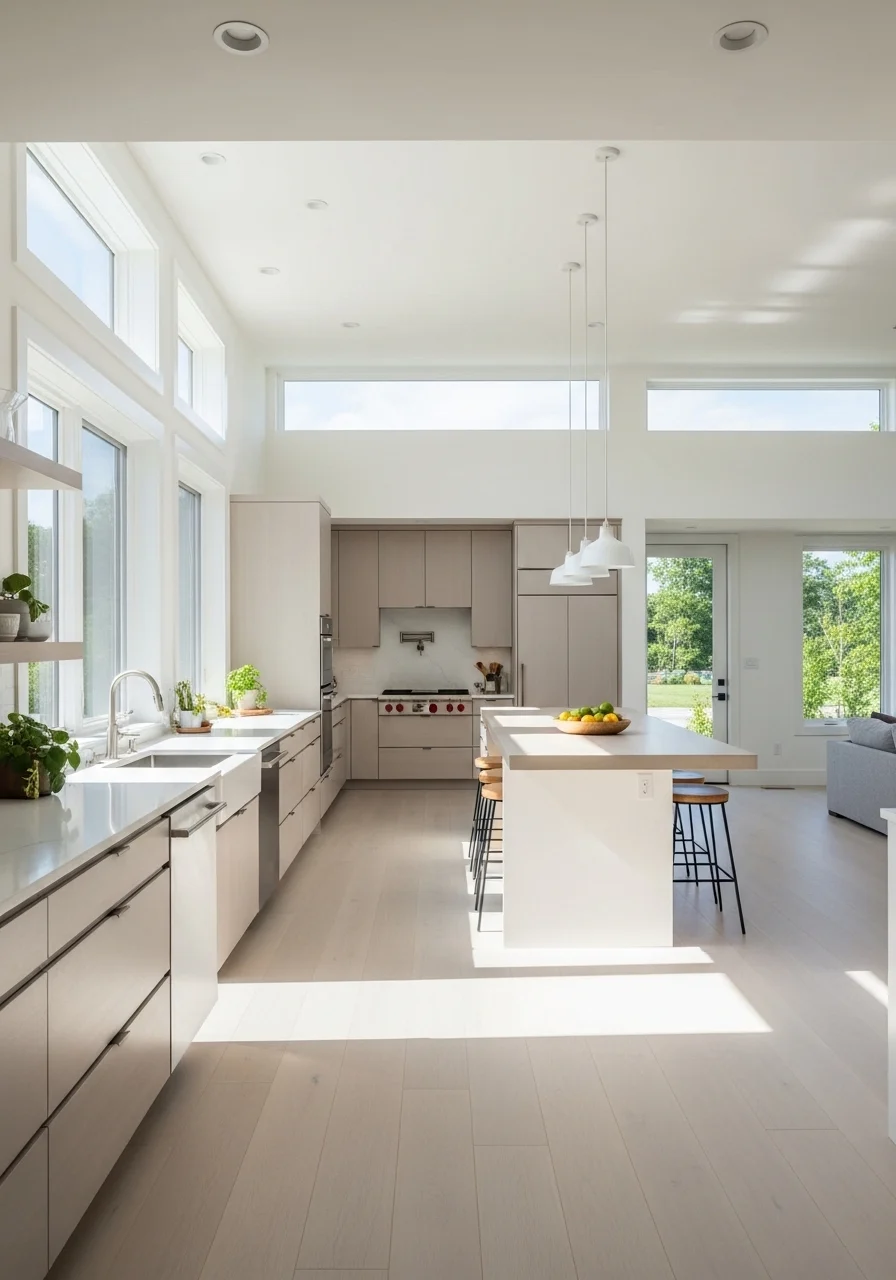
What makes it special: An open plan creates a cohesive living space and encourages social connection. Using consistent finishes makes the whole area feel intentional and high-end. It works for modern family life and entertaining.
Key Elements
- Continuous flooring (engineered wood or large tile)
- Consistent cabinetry finish across zones
- Low-profile island with seating
- Clear sightlines to living area furniture
- Coordinated lighting scheme for both spaces
- Area rugs to define zones
- Concealed storage to limit visual clutter
- Floating media or shelving in living area that complements kitchen
- Acoustic solutions like textiles or sound-absorbing panels
- Transitional color palette for unity
How to Achieve This Look
- Choose flooring and cabinetry that can run through both spaces.
- Design an island that serves both cooking and social faces.
- Keep a unified color palette and coordinated hardware.
- Use rugs and lighting to define the living and kitchen zones.
- Include storage solutions that hide clutter from view.
- Add seating that complements both kitchen and living styles.
- Consider sightline placement for TVs and artwork.
- Use acoustic textiles and soft furnishings to control echo.
- Accessorize in both spaces with coordinated decor pieces.
How to Style / Use It
Keep entertaining flow by clearing counters and placing trays for snacks. Use decorative baskets for quick tidy-ups. During gatherings, arrange seating around conversation clusters rather than the TV. Use cohesive color accents to tie both areas visually.
15. Backlit Onyx or Translucent Stone Accent
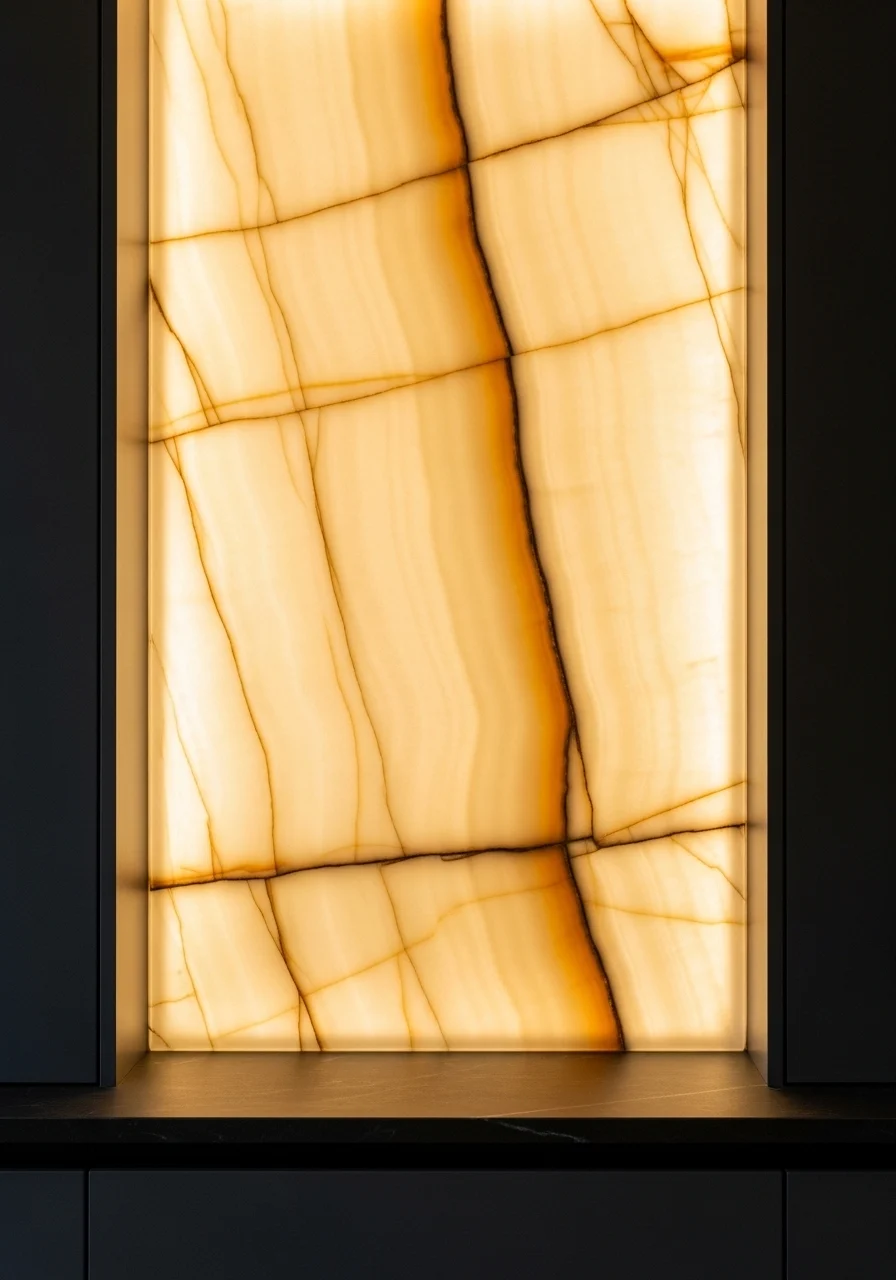
What makes it special: Backlit stone feels gallery-level and instantly luxurious. Translucent materials like onyx glow and create drama. It’s perfect for a focal backsplash or island apron for wow factor.
Key Elements
- Thin-slab translucent stone (onyx, quartzite)
- LED backlighting system with dimmer
- Reinforced backing and mounting system
- Coordinated dark framing or cabinetry
- Neutral countertop to let the stone shine
- Ambient lighting to complement the backlight
- Professional installation to manage weight
- Access panel for lighting maintenance
- Minimal decorative items near the panel
- Cleaning supplies safe for stone and LEDs
How to Achieve This Look
- Source a translucent stone slab and test its translucency with light.
- Design the mounting system with a stone fabricator.
- Install LED panels behind the stone with adequate ventilation.
- Use a dimmer to control mood and reduce glare.
- Frame the panel with cabinetry or metal trim for a finished look.
- Keep the surrounding counters simple to maintain focus.
- Provide access for light driver maintenance.
- Seal the stone according to manufacturer instructions.
- Avoid placing hot pans or sharp objects near the panel.
How to Style / Use It
Make the backlit stone the room’s focal point by keeping accessories sparse. Use warm white LEDs for a welcoming glow. During evenings, lower other lights to let the panel set the mood. Keep this area free of splatters and wipe with a soft cloth.
16. Custom Millwork and Decorative Paneling
What makes it special: Custom millwork adds tailored charm and depth. Decorative panels on islands and cabinets make standard pieces feel bespoke. This suits you if you want built-in character and attention to detail.
Key Elements
- Raised or recessed panel cabinetry
- Beaded or fluted detailing on island ends
- Integrated open niches or bookcase ends
- Custom corbels or pilasters
- Turner-style molding and crown
- Coordinated cabinet paint and glaze
- Full-overlay doors for a seamless look
- Custom toe-kick detailing with lighting
- Matching pantry and furniture-style pieces
- Professional carpentry and finishing
How to Achieve This Look
- Work with a skilled cabinetmaker to design millwork details.
- Choose panel profiles that match your home’s architectural language.
- Apply consistent paint and finish across all woodwork.
- Add functional niches like cookbook shelves or appliance garages.
- Use decorative corbels or pilasters at strategic corners.
- Include a furniture-style island with paneling on all sides.
- Install toe-kick lighting to reveal the millwork at night.
- Coordinate hardware that complements the detailing.
- Protect finishes in high-touch areas with durable topcoat.
How to Style / Use It
Treat millwork as furniture. Style with a few curated objects. Use antique or brass accessories for a classic feel. Keep cleaning gentle and avoid harsh chemicals that can erode finishes. For seasonal refresh, swap books and ceramics.
17. Sustainable Luxury: Recycled Materials and FSC Wood
What makes it special: Sustainable materials can look refined and purposeful. Reclaimed wood, recycled glass countertops, and FSC-certified cabinetry combine ethics with beauty. This appeals if you want a high-end look with environmental care.
Key Elements
- Reclaimed wood island or accent panels
- Recycled glass countertops or backsplashes
- FSC-certified cabinetry or wood veneers
- Low-VOC paints and finishes
- Energy-efficient appliances (ENERGY STAR)
- LED lighting and smart controls
- Water-saving faucets and fixtures
- Natural fiber rugs and textiles
- Eco-friendly sealants and adhesives
- Indoor plants for air quality and texture
How to Achieve This Look
- Source reclaimed or certified wood from reputable suppliers.
- Choose recycled glass or composite stone for counters.
- Specify low-VOC paints and finishes for health and smell.
- Install energy-efficient appliances and programmable thermostats.
- Add LED lighting with occupancy sensors for savings.
- Use water-saving faucets and efficient dishwashers.
- Finish wood with natural oils or eco-friendly sealers.
- Add live plants to improve air and mood.
- Keep a maintenance schedule to prolong material life.
How to Style / Use It
Highlight reclaimed textures with simple ceramics and greenery. Use sustainable cutting boards and linen towels to stay consistent. For longevity, follow specific care instructions for reclaimed wood and recycled surfaces. Rotate plants and decor to keep the space lively.
18. Patterned Tile Floor with Subtle Countertop
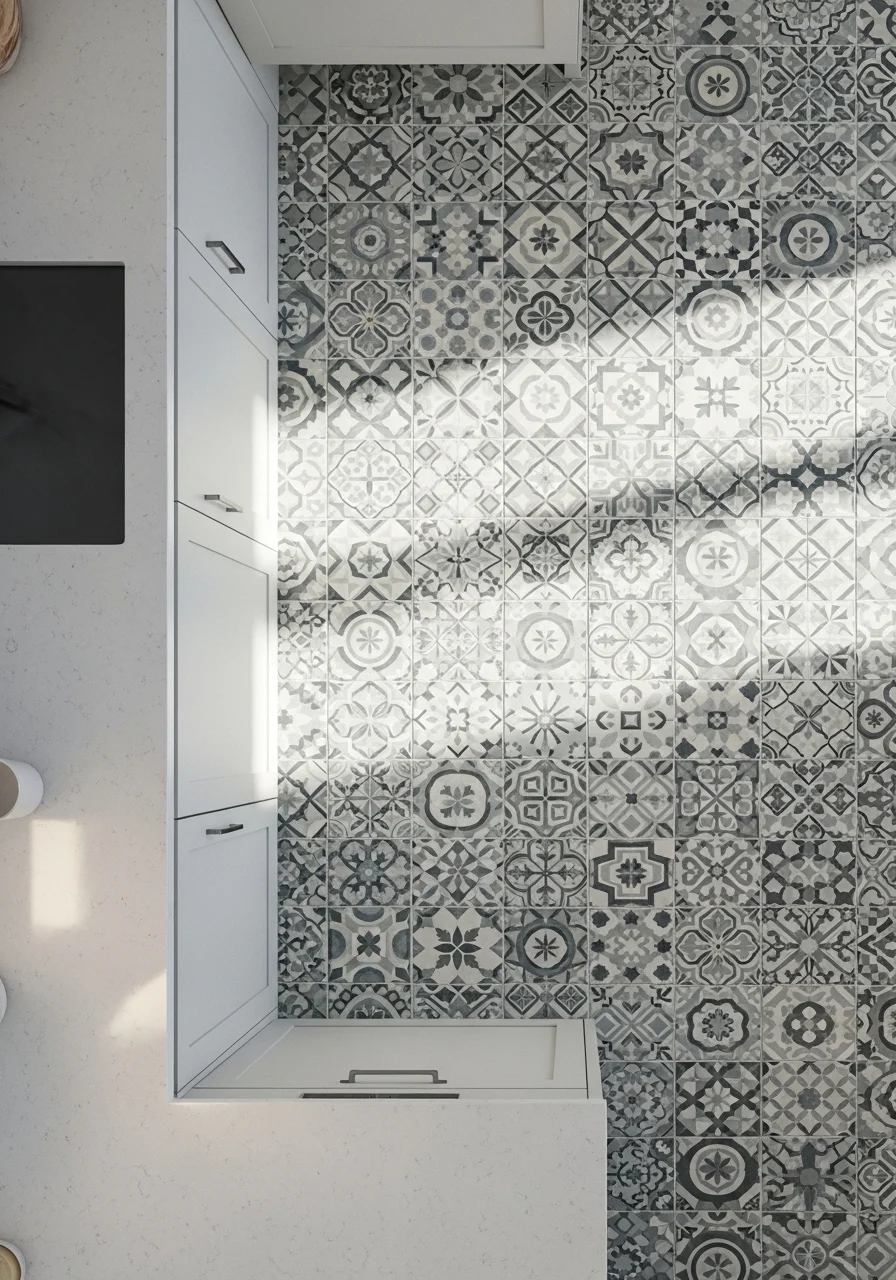
What makes it special: A patterned floor anchors the room and acts like jewelry for the kitchen. Keeping countertops subtle lets the floor take center stage. This approach is excellent if you want personality without visual overload.
How to Style / Use It
- Encaustic or patterned porcelain floor tile
- Neutral quartz or honed stone countertop
- Simple cabinet front styles in a muted tone
- Coordinating grout color to tie palette
- Soft underfoot mat near sink for comfort
- Transitional area rugs to frame zones
- Durable sealant on tiles to prevent staining
- Matching or contrasting baseboard detail
- Brass or black hardware for punches of contrast
- Minimal countertop styling
How to Achieve This Look
- Test tile pattern in the space before installing to confirm scale.
- Use a neutral countertop to balance busy floors.
- Install durable, slip-resistant tiles in high-traffic areas.
- Use professional tiling for pattern alignment.
- Choose grout color that complements tile hues.
- Add underfloor heating if budget allows for comfort.
- Coordinate cabinetry finish with key tones in the tile.
- Protect countertops with cutting boards and trivets.
- Maintain with regular cleaning and reseal tiles as needed.
How to Style / Use It
Let the floor read as decor by keeping counters minimal. Use neutral textiles and wooden accents to warm the tile. For seasonal refresh, add cushions or small rugs in complementing tones. Keep spills wiped to prevent grout discoloration.
19. Curved Island with Integrated Seating

What makes it special: Curved islands soften lines and invite conversation. Integrated seating that follows the curve feels bespoke and approachable. It’s a luxe option if you want a sculptural centerpiece that’s also practical.
Key Elements
- Engineered curved island cabinet carcass
- Seamless curved stone or composite countertop
- Custom curved seating bar with footrail
- Comfortable, fabric-wrapped stools that hug the curve
- Integrated storage and pull-out drawers on the non-seating side
- Under-counter lighting along the curve
- Coordinated pendant lighting proportionate to curve
- Durable edge detail to prevent chipping
- Matching flooring grout and tones for visual flow
- Professional templating and fabrication
How to Achieve This Look
- Work with a cabinetmaker experienced in curves.
- Template the countertop precisely for a snug fit.
- Design the seating radius to allow knee and leg room.
- Include accessible storage on the kitchen-facing side.
- Add a brass or metal footrail for comfort.
- Choose stools that match the curve and can swivel if desired.
- Install task lighting to ensure prep zones are bright.
- Use undercabinet lighting to add drama to the curved silhouette.
- Seal and care for stone edges as recommended.
How to Style / Use It
Use the curved island as a social hub by staging it with a charcuterie board during gatherings. Choose stool fabrics that hide wear and are easy to clean. Keep the island’s prep side orderly by zoning tasks and storing gadgets away.
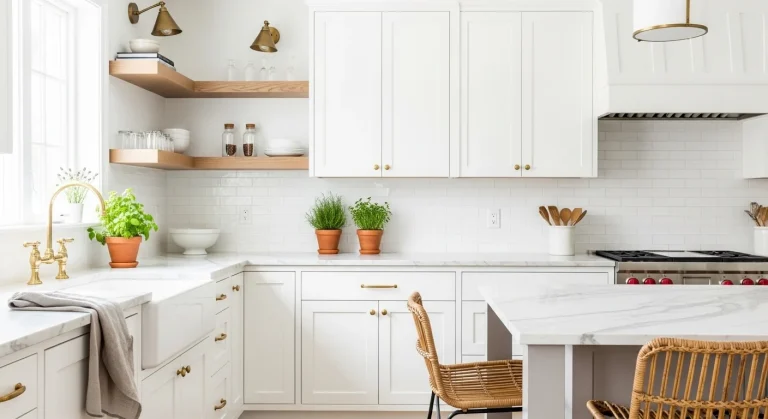
20. Sleek All-White Designer Kitchen with Texture
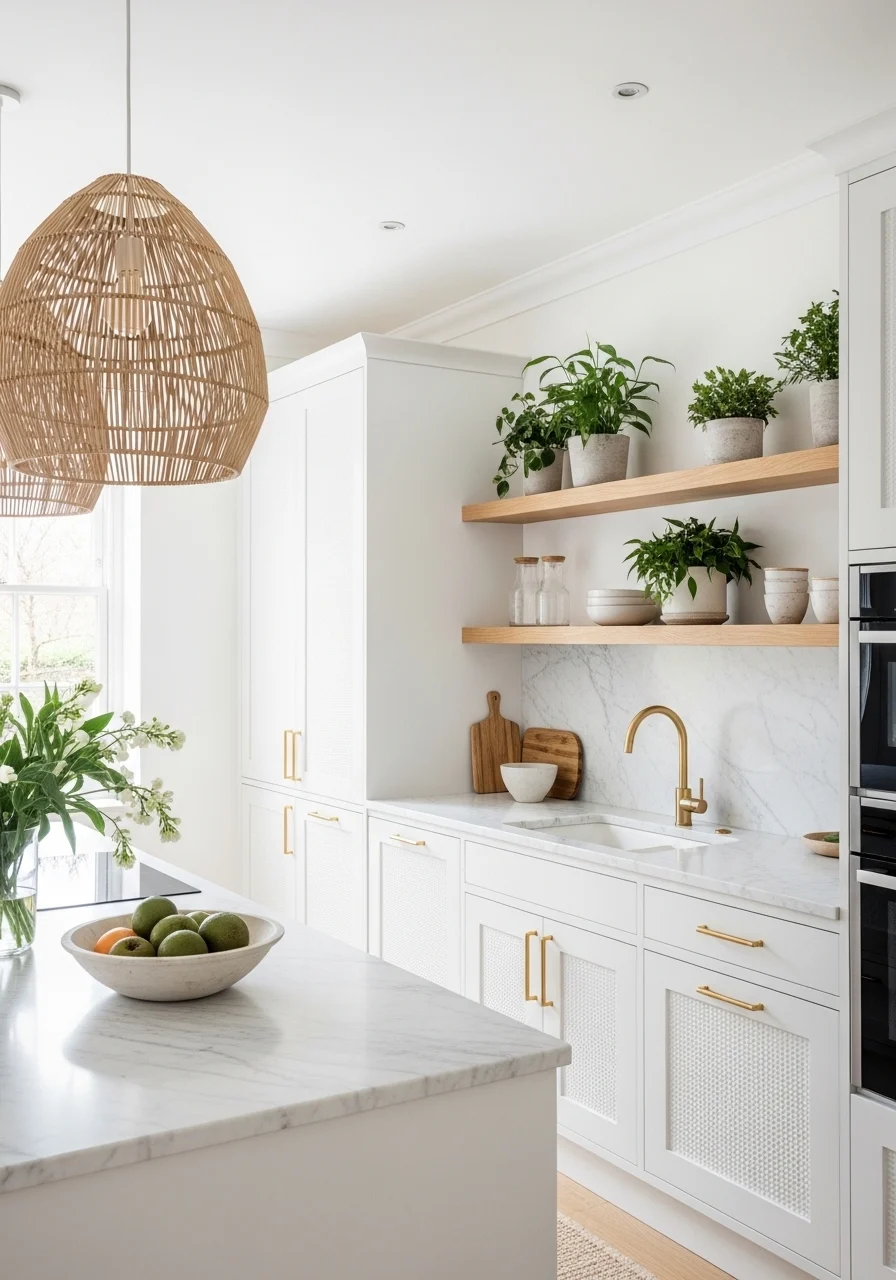
What makes it special: An all-white palette reads timeless and expansive. Adding texture through cabinetry, woven lighting, and warm woods keeps the look from feeling sterile. This suits anyone who loves a clean, bright backdrop with tactile interest.
Key Elements
- Crisp white cabinetry with recessed or shaker fronts
- Textured elements: beadboard, fluting, or rattan panels
- White marble or quartz counters with soft veining
- Natural wood shelving or accents
- Woven pendants or rattan shades
- Brushed nickel or brass hardware
- Light oak flooring for warmth
- Fresh greenery and white ceramics for display
- Under-cabinet lighting to add depth
- Soft textiles like linen curtains or cushions
How to Achieve This Look
- Select a true white palette and decide where texture will appear.
- Paint or order cabinetry with subtle molding or panel details.
- Use warm wood accents to prevent a clinical feel.
- Add woven lighting to introduce organic texture.
- Keep countertops bright and airy with white stone.
- Install undercabinet lighting for depth and function.
- Use low-maintenance plants to add life to surfaces.
- Choose easy-care finishes for busy areas.
- Keep routine cleaning to prevent grime build-up in grout and crevices.
How to Style / Use It
Rotate greenery and seasonal florals to keep the white scheme fresh. Use woven baskets for concealed storage and tactile contrast. For families, select durable textiles and stain-resistant finishes. Keep a small tray near the sink for soap and scrubbers to keep surfaces uncluttered.
21. Stone-Clad Range Wall for Rustic Luxe
What makes it special: A stone-clad range wall lends cabin-like warmth with high-end finishes. Pairing stone with refined metals and wood balances rustic and luxe. This idea suits large kitchens and gives a dramatic focal anchor.
Key Elements
- Stacked stone or large-format stone veneer
- Wood-clad custom hood with mantle detail
- Copper or brass cookware on display
- Durable hearth-style backsplash for heat resistance
- Slate or stone flooring near range
- Recessed spotlights and ambient uplighting
- Integrated pot-filler and heavy-duty faucet
- Masonry sealant and proper backing construction
- Contrasting smooth countertops to balance texture
- Heavy-duty shelving or rack for pots
How to Achieve This Look
- Plan structural support for stone veneer and consult a mason.
- Choose a stone color that complements cabinetry and flooring.
- Build a wood hood with a mantle or shelf for display.
- Install a proper heat-resistant backsplash zone near cooktop.
- Add pot-filler and accessible utensil storage nearby.
- Balance the heavy texture with smooth countertops on either side.
- Use warm task and ambient lighting to highlight stone.
- Seal stone appropriately to avoid staining from oils.
- Keep heavy cookware organized with a rail or rack.
How to Style / Use It
Display copper and brass cookware for a curated hearth feel. Use the mantle to hold decorative bowls or framed recipes. Maintain stone with periodic cleaning and resealing. For holiday gatherings, hang seasonal decor from the hood mantle for charm.
22. Smart Kitchen with Hidden Tech Features
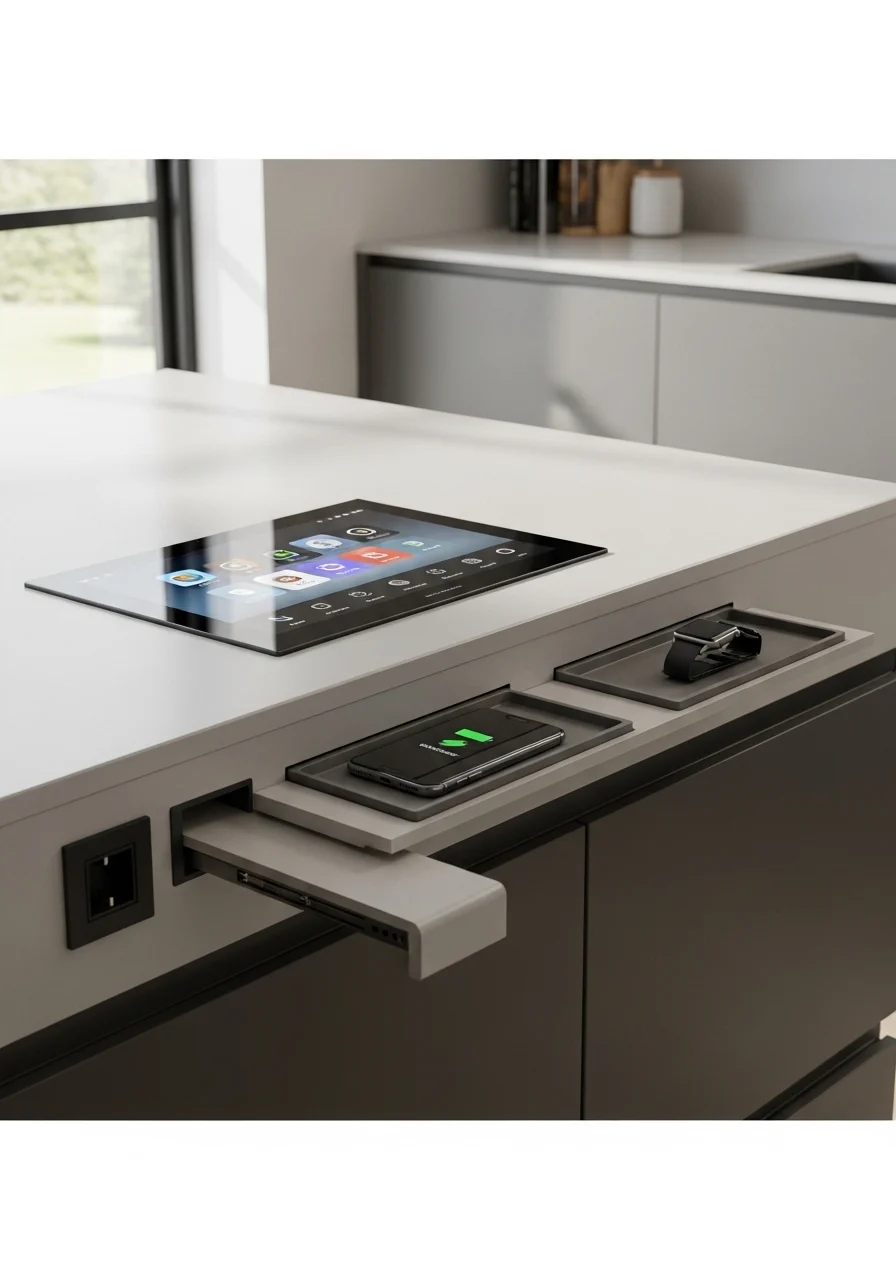
What makes it special: Hidden tech keeps counters clear and adds convenience. Built-in charging, pop-up outlets, and smart lighting feel futuristic while staying elegant. This is great for busy households and tech-forward cooks.
Key Elements
- Retractable pop-up power outlets in islands
- Integrated wireless charging pads in drawers or counters
- Built-in tablet or control panel for recipes and lighting
- Smart lighting with scenes and dimmers
- Soft-close motorized cabinet doors (optional)
- Under-counter refrigeration and drawer fridges
- Networked appliances with app control
- Concealed speaker systems
- Cable management in drawers
- Backup power considerations for heavy tech
How to Achieve This Look
- Plan electrical layouts early in the design process.
- Place pop-up outlets near work zones and seating.
- Install wireless charging pads inside a dedicated drawer or counter.
- Integrate a wall-mounted or recessed control tablet for lighting and music.
- Choose appliances with smart connectivity that match your needs.
- Design cable management into drawers and appliance garages.
- Add smart lighting scenes for prep, dining, and cleaning.
- Test systems for user-friendliness before finalizing.
- Include clear labeling and quick-access cables for guests.
How to Style / Use It
Keep tech intuitive with a central control panel or app group. Use charging drawers to reduce visual clutter. During parties, create lighting scenes that shift from prep to dining. Maintain firmware and password security for connected devices.
23. Scandinavian Minimalism with Warm Accents
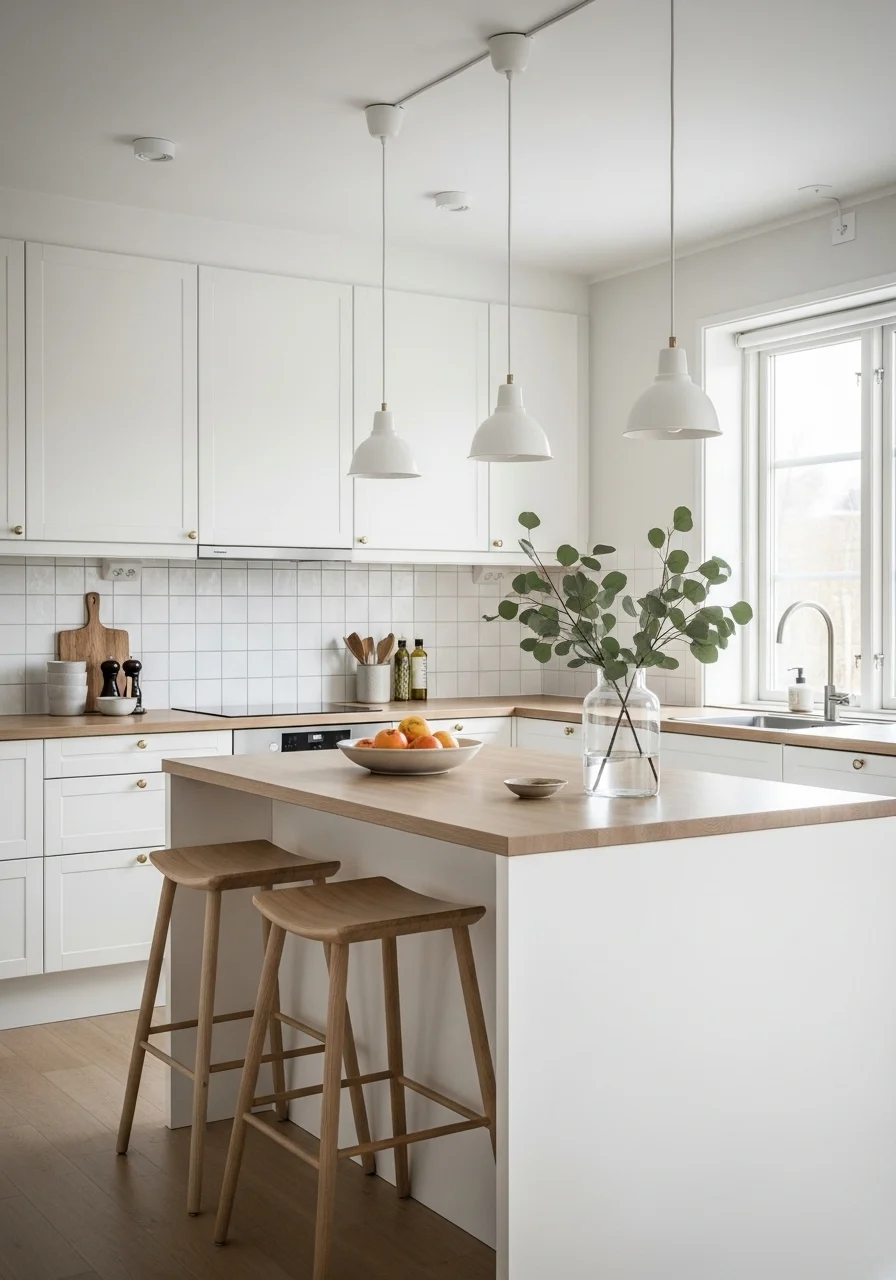
What makes it special: Scandinavian minimalism feels calm, clean, and inviting. Light colors, natural wood, and simple forms create a refined yet cozy vibe. This is ideal if you prefer functional design with subtle warmth.
Key Elements
- White or soft gray cabinets with simple hardware
- Pale oak countertops or butcher block
- Tapered leg seating and furniture details
- Minimal pendant lighting in matte finishes
- Soft linen textiles and simple ceramics
- Neutral rug to soften floors
- Open shelving with curated objects
- Houseplants for life and color
- Functional, unobtrusive storage systems
- Understated, efficient appliances
How to Achieve This Look
- Choose a restrained color palette of whites and pale woods.
- Opt for simple cabinet faces without heavy ornament.
- Install a light wood countertop or island top.
- Use minimalist lighting with matte finishes.
- Keep styling edited with a few quality objects.
- Add textiles like linen curtains for softness.
- Include greenery for contrast and air quality.
- Focus on functional storage to hide clutter.
- Maintain clean lines with consistent hardware.
How to Style / Use It
Balance minimalism with texture: linen, wood grain, and ceramics. Use simple trays to group countertop items. For seasonal updates, swap plant types and textiles. Keep surfaces clear for a serene everyday feel.
24. High-Gloss Lacquered Cabinets for Reflective Depth
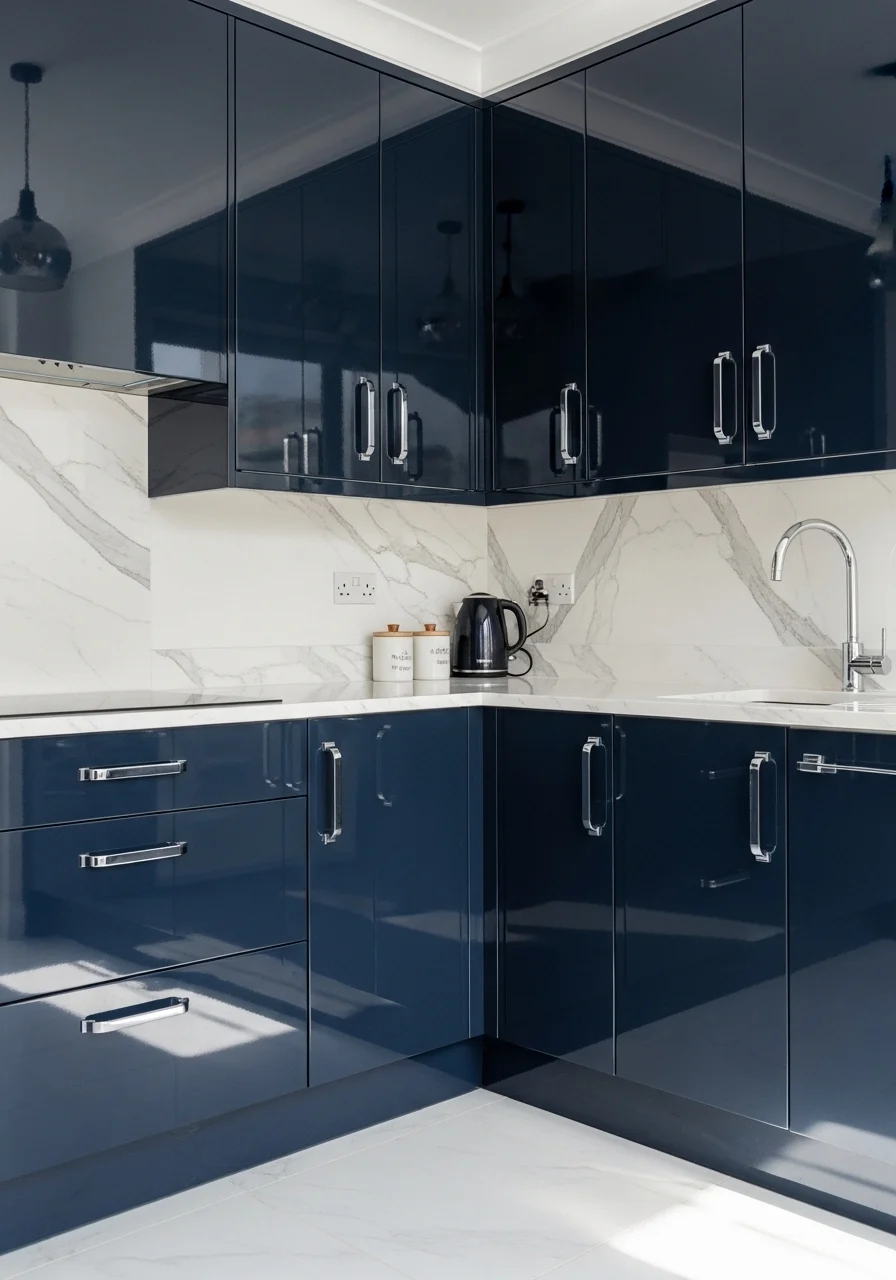
What makes it special: High-gloss cabinetry reflects light and lends a polished, modern vibe. It creates depth and a jewel-like finish that feels premium. This suits contemporary homes and smaller kitchens that benefit from reflection.
Key Elements
- High-gloss lacquered cabinet surfaces
- Polished chrome or brass hardware
- Seamless counter-to-cabinet joints
- High-contrast stone countertops
- Reflective backsplash options (glass or polished tile)
- Minimalistic open shelving or none
- Soft directional lighting to reduce glare
- Fingerprint-resistant finishes if available
- Professional spray finish for even sheen
- Regular microfiber cleaning cloths
How to Achieve This Look
- Choose a high-quality lacquer finish and color.
- Use professional spray application for uniform gloss.
- Pair with polished hardware and reflective accents.
- Install stone countertops with clean seams.
- Add tempered glass backsplash for additional reflection.
- Use directional lighting to accent the sheen.
- Select finishes that resist fingerprints or add protective coatings.
- Use microfiber cloths daily to remove smudges.
- Keep accessories minimal to showcase the gloss.
How to Style / Use It
Let light do the work. Position reflective surfaces opposite windows. Use small textured accents like woven placemats to break shine where needed. For fingerprints, set a cleaning routine and keep a cloth handy. Swap colors seasonally with art or plants.
25. Cozy Corner Banquette with Custom Upholstery
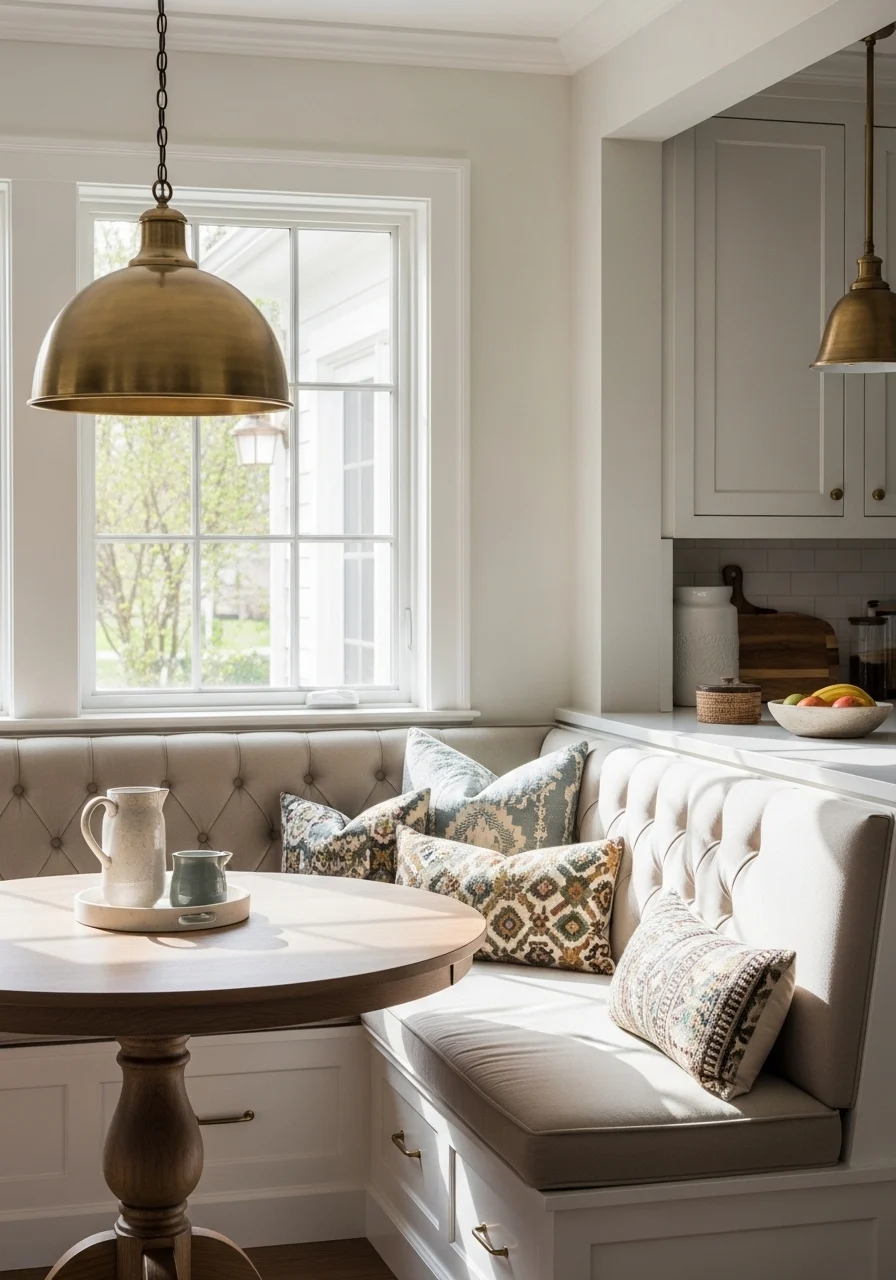
What makes it special: A banquette creates an intimate dining spot that feels like a built-in retreat. Custom upholstery and curated textiles make the nook feel tailored and expensive. This fits family breakfasts and cozy dinners.
Key Elements
- Custom-built banquette bench with storage
- Upholstered seat cushions (velvet, linen blend)
- Round or oval table to encourage conversation
- Variety of throw pillows in mixed textures
- Overhead pendant or sconce for focused light
- Durable, washable fabrics for upholstery
- Hidden storage beneath the seat
- Coordinated window treatments for privacy
- Rug to define the nook area
- Tabletop centerpiece that’s easy to swap
How to Achieve This Look
- Measure the nook and design banquette seating with comfortable depth.
- Choose durable upholstery fabric with stain resistance.
- Build storage compartments under seats for linens or games.
- Select a round table sized to the space and ease of movement.
- Add layered cushions and pillows for comfort and color.
- Hang a pendant light centered above the table for mood.
- Use a rug large enough to frame chairs and bench.
- Install easy-care window shades to control light and privacy.
- Maintain upholstery with periodic cleaning and protectors.
How to Style / Use It
Use the banquette for daily meals, homework, and lounging. Swap linens and pillows seasonally for fresh color. Keep a small caddy under the seat for utensils and napkins. For dinner parties, add extra chairs and a centerpiece to elevate the table.
You’ve now got 25 practical ways to make your kitchen feel like a high-end space. From a glowing onyx panel to simple brass swaps and a cozy banquette, these Luxury Kitchen Design Ideas That Feel High-End cover full remodels and small updates. Try one change this month and pin the ideas you want to try later.
Which idea do you want to try first? Save this list to Pinterest and share it with friends or family who love kitchen design. It’s the easiest way to gather inspiration and compare notes. Go ahead, pick one, and start planning; a small design move can make your kitchen feel luxurious every day.