21 Kitchen Organization Ideas for a Tidy Space
You probably know the feeling: you open a cabinet and a cascade of lids, bags, and mismatched containers tumble out. It’s small, everyday frustration that steals calm from your kitchen. These 21 kitchen organization ideas for a tidy space are meant to fix that — without a major renovation or a shopping cart full of gimmicky gadgets.
You’ll find practical setups for pantries, drawers, countertops, and small kitchens. Each idea includes a clear visual, a list of key elements, step-by-step setup, and styling tips so you can finish fast. The goal is simple: smarter storage, less visual clutter, and a kitchen that feels peaceful and easy to use.
Whether you love minimalist looks, rustic textures, or colorful accents, these kitchen organization ideas for a tidy space offer real, achievable solutions. Pin the ones you like and try one this weekend — you’ll notice the difference when every tool and ingredient has a home.
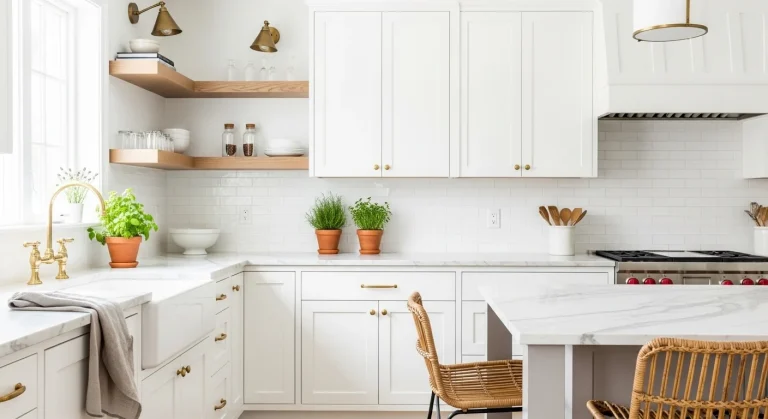
- Deep Drawer Meal Prep Station
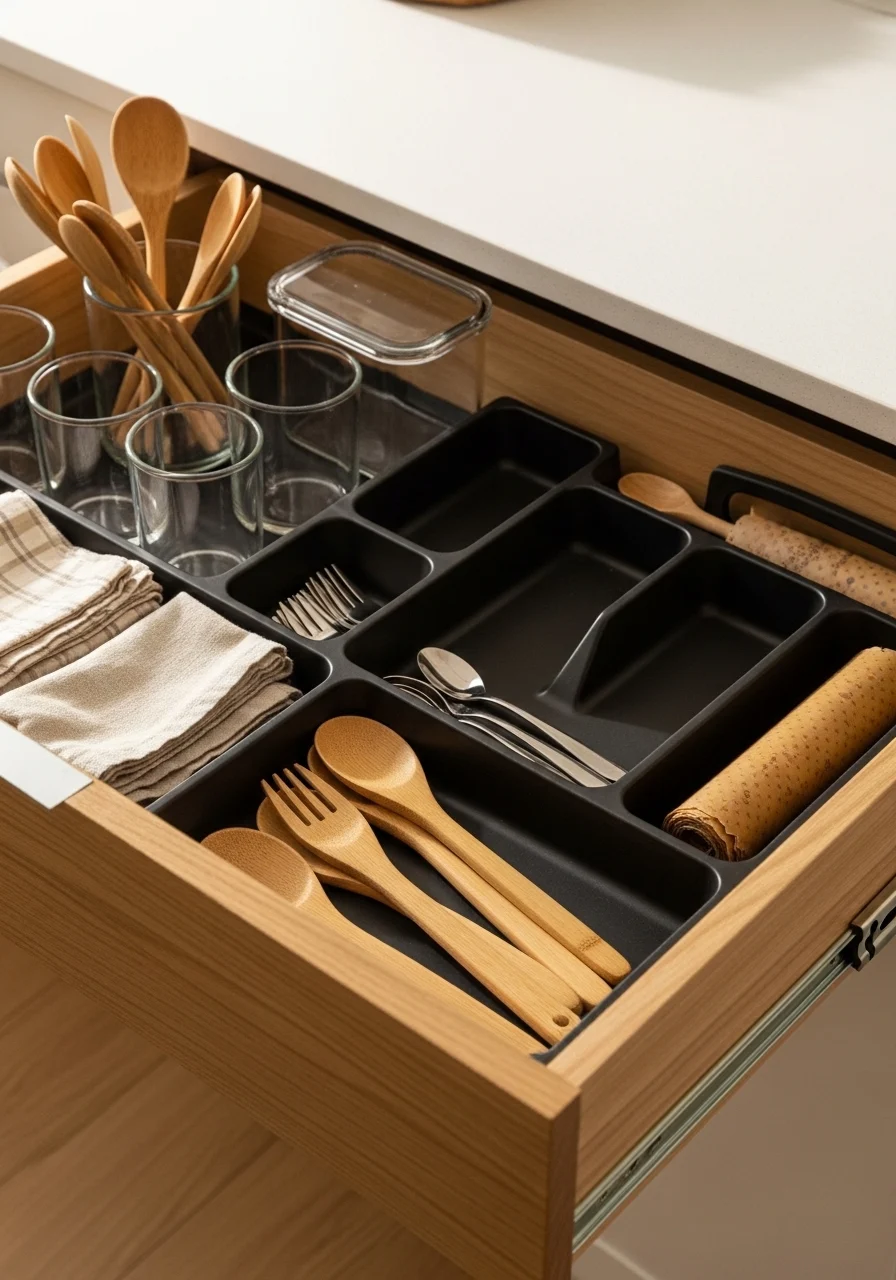
This deep drawer idea keeps your prep tools at hand and hidden for a tidy visual. Smooth-gliding drawers hold cutting boards, mixing bowls, and measuring cups in layers. The mix of wood, glass, and linen looks warm. It’s great if you prep meals often or have limited counter space. The tactile feel of wooden spoons and linen napkins adds comfort while you work.
Key Elements
- Deep full-extension drawer with soft-close slides
- Wooden cutting board or nested boards
- Stackable stainless steel mixing bowls
- Clear glass food storage jars (various sizes)
- Bamboo utensil tray or divider
- Measuring cups and spoons set (nesting)
- Beeswax wraps and silicone lids in a small bin
- Linen napkins or tea towels folded flat
- Non-slip drawer liner in neutral tone
- Label stickers for jars
- Small cutting mat (thin)
- Drawer handle in matte black or brass finish
How to Achieve This Look
- Clear the drawer and wipe it clean. Lay a non-slip liner.
- Place the largest item (cutting board) at the back or on side.
- Nest mixing bowls to save space and put them beside the board.
- Add a bamboo utensil tray near the front for spoons and spatulas.
- Arrange glass jars of frequently used ingredients in the center.
- Stack measuring cups and spoons in a small jar or section.
- Fold linen napkins and place them flat for quick access.
- Keep beeswax wraps rolled in a small basket with lids.
- Attach labels to jars for quick ID.
- Test the drawer glide and adjust spacing so everything lifts easily.
How to Style / Use It
Keep the front section for items you use daily. Pair warm wood with matte hardware for a cohesive look. Rotate seasonal supplies to another drawer if space gets tight. Wipe jars and wipe down the liner weekly. Use clear containers so you can see quantities at a glance.
- Vertical Pantry Shelving with Pull-Out Baskets
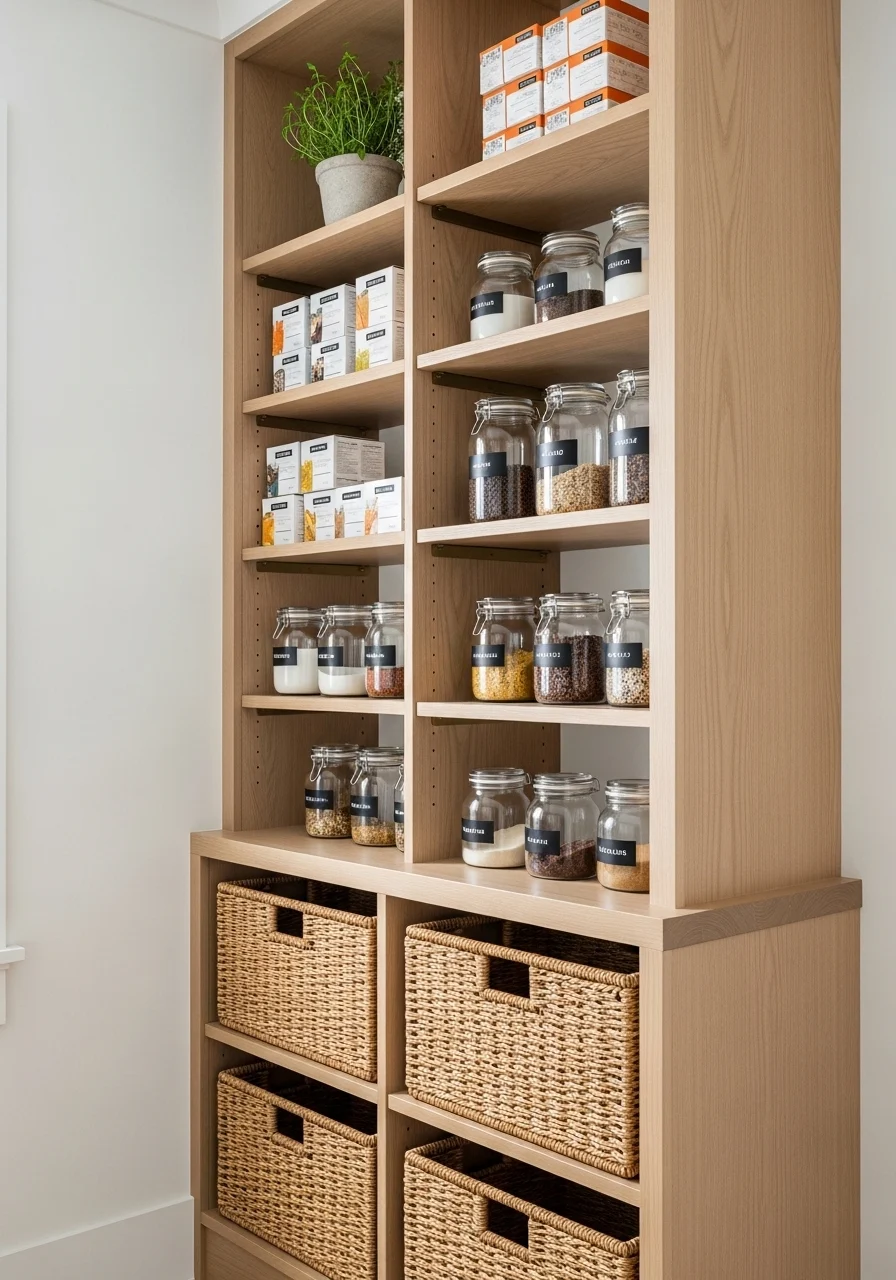
This vertical pantry setup uses tall shelves and pull-out baskets for visibility and access. Baskets frame the space with texture and hide bulkier items. Vertical arrangement keeps cereal boxes and tall bottles upright. It’s ideal for families or anyone who stocks in bulk. The woven textures warm the white shelving.
Key Elements
- Tall shelving unit with adjustable heights
- Woven seagrass or rattan pull-out baskets
- Clear, tall jars for pasta and grains
- Tiered can organizers or risers
- Lazy Susan or rotating tray for oils and sauces
- Wire basket for snacks
- Label maker or chalkboard tags
- Stackable storage bins for small packets
- Wooden shelf risers for plates or trays
- Matte metal shelf brackets
- Shelf liners for easy cleaning
- Clip-on lighting or motion LED strip
How to Achieve This Look
- Remove everything from the pantry and sort into categories.
- Measure shelf heights and set them to fit tall jars and bottles.
- Place woven pull-out baskets at knee to waist height.
- Arrange clear jars on middle shelves for visibility.
- Use risers to create tiers for canned goods and boxes.
- Add a Lazy Susan to a corner shelf for oils and condiments.
- Group snacks into a labeled wire basket for kids.
- Use stackable bins for spare packets and wraps.
- Attach labels to baskets and jars.
- Install a motion LED strip to help find items quickly.
How to Style / Use It
Pull-out baskets make restocking easy. Keep frequently used items at eye level. Rotate pantry ingredients so older items sit front. Wipe shelves monthly and shake out crumbs from baskets. Swap baskets for metal bins if you prefer an industrial look.
- Kitchen Organization Ideas for a Tidy Space: Lid and Bakeware Wall Rack
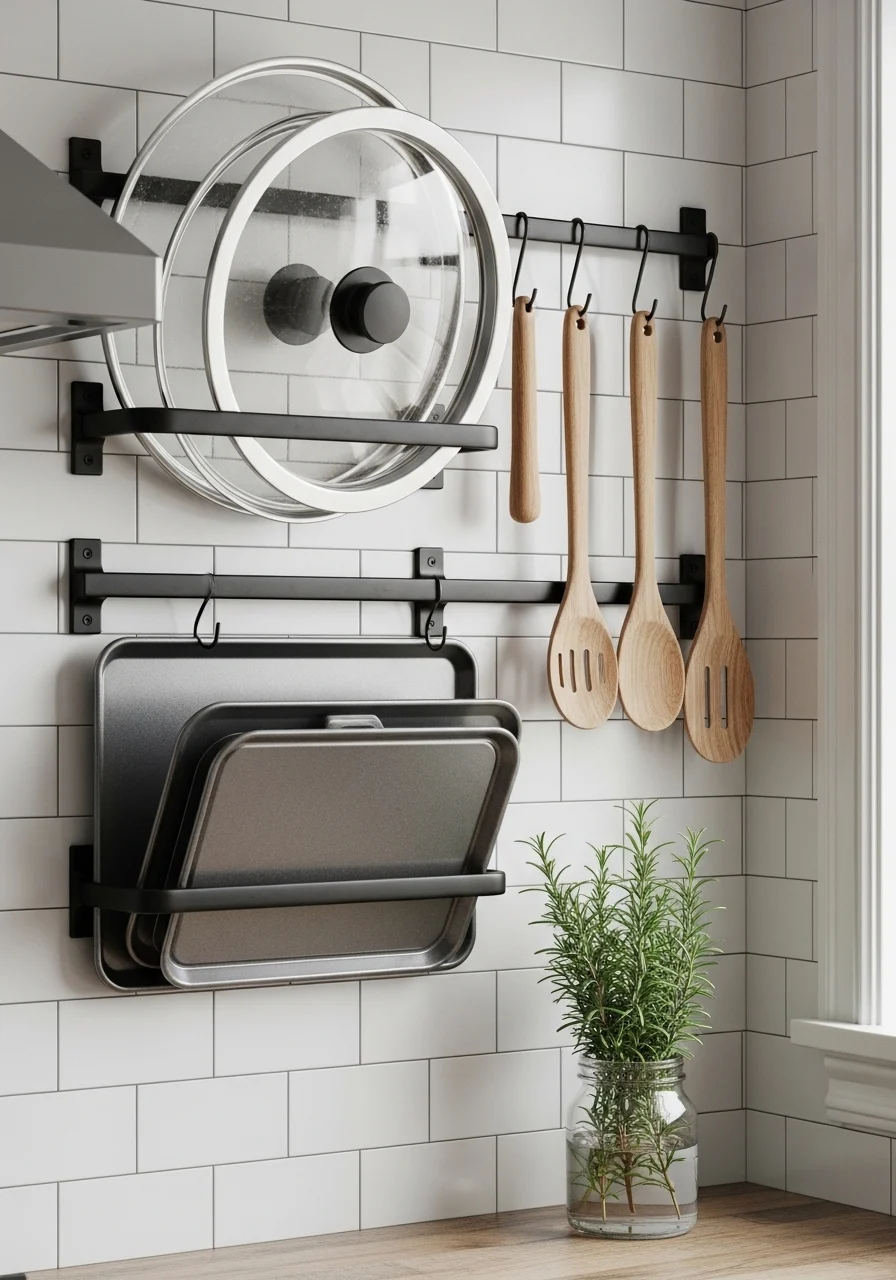
Mounting a lid and bakeware rack frees cabinet space and makes reaching large items painless. Vertical storage lets you see sizes at a glance. The metal-on-tile look reads modern and purposeful. This fits cooks who use multiple pans or bake frequently. The wall display feels calm rather than cluttered when organized.
Key Elements
- Wall-mounted vertical pot lid rack
- Slide-in sheet pan organizer or narrow shelf
- Matte black rails or stainless steel finish
- Cork or rubber bumpers to protect lids
- Hooks for hanging tongs and potholders
- Neat grouping by size or function
- Nearby pegboard or rail for utensils
- Tile or clean wall surface to mount hardware
- Quick-release screws and anchors
- Small shelf for pan spray or mitts
- Soft cloth bumpers for metal contact
- Label or painted size indicators (optional)
How to Achieve This Look
- Choose a wall space near your cooking area.
- Measure and mark stud locations for secure mounting.
- Install a vertical lid rack using anchors if needed.
- Fit sheet pan organizer below or beside the rack.
- Add hooks for potholders, oven mitts, and tongs.
- Place rubber bumpers on rails to protect finishes.
- Group lids by size from left to right.
- Keep baking sheets upright to reduce warping.
- Add a small shelf for oven mitts or spray.
- Test accessibility while cooking and adjust height.
How to Style / Use It
Keep the most-used lids at hand height. Pair the rack with a small wall shelf of oil spray or spices. Wipe metal racks monthly to avoid grease build-up. For seasonal shifts, rotate baking sheets and pans to the top or back.
- Under-Sink Caddy System
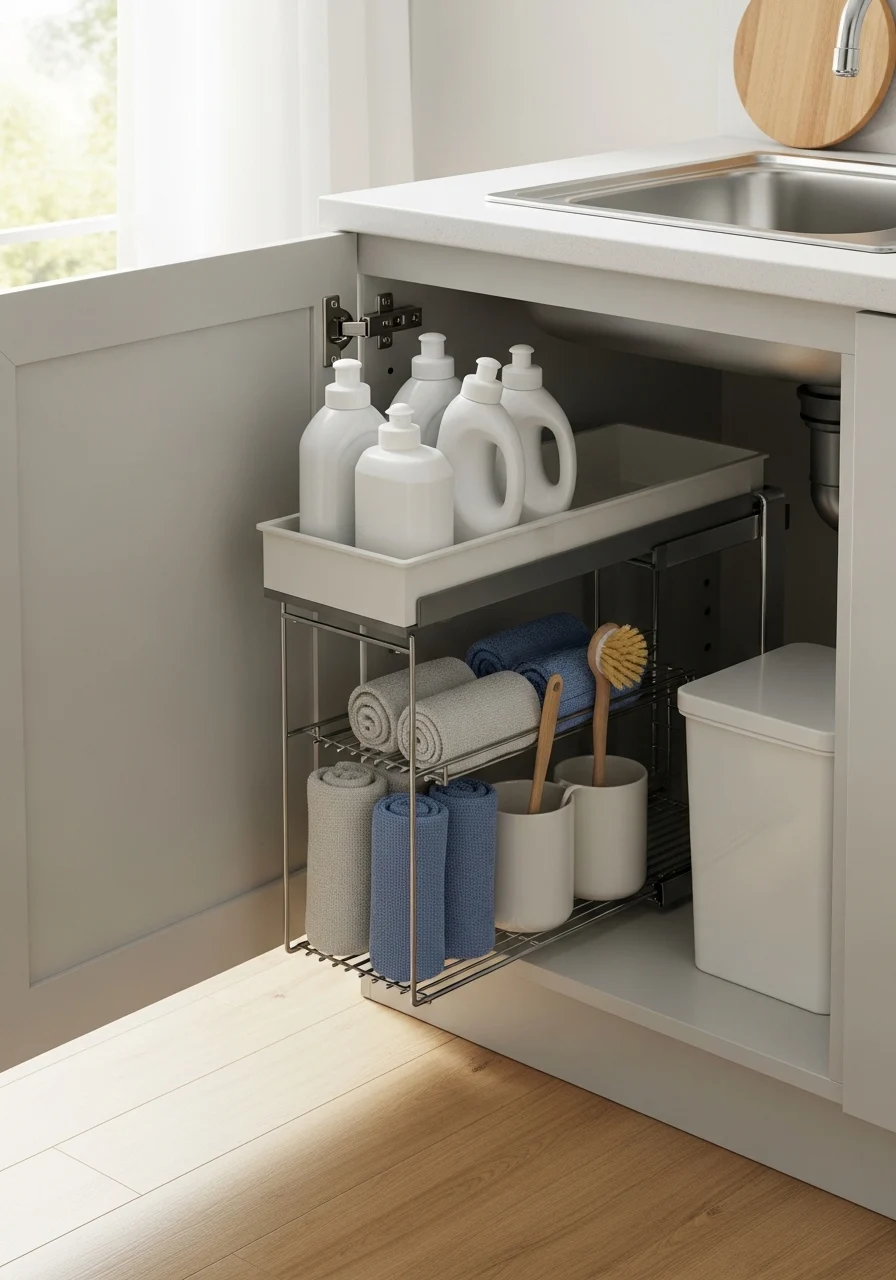
Under-sink areas are messy by default. A caddy system keeps cleaners upright and accessible. Rolling cloths and a small trash solve small messes fast. This system looks neat and saves your back while digging for that degreaser. It’s perfect if your under-sink space is shallow but wide.
Key Elements
- Slide-out under-sink caddy or tray
- Tall bottles stored upright with bottle holders
- Small removable caddies for sponges
- Ceramic holder for dish brush
- Rolled microfiber cloths in a bin
- Small trash or compost pail
- Tension rod for spray bottles
- Waterproof shelf liner
- Labels for cleaner types
- Rubber mat to catch drips
- Childproof latch if needed
- Small stackable containers for extra sponges
How to Achieve This Look
- Empty the cabinet and clean the area thoroughly.
- Put down a waterproof shelf liner.
- Install a slide-out caddy if possible.
- Use a tension rod to hang spray bottles by their trigger.
- Group cleaners by use: dish, counter, glass.
- Place sponges and brushes in a removable caddy.
- Roll microfiber cloths and stack them in a small bin.
- Add a small compost or trash pail to one side.
- Label containers and line the bottom with a rubber mat.
- Test access and move less-used items to the back.
How to Style / Use It
Keep daily cleaners in front for quick reach. Replace liners every month to avoid odors. If you have hard water, keep a vinegar spray near the sink and label it. Childproof if needed, and periodically pare down expired cleaners.
- Drawer Divide for Tupperware and Lids
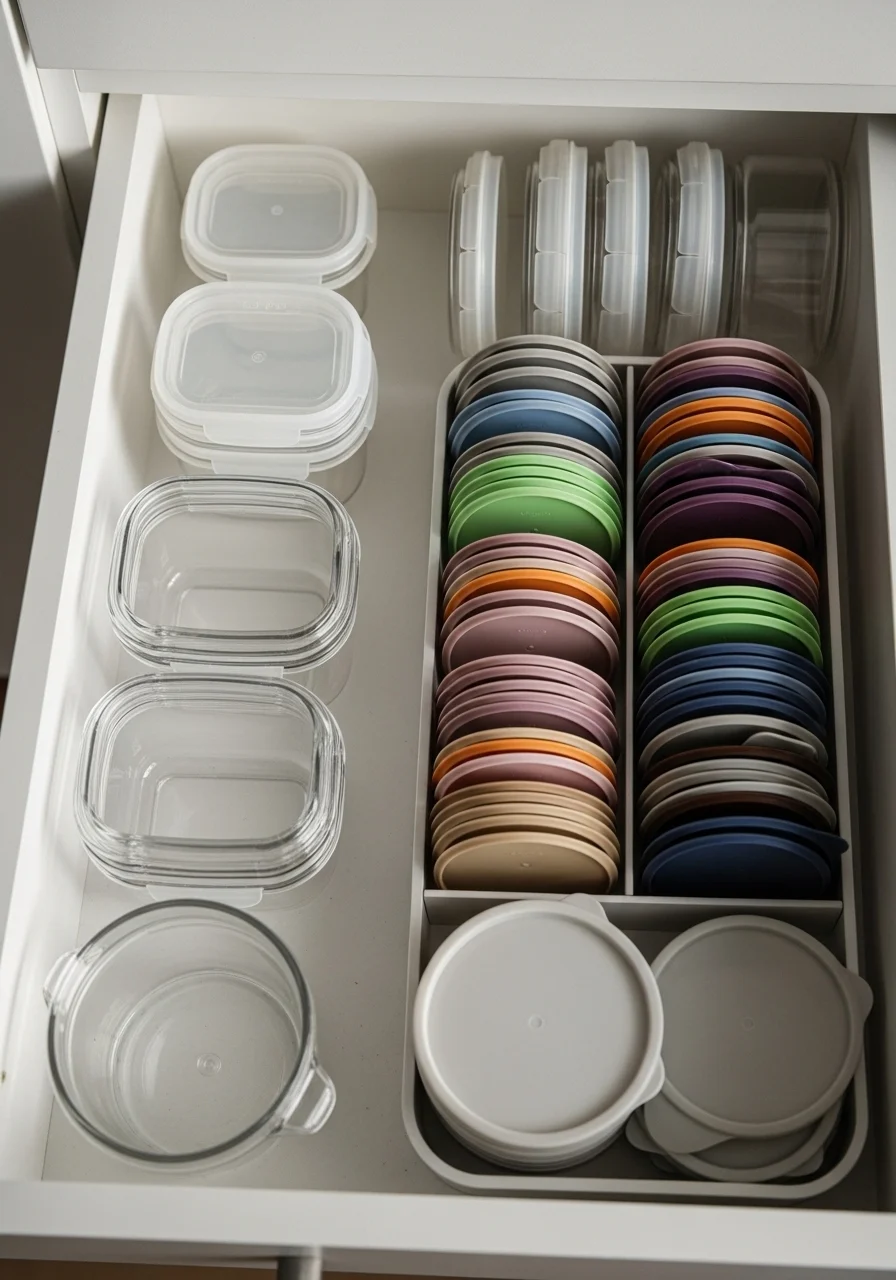
Matching containers to lids is a daily chore. A dedicated drawer divider keeps lids upright and containers nested. Sorting by size and color makes morning lunches quicker. This method is great if you use food storage often. It looks orderly and reduces the “where’s the lid?” panic.
Key Elements
- Deep flat drawer with high sides
- Adjustable drawer dividers or custom inserts
- Nested container stacks by size
- Vertical lid organizer or wire rack
- Silicone lids grouped by color
- Clear containers for easy visibility
- Small bin for loose lids or clips
- Non-slip drawer liner
- Labels or color-coded stickers
- Small silicone mats to prevent slipping
- Drawer front handle in matching finish
How to Achieve This Look
- Empty the drawer and sort containers by size.
- Nest similar containers and stack them by height.
- Install adjustable dividers to create a lid zone.
- Place lids upright in a vertical organizer.
- Group silicone lids by color for fast matching.
- Reserve a small bin for odd or single lids.
- Use a non-slip liner to keep stacks from shifting.
- Label sections for “small,” “medium,” and “large.”
- Test opening and closing the drawer for clearance.
How to Style / Use It
Keep the most-used sizes at the front. Wash and return lids immediately to stop mix-ups. Replace warped containers and donate mismatched sets. If you swap containers often, add a small sticky note on the inside of the cabinet door as a reminder to close lids.
- Magnetic Spice Wall
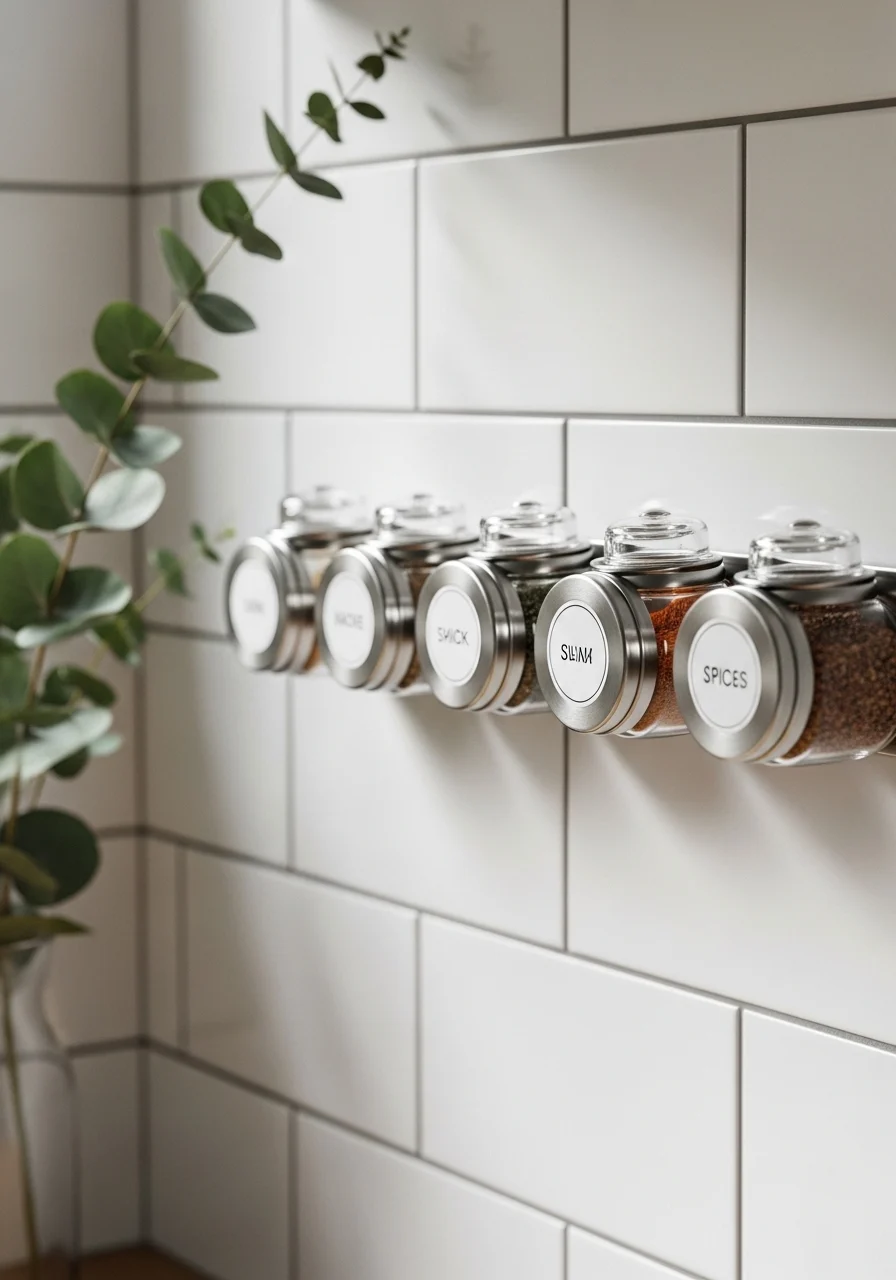
A magnetic spice wall is sculptural and makes spices instantly accessible. Glass-topped tins keep the colors visible, adding visual warmth. This is ideal if you cook by sight and smell. The wall becomes a design feature and practical tool.
Key Elements
- Magnetic board or magnetic paint on backsplash
- Round metal spice tins with clear lids
- Minimalist label stickers
- Small wooden shelf for extra jars
- Chalk marker for quick notes
- Grouping by cuisine or frequency
- Herb scissors hung nearby
- Small magnetic spoon for measuring
- Matte black or stainless steel accents
- Window light to keep colors lively
- Wall-safe adhesive strips or screws
How to Achieve This Look
- Choose an accessible backsplash area near the stove.
- Install a magnetic sheet or paint a spot with magnetic paint.
- Fill round metal tins with spices and seal lids.
- Label each tin clearly on the side or top.
- Arrange tins by use: daily herbs first, then exotic spices.
- Add a small shelf beneath for salt or larger jars.
- Hang herb scissors or small measuring spoons on nearby hooks.
- Refill tins from bulk jars stored in the pantry.
- Wipe tins periodically to keep them shiny.
How to Style / Use It
Keep everyday spices closest to the stove. Refill from pantry jars to keep the tins fresh. If you move often, choose removable magnetic strips to avoid wall damage. Change the arrangement seasonally to highlight baking vs. grilling spices.
- Command Center Corner for Lists and Schedules

A kitchen command corner keeps papers, schedules, and grocery lists from piling on the counter. A small shelf with trays and a mounted calendar keeps your family on track. It’s great for busy households and looks tidy when everything has a place. The corner offers a calm station for quick notes.
Key Elements
- Wall-mounted calendar or whiteboard
- Small floating shelf for mail and keys
- Cork strip or pinboard for notes
- Pen cup with pens and highlighters
- Small basket for outgoing mail
- Sticky note pad and ruler
- Clip for grocery list sheets
- Mini chalkboard for dinner plans
- Matte black hook for keys
- Neutral frame to match kitchen decor
- Recharge station for phone (optional)
How to Achieve This Look
- Choose a corner near the kitchen entrance or fridge.
- Mount a calendar or whiteboard at eye level.
- Install a floating shelf below for mail and chargers.
- Add a cork strip or small pinboard for receipts.
- Place a pen cup and sticky notes on the shelf.
- Use a small basket for coupons or school notices.
- Hang a key hook below the shelf.
- Create a clip system for grocery lists and quick notes.
How to Style / Use It
Keep the command center uncluttered by emptying mail daily. Use color-coded pens for family members. Pin only current items to the board and file the rest. Update the calendar weekly and make grocery lists visible for fast grabbing.
- Corner Carousel (Lazy Susan) Built-In
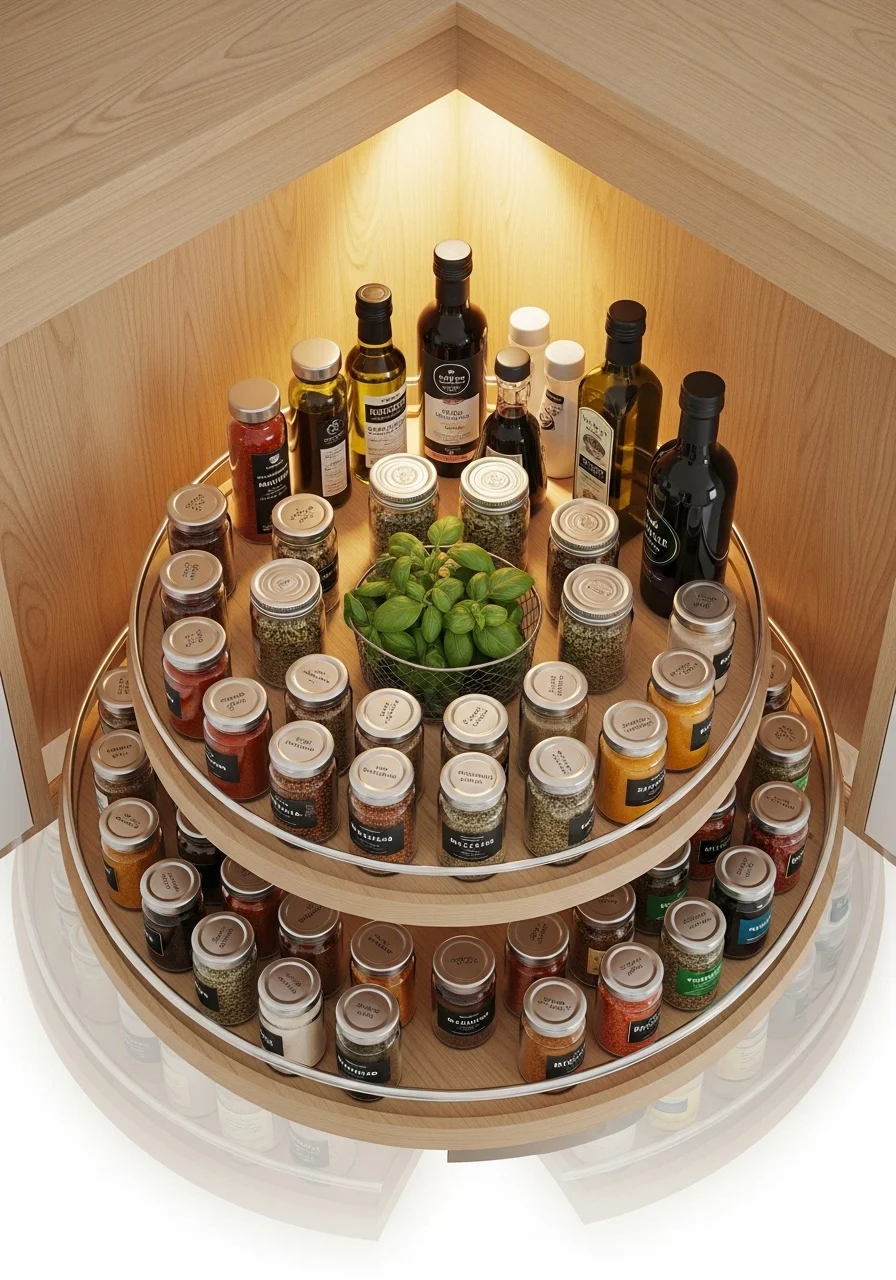
A corner carousel makes dead corners usable. Rotating tiers bring everything forward with a spin. It’s a perfect fit for small kitchens where every inch matters. The circular motion feels playful and practical, and it reduces reaching.
Key Elements
- Built-in Lazy Susan with full rotation
- Two or three circular tiers
- Glass jars or small bottles for spices
- Non-slip liner on each tier
- Center pole securely anchored
- Low-profile jars for stability
- Grouped by type (spices, condiments)
- Matte finishes on jars for cohesive look
- Soft-close cabinet hinge
- Small basket for loose items
- Lighting inside cabinet if possible
How to Achieve This Look
- Empty the corner cabinet and measure interior depth.
- Choose a Lazy Susan kit sized to the cabinet.
- Install center pole and tiers per instructions.
- Add non-slip liners to each tier.
- Place heavier items on the bottom tier.
- Group similar items together for quick access.
- Test rotation and adjust spacing to avoid hitting doors.
- Add small baskets for odd items.
- Keep frequently used items on the front edge.
How to Style / Use It
Use the bottom tier for canned goods and top for spices. Rotate as you cook to bring items forward. Clean tiers when spills occur. If you prefer open looks, swap jars for woven baskets that sit on tiers.
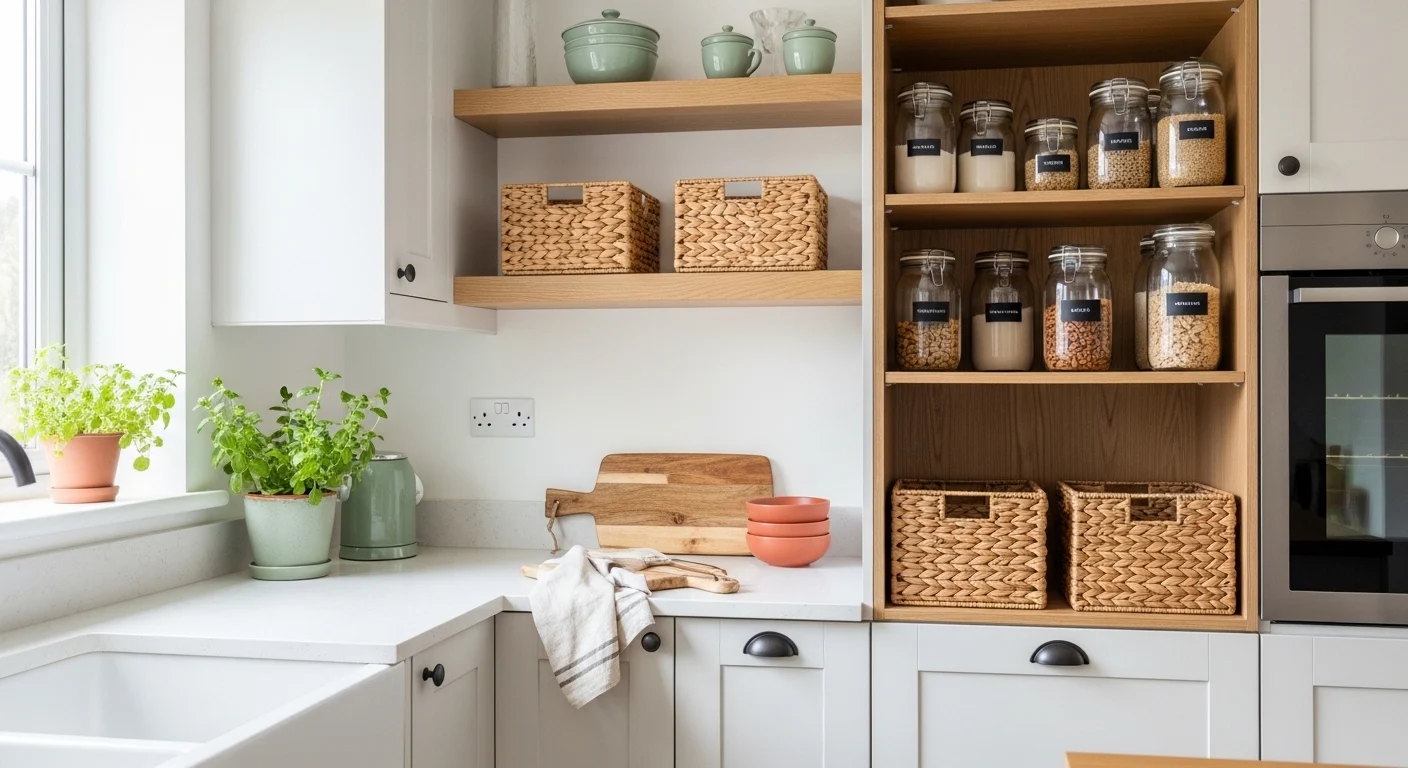
- Kitchen Organization Ideas for a Tidy Space: Minimalist Open Shelving
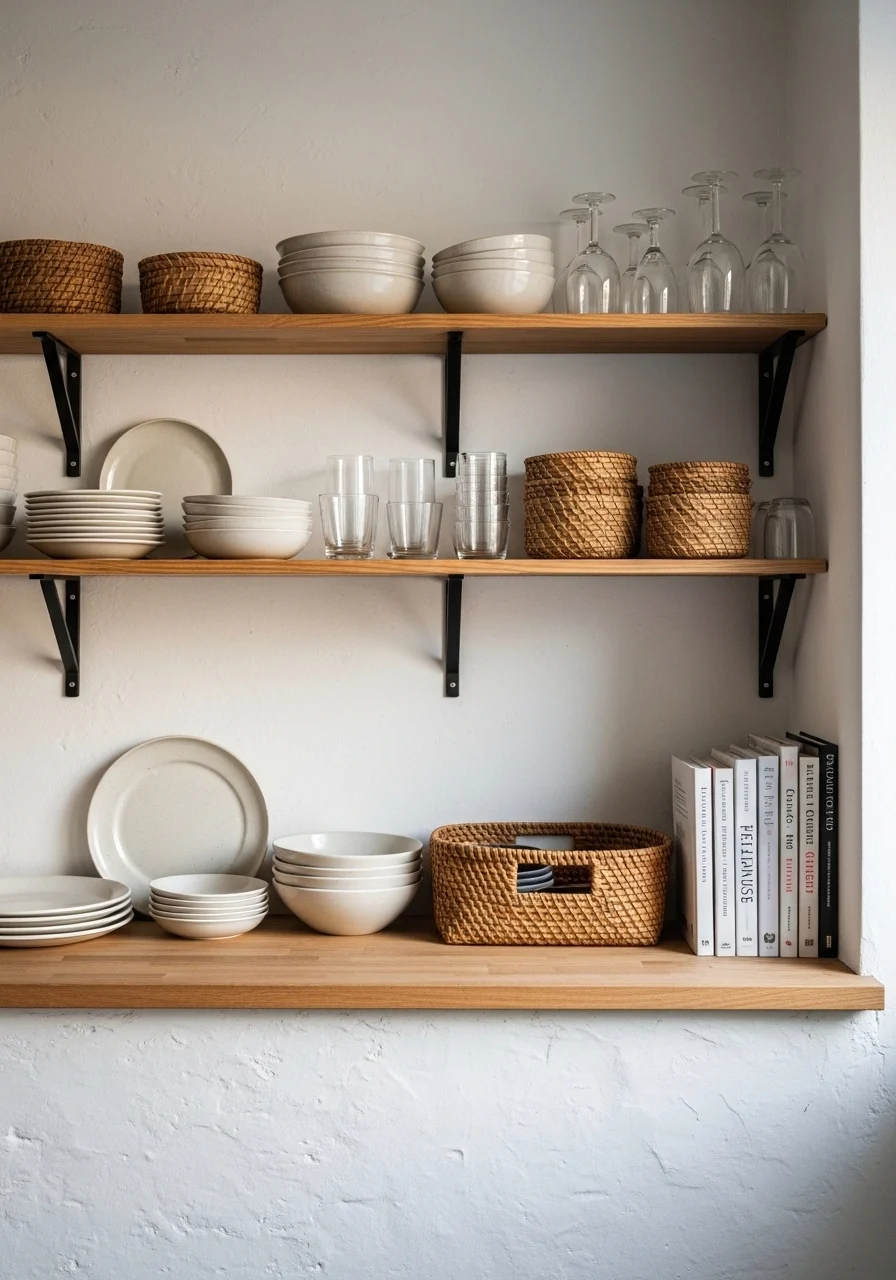
Open shelving makes the kitchen feel airy and organized when done right. Minimal displays of plates and baskets keep clutter invisible while showing a curated look. This suits those who like quick access and enjoy styling. The tactile mix of ceramics and woven fibers balances stark shelves.
Key Elements
- Floating wood shelves in light oak or walnut
- Matte black or brass brackets
- Stack of white ceramic plates and bowls
- Clear glassware grouped neatly
- Woven baskets to hide small items
- A small cluster of cookbooks
- Ceramic vessel for utensils
- Minimal decorative object (plant or jar)
- Consistent color palette (neutrals with one accent)
- Shelf liner or felt pads for plate protection
- Small hooks under shelf for mugs
How to Achieve This Look
- Choose a wall with good sightlines and measure spacing.
- Install sturdy floating shelves anchored into studs.
- Place heavy items like plates on lower shelves.
- Group similar items together for visual calm.
- Hide clutter in woven baskets on upper shelves.
- Add a small plant or ceramic object for warmth.
- Hang mugs from hooks under the shelf.
- Keep colors consistent to avoid visual noise.
- Dust shelves and rotate styling seasonally.
How to Style / Use It
Display items you use daily for ease. Keep baskets for small packets, chargers, or napkins. Swap decor seasonally — fresh herbs in spring, warm ceramics in fall. Wipe shelves weekly to prevent dust build-up.
- Appliance Garage with Roll-Up Door
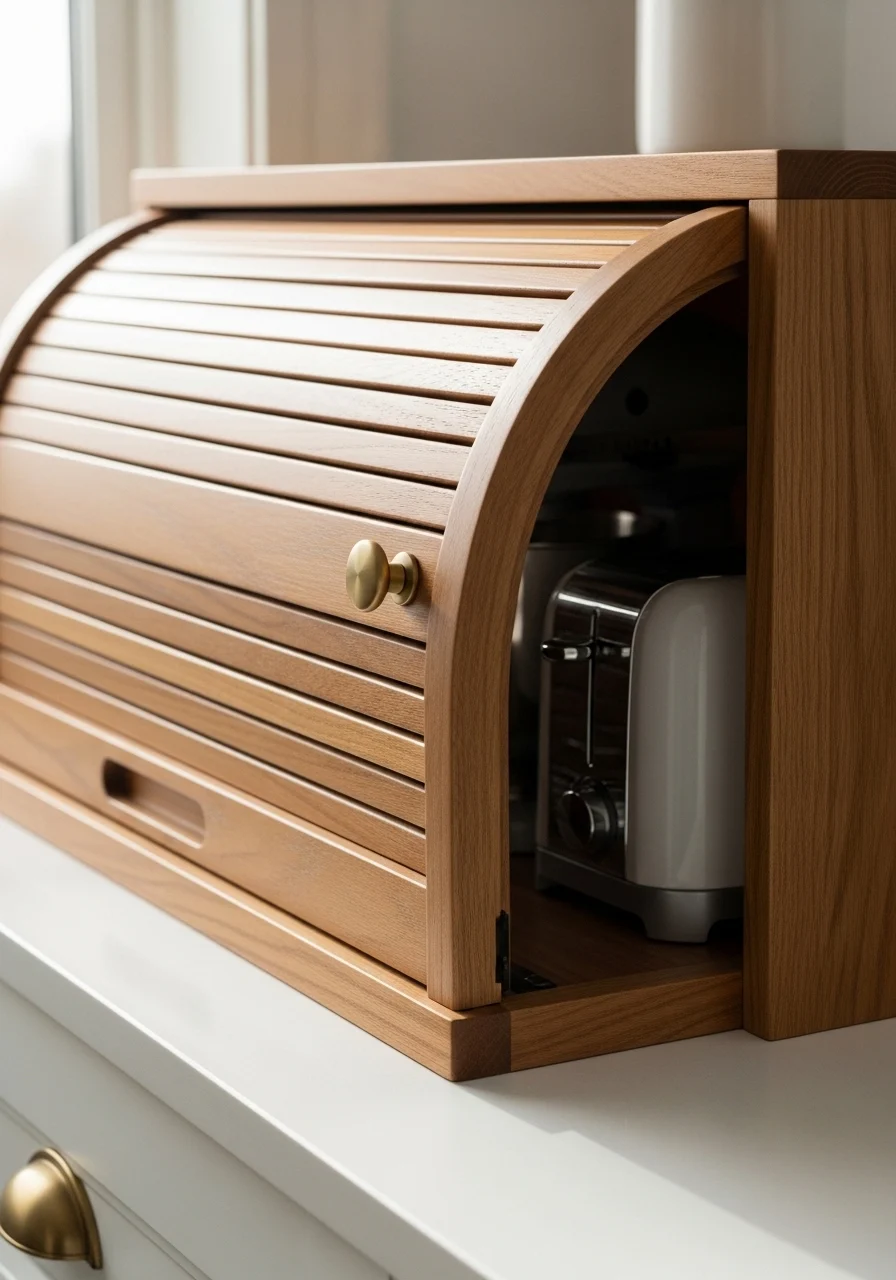
An appliance garage hides small machines while keeping them handy. The roll-up door design makes access seamless and keeps counters tidy. You’ll love this if you want a clean look without storing appliances in distant cabinets.
Key Elements
- Counter-level cabinet with roll-up slatted door
- Pull-out electrical outlet or appliance cord organizer
- Space sized for toaster, mixer, blender
- Heat-resistant surface inside
- Vent holes or small gap for airflow
- Matte brass or black hardware
- Small shelf inside for accessories
- Easy-open mechanism with smooth glide
- Cable clip or organizer for cords
- Non-slip mat on base
- Soft-close feature for the door
How to Achieve This Look
- Measure appliances to ensure fit.
- Install an appliance garage with roll-up door to specs.
- Add a pull-out outlet or install an interior outlet.
- Place a non-slip mat inside to secure appliances.
- Use small shelf or bins for attachments.
- Keep cords organized with clips or ties.
- Leave small ventilation gaps for heat dissipation.
- Test the roll-up door for smoothness.
- Store lighter appliances at the front, heavier ones at back.
How to Style / Use It
Keep the countertop free by closing the door when items aren’t used. Use the garage for items you use daily to avoid lugging them out. Clean inside regularly to catch crumbs. If you like visible design, choose a wood finish that matches your countertops.
- Drawer Tray for Cutlery + Gadgets
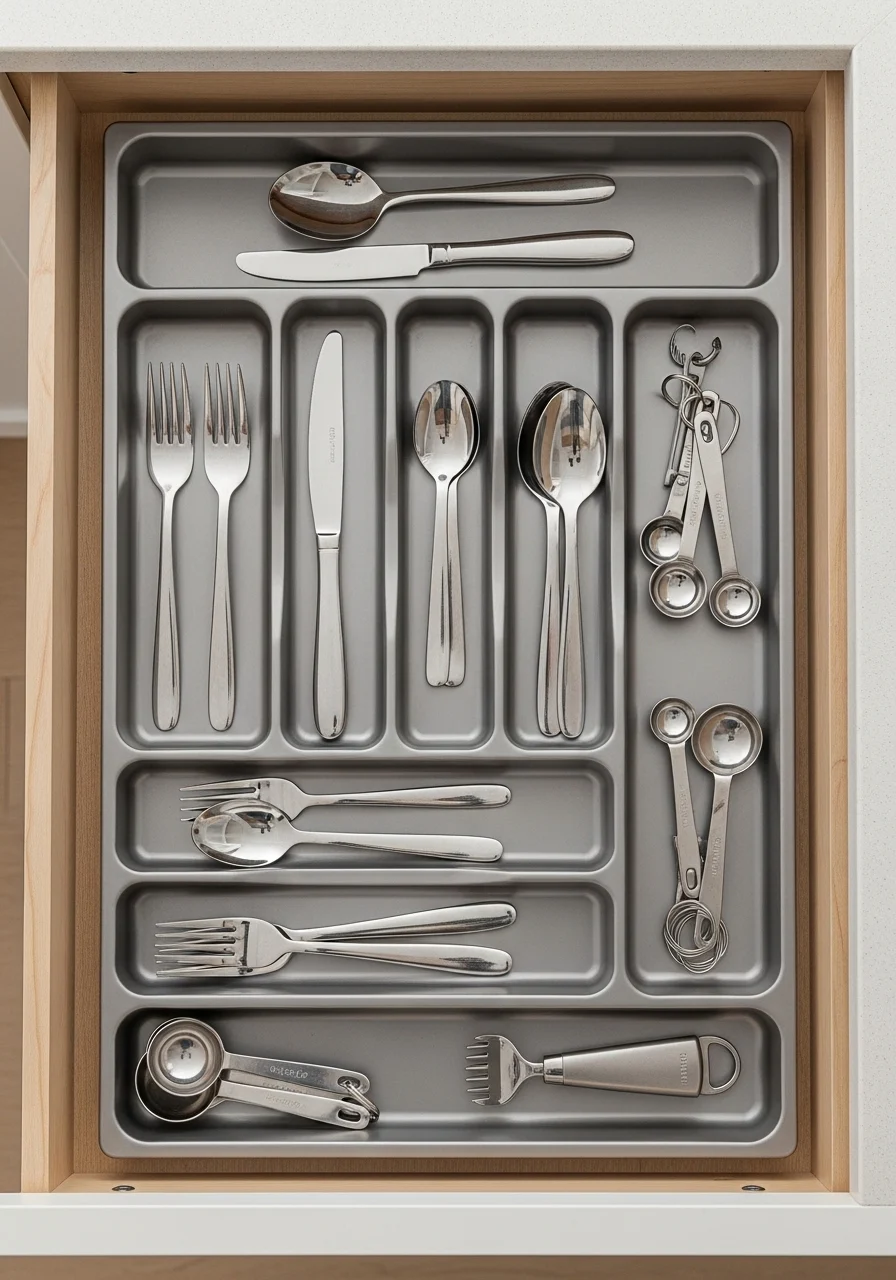
A well-organized cutlery drawer speeds meal prep. Combine tight compartments for forks with a wider slot for gadgetry. When everything has a place, cooking flows smoother. This works whether you love cooking or just want a neat daily routine.
Key Elements
- Shallow drawer with sectional tray inserts
- Bamboo utensil tray for forks, knives, spoons
- Slim slot for scissors and bottle opener
- Wider compartment for spatulas and whisks
- Small magnetic strip for metal tools (optional)
- Non-slip liners under trays
- Knife block or magnetic strip in a nearby spot
- Labels for compartments (optional)
- Matte metal or wood finishes to match cabinet
- Soft-close drawer slides
- Small coin or rubber band bin for odds
How to Achieve This Look
- Empty the drawer and wipe it clean.
- Install a tray insert sized for your drawer.
- Sort cutlery into categories and place them in sections.
- Allocate a long slot for long-handled tools.
- Add a small container for rubber bands and twist ties.
- Consider a magnetic strip for small metal gadgets.
- Use non-slip liners to prevent shifting.
- Close the drawer and test the fit.
- Reorganize after a week for small tweaks.
How to Style / Use It
Keep the sharpest knives on a separate magnetic strip. Replace the cutlery tray if utensils change over time. Wipe the drawer weekly and keep a small hand vacuum handy to catch crumbs. Rotate items seasonally if you use different tools.
- Rolling Cart for Mobile Counter Space
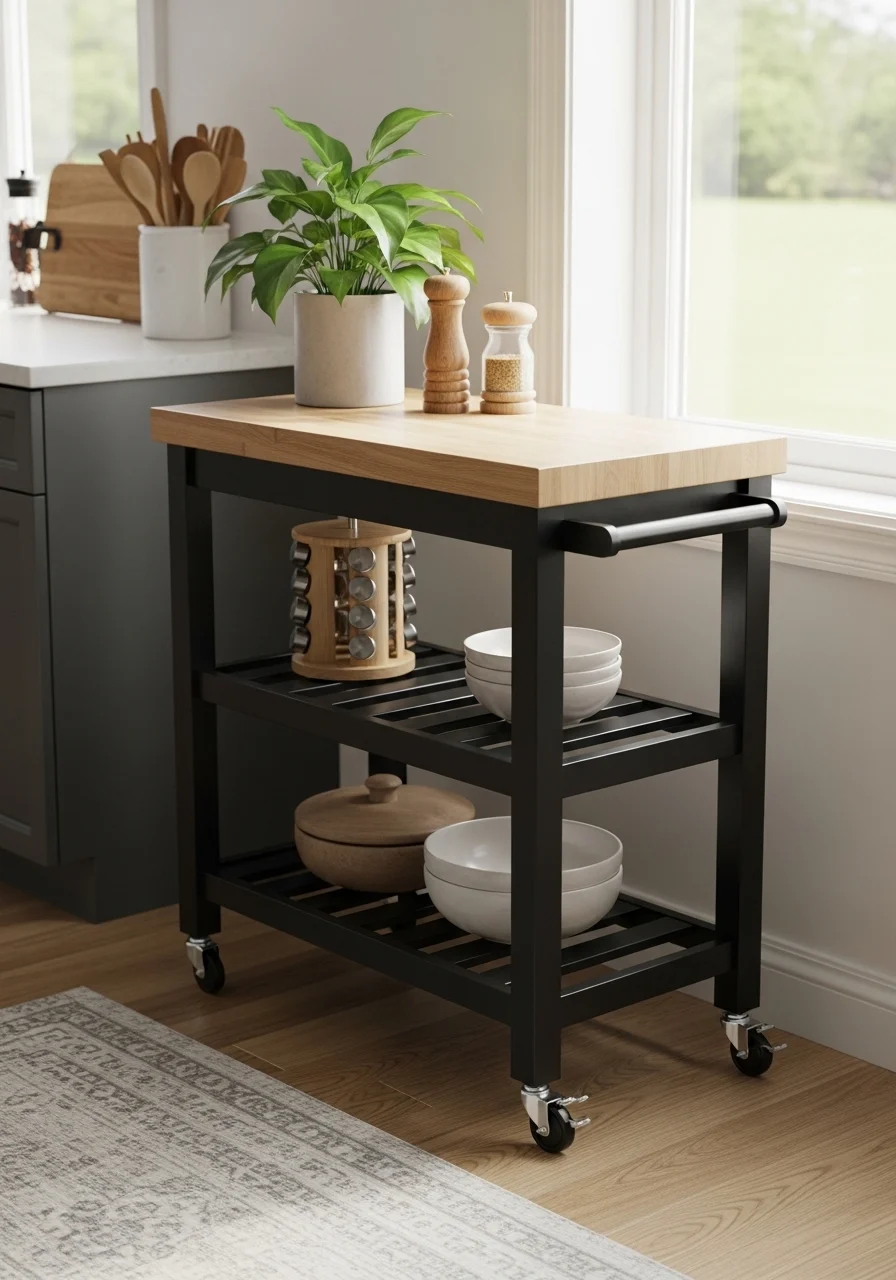
A rolling cart adds prep space and storage where you need it. Lock the wheels and use the top for chopping or staging dinner. The cart can travel to the table or storage closet when not in use. It’s ideal if you lack a permanent island.
Key Elements
- Narrow cart with butcher block top
- Locking caster wheels
- Open shelving and a single drawer
- Built-in towel bar or hooks
- Wire baskets for produce
- Small spice rack mounted to side
- Condiment caddy on top
- Matte black frame or chrome finish
- Protective finish on wood top
- Drawer liner and shelf liners
- Compact appliances can live on lower shelf
How to Achieve This Look
- Choose a cart sized for your space and needs.
- Place the cart near prep zones for convenience.
- Lock wheels when using as a fixed prep surface.
- Use top for chopping with a cutting board.
- Store frequently used items on middle shelf.
- Put heavy items like mixing bowls on lower shelf.
- Hang towels on the bar and hooks for utensils.
- Move cart out when guests arrive for extra serving space.
- Wipe down the wood top and clean wheels regularly.
How to Style / Use It
Keep seasonal tools or the tea station on the cart for flexibility. When not in use, tuck it beside the fridge or pantry. Use a small basket on top for napkins and utensils during dinner. Treat wood tops to oiling every few months.
- Over-the-Fridge Cabinet Makeover
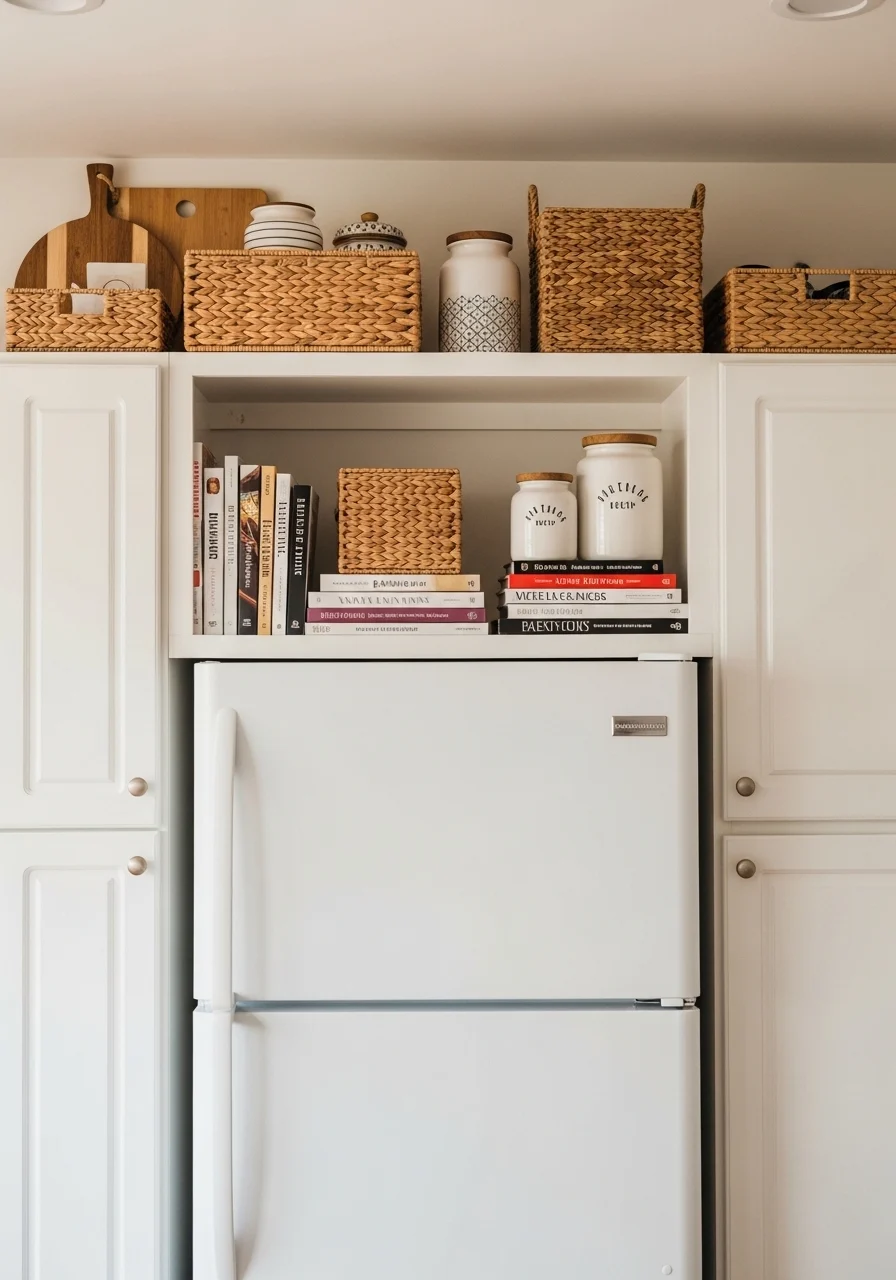
The space above the fridge is often wasted. Turn it into hidden storage with baskets and jars. It’s perfect for rarely used items like party serveware or extra paper goods. The added height gives a sense of completion in the kitchen.
Key Elements
- Shallow cabinet or open shelf above fridge
- Woven baskets for easy pull-down
- Lightweight boxes with rope handles
- Labeled jars for napkins or plasticware
- Decorative items kept minimal
- Lightweight serving trays stacked
- Non-slip shelf liner
- Step stool stored nearby
- Baskets in matching materials for cohesion
- Low-contrast labels for neatness
How to Achieve This Look
- Empty the area and measure depth and height.
- Choose baskets that fit with handles for pulling.
- Place lightweight items like napkins and party cups into baskets.
- Keep heavier items off the top shelf.
- Label baskets for quick identification.
- Store a small foldable step stool nearby.
- Adjust cabinet doors or install a lift kit if you prefer hidden storage.
- Dust and clean twice a year to avoid grime.
How to Style / Use It
Use matching baskets for a uniform look. Store seasonal serving items and rotate them as needed. Keep a small inventory list if you use the area for entertaining gear. Avoid storing perishable items up high.
- Pegboard Utensil Wall
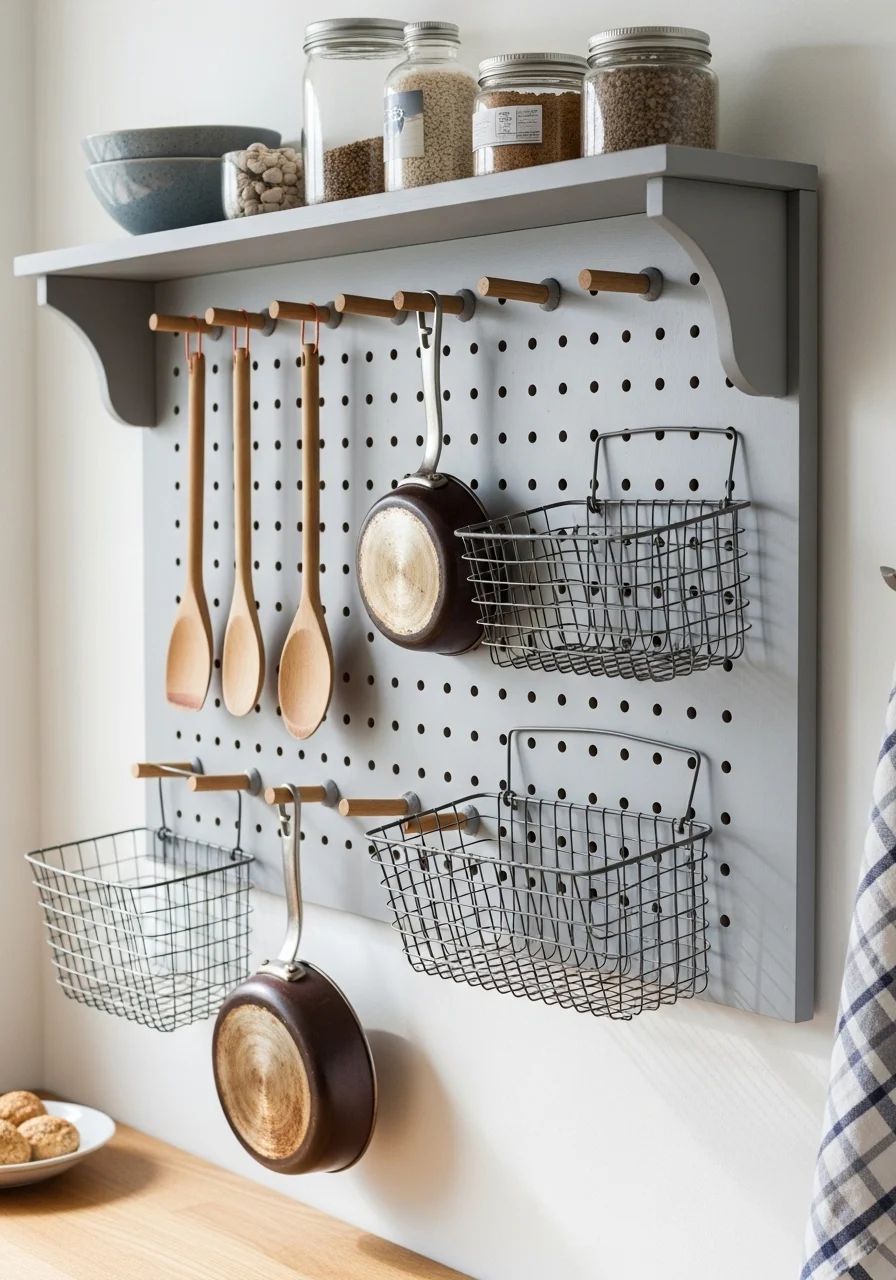
A pegboard wall is flexible and playful. Move pegs to suit different tools and keep your most-used utensils visible. It adds texture and can be styled like a gallery of tools. This works well if you love rearranging or have many oddly shaped tools.
Key Elements
- Painted wooden or metal pegboard
- Wooden pegs and hooks of various sizes
- Hanging baskets for small items
- Display of wooden spoons and spatulas
- Small hooks for measuring cups
- Mounted shelf for jars or small plants
- Neutral paint color for cohesion
- Magnetic strip for knives nearby
- Pegboard mounting hardware
- Small cloth bag for odd tools
How to Achieve This Look
- Choose a wall and measure for pegboard size.
- Install the pegboard securely with spacers for pegs.
- Start with a basic layout: shelf, hooks, basket.
- Hang wooden spoons and daily spatulas within reach.
- Add baskets for loose items and measuring cups.
- Test the spacing and move pegs as you refine.
- Keep heavier items lower for safety.
- Paint the board to match kitchen tone if desired.
How to Style / Use It
Arrange tools by frequency of use. Swap decorative objects seasonally to refresh the look. Use matching wooden pegs for a cohesive aesthetic. Wipe down the board and tools as part of your kitchen cleaning routine.
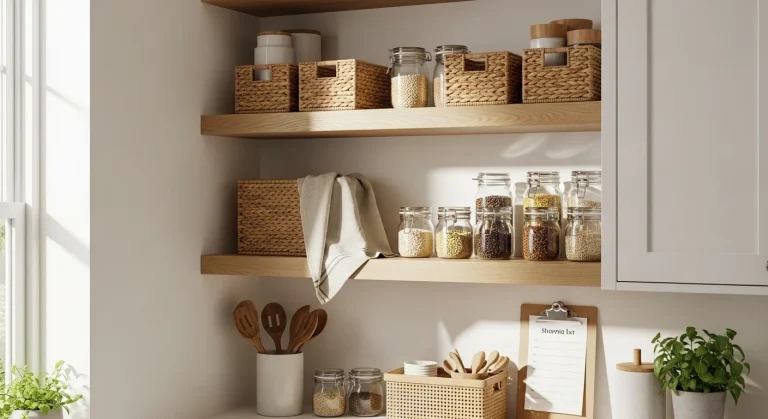
- Kitchen Organization Ideas for a Tidy Space: Label-First Pantry System
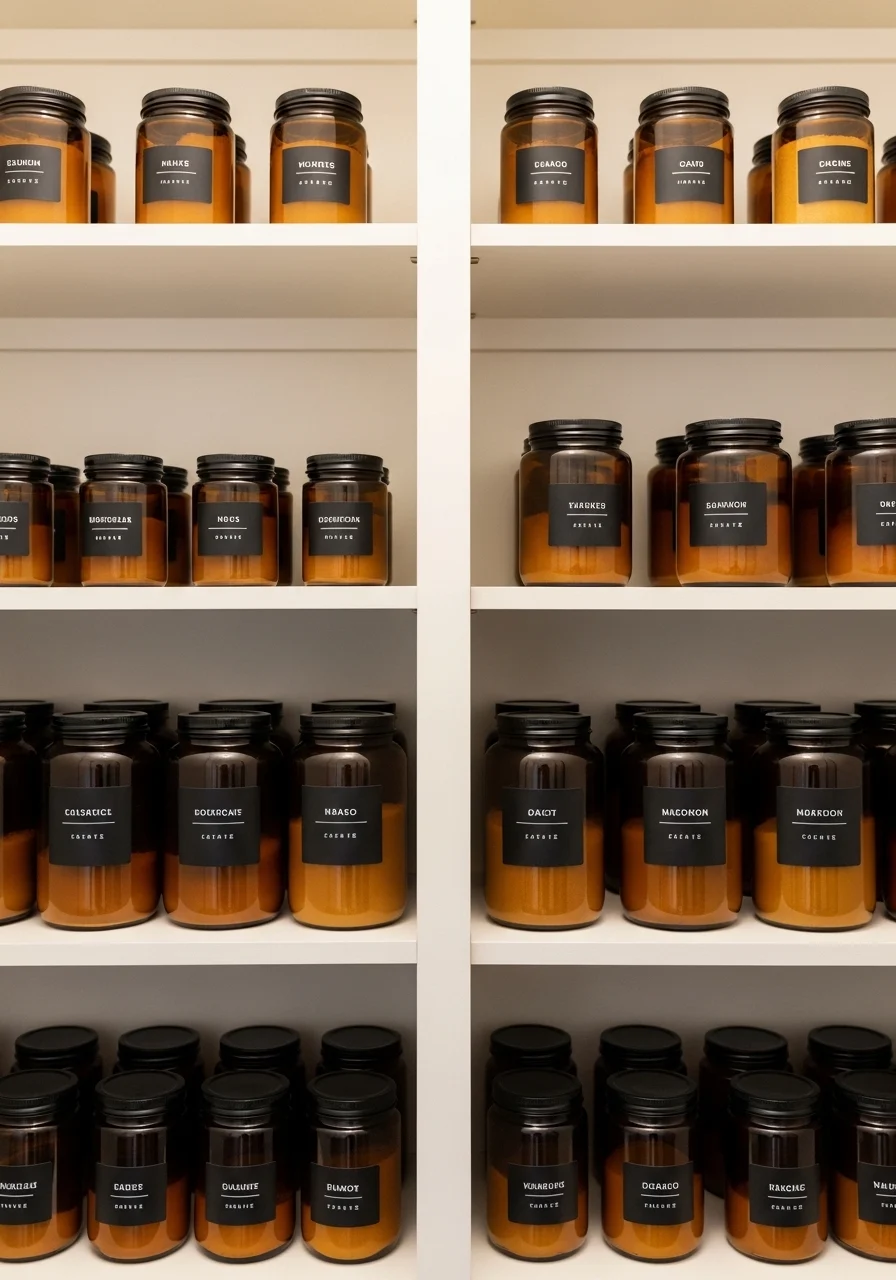
A label-first pantry system turns chaos into calm. Uniform jars and clear labels let you find ingredients in seconds. This works well for those who buy bulk or bake often. The visual rhythm of matching containers feels peaceful and intentional.
Key Elements
- Matching airtight glass jars in various sizes
- Clear black-and-white labels or printed stickers
- Wooden scoops for dry goods
- Stackable bins for packets
- Small measuring cup set stored near staples
- Tier risers for cans and boxes
- Lazy Susan for jars of frequently used items
- Dark lids or neutral wood lids for contrast
- Label maker or printable label sheets
- Shelf liners and dividers
- Inventory list taped inside pantry door
How to Achieve This Look
- Empty the pantry and wipe shelves.
- Transfer dry goods into uniform jars.
- Label each jar with name and expiration date.
- Group items by category: baking, grains, snacks.
- Use risers and lazy susans for visibility.
- Store less-used seasonings on higher shelves.
- Keep packets in stackable bins for neatness.
- Place an inventory list on the pantry door.
- Refill jars from bulk bags to keep quantities consistent.
How to Style / Use It
Keep the most-used items at eye level. Replace labels when they fade and update dates regularly. Use different lid colors to denote whole-grain or gluten-free staples. Wipe jars as you refill to maintain a fresh look.
- Pegged Drawer for Plates and Cutting Boards
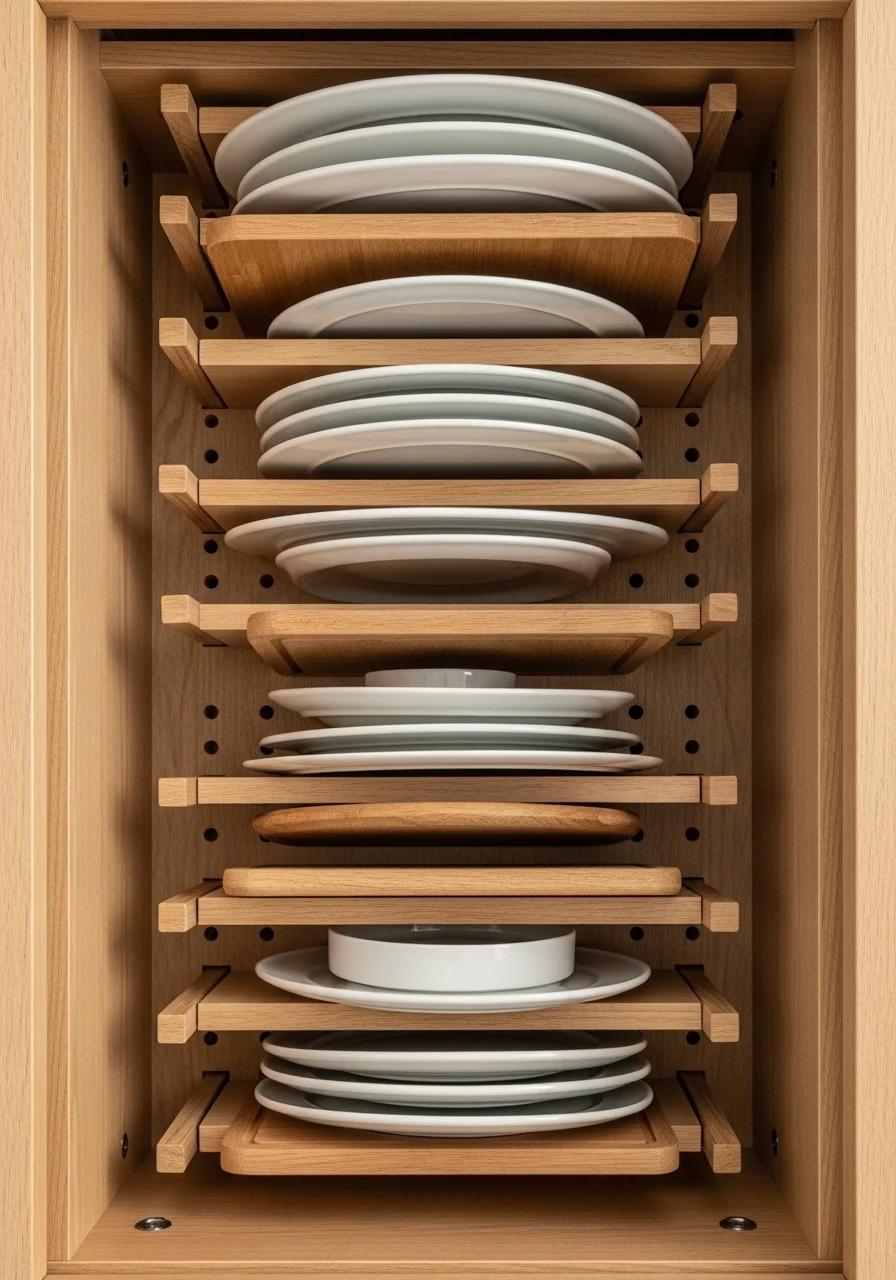
Storing plates and boards upright in a pegged drawer prevents stacking accidents and makes them easy to grab. Adjustable pegs fit a variety of sizes. This is great for households that like to set a quick table or who have fragile plates.
Key Elements
- Deep drawer with adjustable wooden pegs
- Felt-lined pegs to protect ceramics
- Variety of peg positions for different plate sizes
- Upright cutting board section
- Non-slip drawer base
- Space for chargers or serving platters
- Small felt pads between plates
- Drawer width sized to plate diameter
- Soft-closing drawer mechanism
- Labels at the edge for plate types
How to Achieve This Look
- Measure your plates and drawer depth.
- Install a pegged base or buy a peg kit.
- Place felt pads on pegs to cushion plates.
- Organize plates by size from front to back.
- Reserve a tall slot for cutting boards and platters.
- Add felt separators for delicate items.
- Test opening and closing to ensure no rubbing.
- Adjust pegs over time as your set evolves.
How to Style / Use It
Keep plates you use most near the front. Add a small dish towel in a corner for quick drying. Rotate seasonal dinnerware into this drawer as needed. Clean felt pads to remove crumbs that accumulate.
- Hidden Drawer Recycling & Compost Bin
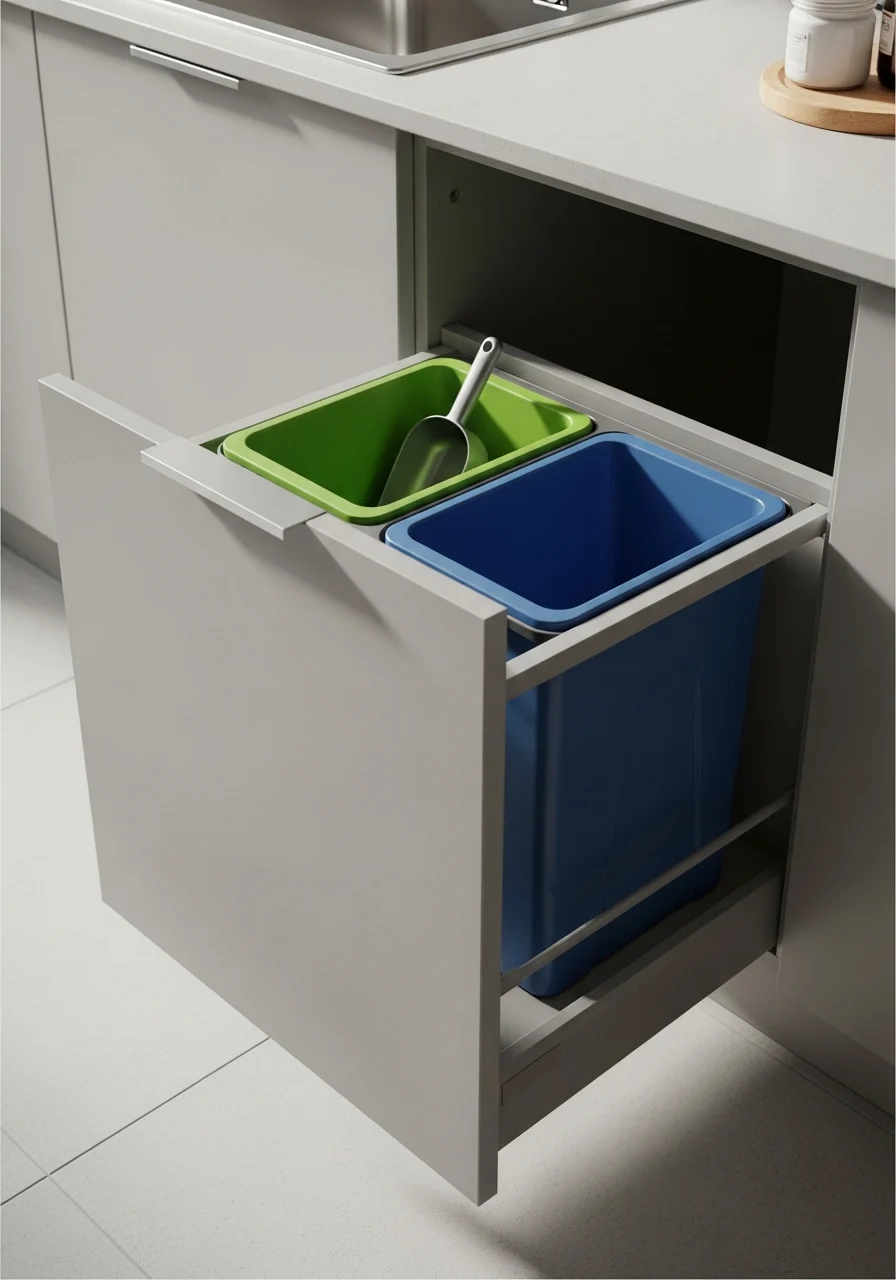
A hidden drawer for recycling and compost keeps waste out of sight and odor contained. Separate bins with lids make sorting simple. This works if you prefer a clean countertop and want quick sorting while prepping.
Key Elements
- Pull-out drawer with two or three bins
- Color-coded or labeled bins for recycling/compost/trash
- Tight-fitting lids to reduce smell
- Damp-proof liner at the base
- Small compost scoop or biodegradable bag holder
- Sliding mechanism rated for the weight
- Vent holes or charcoal filter (optional)
- Space allowance for weekly collection
- Easy-clean removable bins
- Small decal on cabinet front for quick ID
How to Achieve This Look
- Measure space under sink or in a cabinet for a pull-out system.
- Install a heavy-duty slide mechanism.
- Place bins sized to your household’s waste needs.
- Add lids to minimize odors.
- Use biodegradable liners for compost.
- Keep a small scoop and replacement bags nearby.
- Wipe down bins weekly and wash monthly.
- Replace charcoal filter if using one.
How to Style / Use It
Label bins clearly and keep lids on for odor control. Empty regularly to avoid overflow. If you collect glass separately, add a fourth slim bin or use a nearby bucket. Keep a small list of what goes where inside the cabinet door.
- Command Hanger for Oven Mitts and Aprons
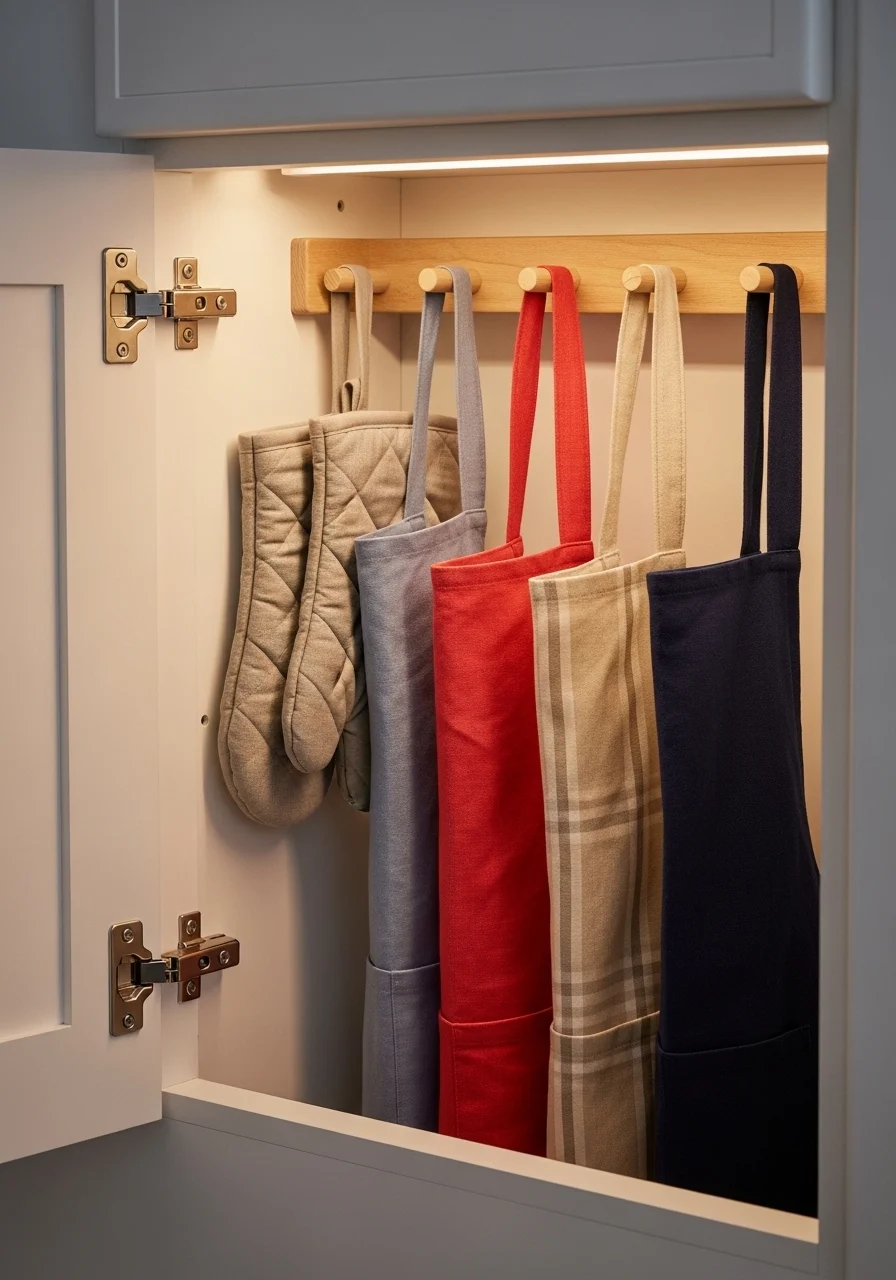
A hanger inside a cabinet door stores oven mitts, aprons, and small towels out of sight. It frees up hooks and keeps soft textiles clean. This solution is simple and low-cost, but it makes a big difference when you open cabinet doors to grab pans.
Key Elements
- Inch-thick wooden peg rail or multi-hook strip
- Oven mitts and aprons with hanging loops
- Small towel hooks for dishcloths
- Command-style removable hooks or screws if permanent
- Soft cotton or linen aprons to reduce bulk
- Small shelf above for gloves or baking sheets
- Neutral-colored textiles for a cohesive look
- Adhesive hook backing for rental-friendly install
How to Achieve This Look
- Clean the inside of the cabinet door.
- Choose hooks or a peg rail sized to your door.
- Install with screws or adhesive hooks per lid weight.
- Hang mitts and aprons by their loops.
- Place towels on lower hooks for easy reach.
- Use a small shelf above the rail for gloves.
- Test cabinet closure to avoid catching textiles.
How to Style / Use It
Keep mitts nearest to the oven for speed. Replace mitts if they get singed or stained. Use lighter textiles in summer to reduce heat retention. If renting, use removable hooks to avoid holes.
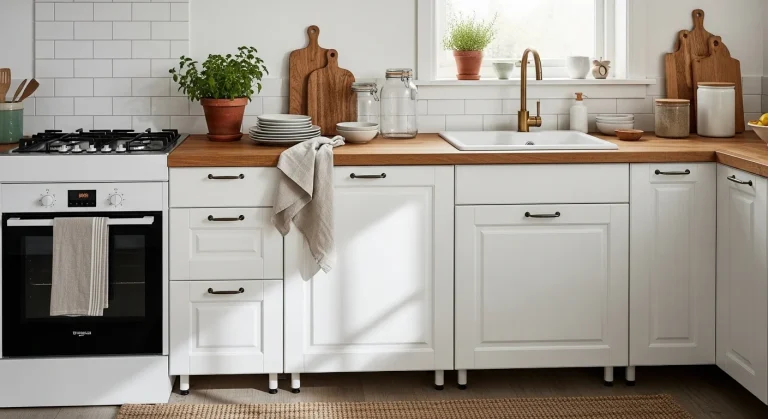
- Stovetop Back Shelf for Oils & Tools
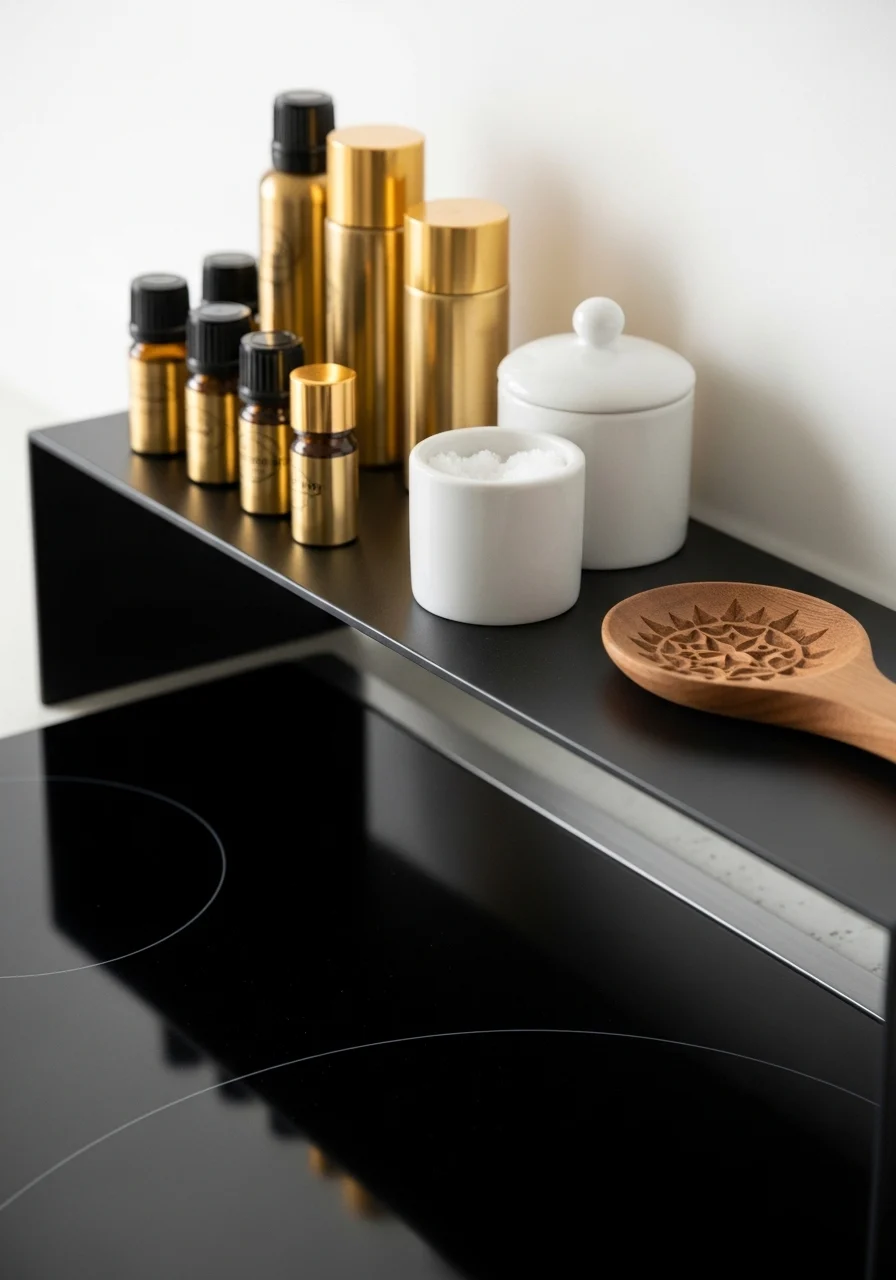
A slim shelf behind the stove organizes the oils and tools you reach for mid-cook. It creates a tidy line of frequently used items without crowding the counter. This works for both gas and electric stoves and keeps splatter zones minimal.
Key Elements
- Slim metal or wooden stovetop back shelf
- Small oil cruets and salt cellar
- Wooden spoon rest and spatula holder
- Heat-resistant materials for the shelf
- Non-slip rubber feet to protect stove
- Small tray to catch drips
- Compact utensil jar for immediate tools
- Matte finishes to hide fingerprints
- Simple, minimal palette for neat look
How to Achieve This Look
- Choose a heat-resistant shelf sized to your stove.
- Place non-slip feet to prevent sliding.
- Arrange oils, salt, and wooden spoon in a neat row.
- Keep only what you use daily to avoid clutter.
- Use a small tray to catch drips.
- Wipe the shelf after each cooking session.
- Move shelf away from open flame if needed.
How to Style / Use It
Use lightweight bottles to avoid tipping. Replace oils as they run low to avoid sticky spills. During high-heat cooking, move the shelf back slightly. Keep a small towel nearby for quick wipe-ups.
- Fridge Door Bins Reimagined
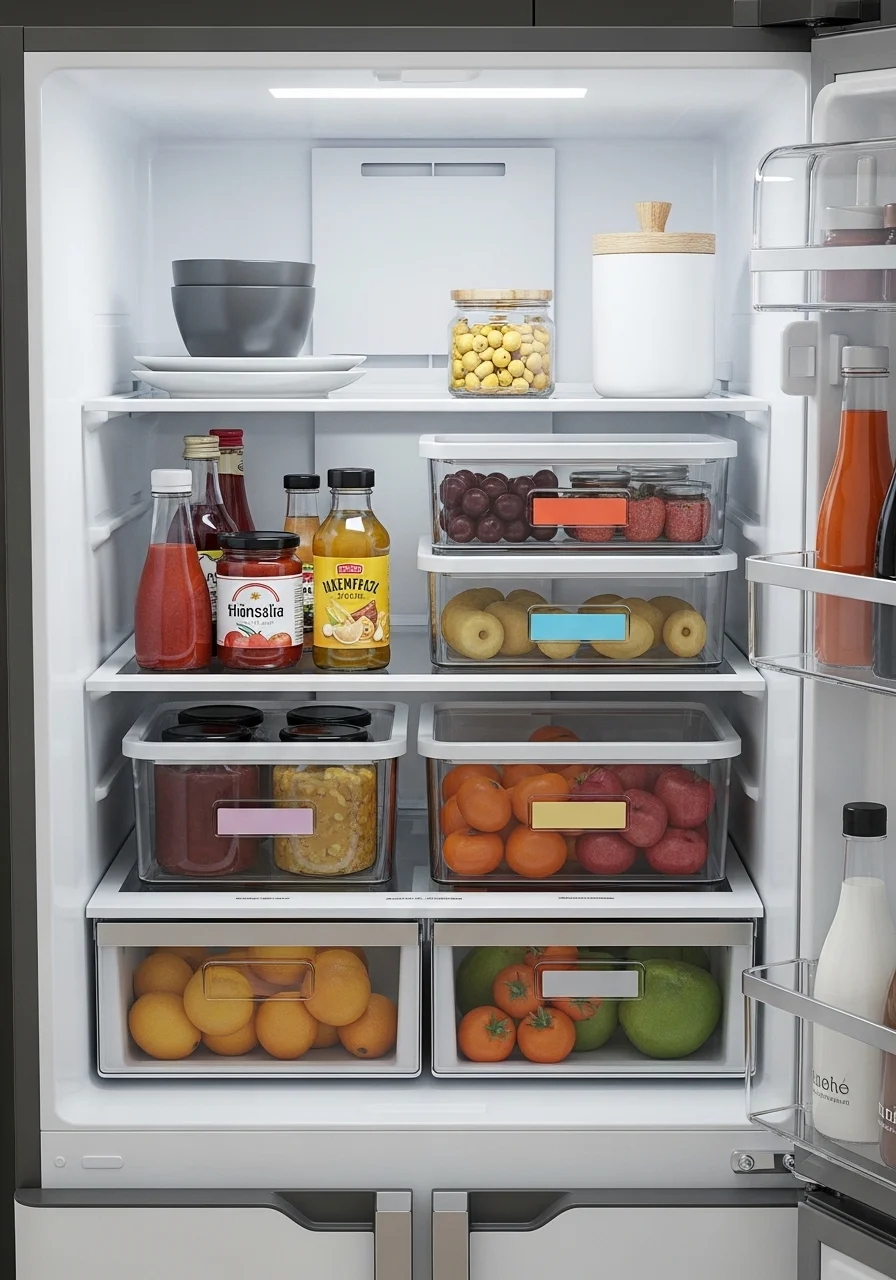
Reworking fridge door bins can solve lost condiments and sticky shelves. Use clear, removable trays to group sauces and small jars. This keeps items from toppling and speeds up midday searches. It’s helpful for busy households and kids grabbing snacks.
Key Elements
- Clear removable fridge door bins
- Small condiment bottles grouped together
- Jar rack or small divider for pickles and jams
- Label stickers for grouping
- Soft silicone liners to catch drips
- Tall bottle zone for sauces
- Small produce drawer for herbs
- Magnetic spice rack on fridge side (optional)
- Easy-grip handles on bins
- Weekly wipe-down routine
How to Achieve This Look
- Empty the fridge door and wipe clean.
- Select clear removable bins to fit the shelves.
- Group similar items: dressings, jams, sauces.
- Use a small divider for tall vs. short bottles.
- Put herbs in a small jar with a lid in the produce zone.
- Add silicone liners to catch drips.
- Refill bins in a way that keeps labels facing out.
- Wipe the bins weekly and shake out crumbs.
How to Style / Use It
Keep the most-used condiments within easy reach for kids. Store taller items at the back and short ones forward. Replace torn labels to keep it looking fresh. If you like a cleaner look, use matching bottles for frequently used sauces.
- Breakfast Nook Station
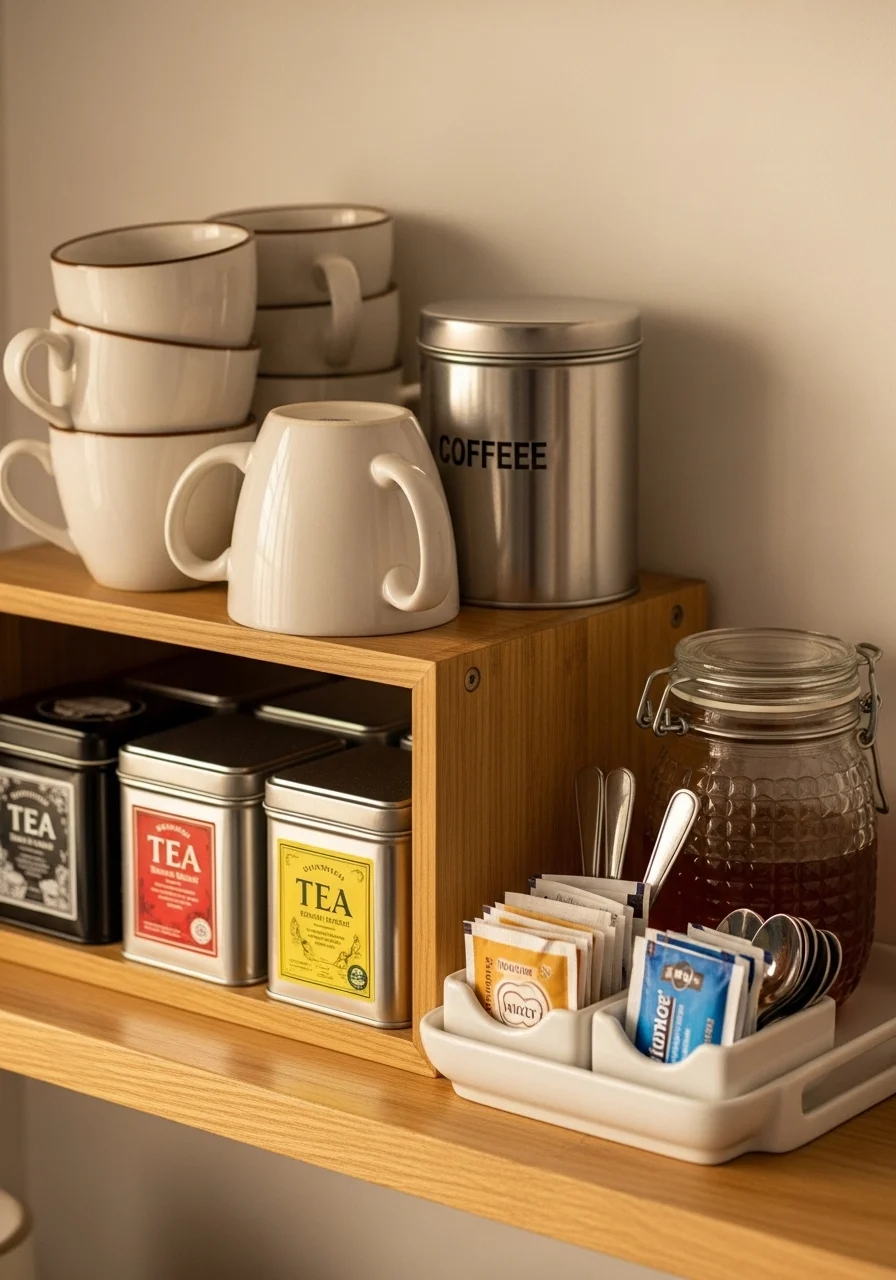
A dedicated breakfast station corrals mugs, coffee, tea, and spreads for quick mornings. It reduces counter clutter and speeds up daily routines. This is ideal for households with a morning routine or for those who want a cafe-like corner at home.
Key Elements
- Small tray or shelf for corralled items
- Air-tight coffee canister and tea tins
- Stack of mugs and small plates
- Honey jar and spoon in a mini holder
- Sugar container with small scoop
- Milk frother or tiny kettle nearby
- Small tray for spoons and napkins
- Warm wood and ceramic textures
- Small plant or decorative object for charm
- Minimal color palette like cream and warm brown
How to Achieve This Look
- Choose a small counter corner for the station.
- Place a tray to define the area and protect the countertop.
- Add coffee canister and tea tins in back.
- Stack mugs and place spoons in a small jar.
- Keep honey and sugar in accessible containers.
- Store a small kettle or frother nearby for speed.
- Wipe the tray daily and refill supplies as needed.
- Add a small plant to make the corner inviting.
How to Style / Use It
Use the tray to keep everything together during cleaning. Keep seasonal teas rotated in the front. If space is tight, use a narrow shelf above the counter. Refill coffee and sugar weekly to avoid mid-morning runs.
These 21 kitchen organization ideas for a tidy space give you practical, aesthetic ways to conquer clutter and make cooking calm. Try one small change this weekend — even a single drawer reorganized makes mornings smoother. Save or pin the ideas you love, and share this with a friend who’s renovating or loves kitchen hacks.
Which setup are you most excited to try first? Tell a friend and plan a weekend project together — it’s more fun that way.