
24 False Ceiling Design Ideas That Look Stunning
You spend time curating furniture, art, and lighting, yet the ceiling often gets overlooked. A well-planned false ceiling design gives the whole room personality and balances light, shadow, and texture.
This collection of 24 false ceiling design ideas helps you pick a style that fits your space and budget. You’ll find simple cove LED layouts, layered gypsum shapes, wooden beam looks, starry fiber-optic options, and playful kids’ ceilings. Each idea includes visual cues, a list of key elements, step-by-step execution, and styling tips.
Whether you’re renovating or planning new construction, these false ceiling design ideas will help you imagine the result and guide the build. Pin the ones you love, and try one that suits your room, mood, and lighting goals.
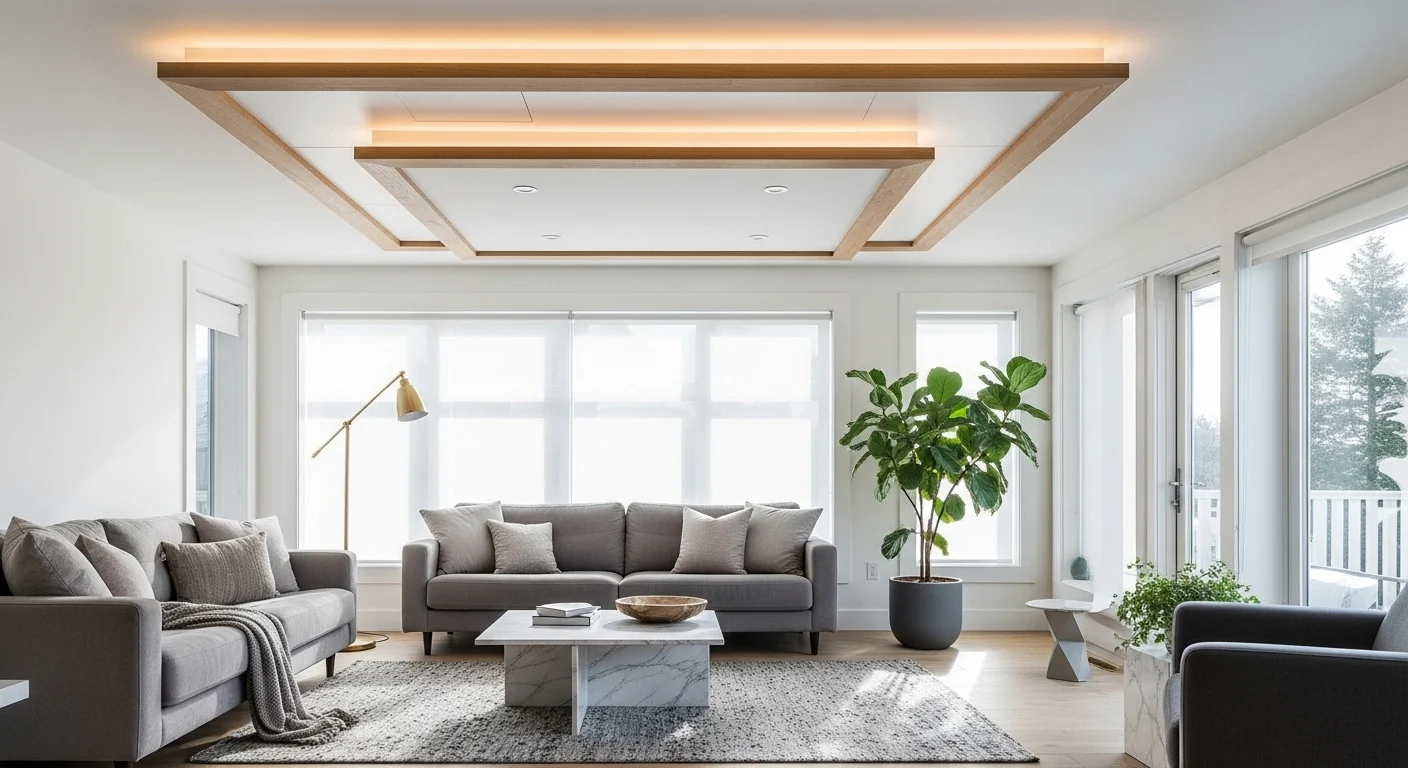
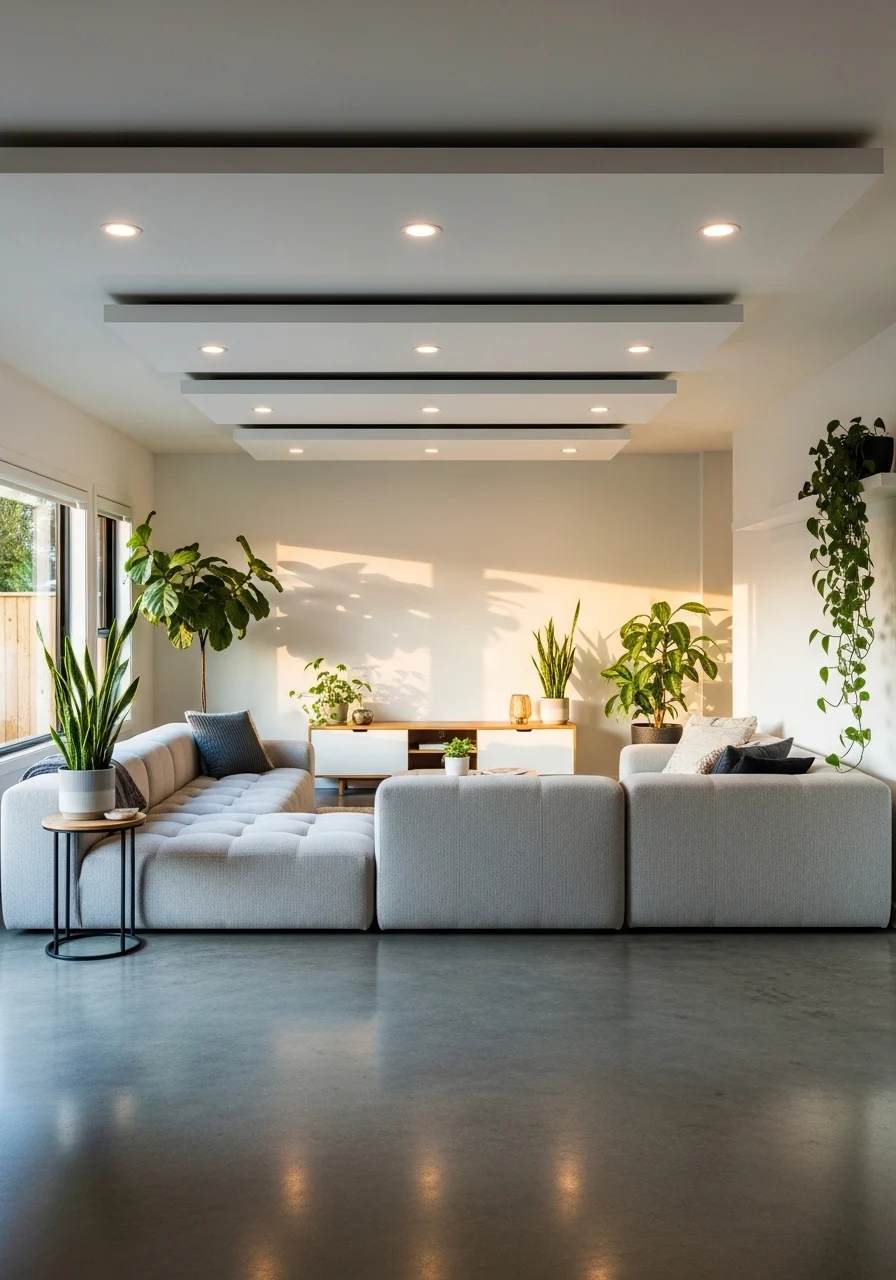
1. Minimal Cove LED False Ceiling Design
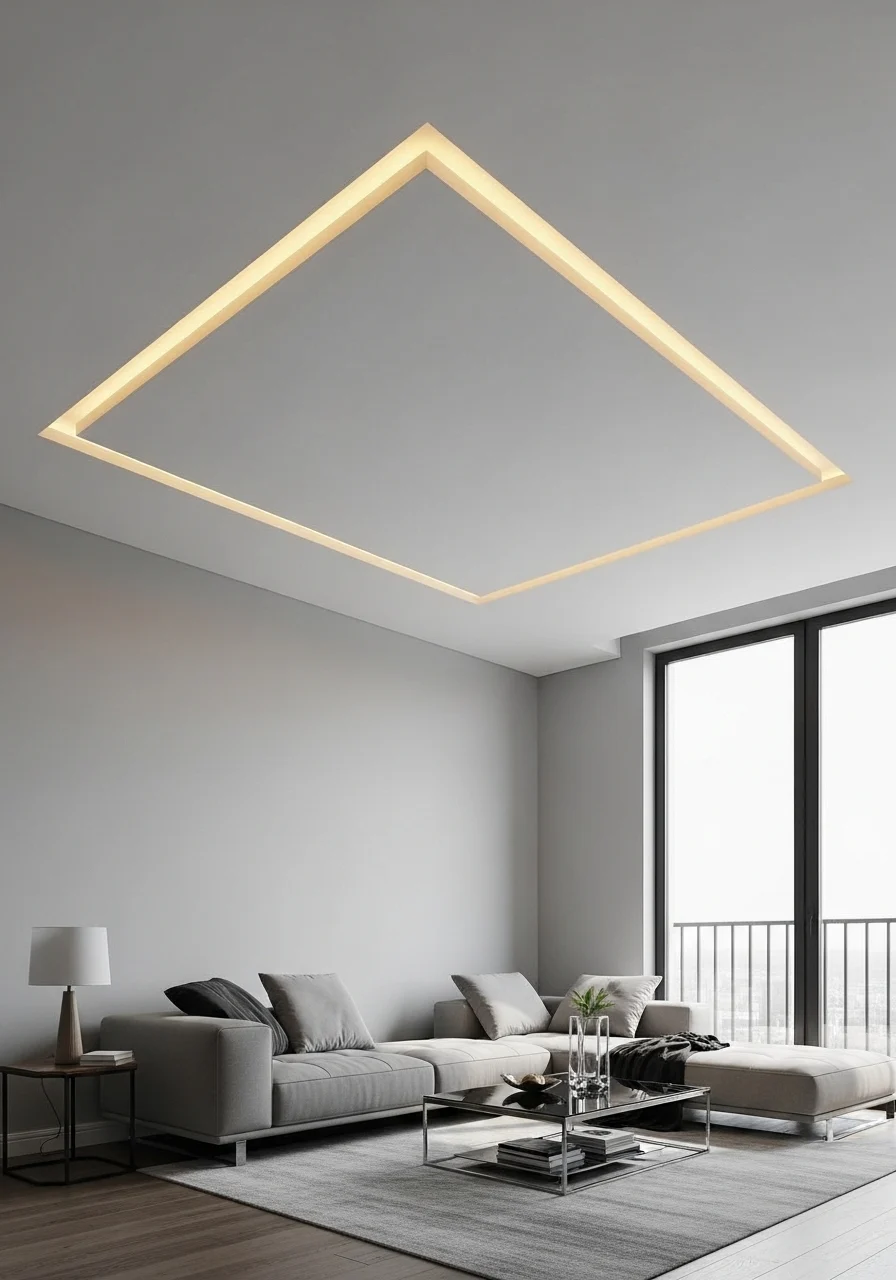
This look is all about clean lines and soft ambient light. The minimal cove false ceiling design uses a shallow recessed perimeter to hide LED strips. It feels airy and modern, perfect for living rooms and bedrooms that want soft, diffuse light without heavy fixtures. You’ll love its calm, spa-like glow and uncluttered silhouette.
Key Elements (cove lighting, gypsum false ceiling, LED strips)
- Gypsum board perimeter soffit, 80–120 mm depth
- High-CRI warm white LED strip (2700–3000K)
- Concealed aluminum channel for LEDs
- Smooth skim-coated plaster finish, matte white
- Hidden diffuser (opal polycarbonate) for even glow
- Dimmable LED driver
- Recessed downlights for task zones
- Patch-matching paint in ceiling color
How to Achieve This Look
- Mark the cove perimeter 150–200 mm from the wall line.
- Build an L-shaped gypsum soffit frame using metal channels.
- Fix gypsum boards, tape joints, and skim-coat for seamless finish.
- Install aluminum LED channel inside the recess.
- Fit warm white LED strip and connect to a dimmable driver.
- Add an opal diffuser for uniform light.
- Mount recessed downlights in the ceiling field as needed.
- Paint the ceiling matte white and test dimming levels.
How to Style / Use It
This suits minimalist interiors and Scandinavian schemes. Pair with neutral textiles, a wooden accent, and low-profile furniture. Use warmer color temperature in living spaces and cooler LEDs in study areas. Keep dust-free by wiping the cove edges occasionally and check LED drivers yearly.
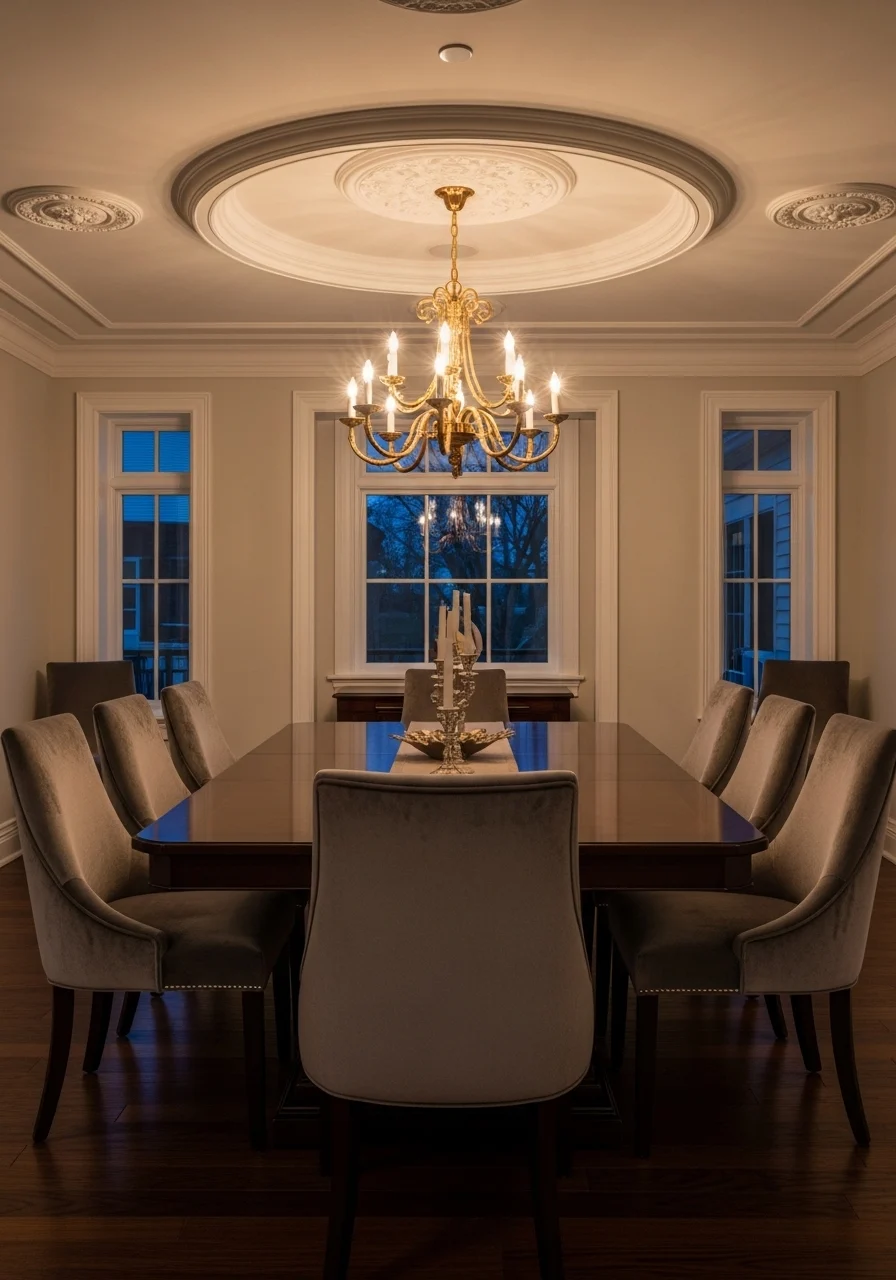
2. Gypsum Tray False Ceiling Design with Spotlights
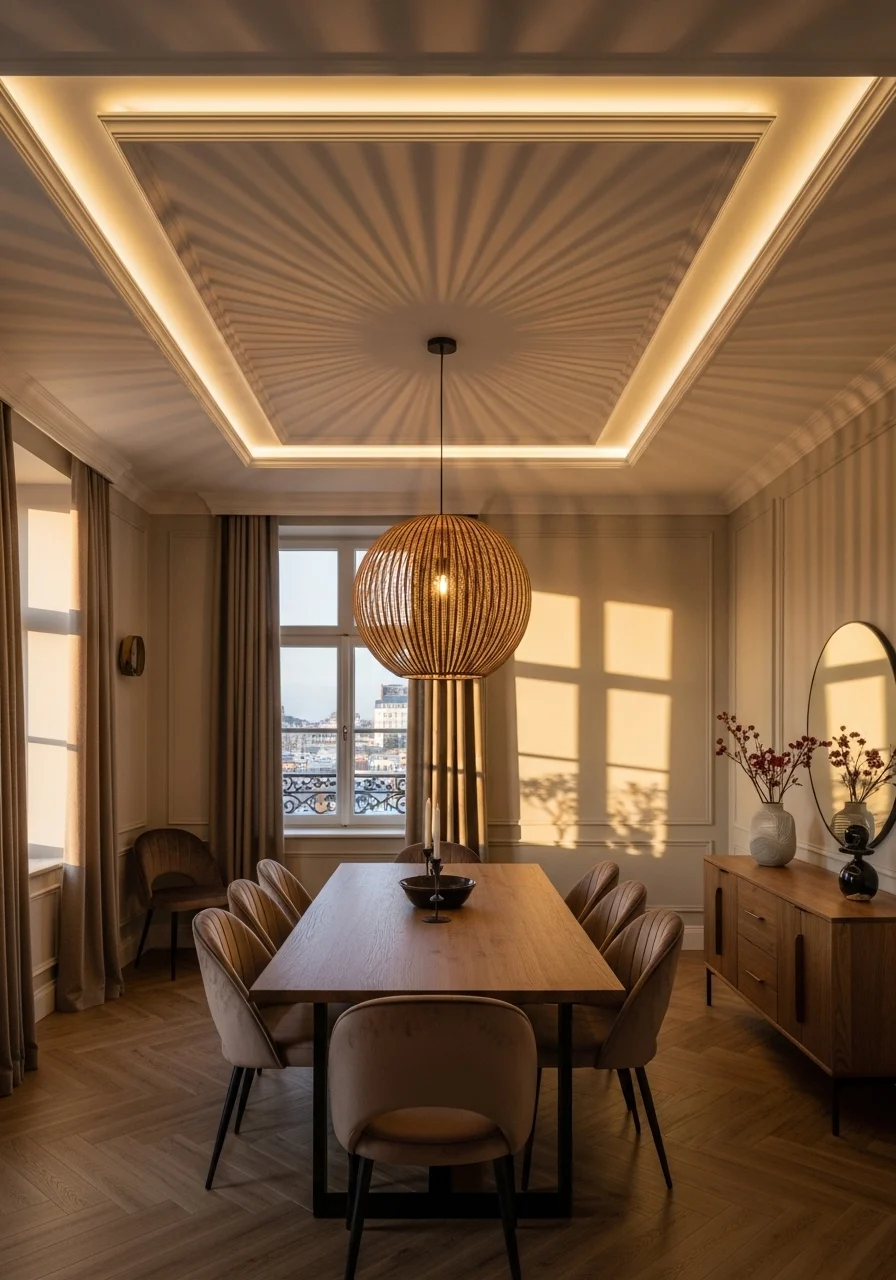
A gypsum tray false ceiling adds depth and frames a central feature, like a dining table or bed. The recessed tray creates a shadow gap that emphasizes height. Pair with directional spotlights to highlight textures or artwork. It’s a classic, refined way to make a room feel intentional.
Key Elements (tray ceiling, recessed lighting, gypsum)
- Central recessed tray framed by gypsum cassette
- Accent shadow gap 20–40 mm
- Adjustable LED spotlights (GU10 or MR16)
- Center pendant or chandelier mounting box
- Satin or matte plaster finish
- Integrated channel for wiring
- Decorative cornice optional
- Damp-proofing for kitchens if needed
How to Achieve This Look
- Measure and mark the tray area centered over the room focal point.
- Build a sturdy metal frame for the recessed tray.
- Fit gypsum boards and create a neat shadow gap.
- Run wiring for spotlights and central pendant through the frame.
- Install adjustable LED spotlights around the tray edge.
- Mount the central pendant and secure ceiling box.
- Skim and sand the gypsum for a flawless finish.
- Prime and paint; test spotlight angles and central lighting.
How to Style / Use It
Use this over dining tables, beds, or lounges to define zones. Hang a decorative pendant in the center for drama. Angle spotlights toward walls to wash artwork with light. For high-traffic areas, choose washable paints and seal edges against kitchen moisture.
3. Wooden Slat False Ceiling with Backlit Groove
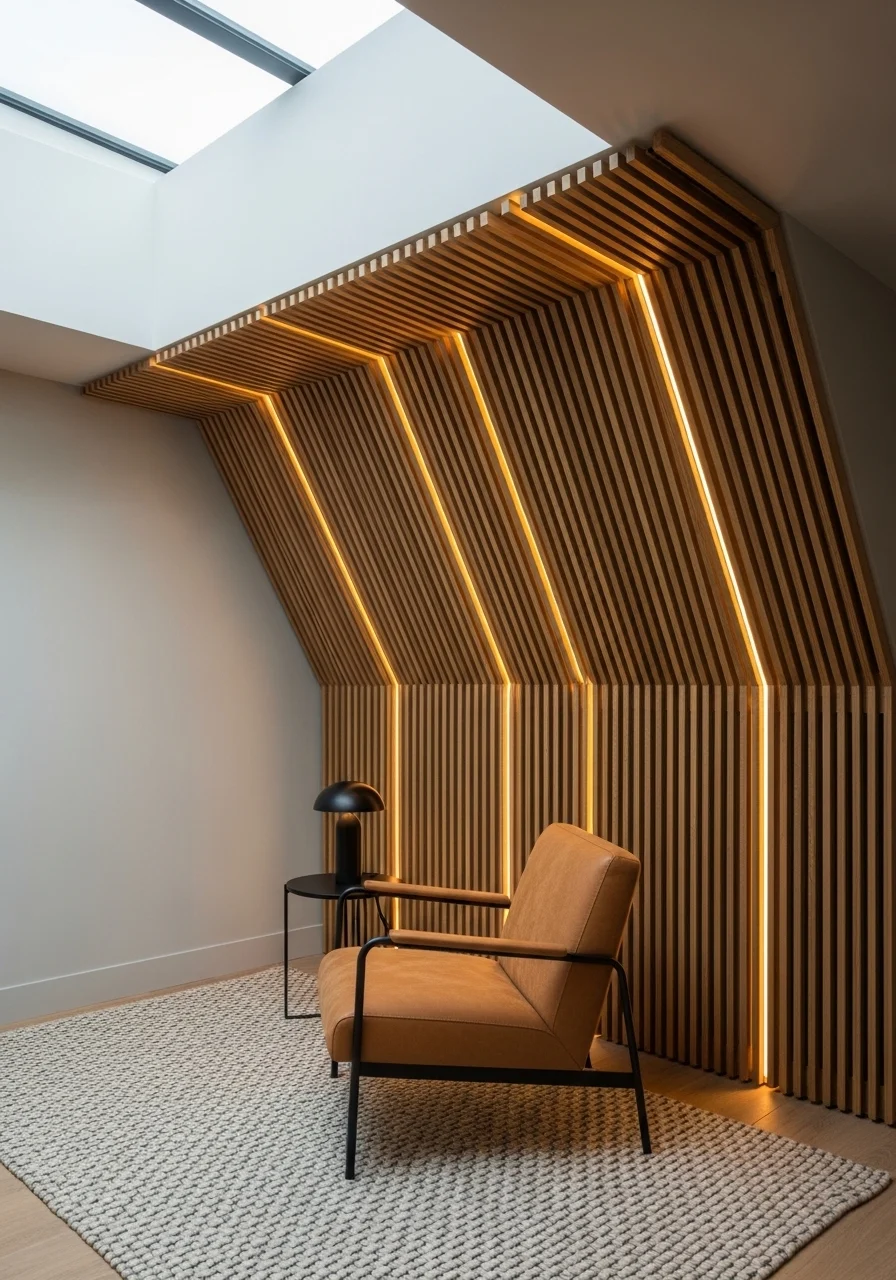
Wood slats bring warmth and rhythm to a ceiling. A wooden slat false ceiling with backlit grooves pairs natural tones with modern lighting. The rhythm of the slats draws the eye across the room, and the hidden LEDs add an inviting glow. Ideal for living rooms, home offices, and media rooms.
Key Elements (wood slat ceiling, backlighting, acoustic benefits)
- Veneered oak or walnut slats, 20–40 mm wide
- MDF backing panels for mounting
- Concealed LED strips in grooves (3000K)
- Black or dark bronze mounting channels
- Acoustic felt backing for sound dampening
- Clear matte lacquer finish
- Flush micro-bead caulking for seams
- Spot or track lighting for accents
How to Achieve This Look
- Fit a level MDF or plywood base to the ceiling.
- Apply acoustic felt to the base for sound control.
- Fix mounting channels parallel across the base.
- Lay wood slats into channels, leaving uniform gaps for LEDs.
- Install LED strips within grooves and hide wires.
- Seal gaps with micro-bead caulk and sand lightly.
- Finish wood with a matte lacquer.
- Fit additional spotlights or track lighting where needed.
How to Style / Use It
Pair with warm textiles and natural fibers for a cozy aesthetic. Use darker slats in modern spaces, lighter slats for Scandinavian looks. Regular dusting keeps grooves clean; polish wood every few years. Consider acoustic backing in home theaters or open-plan areas.
4. Floating Islands False Ceiling with Downlights
Floating islands create suspended focal points on the ceiling. Each island holds downlights and defines seating or lounging zones. The layered look is sculptural and practical, giving depth without heavy ornamentation. It’s great for open-plan living where you want visual separation.
Key Elements (floating islands, recessed downlights)
- Gypsum or plywood islands, 40–120 mm thickness
- Concealed suspension fixings or plywood boxes
- Multiple recessed LED downlights per island
- Isolated power circuits for islands
- Smooth skim coat finish
- Shadow gaps around edges
- Access panels for wiring
- Fire safety brackets if required
How to Achieve This Look
- Plan island dimensions over the seating areas.
- Install sturdy ceiling anchors or a frame for suspension.
- Construct islands off-site or on-site with gypsum or plywood.
- Run electrical wiring and recesses for downlights.
- Mount islands securely from ceiling anchors.
- Fit downlights and test wiring circuits.
- Finish edges with texture-matched paint.
- Add shadow gap trim to enhance the floating effect.
How to Style / Use It
Use islands to define kitchen islands, dining spaces, and living zones. Combine with pendant lighting for layered looks. For cleaning, dust flat surfaces and check suspension hardware annually. Build islands larger for dramatic effect, smaller for subtle zoning.
5. Coffered Gypsum False Ceiling with Painted Insets
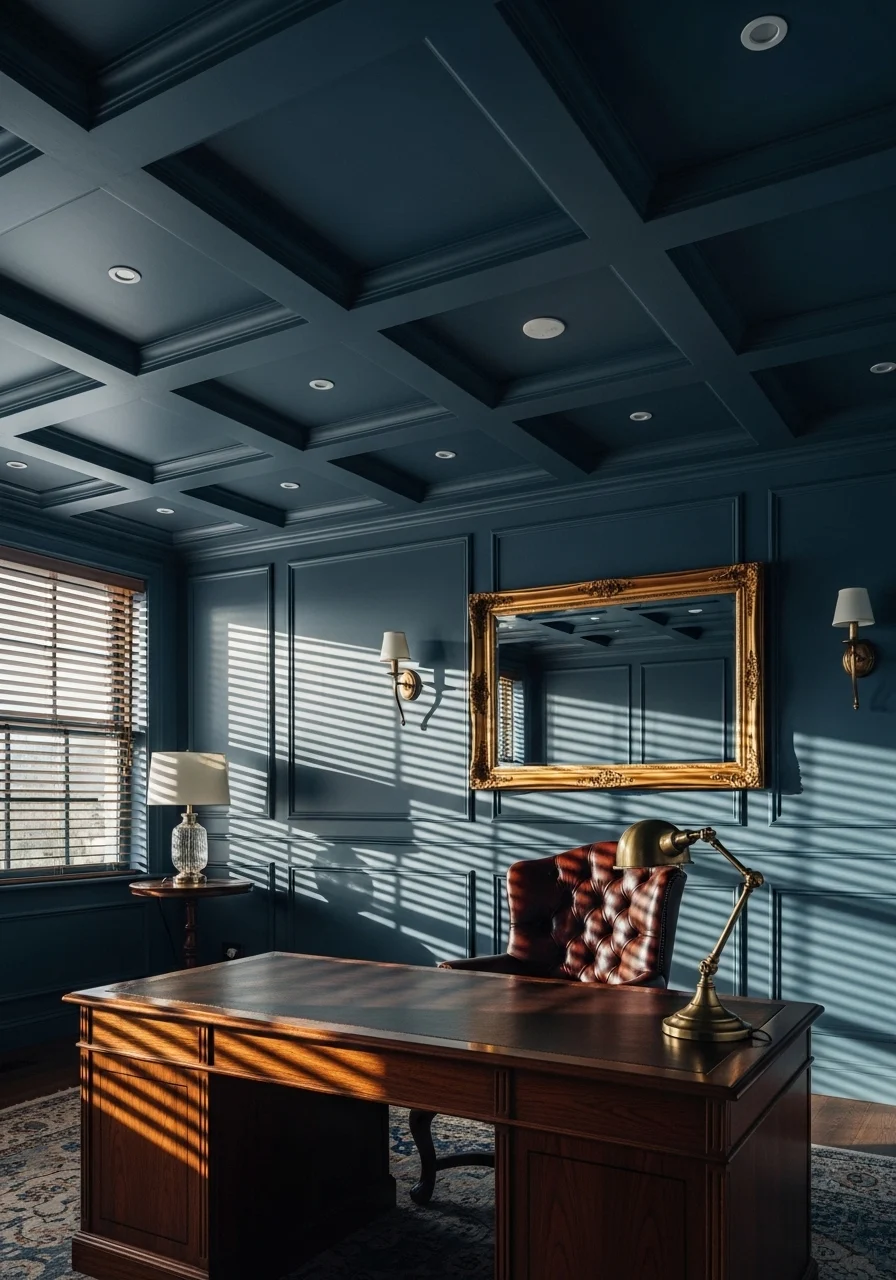
Coffered ceilings feel timeless and refined. A coffered gypsum false ceiling with painted insets adds character without heavy woodworking. The painted panels can match wall color or provide a contrasting pop. This design suits studies, dining rooms, and classic living rooms.
Key Elements (coffered ceiling, painted panels)
- Gypsum coffer grid with beams 80–150 mm wide
- Recessed square or rectangular panels
- Satin paint in accent color (e.g., deep blue)
- Cove or hidden LED in perimeter for soft light
- Decorative rosettes or center lights optional
- Smooth plaster finish on beams
- Accessible panels for maintenance
- Complementary crown moulding as desired
How to Achieve This Look
- Draw a grid layout aligned with room proportions.
- Build the beam framework from metal channels.
- Fit gypsum boards for beams and panel bases.
- Skim-coat beams and panels; sand for crisp lines.
- Prime and paint panels with the accent color.
- Install perimeter cove LED for soft uplight.
- Mount central fixtures if needed in select coffers.
- Seal and touch up edges for a clean finish.
How to Style / Use It
Paint insets to coordinate with upholstery or wallpaper. Use muted tones for subtle class, bold colors for contrast. Maintain by touching paint scuffs promptly. This design pairs well with traditional furniture and brass accents.
6. Curved Gypsum Wave False Ceiling with Ambient Lighting
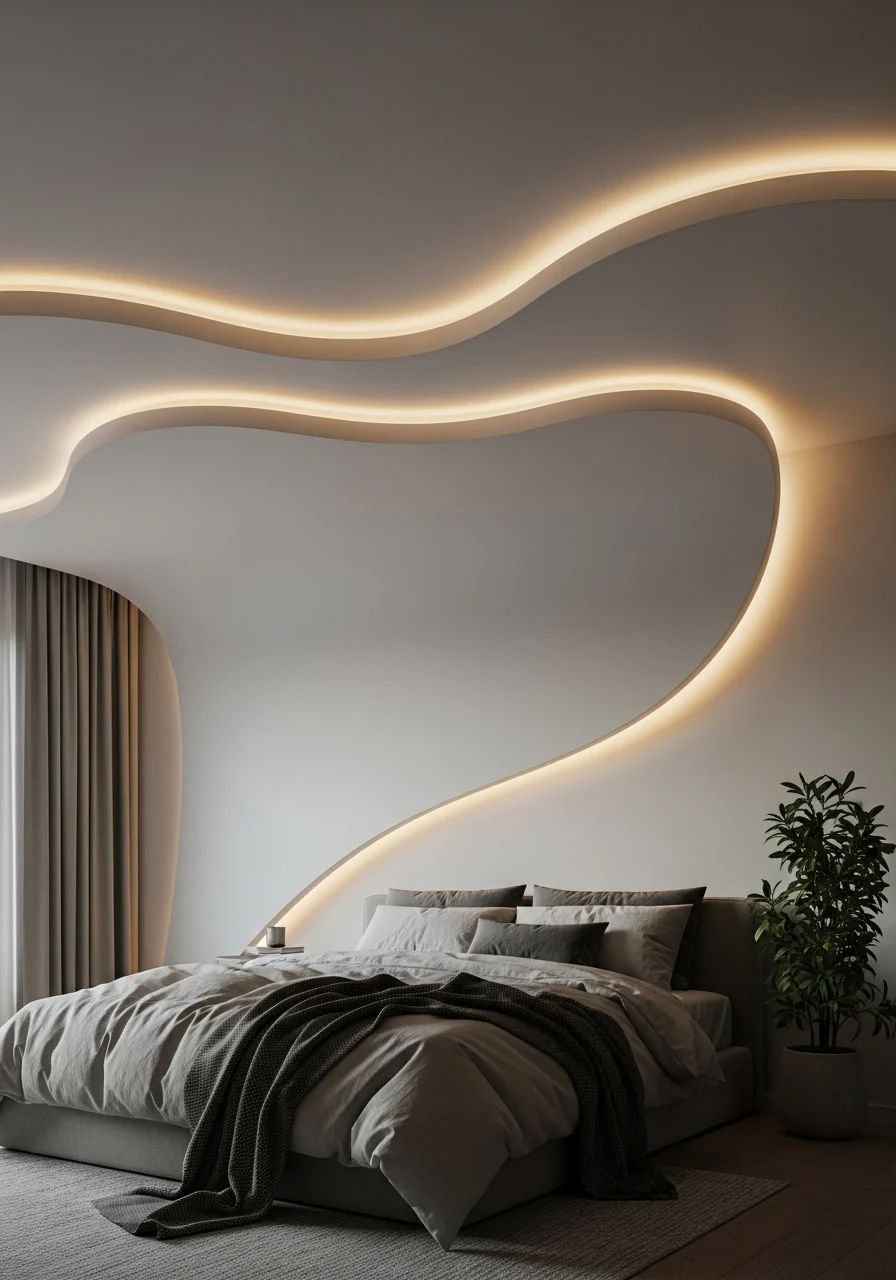
Curved wave ceilings add organic motion and a relaxed vibe. The curved gypsum form softens hard room edges. Ambient LEDs following the curve create a floating ribbon of light. It’s perfect for bedrooms, lounges, and boutique spaces seeking fluid design.
Key Elements (curved ceiling, ambient LED)
- Flexible gypsum or tapered MDF for curves
- Continuous warm LED strip integrated in curve
- Metal or plywood sub-frame shaped to curve
- Smooth joint finish and flexible compound
- Soft matte paint for seamless look
- Hidden wiring channels along curve
- Accent uplighting for drama
- Matching curved furniture or rugs
How to Achieve This Look
- Sketch the wave path and mark on ceiling.
- Construct curved metal or plywood sub-frame.
- Fix flexible gypsum boards to the frame.
- Tape joints and apply flexible joint compound.
- Install continuous LED strips along the curve.
- Finish with primer and matte paint.
- Add uplights under wave for soft shadowing.
- Test lights and refine paint edges.
How to Style / Use It
Pair with rounded furniture and soft fabrics for harmony. Use dimmable LEDs to change mood from morning to night. Clean gently with a microfiber to avoid marks on curved surfaces. Curved ceilings work well in modern and coastal interiors.
7. Wooden Beam False Ceiling Design (Rustic Modern)
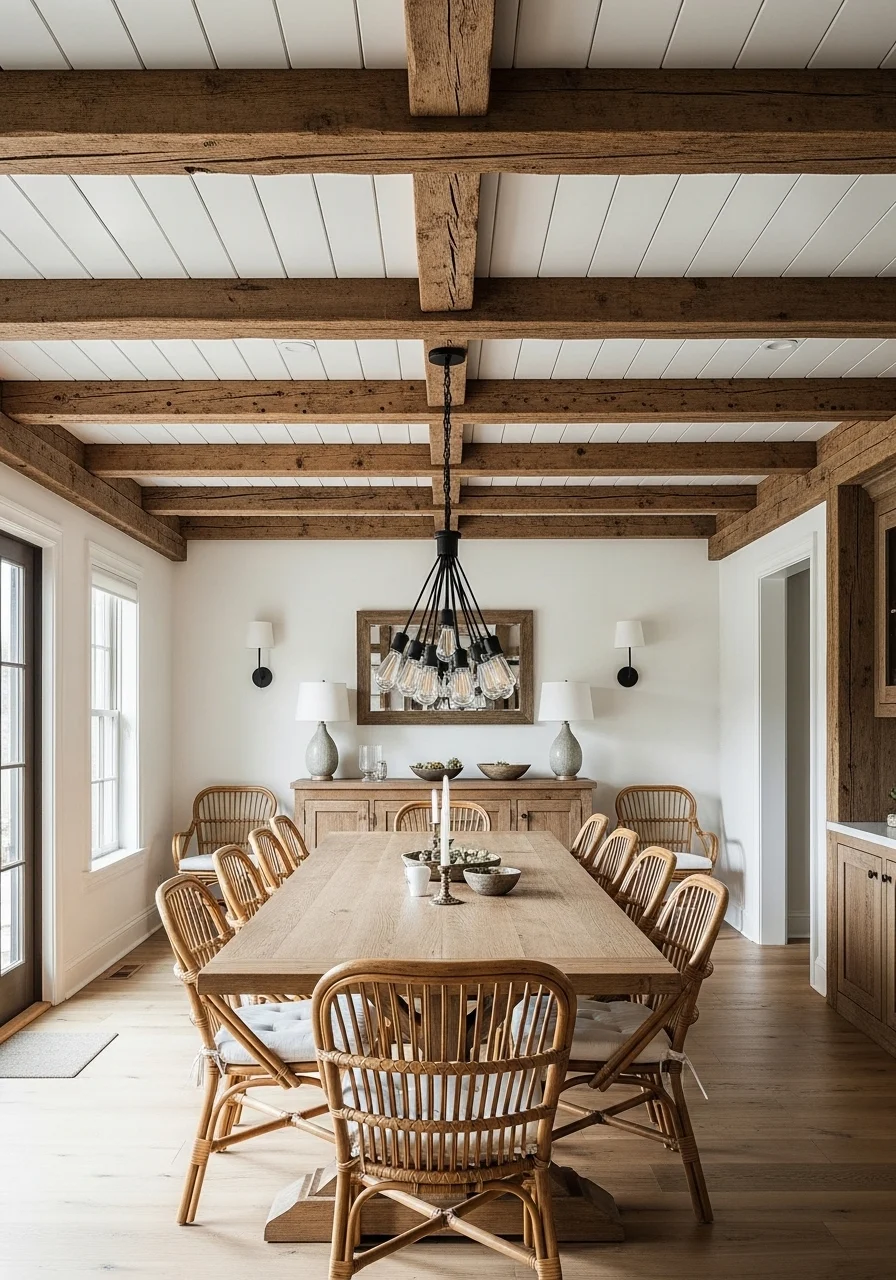
Exposed beams create a warm, rustic-modern feel. A wooden beam false ceiling design mixes reclaimed timber with painted planks for contrast. The result feels handcrafted and cozy, ideal for dining rooms, kitchens, and cottage-style living rooms.
Key Elements (wooden beams, reclaimed timber)
- Reclaimed timber or faux beam enclosures
- Painted tongue-and-groove planks between beams
- Matte natural wood finish on beams
- Exposed metal brackets for authenticity
- Pendant lighting hung between beams
- Insulation and fireproofing as needed
- Secure fixing plates and screws
- Beeswax or matte sealant finish
How to Achieve This Look
- Assess existing ceiling and install cross-beams if needed.
- Build hollow beam boxes if real structural beams aren’t used.
- Fit tongue-and-groove planks between beams.
- Secure beams or boxes to the ceiling joists.
- Add metal brackets for visual interest.
- Finish beams with beeswax or matte sealant.
- Run wiring for pendants and downlights through beams.
- Hang pendants centrally and test fittings.
How to Style / Use It
This pairs well with leather, woven textures, and warm metals. Maintain by inspecting beam fixings and resealing finish every few years. Use lighter plank colors to prevent a heavy look in low-ceiling rooms.
8. Perforated Acoustic False Ceiling with Integrated LEDs
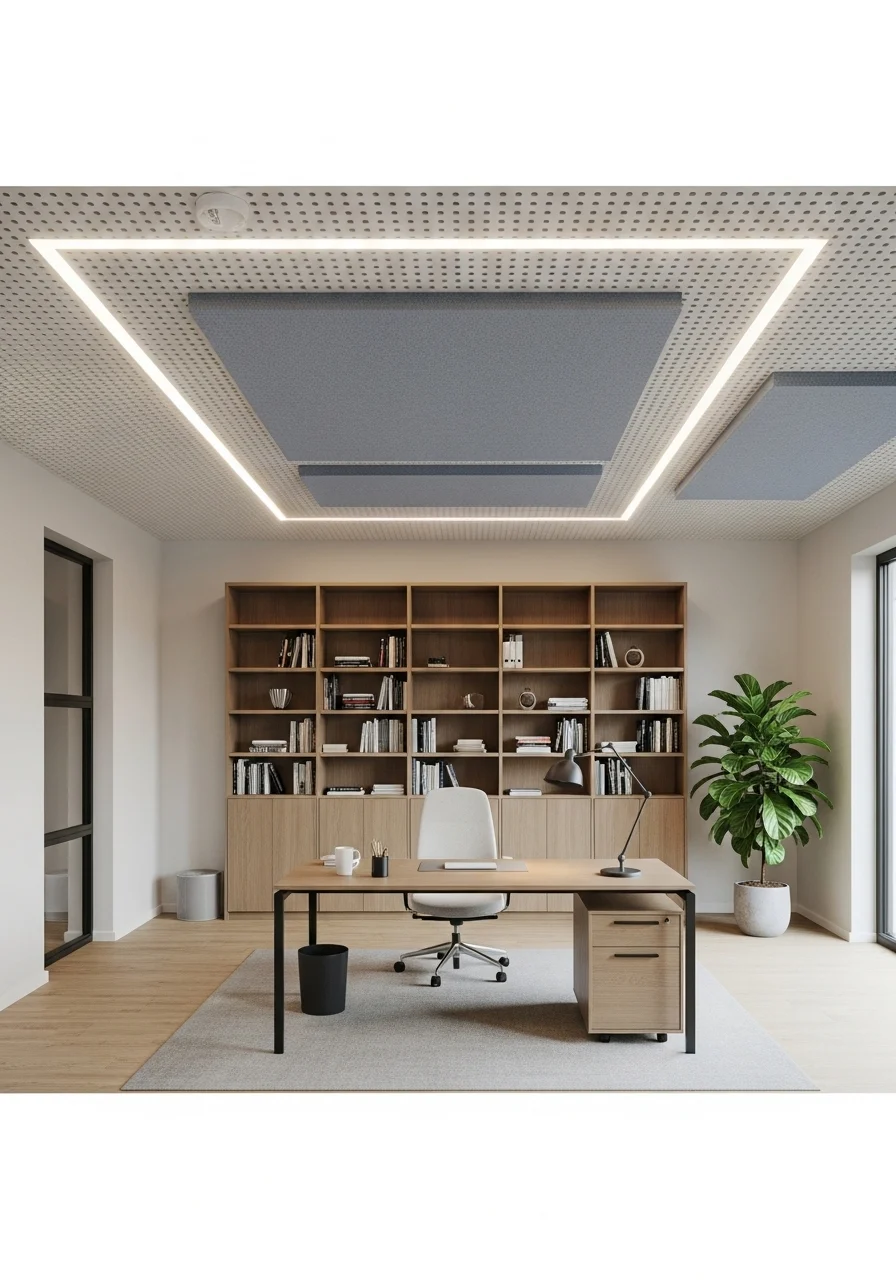
Perforated acoustic ceilings absorb sound and look modern. Integrating LEDs keeps lighting seamless. This design is practical in busy homes, open-plan spaces, or home offices where clarity matters. It balances function and style with subtle texture.
Key Elements (acoustic panels, perforated metal or gypsum)
- Perforated gypsum or metal panels with acoustic backing
- Mineral wool or felt behind panels
- Linear LED fixtures recessed into panels
- Powder-coated frames in neutral tones
- Flush-mounted diffuser on LEDs
- Fire-rated materials as required
- Accessible service panels
- Clean-edge metal trims
How to Achieve This Look
- Plan panel layout to align with grid or beams.
- Install suspension grid or slim metal frame.
- Place acoustic insulation behind panel positions.
- Fit perforated panels to grid securely.
- Run LED fixtures and connect to drivers.
- Ensure service access panels are integrated.
- Seal edge trims for a refined finish.
- Test acoustic performance and lighting uniformity.
How to Style / Use It
Ideal for home offices, gyms, and open-plan living areas. Pair with minimalist décor and ergonomic furniture. Clean perforations gently with a soft brush. Replace acoustic material if moisture or staining occurs.
9. Backlit Glass Panel False Ceiling (Frosted)
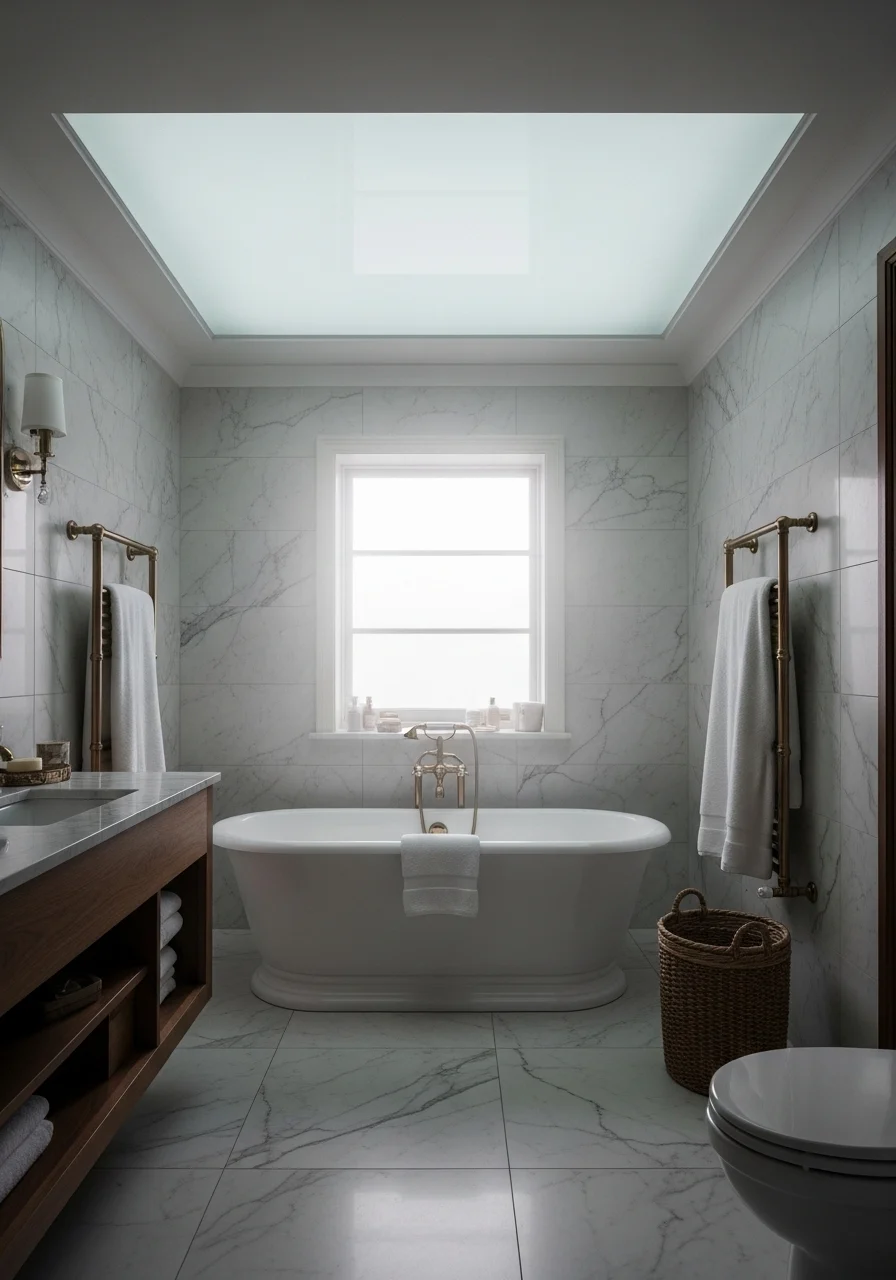
Backlit frosted glass panels create even, luminous ceilings. They spread light gently and add a contemporary, luminous plane. This works beautifully in bathrooms, hallways, and compact rooms that benefit from soft, broad illumination.
Key Elements (backlit glass ceiling, frosted finish)
- Tempered frosted glass panels (12–15 mm)
- LED panel light boxes above glass
- Metal grid for secure mounting
- Waterproof sealing for humid zones
- Diffuser film for even light spread
- Low-iron glass option for clarity
- Dimmable LED drivers
- Concealed access panels for maintenance
How to Achieve This Look
- Verify ceiling structure can support glass weight.
- Install metal grid and secure mounting clips.
- Fit LED light boxes above glass area.
- Place diffuser film or opal acrylic above LEDs.
- Lay tempered frosted glass panels into grid.
- Seal edges with silicone for moisture protection.
- Connect dimmable drivers and test lighting.
- Ensure access panels allow lamp replacement.
How to Style / Use It
Works well in bathrooms and corridors for even light. Choose warmer LEDs in living spaces and cooler in kitchens. Clean glass with non-abrasive cleaners. Check seals annually in humid rooms to prevent moisture ingress.
10. Starry Fiber-Optic Sky False Ceiling
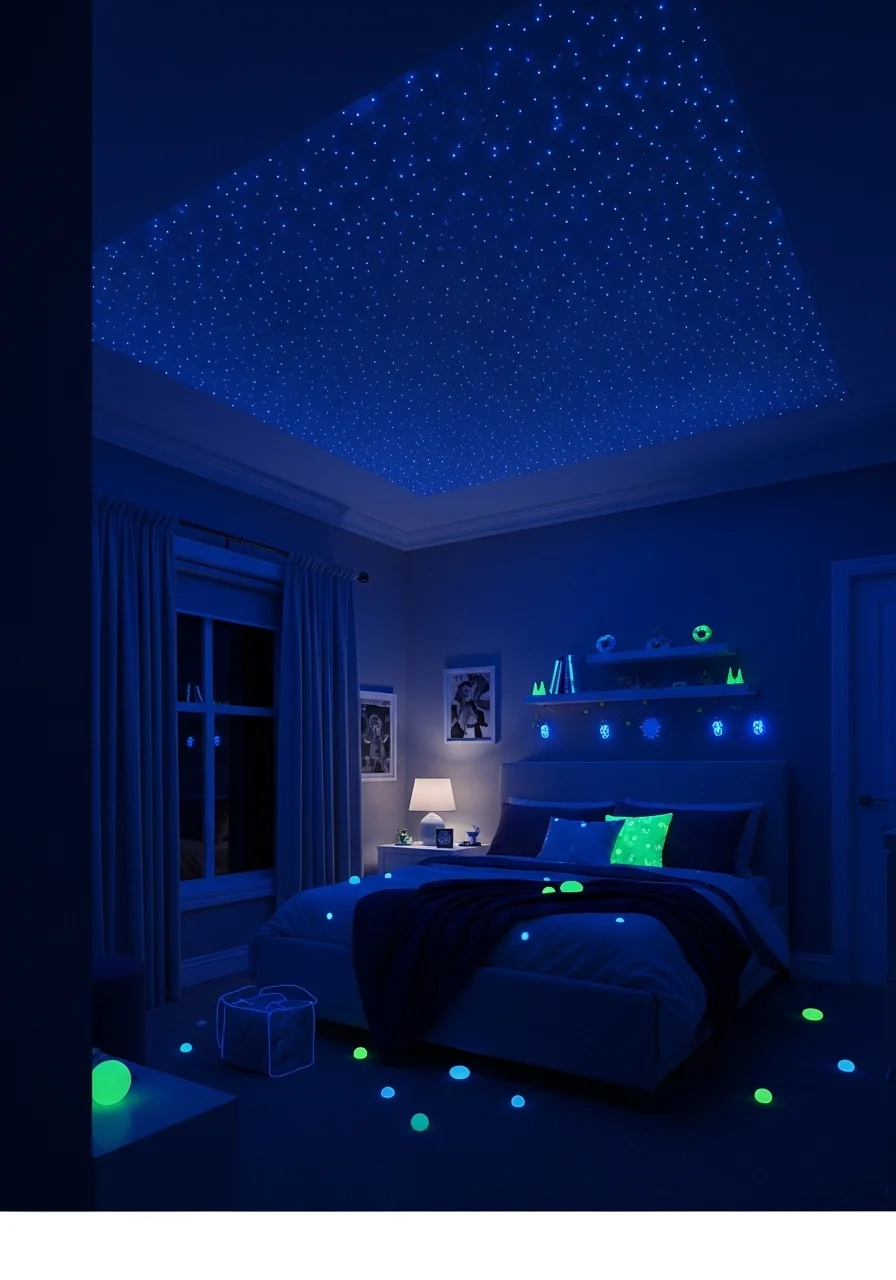
A starry fiber-optic ceiling turns a room into a night sky. Tiny pinprick lights peek through a dark painted field, creating a calming, magical effect. Ideal for bedrooms, media rooms, and nurseries where ambiance matters.
Key Elements (fiber-optic ceiling, twinkle effect)
- Fiber-optic star field kit with illuminator
- Black or deep navy matte paint base
- Randomized dot pattern with varying sizes
- Dimmable illuminator with color options
- Constellation focal points if desired
- Access hatch for illuminator box
- Secure cable routing and clips
- Optional slow-moving cloud projector
How to Achieve This Look
- Paint ceiling in deep matte black or navy.
- Plan star positions, including some clustered areas.
- Drill tiny holes and feed fibers through from above.
- Secure fibers at the back with grout or fixative.
- Group fibers into a light engine (illuminator).
- Mount illuminator in an accessible ceiling cavity.
- Test twinkle and dimming functions.
- Trim fiber ends to desired exposure and tidy edges.
How to Style / Use It
Use in bedrooms, nurseries, and home cinemas for a calming vibe. Pair with blackout curtains and soft bedding. Replace illuminator bulbs per manufacturer schedule. Turn on at night for winding-down routines.
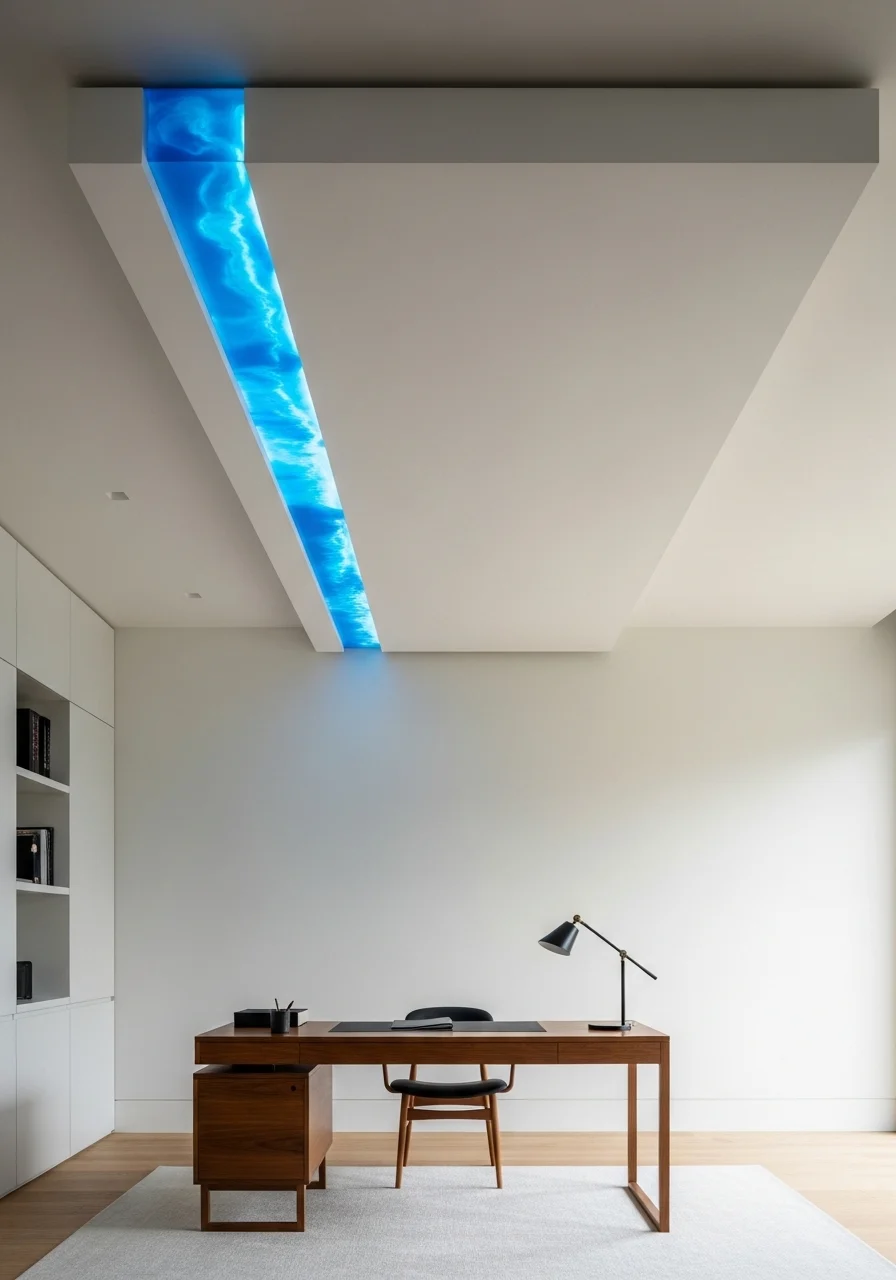
11. Skylight-Style Translucent Panel False Ceiling
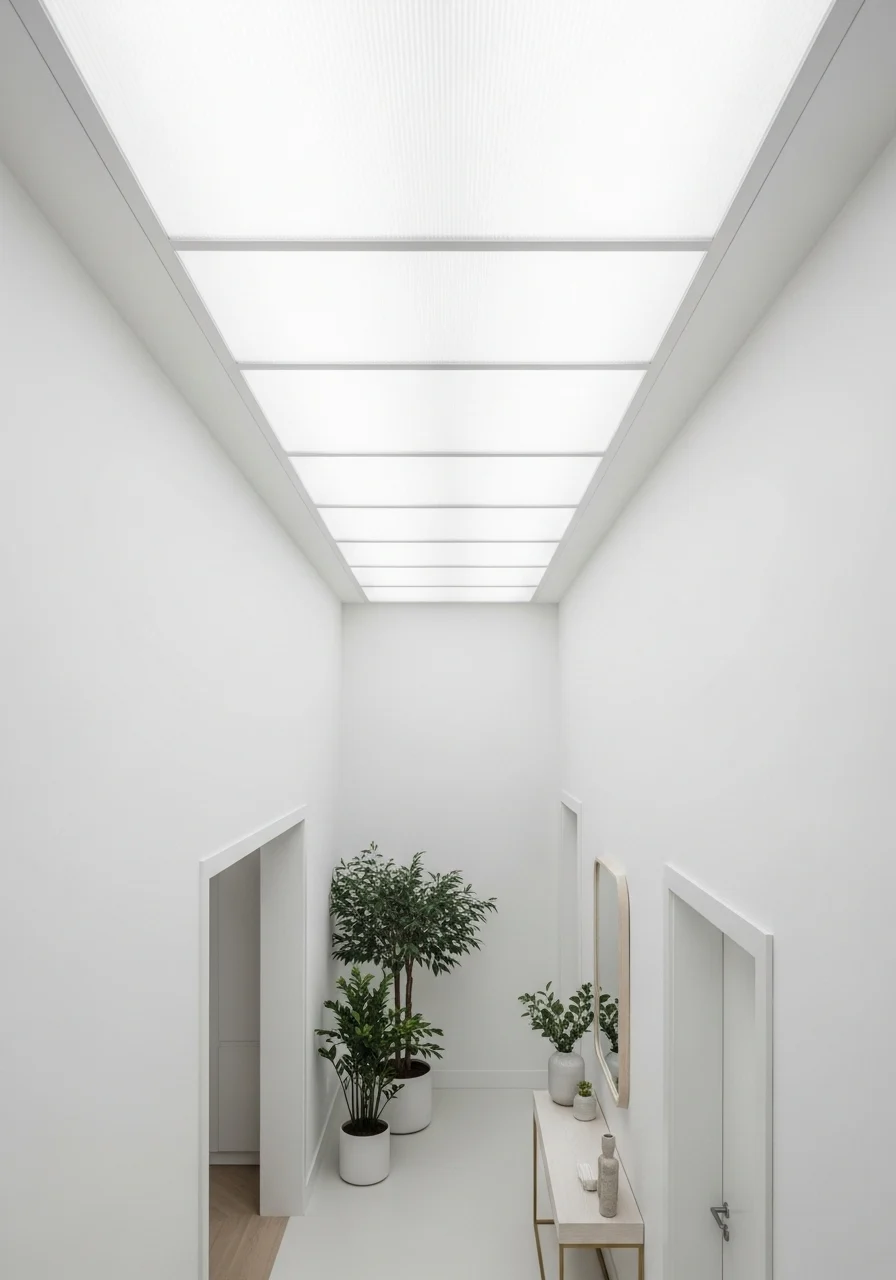
Translucent panels mimic skylight daylight, brightening interior spaces without structural roof work. They’re great for long hallways, internal rooms, and basements. The uniform glow adds perceived height and freshness.
Key Elements (translucent ceiling, daylight LEDs)
- Opal polycarbonate or acrylic panels
- Backlit LED troffers with high lumen output
- Metal frame or T-bar grid
- Daylight color temperature LEDs (5000K)
- Diffuser layer for soft light
- Fire safety-rated panels
- Accessible lamp replacement panels
- Moisture-resistant panels for bathrooms
How to Achieve This Look
- Measure ceiling area and grid layout.
- Install a sturdy metal frame to support panels.
- Fix LED troffers securely above panel positions.
- Fit opal polycarbonate panels into the frame.
- Ensure driver boxes are accessible for service.
- Wire lighting to a daylight-capable circuit.
- Test and adjust light distribution for balance.
- Seal edges to prevent dust ingress.
How to Style / Use It
Use daylight panels where natural light lacks, such as basements. Complement with warm task lighting for evening. Replace LED drivers every 5–8 years as performance drops. Keep diffusers clean to maintain brightness.
12. Black Matte Dramatic False Ceiling with Spot Accents
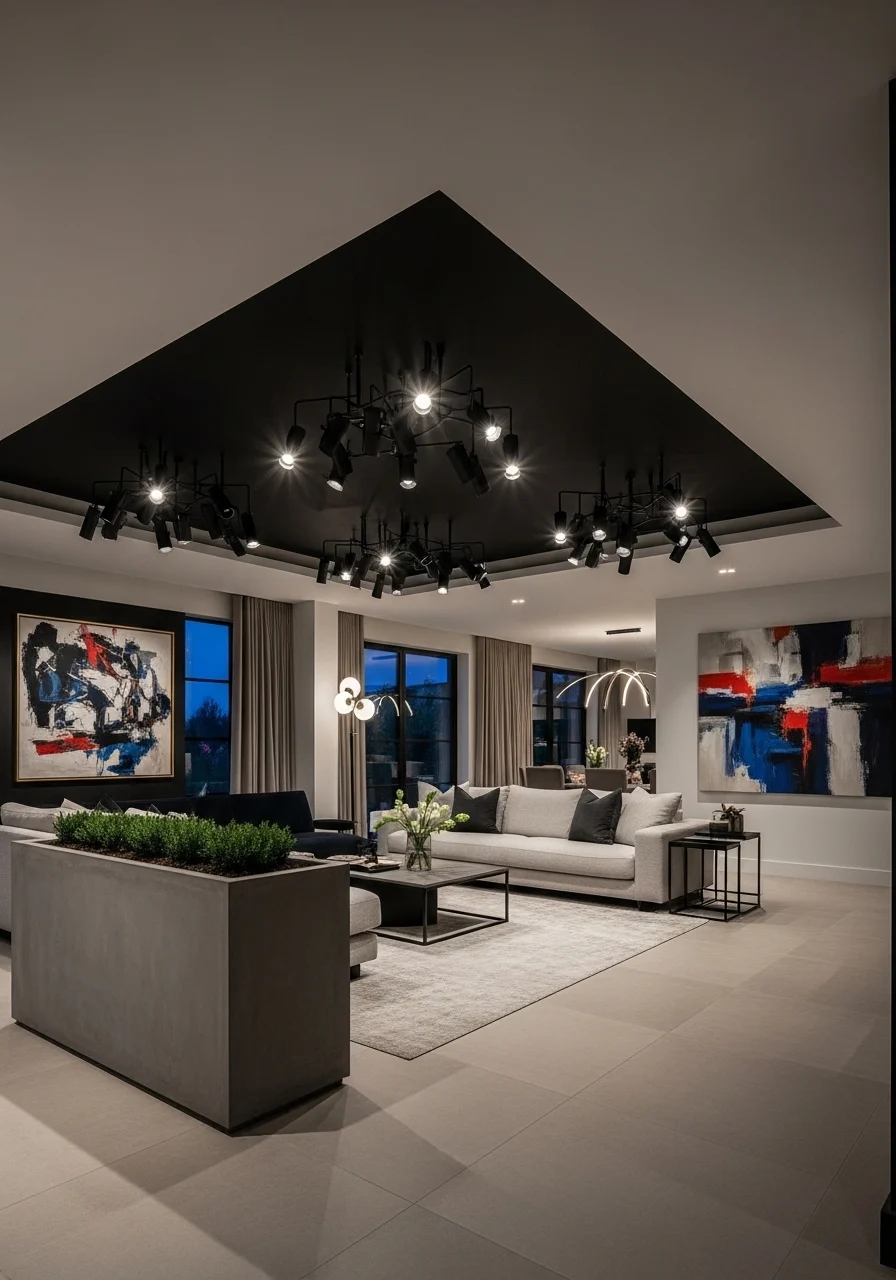
Black ceilings create a dramatic, cocoon-like feel. A black matte false ceiling with spot accents focuses attention downwards. It works well in lofts, media rooms, and spaces where you want intimacy and theater-like mood.
Key Elements (black ceiling, spotlights, contrast)
- Matte black paint with low sheen
- Multiple adjustable LED spotlights
- Concealed wiring with metal junctions
- Contrasting light furniture and decor
- Sound-absorbing panels optional
- Dark trim and shadow gaps
- Fire-rated finishes if required
- Integrated dimmer for mood control
How to Achieve This Look
- Prepare ceiling surface and prime for dark paint.
- Install necessary wiring and junction boxes.
- Paint the ceiling with high-quality matte black.
- Mount adjustable spotlights in planned positions.
- Install dimmer switches and test light scenes.
- Add soft furnishings in light tones to balance contrast.
- Inspect for paint drips and touch up edges.
- Verify that black finish meets safety codes.
How to Style / Use It
Pair with metallic accents and textured throws for balance. Use lower-intensity bulbs to avoid glare. Clean spotlights and trims routinely. Black ceilings suit high-ceiling rooms more often, but can also work in smaller areas with careful lighting.
13. Mirror-Inset False Ceiling with Metallic Trim

Mirrored ceiling insets add reflective drama and scale. Small mirrored panels framed with metallic trim offer glam without overpowering. They catch chandeliers and daylight to make rooms seem larger and brighter.
Key Elements (mirrored insets, metallic trim)
- Safety-backed mirror panels (tempered)
- Thin brass or bronze trim frames
- Gypsum grid around mirror zones
- Center chandelier or pendant alignment
- Matte plaster between insets for contrast
- Secure mounting clips and adhesives
- Anti-fog coating for humid areas
- Accessible backing maintenance access
How to Achieve This Look
- Plan mirror inset locations aligned with focal lighting.
- Build a gypsum frame around each inset.
- Secure tempered mirrors into frames with clips.
- Attach thin metallic trim around mirror edges.
- Install central chandeliers to maximize reflection.
- Seal mirror edges with non-yellowing silicone.
- Clean mirrors with a gentle glass cleaner.
- Check fittings periodically for movement.
How to Style / Use It
Works well in dining rooms, powder rooms, and glam living spaces. Keep furniture textures matte to contrast mirrored shine. Use anti-fog backing in bathrooms. Mirrors reflect light—manage glare with curtains or shaded fixtures.
14. Circular Layered False Ceiling Design
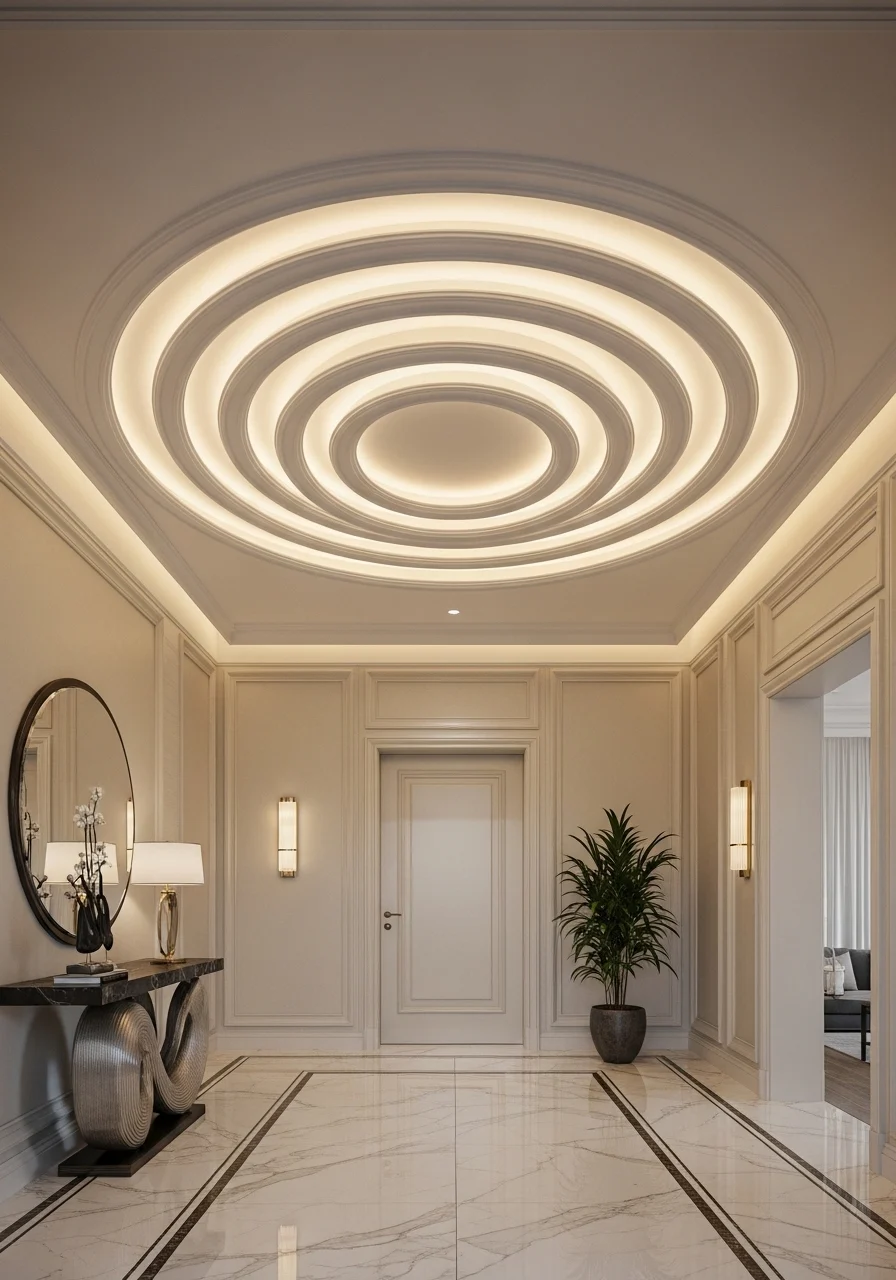
Concentric circles create an eye-catching focal point. A circular layered false ceiling design adds motion and central emphasis. The rings can house LEDs, downlights, or a dramatic pendant. It’s an elegant choice for foyers, living rooms, and dining areas.
Key Elements (circular ceiling, concentric rings)
- Multiple gypsum rings of varying diameters
- Hidden LED channels in ring undersides
- Central pendant or chandelier mount
- Shadow gaps between rings for depth
- Smooth plaster finish for each layer
- Structural support brackets
- Dimming LED drivers
- Fire-rated materials as necessary
How to Achieve This Look
- Draw concentric circles centered on your focal point.
- Build ring frames from metal channels.
- Attach gypsum sheets to ring frames precisely.
- Tape and skim ring joints for seamless curves.
- Fit LED channels beneath ring bottoms.
- Mount central light fixture and handle wiring.
- Paint rings in coordinated tones.
- Test ring lighting and dimming presets.
How to Style / Use It
Hang a statement fixture in the center for drama. Use softer colors on inner rings for subtlety. Circular layers suit round dining tables or central seating. Dust rings gently and check LED channels for secure fixing.
15. Perforated Geometric Pattern False Ceiling
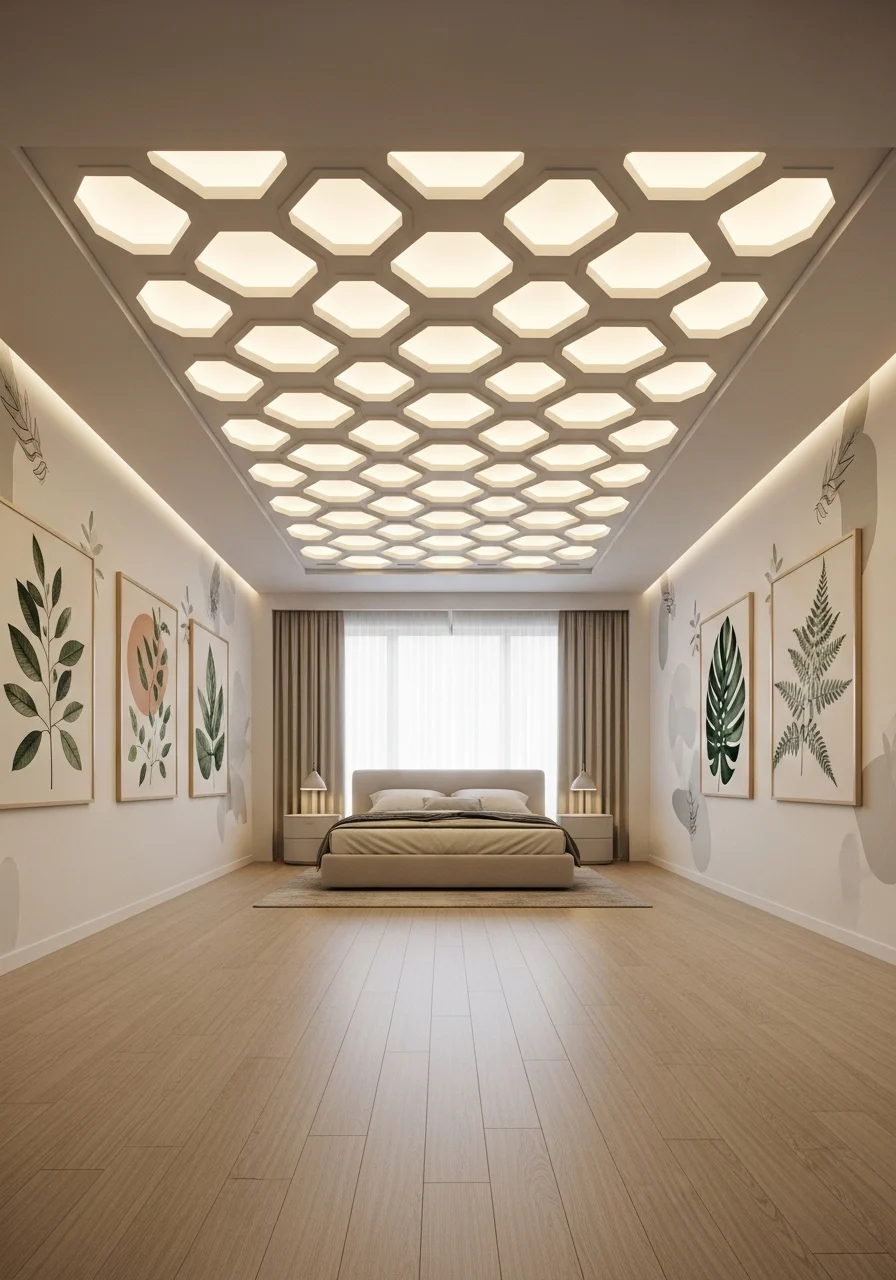
Geometric perforations create texture and shadow play. Perforated pattern false ceilings deliver visual interest and control acoustics. Use hexagons, triangles, or custom motifs to match your interior geometry.
Key Elements (geometric panels, perforations)
- CNC-cut gypsum or metal panels
- Acoustic backing behind perforations
- LED backlighting or spot accents
- Powder-coated finishes in neutral or bold colors
- Precise panel alignment hardware
- Flush ceiling grid system
- Fire-rated materials for safety
- Clean-edge trims for sharp lines
How to Achieve This Look
- Choose a pattern and plan panel layout for minimal seams.
- Fabricate CNC-cut panels to exact dimensions.
- Install a secure grid or frame to support panels.
- Place acoustic material behind panel positions.
- Fit panels into the frame with alignment clips.
- Install backlighting or spotlights to highlight patterns.
- Seal edges and touch paint for a consistent finish.
- Test acoustics and lighting balance in the room.
How to Style / Use It
Pair with geometric textiles and minimalist furniture for cohesion. Use darker patterns for drama or light colors for subtle texture. Vacuum perforations gently to remove dust. Replace acoustic backing if moisture or wear occurs.
16. Resin Inlay False Ceiling with Color Accent
Resin inlays add color and translucency to ceilings. A resin strip or panel can be backlit to create a colored glow. This option gives a bespoke, artistic feel, great for boutique interiors and creative spaces.
Key Elements (resin inlay, colored illumination)
- Epoxy or polyurethane resin in chosen color
- Reinforced backing panel for resin pour
- LED backlighting behind resin sections
- FRP or plywood support frame
- Edge sealing with non-yellowing lacquer
- Diffuser film for even light
- UV-stable pigments to prevent fading
- Access hatch for LED maintenance
How to Achieve This Look
- Design resin inlay shapes and sizes for the ceiling.
- Build backing panels with secure frames.
- Prepare and pour resin with UV-stable pigment.
- Allow full curing per resin manufacturer’s instructions.
- Install resin-backed panels into ceiling grid.
- Fit LED backlighting and test color and intensity.
- Seal panel edges and fix diffusers as needed.
- Clean surface gently with non-abrasive cleaners.
How to Style / Use It
Use colored resin strips to echo decor accents. Keep colors subtle in large spaces to avoid overpowering. Replace LED backlights if color shifts occur. Resin is durable but avoid heavy cleaning solutions.
17. Integrated Chandelier Niche False Ceiling
A chandelier niche makes hanging fixtures feel built-in and intentional. The recessed area frames the light and can include cove illumination for added depth. It’s a refined approach to lighting in formal rooms.
Key Elements (chandelier niche, recessed framing)
- Gypsum niche with central mounting box
- Reinforced support for heavy fixtures
- Cove LED around niche perimeter
- Decorative plaster finish inside niche
- Dimming circuit for chandelier
- Wiring access panel above niche
- Safety-rated mounting hardware
- Complementary ceiling paint or wallpaper
How to Achieve This Look
- Measure and build the niche centered over the table.
- Reinforce the ceiling structure to support fixture weight.
- Install the mounting box and fixings securely.
- Run wiring and cove LED around niche edge.
- Plaster and finish niche interior smoothly.
- Mount chandelier and connect to dimmer circuit.
- Balance cove and chandelier lighting levels.
- Inspect fixings and trim for finish quality.
How to Style / Use It
Pair with formal dining furniture and textured wall finishes. Dim chandelier for mood setting. Verify load capacity before selecting heavy fixtures. Dust chandelier crystals and niche surfaces regularly.
18. PVC Plank False Ceiling for Easy Upkeep
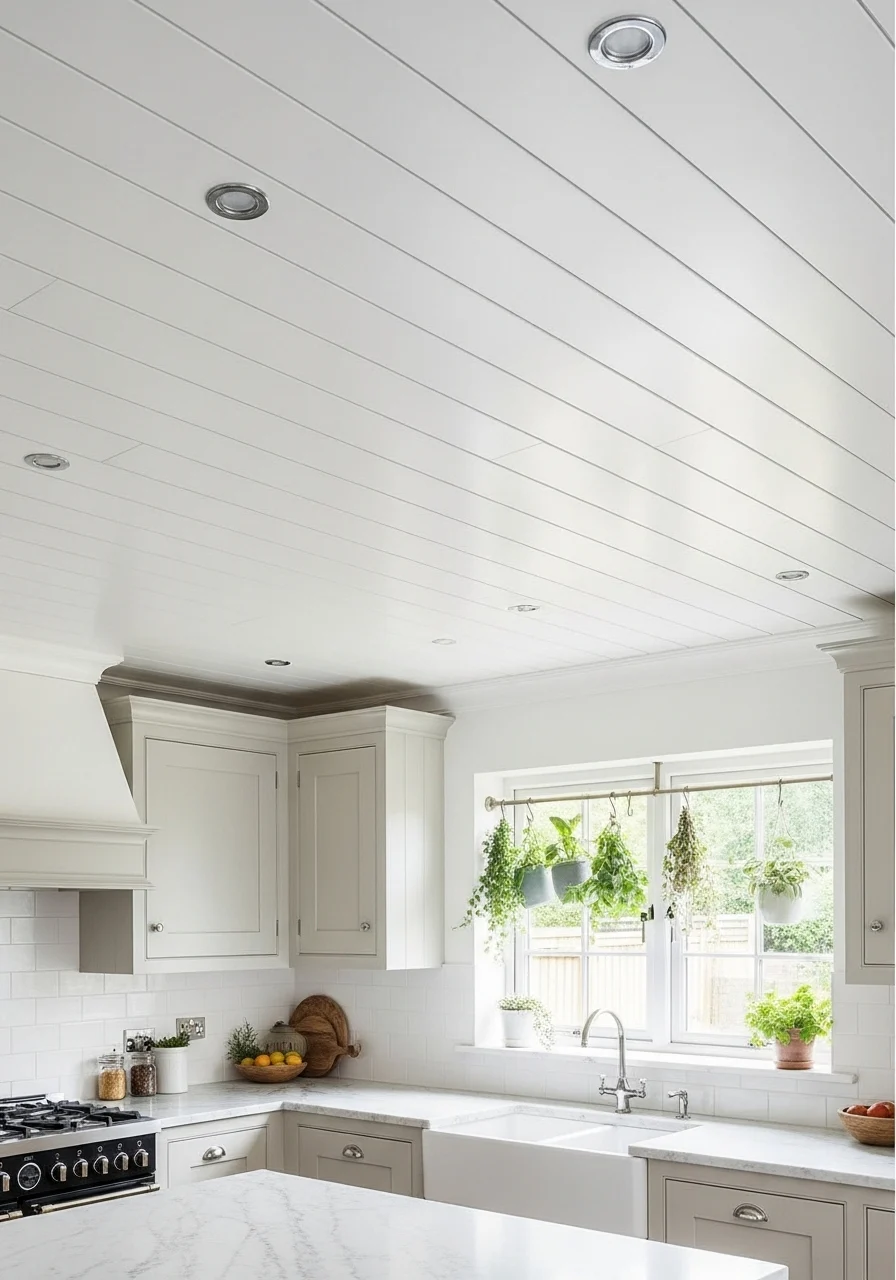
PVC plank ceilings are lightweight and low-maintenance. They resist moisture and stains, making them ideal for kitchens, bathrooms, and laundry rooms. The planks can mimic wood or be smooth white for a clean finish.
Key Elements (PVC planks, moisture resistance)
- PVC tongue-and-groove planks, 8–12 mm thick
- Corrosion-resistant metal battens for fixing
- Integrated LED downlights with waterproof fittings
- Easy-clean smooth finish
- Fire-retardant rated PVC where required
- Silicone-sealed joints in wet areas
- Quick-access panels for utilities
- Matching trims for perimeter finish
How to Achieve This Look
- Install metal battens perpendicular to plank direction.
- Clip or screw PVC planks into battens starting from one edge.
- Cut around downlight positions and install waterproof fittings.
- Seal perimeter joints with silicone in wet zones.
- Fit edge trims for neat finish.
- Connect LEDs to a suitable circuit.
- Clean planks with mild detergent after installation.
- Check for any movement and adjust battens if needed.
How to Style / Use It
Use white planks for small kitchens to reflect light. Choose wood-look PVC for warmth without maintenance. Wipe down periodically to remove cooking grease. PVC works well in humid areas where gypsum isn’t ideal.
19. Stepped Layer False Ceiling with Color Wash
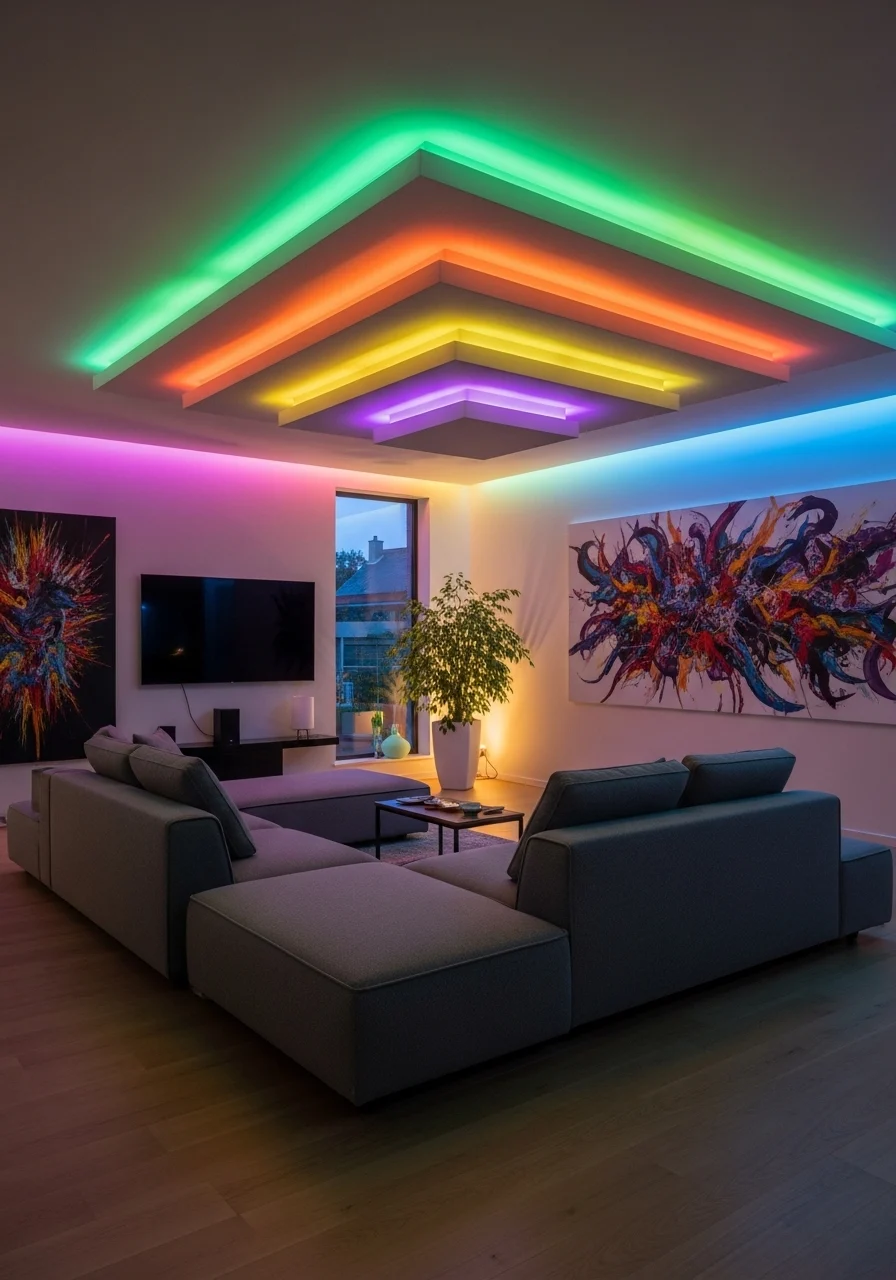
Stepped layers create rhythm and shadow across the ceiling. Adding color wash LEDs to each step brings dynamic mood control. The look works in media rooms and lounges where you want to shift ambiance easily.
Key Elements (stepped ceiling, colored LEDs)
- Multiple stepped gypsum layers with varying depths
- RGBW LED strips for color and white light
- Dimmable controllers and remote/Wi-Fi control
- Hidden channels for wiring between steps
- Smooth skim coat finish on all layers
- Centralized driver location for access
- Accent downlights in selected steps
- Heat dissipation planning for RGB units
How to Achieve This Look
- Design step widths and depths based on ceiling height.
- Build supporting metal framework for each step.
- Install gypsum sheets and create crisp step edges.
- Run RGBW LED strips in channels within each step.
- Wire to a central controller with Wi-Fi capability.
- Skim, sand, and paint each layer to finish.
- Configure presets for mood lighting scenes.
- Test color transitions and dimming smoothness.
How to Style / Use It
Use color presets for movie nights or parties. Keep white balance options for everyday living. Update LED firmware as needed. Use softer colors for relaxed evenings and brighter washes for events.
20. Floral Cutout False Ceiling for Romantic Spaces
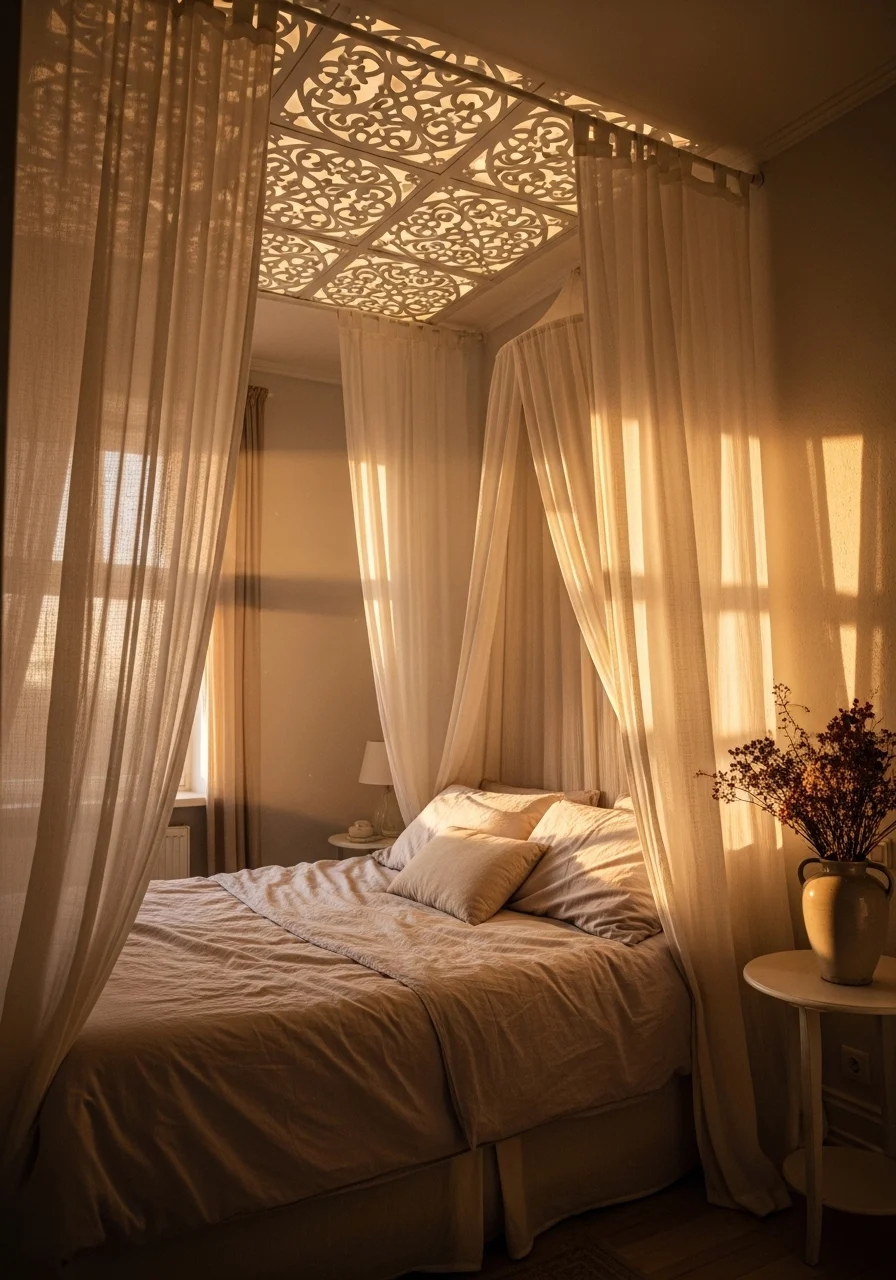
Floral cutouts add delicate patterning to the ceiling. Laser-cut gypsum panels with backlighting create soft, romantic illumination. This suits bedrooms, boutique spaces, and themed rooms that benefit from gentle decorative detail.
Key Elements (laser-cut panels, backlighting)
- CNC or laser-cut gypsum panels with floral motifs
- Warm LED backlighting for soft glow
- Smooth painted finish on panel fronts
- Acoustic backing optional behind panels
- Secure clip mounts for panels
- Non-yellowing diffuser film
- Precise edge trims to avoid light bleed
- Maintenance access for LEDs
How to Achieve This Look
- Choose floral motifs and plan panel placement.
- Fabricate panels from gypsum or MDF.
- Mount a frame with backing for each panel.
- Install warm LED backlights behind panels.
- Fit panels to frames using hidden clips.
- Paint panel fronts and finish edges.
- Test backlighting for even glow.
- Clean panels with a soft brush to remove dust.
How to Style / Use It
Pair with soft linens, floral prints, and warm metals. Use dimmers for evening ambiance. Replace diffusers if uneven light appears. Floral ceilings are charming for guest bedrooms and boutique spaces.
21. Industrial Exposed Grid False Ceiling
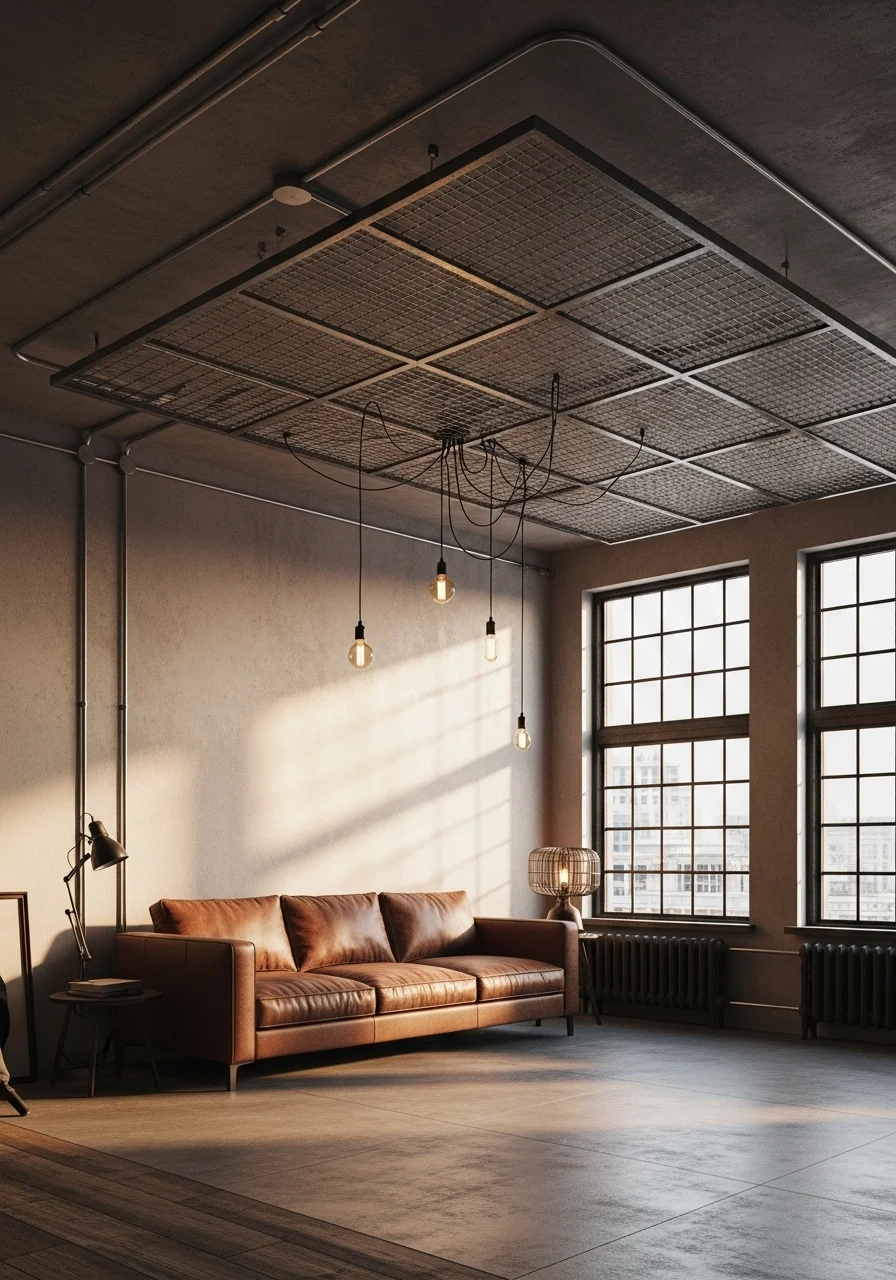
An exposed grid embraces industrial character. Leaving structural elements visible creates an urban, raw vibe. The industrial exposed grid false ceiling fits lofts and creative studios, and it’s often budget-friendly.
Key Elements (exposed grid, conduits)
- Exposed metal grid or open-web framing
- Visible conduit and junction boxes painted to match
- Pendant Edison bulbs or track lighting
- Concrete or brick wall textures for contrast
- Matte black or metallic finishes
- Hanging elements like pipes or vents integrated
- Flexible mounting for future changes
- Fire-safety and insulation considerations
How to Achieve This Look
- Evaluate existing ceiling and code requirements.
- Install exposed metal grid or open-web supports.
- Run conduit visibly and paint to coordinate.
- Mount Edison bulbs or track systems to the grid.
- Add HVAC vents and speaker components to the layout.
- Test electrical circuits and safety bonding.
- Style with raw materials like leather and concrete.
- Inspect and maintain visible wiring and fixtures.
How to Style / Use It
Pair with industrial furniture and raw textiles. Use dark finishes to hide dust and marks. Keep wiring tidy and labeled for safety. This ceiling type allows easy future additions.
22. Decorative Plaster Medallion Grid Ceiling
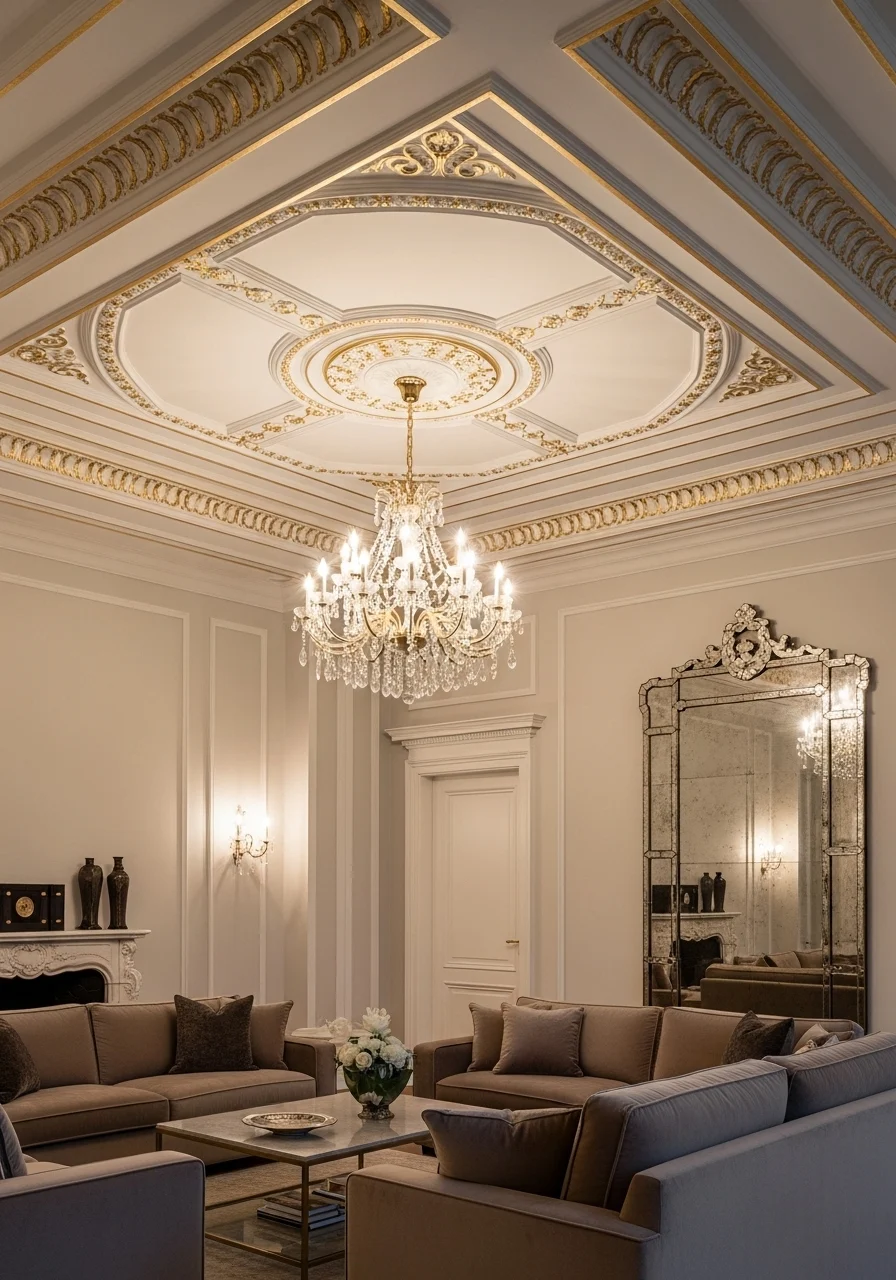
Plaster medallions add classic detail and ornamental charm. A medallion grid on a false ceiling blends old-world detail with modern comforts. It’s ideal for traditional interiors and formal rooms seeking elegance.
Key Elements (plaster medallions, decorative trims)
- Plaster medallions or polyurethane equivalents
- Gypsum false ceiling grid to mount medallions
- Subtle gold or silver leaf accents
- Central chandelier points in select medallions
- Smooth plaster finish between medallions
- Secure adhesive and mechanical fixings
- Matching cornices or mouldings
- Paintable finishes for custom color
How to Achieve This Look
- Plan medallion spacing aligned with room symmetry.
- Install gypsum grid or backing panels for medallion fixes.
- Secure medallions with adhesive and screws.
- Fill seams and skim coat surrounding plaster.
- Prime and apply chosen decorative finish or leaf.
- Mount chandeliers through medallions with reinforced supports.
- Touch up paint and metallic accents.
- Check medallion fixings for long-term safety.
How to Style / Use It
Works beautifully with vintage furniture and rich textiles. Dust medallions with a soft brush. Reapply leafing if it tarnishes. Keep fixtures consistent in scale with medallion sizes.
23. Kids’ Cloud-Themed False Ceiling with Soft LED

Cloud shapes make a playful ceiling for kids. Soft LED edges give a dreamy, calming light for bedtime. The kids’ cloud-themed false ceiling is fun, safe, and helps create a restful nook.
Key Elements (cloud panels, soft LEDs)
- Lightweight foam or gypsum cloud panels
- Pastel matte paint background (sky blue)
- Soft warm LED strips along cloud edges
- Rounded, child-safe mounting hardware
- Low-voltage LEDs and concealed drivers
- Non-toxic paint and finishes
- Accessible wiring in removable panels
- Soft dimmer for bedtime scenes
How to Achieve This Look
- Paint ceiling sky-blue as the base.
- Cut cloud shapes from lightweight material.
- Fix cloud panels with child-safe screws or velcro.
- Mount warm LED strips around cloud edges.
- Wire LEDs to a low-voltage dimmer driver.
- Secure and conceal wiring behind panels.
- Test dimmer levels for comfortable night light.
- Inspect and tighten fixings periodically.
How to Style / Use It
Pair with soft bedding and soothing night routines. Use dimmer presets for bedtime and play. Clean panels gently to remove fingerprints. Replace LEDs as needed and check child-safe mounts.
24. Glass Bead Chandelier Integrated False Ceiling
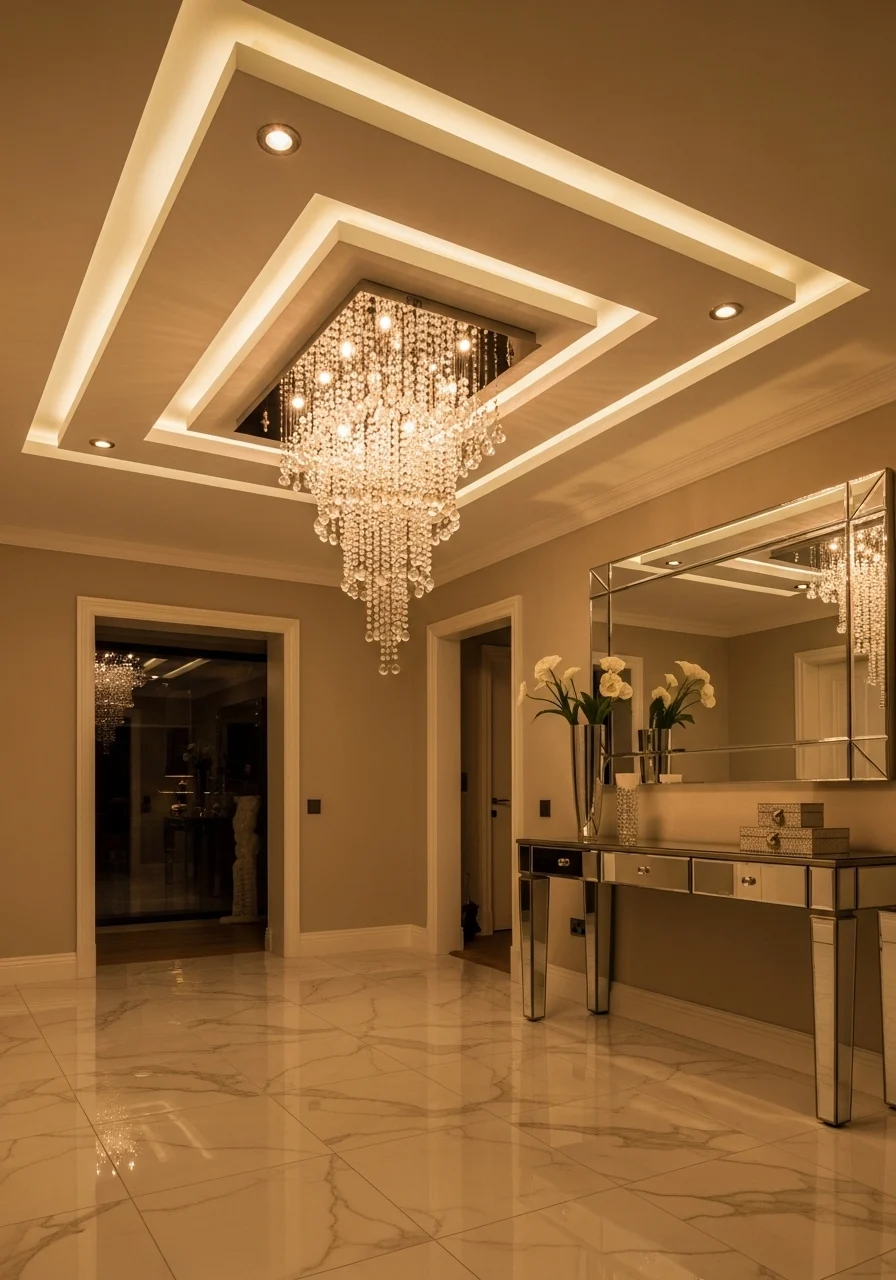
Integrating a glass bead chandelier into a false ceiling cradle gives a museum-worthy focal point. The ceiling frames the chandelier and conceals supporting hardware. This design suits grand foyers and formal living areas.
Key Elements (chandelier cradle, integrated lighting)
- Reinforced false ceiling cradle with central support
- Hanging hardware rated for chandelier weight
- Layered downlights around cradle perimeter
- Fabric-lined or painted cradle interior
- Wiring access and maintenance hatch
- Glass bead or crystal chandelier with secure fixings
- Soft cove LED around cradle for halo effect
- Fire-safety compliance for heavy fixtures
How to Achieve This Look
- Calculate chandelier weight and required structural support.
- Build a reinforced cradle in the false ceiling structure.
- Install support bracket and secure mounting points.
- Run wiring and mount downlights around cradle edge.
- Hang chandelier securely and test fittings.
- Finish cradle interior with fabric or paint.
- Add cove LED halo for soft uplift.
- Verify safety standards and inspect annually.
How to Style / Use It
Use as a statement in high-ceiling entrances and dining rooms. Keep the surrounding decor minimal to let the chandelier shine. Regularly inspect anchor points and clean beads gently. Replace bulbs with warm LEDs for consistent ambiance.
You now have 24 distinct false ceiling design ideas, spanning minimalist to ornate, functional to whimsical. Each idea shows how lighting, material, and shape change a room’s mood and scale. Try a simple cove LED for quick impact, or pick a wooden slat or resin inlay for personality.
Save or pin the ideas you love and test one in a small area before committing to a full install. Which ceiling idea are you most drawn to? Share this with friends or family renovating their home. They’ll thank you for the inspiration.