25 POP Ceiling Design Ideas for Modern Homes
Your ceiling can be the secret hero of your home. When you pick the right POP ceiling design, a room feels higher, cleaner, and more finished. You’ll find modern textures, clean lines, hidden lighting, and playful shapes that lift the whole space.
This list of 25 POP ceiling design ideas for modern homes gives you ready-to-use looks. Each idea shows what makes it special, the exact materials and finishes to use, step-by-step installation or styling guidance, and tips for pairing and care. Whether you want a simple white tray ceiling or a sculptural gypsum centerpiece, there’s a POP ceiling design here for your style and budget. Pin the ones you love and try a small area first—your ceiling deserves the same thought you give your floors and walls.
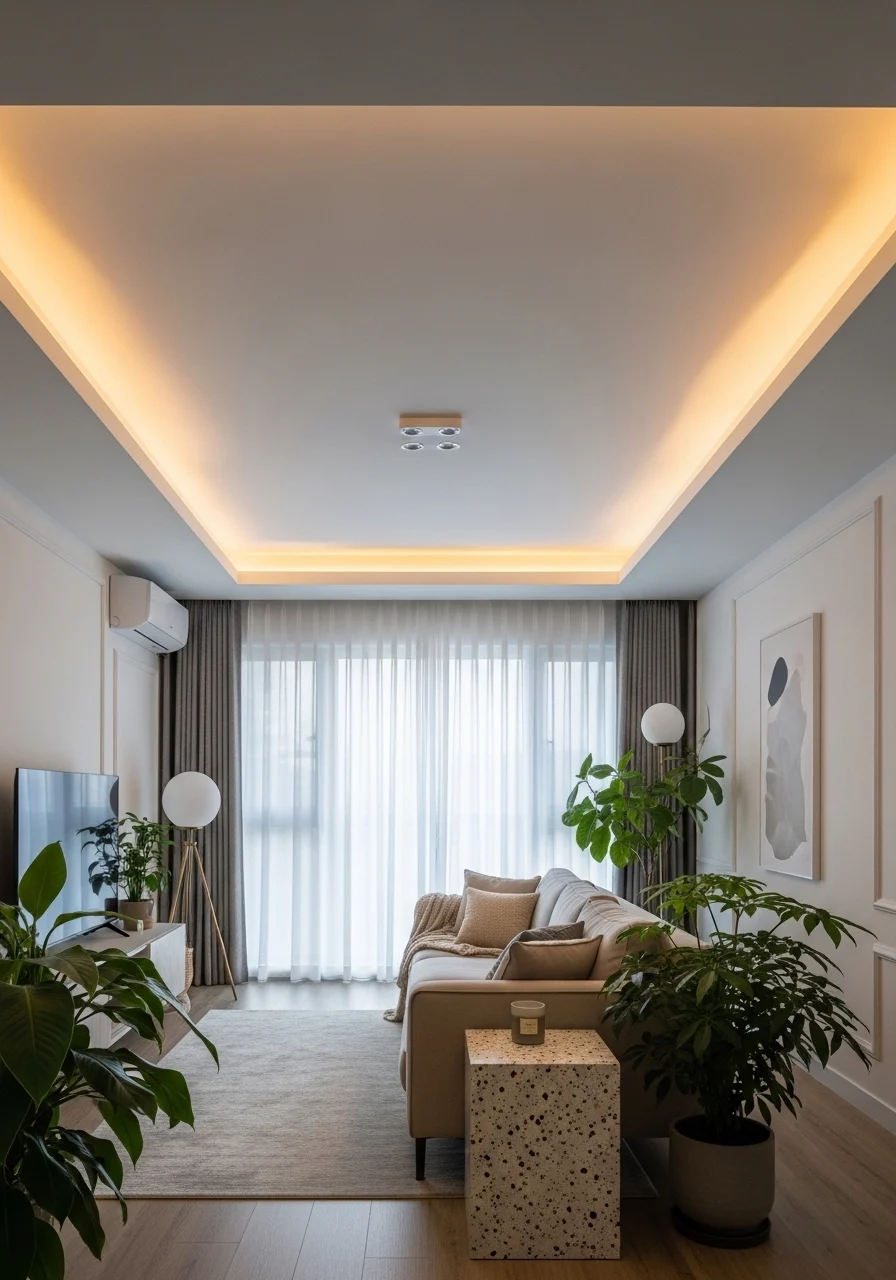
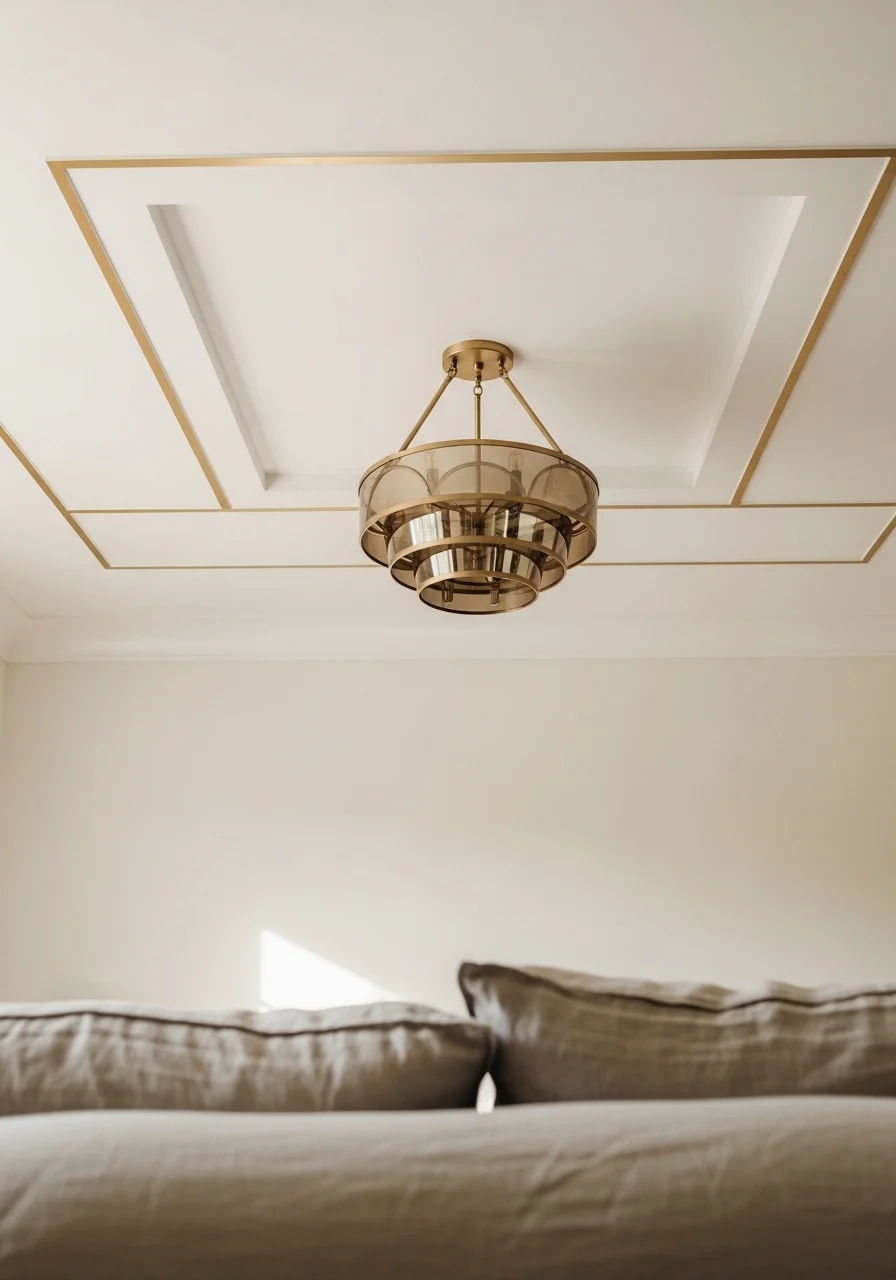
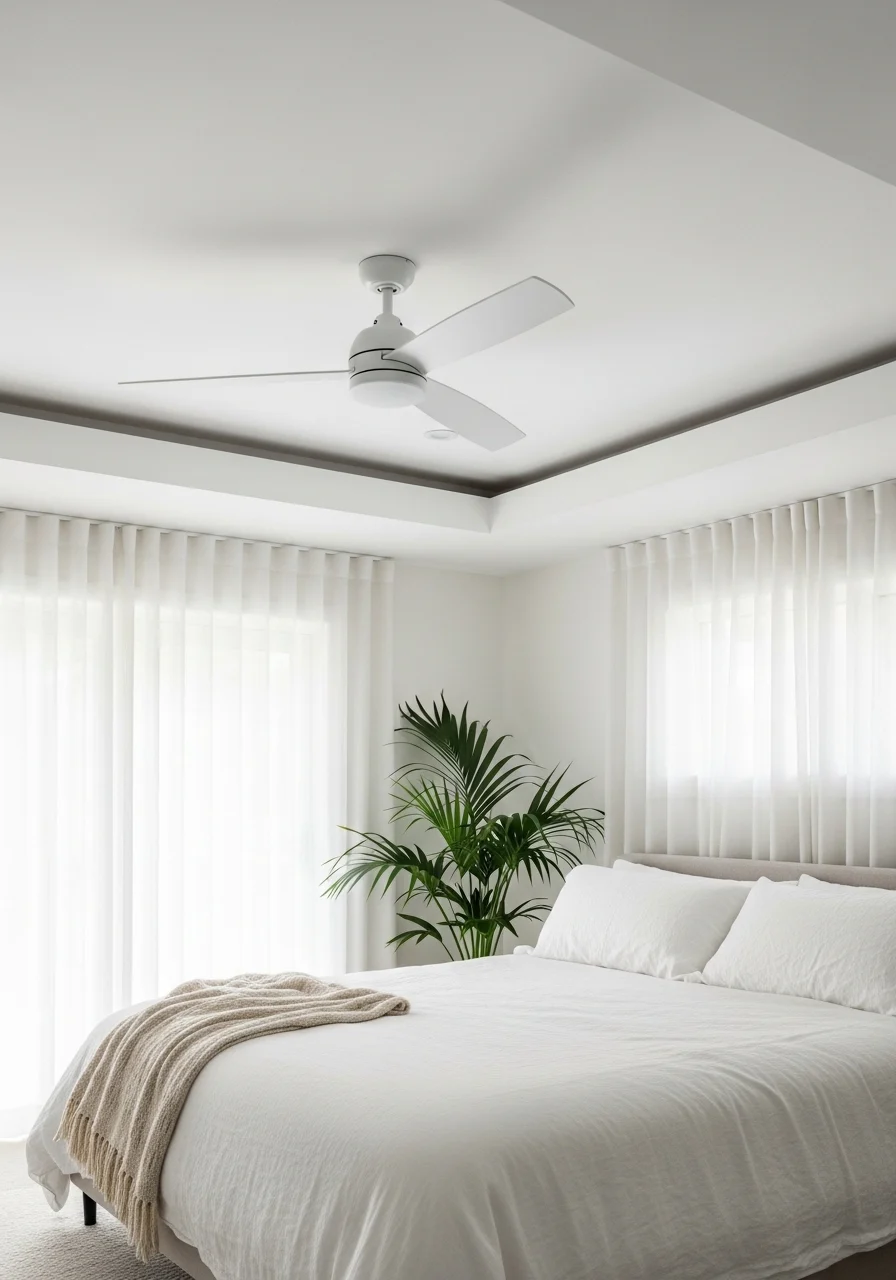
1. Minimalist White Tray POP Ceiling Design
This minimalist tray POP ceiling design keeps focus on clean lines and soft depth. The white finish reflects light and feels airy. A slim recessed cove adds a warm glow without fuss. It’s perfect for small living rooms, studios, or bedrooms that need visual height. You’ll notice the calm, hotel-like vibe it creates.
Key Elements
- POP (plaster of Paris) tray construction, smooth skim finish
- Matte white paint (eggshell or satin)
- Slim recessed cove for warm LED strip
- Gypsum edge trim for crisp corners
- Low-profile ceiling rose or concealed fan mount
- Minimal cornice, 2–4-inch depth
- Damp-proof primer for humid zones
- Acoustic foam backing (optional, for sound reduction)
- Concealed wiring channels
- Metal framing (Mild Steel or aluminum) for stability
How to Achieve This Look
- Measure room and mark a 4–6 inch drop for tray perimeter.
- Build metal framing and attach POP boards for the tray.
- Apply joint compound and sand for a seamless surface.
- Install recessed LED strip inside the cove.
- Prime with acrylic primer, then paint matte white.
- Fit gypsum edge trim for crisp corners.
- Run wires for any fixtures before final skim coat.
- Seal edges and touch up paint after lighting test.
How to Style / Use It
Keep furniture low and streamlined to show off the ceiling’s height. Pair with light wood tones, neutral textiles, and matte black accents. For maintenance, dust the cove monthly and check LED connections yearly. Use this in any season. Styling changes with cushions and rugs.
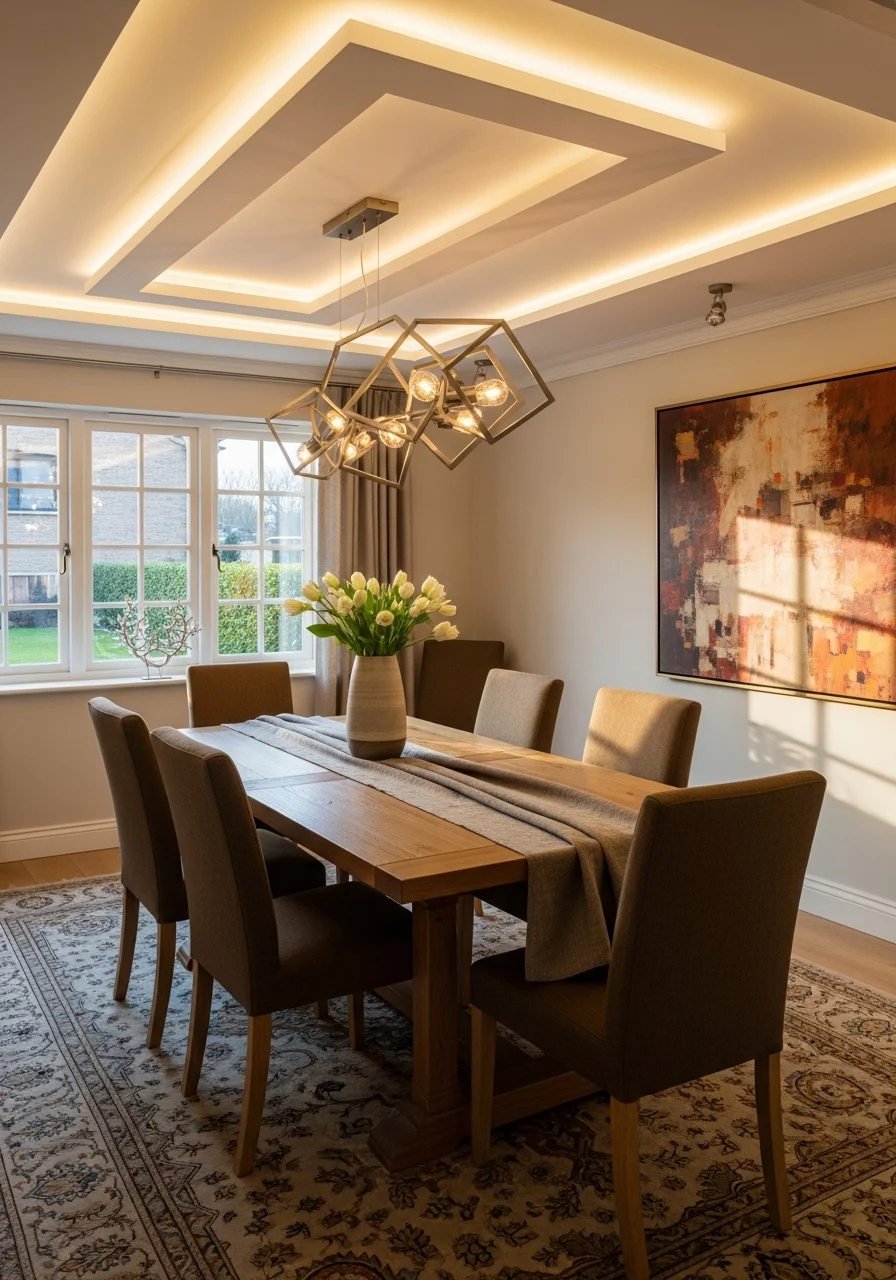
2. Layered Geometric POP Ceiling Design

This layered geometric POP ceiling design uses bold shapes and depth to create drama. Contrasting tones or finishes emphasize the geometry. It works well over dining tables or entryways where the ceiling becomes focal. You’ll love how it adds modern architecture without changing the floorplan.
Key Elements
- Multiple POP layers in squared and angled shapes
- Accent paint (charcoal, navy, or terracotta)
- Central recessed box for a pendant
- Gypsum fillets for sharp transitions
- Metal L-channel supports
- Satin finish for contrast
- Hidden joinery and flush edges
- LED spotlights in select panels
- Damp-proofing where needed
- Timber or plaster medallion alternative
How to Achieve This Look
- Sketch the geometric layout and transfer to ceiling.
- Build metal framing for each layer based on depth plan.
- Fix POP boards layer by layer, leaving spaces for lights.
- Add gypsum fillets and sand joints for sharp lines.
- Paint base coat, then mask and paint accent panels.
- Install downlights or pendants in prepared cutouts.
- Fit trims and seal edges for a crisp finish.
- Check lighting balance and touch up paint.
How to Style / Use It
Place a bold pendant or sculptural fixture in the center. Pair with textured fabrics and matte metals. Keep wall art minimal so the ceiling stays the star. Clean painted surfaces with a damp cloth occasionally.
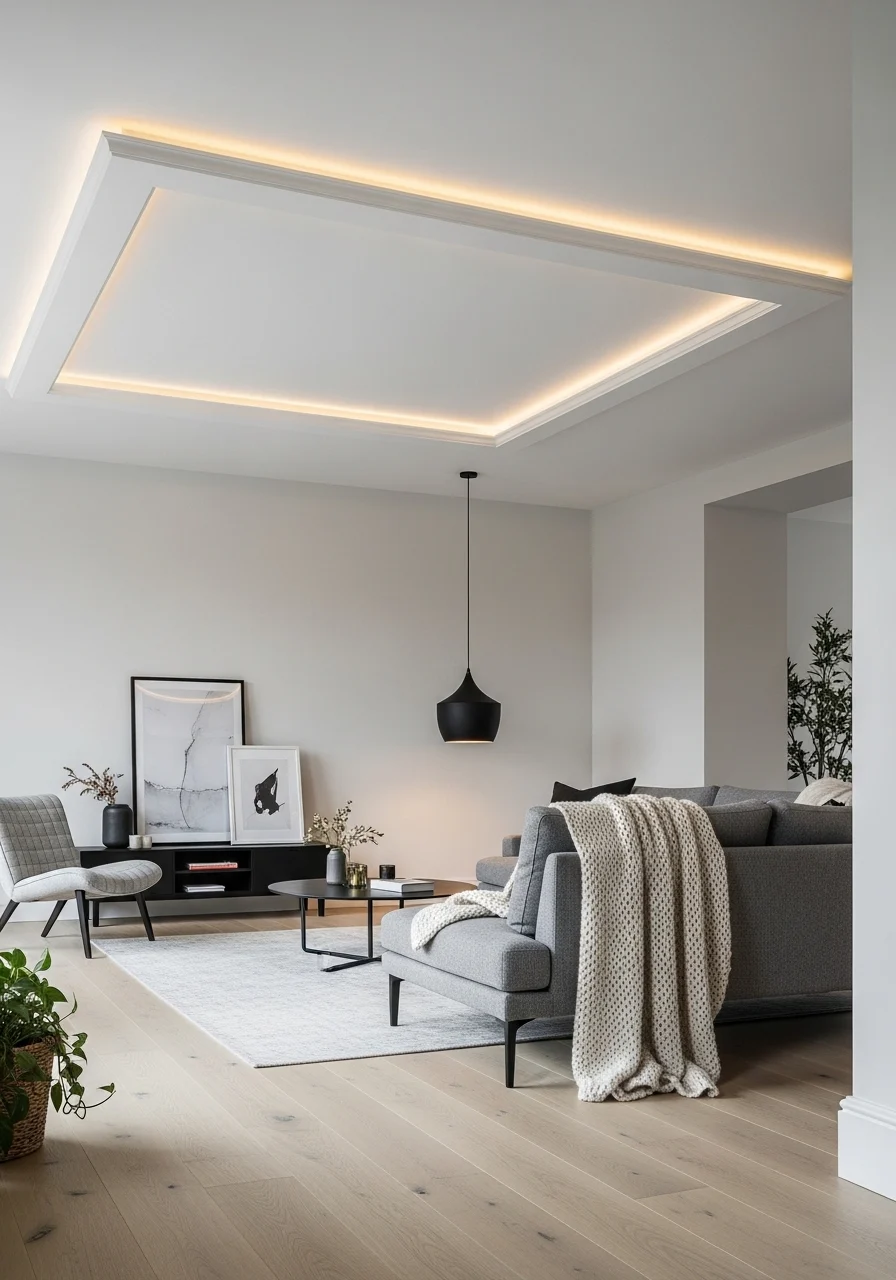
3. Cove Lighting POP Ceiling Design with Indirect LEDs
This POP ceiling design highlights soft indirect light from a recessed cove. The glow eliminates harsh shadows and sets a relaxing mood. It’s ideal for living rooms and bedrooms where ambient light matters most. You’ll get a cozy, cinematic feel after dark.
Key Elements
- Continuous cove in POP ceiling perimeter
- High-CRI warm white LED strips (2700–3000K)
- Diffuser channel for even light spread
- Smooth POP finish and microcornice
- Dimmable driver and switch
- Concealed wiring junction box
- Corner joinery for seamless runs
- Moisture-resistant POP in humid rooms
- Painter’s tape and edge sealant
How to Achieve This Look
- Plan the cove depth and width for LED placement.
- Build the POP cove with metal framing and POP sheets.
- Install LED channel with diffuser inside the cove.
- Run driver to a concealed junction box.
- Prime and paint the ceiling surface.
- Connect dimmer switch and test the LEDs.
- Adjust LED spacing or add reflectors for even glow.
- Seal cove edges and clean up.
How to Style / Use It
Use cove lighting for mood scenes and movie nights. Pair with warm accent lamps and textured cushions. Dimming saves energy and extends LED life. Use moisture-resistant materials in bathrooms.
4. Circular Dome POP Ceiling Design with Central Pendant
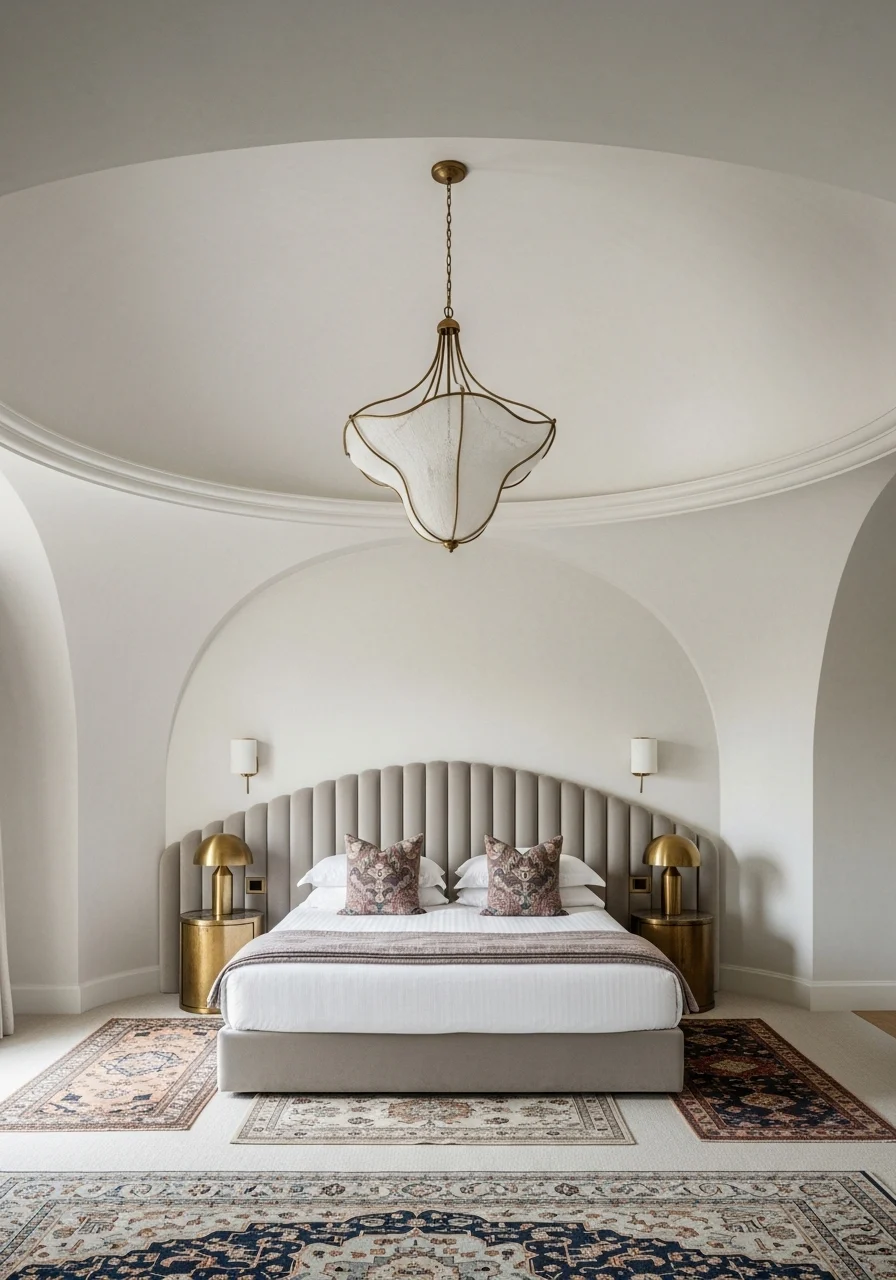
A circular dome POP ceiling design adds soft architecture and focus. The curved form feels organic and luxe. It’s perfect above beds or seating clusters and pairs gorgeously with rounded furniture. You’ll enjoy the soft acoustics and visual center it creates.
Key Elements
- Shallow POP dome with smooth plaster finish
- Circular gypsum ring detailing
- Central pendant or chandelier mount
- Soft ambient LED halo or cove
- Acoustic insulation layer
- Satin paint or silk finish
- Metal framing shaped for curve
- Flexible POP sheets or strips
- Corner sealing and caulk
- Decorative medallion option
How to Achieve This Look
- Draw dome radius and mark center on ceiling.
- Build curved metal framing and attach flexible POP.
- Smooth joints with multiple skim coats.
- Install central pendant box and secure mounting.
- Add halo LED ring inside dome perimeter.
- Prime, sand, and apply satin paint finish.
- Fit trim and caulk any tiny gaps.
- Hang pendant and balance lighting.
How to Style / Use It
Pair with rounded furniture and soft textiles. Use low-glare pendants for intimate lighting. For dust-free upkeep, vacuum pendant crevices and wipe the dome gently. Use darker painted dome interiors for drama.
5. Gypsum Floral Motif POP Ceiling Design
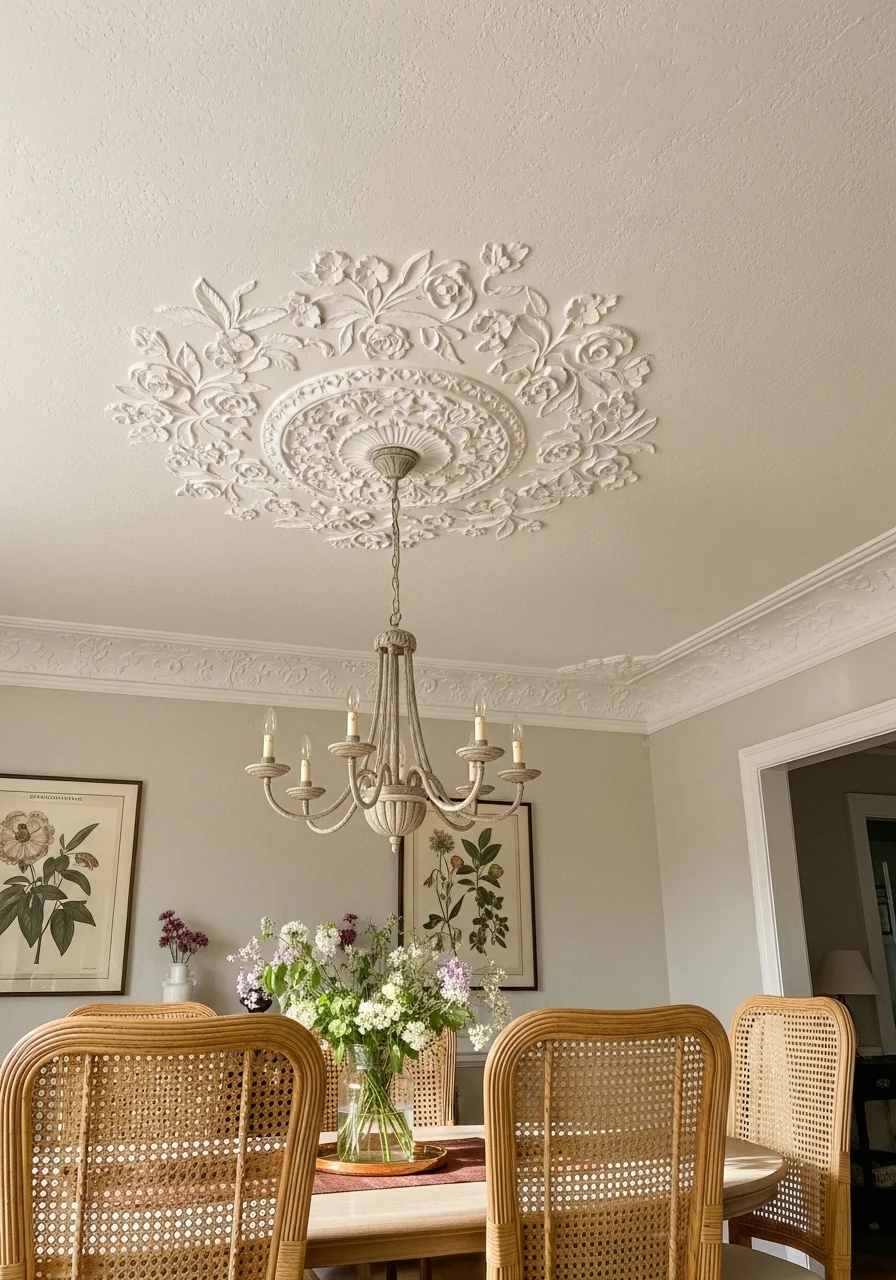
This gypsum floral POP ceiling design adds classic ornament in a modern shell. Low-relief floral motifs give texture without heavy decoration. It suits dining rooms and foyers where you want subtle elegance. You’ll feel the handcrafted character each time you look up.
Key Elements
- POP ceiling base with gypsum floral appliqués
- Low-relief sculpted motifs (roses, vines)
- Satin white paint with soft shadows
- Central chandelier mount
- Lightweight gypsum for reduced load
- Adhesive and mechanical anchors
- Primer and protective sealer
- Soft cove or recessed lights to highlight relief
- Dust-resistant finish
How to Achieve This Look
- Prepare the ceiling and lay out motif placement.
- Attach gypsum appliqués using construction adhesive.
- Use mechanical anchors for larger pieces.
- Skim around joins and sand gently.
- Install lighting to cast soft shadows across relief.
- Prime and finish with satin white paint.
- Seal with a thin protective coat for dust resistance.
- Inspect joins and touch up paint as needed.
How to Style / Use It
Keep surrounding decor simple to let texture stand out. Pair with warm metals and botanical accents. Clean gently with a soft brush. Use in formal rooms for a timeless touch.
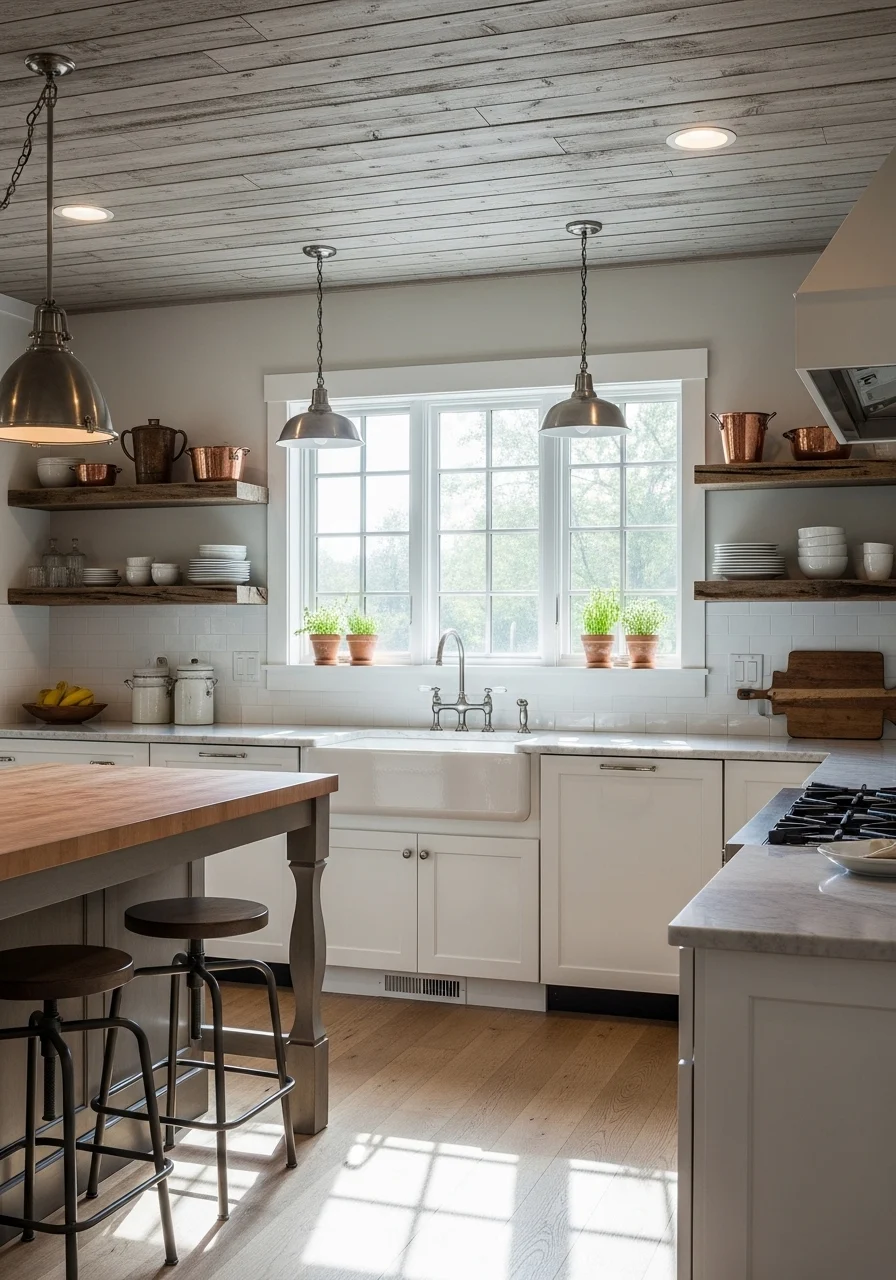
6. Wooden Beam Effect POP Ceiling Design
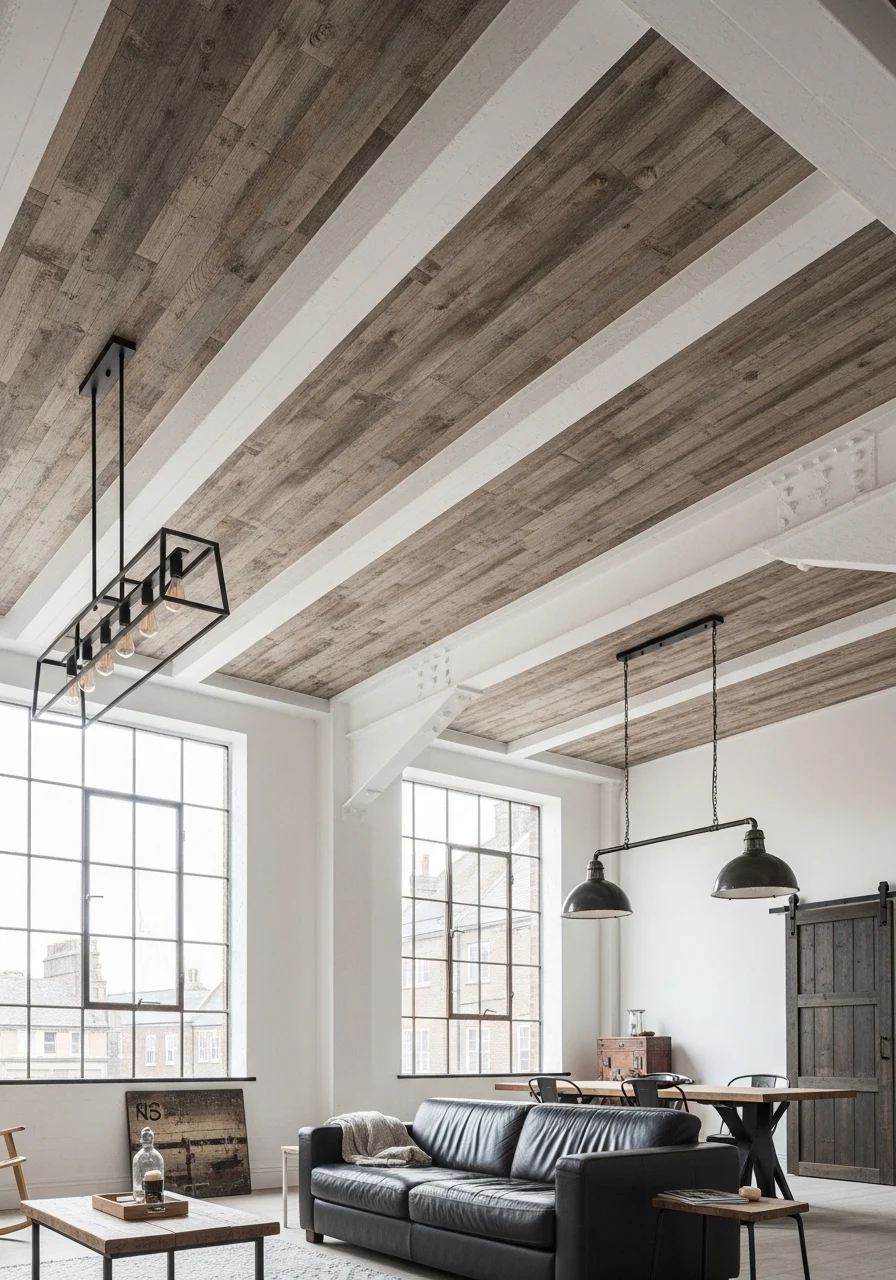
This POP ceiling design mimics wooden beams using textured POP elements. You get rustic warmth without the weight or cost of real beams. It’s great for open-plan living rooms or kitchens where you want cozy character. You’ll appreciate the wood look with lower maintenance.
Key Elements
- POP beams finished with wood-grain texture
- White POP infill for contrast
- Faux wood stain or paint finish
- Concealed metal support for safety
- Matte polyurethane seal for durability
- Recessed spotlight grooves between beams
- Acoustic backing to reduce echo
- Matching cornice and base trims
- Screw and adhesive anchors
How to Achieve This Look
- Design beam placements aligned with room layout.
- Build metal framing for each faux beam.
- Apply POP and rough-skim to create grain texture.
- Sand and apply wood-toned stain or layered paint.
- Seal with matte polyurethane for protection.
- Install recessed lights or pendant wires where required.
- Attach beams securely with anchors to structure.
- Clean and touch up finishes after installation.
How to Style / Use It
Pair with leather, linen, and warm metals. Use pendant clusters between beams for task lighting. Dust beams with a microfiber duster. Works well year-round—swap cushions for seasonal color.
7. Black Contrast POP Ceiling Design for Drama
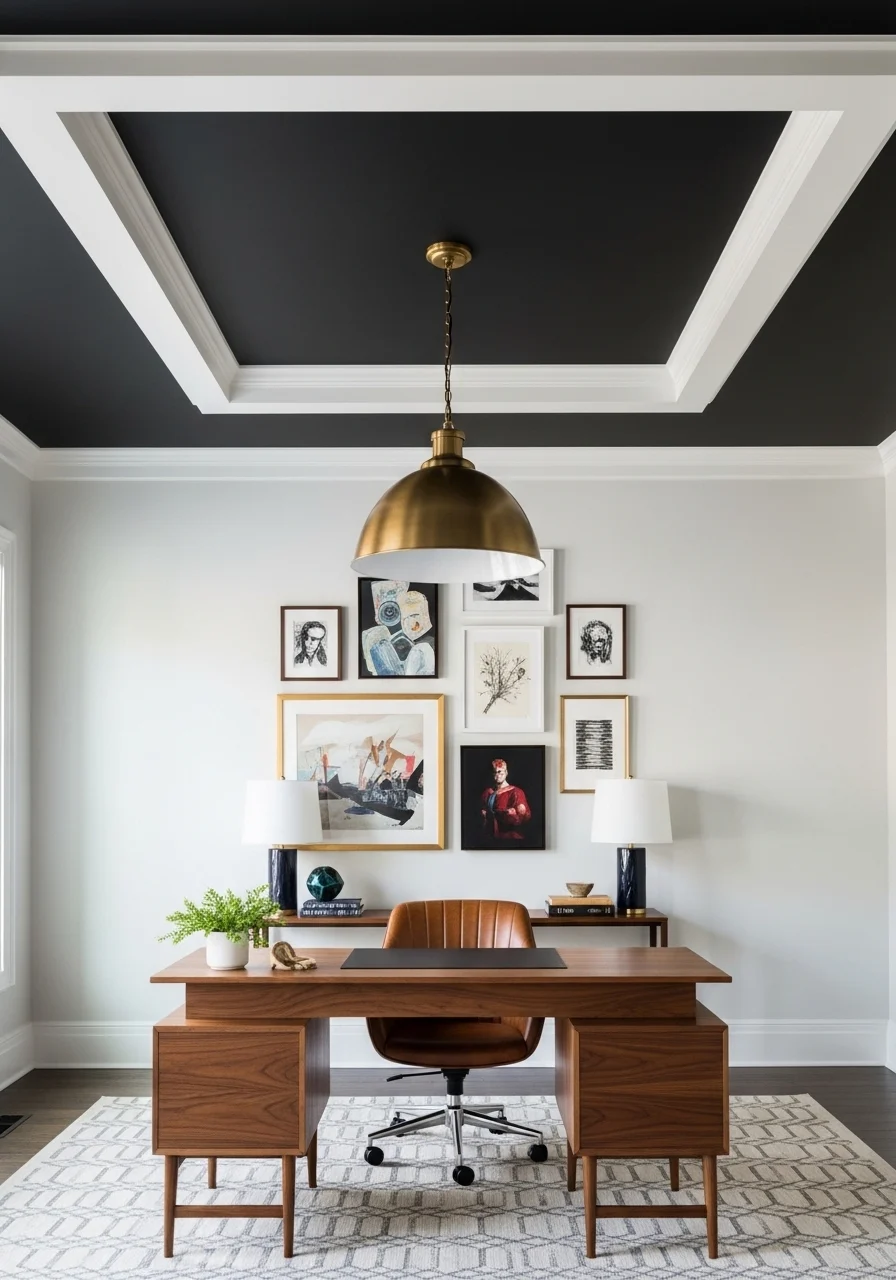
A black contrast POP ceiling design adds bold drama and focus. Dark colors visually lower tall rooms, creating a cocooning effect that’s cozy and modern. Use it in offices, bedrooms, or reading nooks where intimate ambiance helps you focus. You’ll love the cinematic mood it sets.
Key Elements
- Deep matte black POP inset
- White perimeter or tray for contrast
- High-CRI warm downlights
- Satin or matte paint for low reflection
- Concealed wiring and junctions
- Gypsum fillet for crisp border
- Ceiling-mounted pendant or task lamp point
- Acoustic insulation for comfort
- Touch-up paint kit
How to Achieve This Look
- Map out the black inset area and protect surrounding surfaces.
- Install POP base and smooth joints.
- Prime with stain-blocking primer.
- Paint inset with two coats of matte black paint.
- Fit warm downlights and check color balance.
- Paint perimeter white for crisp edge contrast.
- Caulk joints and touch up any bleed.
- Adjust fixture lighting for dramatic focus.
How to Style / Use It
Pair with brass or warm wood accents to avoid a cold vibe. Use in study areas or bedrooms for a snug feel. Clean black paint gently with a damp cloth. Swap wall textiles for lighter tones to keep room balanced.
8. Layered Circular POP Ceiling with LEDs
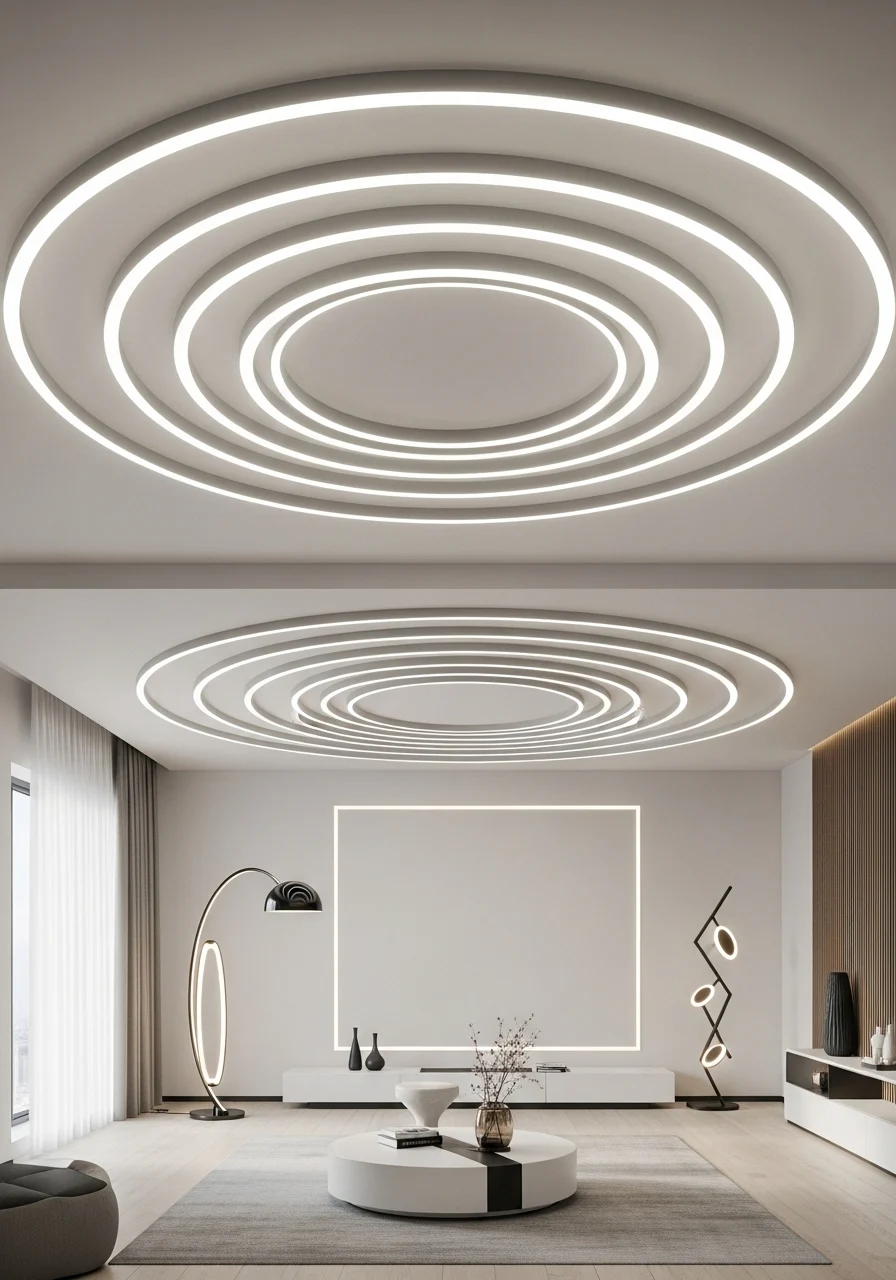
Concentric circular layers create a soft ripple effect on your ceiling. This POP ceiling design feels modern and sculptural. The built-in LED rings emphasize depth and rhythm. It’s ideal for living rooms and media spaces where circular symmetry adds calm focus.
Key Elements
- Multiple concentric POP rings
- LED ring lights with diffusers
- Central pendant or recessed spotlight
- Smooth satin finish on each ring
- Metal framing for precise curves
- Acoustic pad between rings
- Concealed wiring channels
- White or soft gray paint tones
- Fine sanded joints for seamless look
How to Achieve This Look
- Draw concentric circles and mark framing positions.
- Build curved metal frames accordingly.
- Attach flexible POP and fill with skim coat.
- Install LED rings with diffusers in channels.
- Prime and paint rings with a satin finish.
- Install central fixture and test lighting scenes.
- Seal edges and inspect for continuity.
- Make final adjustments to LED brightness.
How to Style / Use It
Use circular rugs and round furniture to echo the ceiling shape. Keep textures soft to match curves. This works well for family rooms where you want a focal point without clutter. Maintain LEDs per manufacturer instructions.
9. False Ceiling with Integrated Speakers (POP Design)
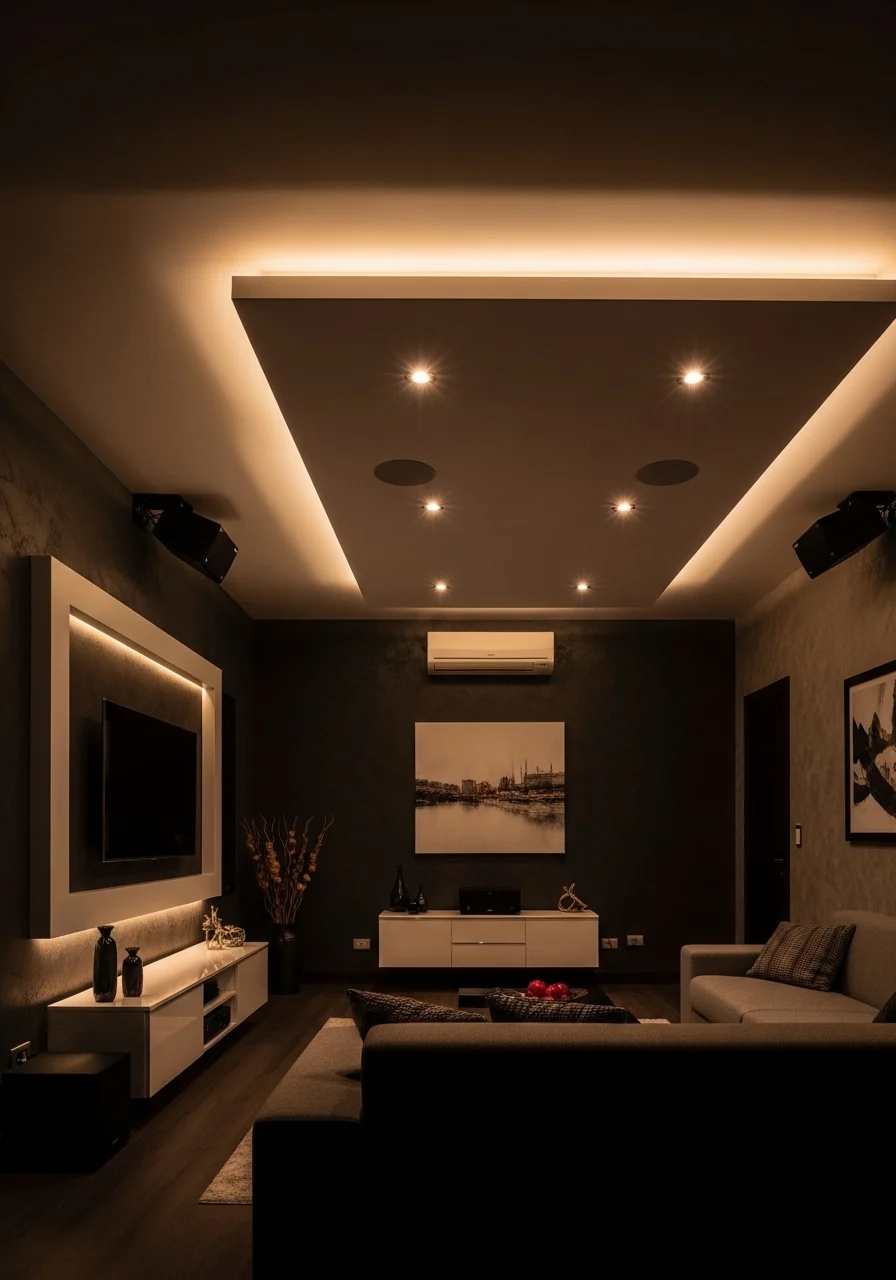
This POP ceiling design integrates speakers for clean audio and a tidy look. It’s perfect for home theaters and media rooms. You’ll get immersive sound without visible speaker boxes. The ceiling stays smooth and stylish.
Key Elements
- POP ceiling with speaker cutouts
- Flush mount in-ceiling speakers
- Reinforced framing for speaker weight
- Sound insulation layer
- Recessed downlights with narrow bezels
- Concealed wiring and speaker amplifier access
- Matte white paint to minimize reflections
- Ventilation paths to prevent heat buildup
- Access panels for maintenance
How to Achieve This Look
- Plan speaker placement for ideal sound staging.
- Build POP ceiling and cut precise speaker openings.
- Reinforce framing where speakers mount.
- Run speaker and power cables to the amplifier location.
- Install speakers and seal around edges.
- Fit recessed downlights and test audio performance.
- Prime and paint the ceiling surface.
- Label wiring access for future servicing.
How to Style / Use It
Pair with dimmable lighting and blackout curtains for home theater nights. Keep speaker grills clean and check wiring annually. This design keeps tech hidden and rooms minimal.
10. Sculptural Wave POP Ceiling Design
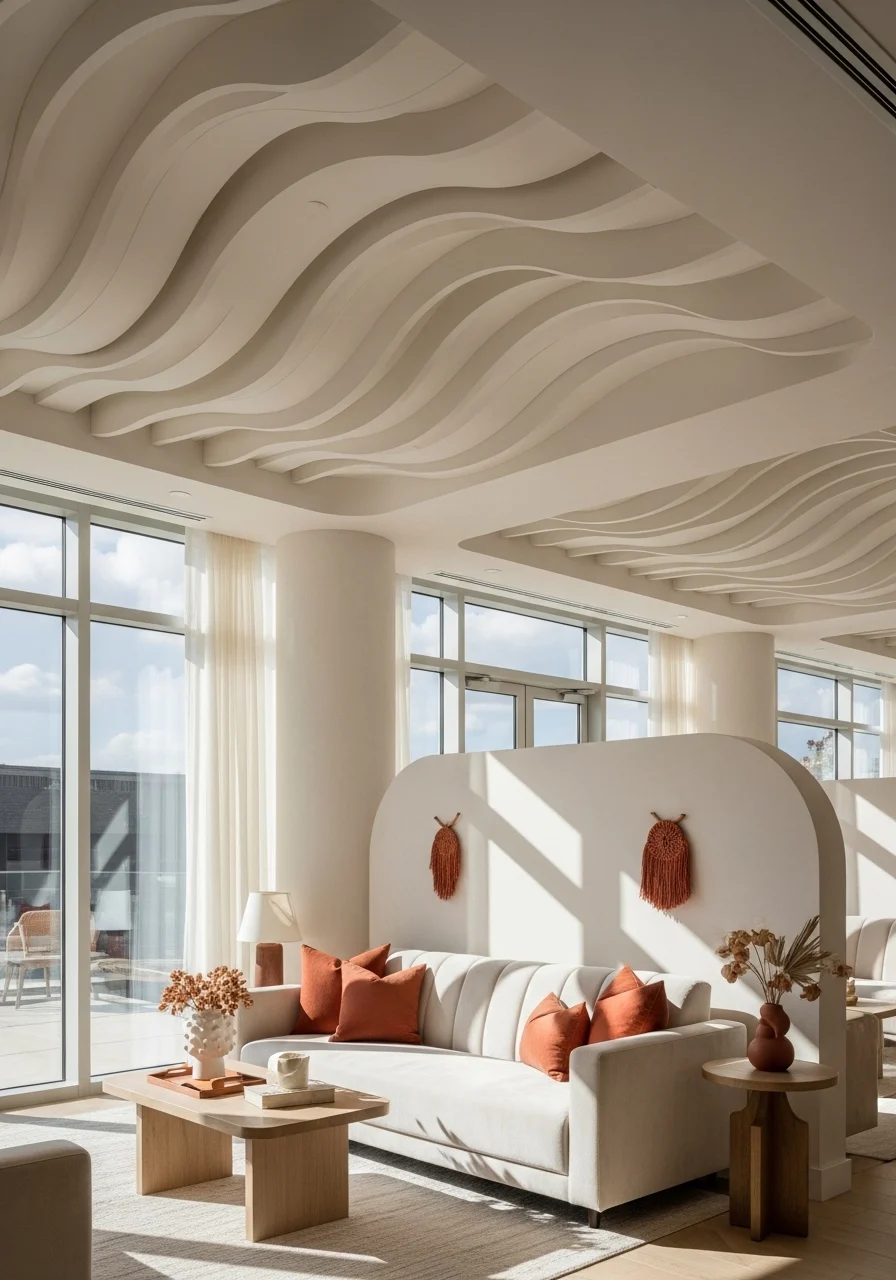
A wave-like POP ceiling adds motion and softness to a space. Curved panels guide the eye and soften rectilinear rooms. It’s a great choice for lounges and studios where you want organic movement overhead. You’ll feel a gentle, calming energy in the room.
Key Elements
- Curved POP panels forming continuous waves
- Smooth skim finish
- Subtle shadow gaps to accentuate curves
- Integrated strip lighting in valleys
- Flexible metal framing to shape curves
- Acoustic backing for sound control
- Warm neutral paint tones
- Concealed support channels
- Seamless joinery and caulk
How to Achieve This Look
- Design wave pattern and mark on ceiling.
- Build flexible framing to match curves.
- Attach POP strips or sheets and secure edges.
- Fill and sand joints for smooth flow.
- Install LED strips in wave valleys.
- Prime and paint with warm neutrals.
- Seal gaps and check for uniform shadows.
- Balance lighting intensity for soft ambience.
How to Style / Use It
Match with textured fabrics and curvy furniture. Use soft rugs and layered lighting for a cozy feel. Dust curves gently with a microfiber cloth. Works well in both sunny and cozy interiors.
11. POP Ceiling Design with Mirror Insets
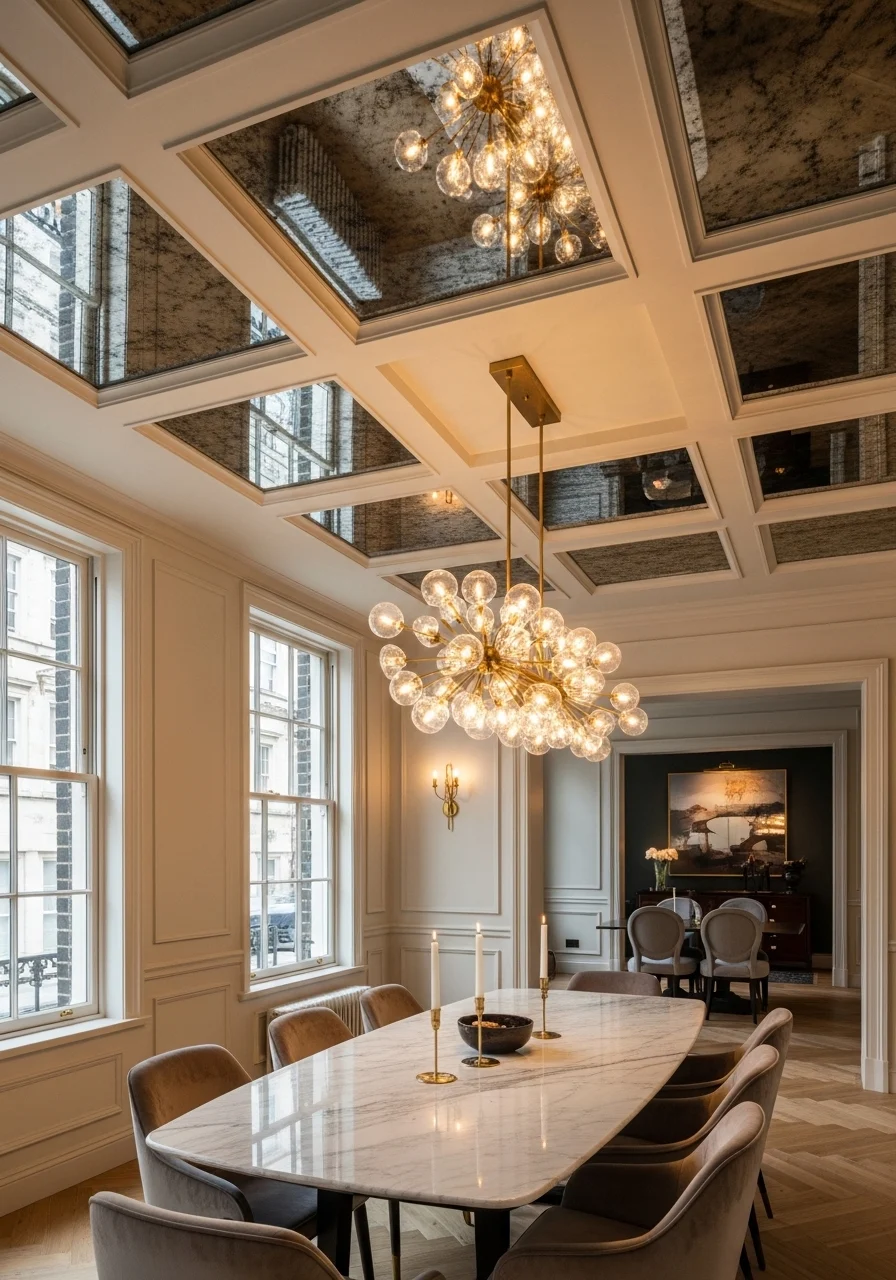
Mirror insets in a POP ceiling create depth and reflect light. They can open up compact rooms and add a modern luxe touch. Use them sparingly above dining or entry areas to avoid glare. You’ll notice a brighter, more spacious feeling instantly.
Key Elements
- POP panels with flush mirror insets
- Safety-backed mirror glass
- Adhesive and mechanical fasteners
- Satin white or pale paint finish
- Concealed low-profile frame for mirrors
- Recessed lighting to control reflections
- Anti-condensation backing where needed
- Beveled edges for a refined look
- Access for cleaning and replacement
How to Achieve This Look
- Plan mirror inset sizes and locations.
- Build POP panel frames and cut precise openings.
- Fit safety-backed mirrors with a silicone perimeter.
- Secure mirrors mechanically too for safety.
- Install recessed downlights to balance reflections.
- Prime and finish POP surfaces around mirrors.
- Inspect mirror positioning from seating zones.
- Clean mirrors with non-abrasive cleaner.
How to Style / Use It
Avoid placing mirrors opposite large windows to reduce glare. Combine with metallic accents for a luxe feel. Dust and clean mirrors regularly. Mirrors amplify light—use them in north-facing rooms.
12. Layered Cove and Spot POP Ceiling for Dining
This layered cove and spot POP ceiling design balances ambient glow with functional task light. The cove sets the mood while adjustable spots highlight art or tabletop settings. It’s tailor-made for dining rooms and kitchens where layered lighting matters. You’ll enjoy flexible scenes from bright meals to intimate dinners.
Key Elements
- POP perimeter cove with LED strip
- Adjustable recessed spotlights (GU10 or LED modules)
- Central pendant mount
- Dimmable drivers and switch zones
- Smooth POP finish and clean cornice
- Concealed wiring distribution points
- Reflective diffuser for even cove light
- Thermal protection near spots
- Paint matched to walls or ceiling
How to Achieve This Look
- Plan lighting zones and switch locations.
- Build cove and install POP base.
- Fit LED strips in the cove with driver location.
- Cut and mount adjustable recessed spot housings.
- Run separate circuits for dimming control.
- Prime and paint ceiling, then install fixture trims.
- Program dimmer scenes and test spots for beam focus.
- Fine-tune spot angles to highlight features.
How to Style / Use It
Use cove for mood and spots for art or table focus. Layer scenes for dinner parties and chores. Clean spot trims occasionally and check dimmer compatibility. This gives you both style and utility.
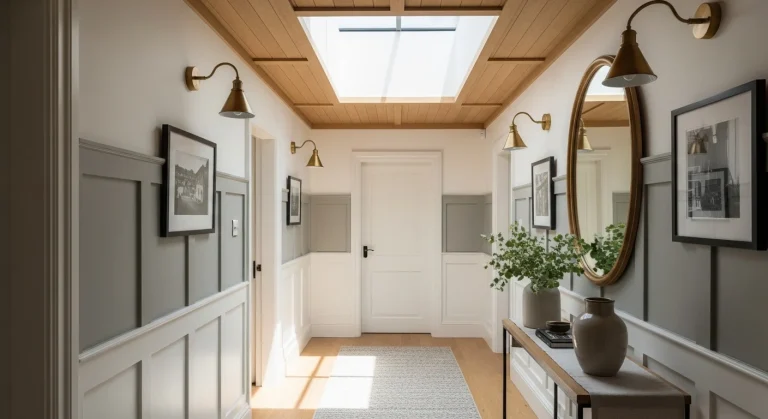
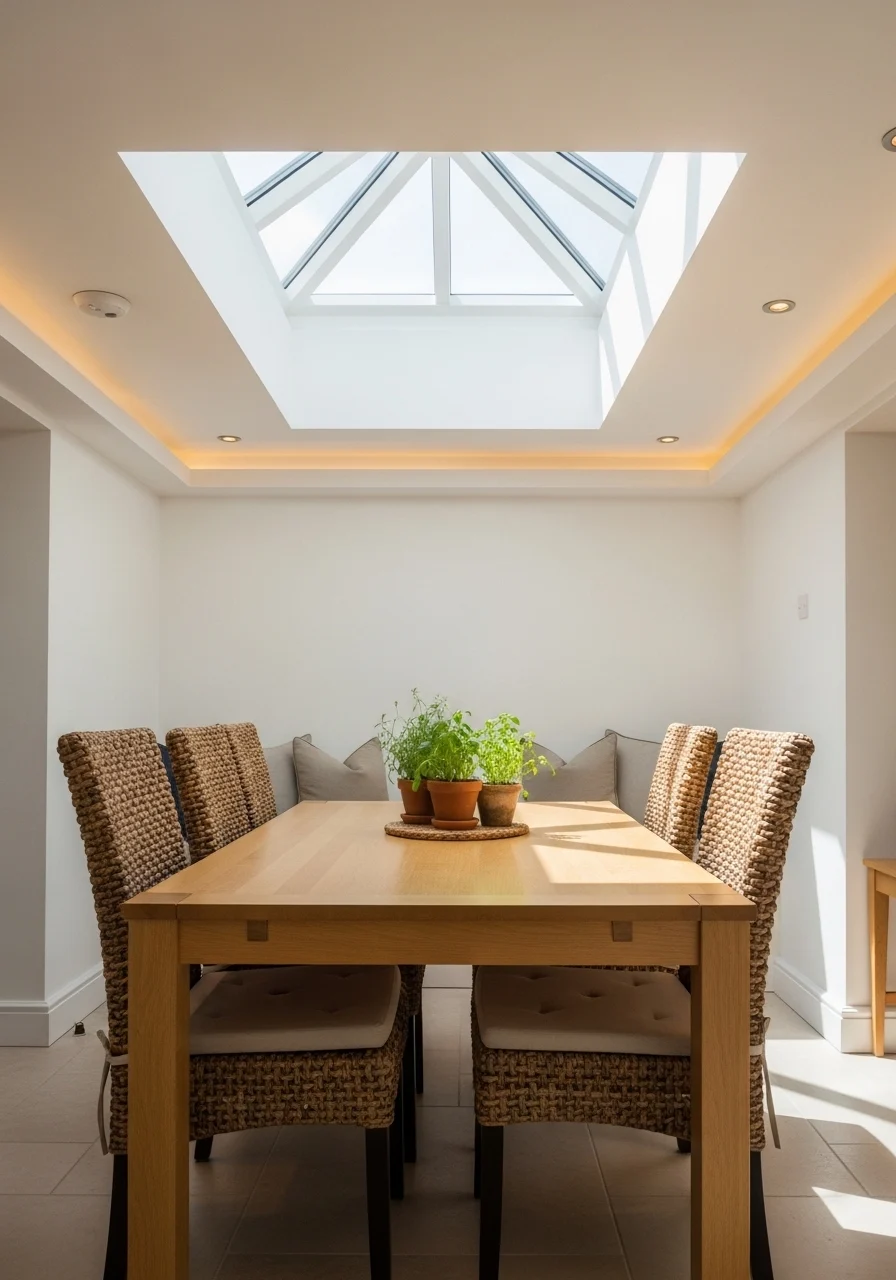
13. POP Ceiling Design with Skylight Integration
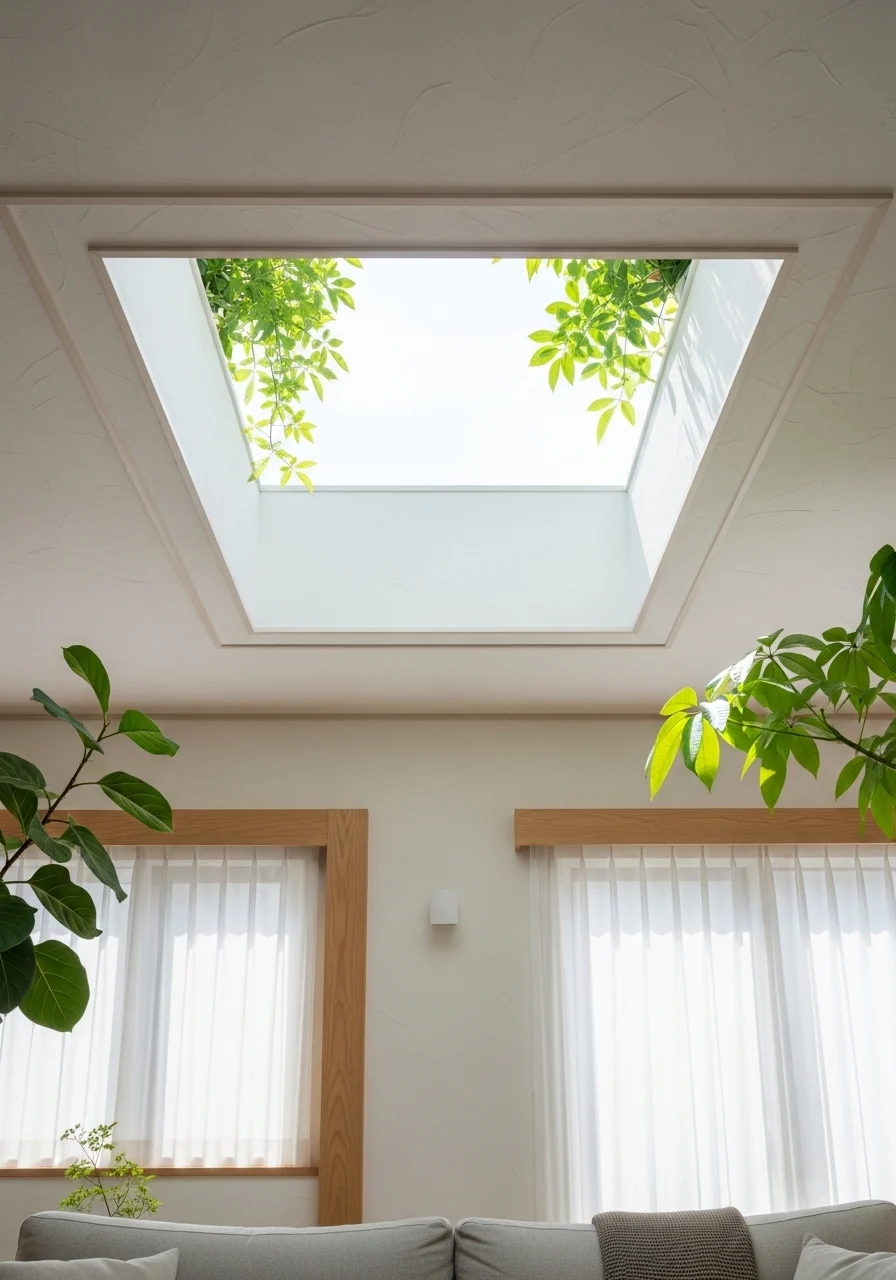
Integrating a skylight into a POP ceiling floods a room with natural light. The plaster framing around skylights smooths transitions and hides flashings. It’s perfect for top-floor living rooms, kitchens, or bathrooms. You’ll get daylight that changes the mood all day long.
Key Elements
- POP framing with skylight curb integration
- Flashing and weatherproof skylight unit
- Damp-proof POP finishes for bathrooms/kitchens
- Diffuser or blind for light control
- Insulation around skylight curb
- Smooth joint skim around opening
- UV-stable paint and sealants
- Condensation management channel
- Access for glass cleaning and maintenance
How to Achieve This Look
- Position skylight where daylight is most beneficial.
- Frame opening in roof and install skylight flashing.
- Build POP framing and attach to ceiling edges.
- Insulate and seal around the skylight curb.
- Skim joints and sand for a seamless look.
- Install blinds or diffusers for light control.
- Prime and finish POP with UV-stable paint.
- Check for leaks and condensation after rain.
How to Style / Use It
Use skylights to highlight plants and reading nooks. Fit translucent blinds for afternoon glare. Clean skylight regularly and inspect seals annually. Skylights are great for north-facing rooms to increase brightness.
14. POP Ceiling Design with Brass Inlays
Brass inlays bring warm metallic accents to a POP ceiling design. Thin brass strips or plates embedded in grooves add an upscale, tailored look. Use this in bedrooms and living rooms to introduce warmth without heavy ornament. You’ll get a designer feel with small, strategic details.
Key Elements
- POP ceiling with recessed brass strips
- Antique or satin brass finish
- Stainless steel backing for brass strips
- Narrow grooves or channels routed in POP
- Satin white or warm paint base
- Concealed fixture mounts near inlays
- Sealant to prevent tarnish
- Soft diffused lighting to show metal
- Access for cleaning and polishing
How to Achieve This Look
- Plan brass inlay pattern on your ceiling design.
- Route narrow grooves in POP before final skim.
- Glue and mechanically fix brass strips into grooves.
- Seal edges with clear non-yellowing sealant.
- Prime and paint POP surface carefully.
- Polish brass inlays and buff to finish.
- Install lighting to accent metal without glare.
- Schedule gentle cleanings to maintain shine.
How to Style / Use It
Pair brass inlays with warm woods and leather. Avoid overuse. Small runs are most elegant. Wipe with a soft cloth and brass cleaner occasionally. Works well in spaces with warm-toned furnishings.
15. Rustic POP Plank Ceiling Look
A POP plank ceiling creates a rustic look without heavy timber. Long POP panels mimic plank lines and can be textured with paint to suggest grain. Great for kitchens or cozy nooks that need character. You’ll enjoy the farmhouse charm with modern ease.
Key Elements
- Long POP plank panels with slight bevels
- Faux wood-paint techniques (dry-brush)
- Matte or low-sheen finish
- Narrow recessed lights between planks
- Lightweight metal supports for panels
- Flexible joint tape and compound
- Damp-proof priming in kitchens
- Accent beams or trims (optional)
- Sealed edges to prevent moisture ingress
How to Achieve This Look
- Plan plank widths and directionality.
- Install metal framework and fix POP panels lengthwise.
- Tape and skim joints for a continuous surface.
- Use dry-brushing technique with two paint tones for wood effect.
- Seal with matte protective coat.
- Install recessed or strip lighting between planks.
- Attach optional faux beams for depth.
- Touch up paint as needed over time.
How to Style / Use It
Pair with open shelving, vintage pieces, and woven textiles. Clean with a damp cloth; avoid harsh chemicals. Use in kitchens and covered outdoor rooms where weight and maintenance matter.
16. POP Ceiling Design with Painted Murals
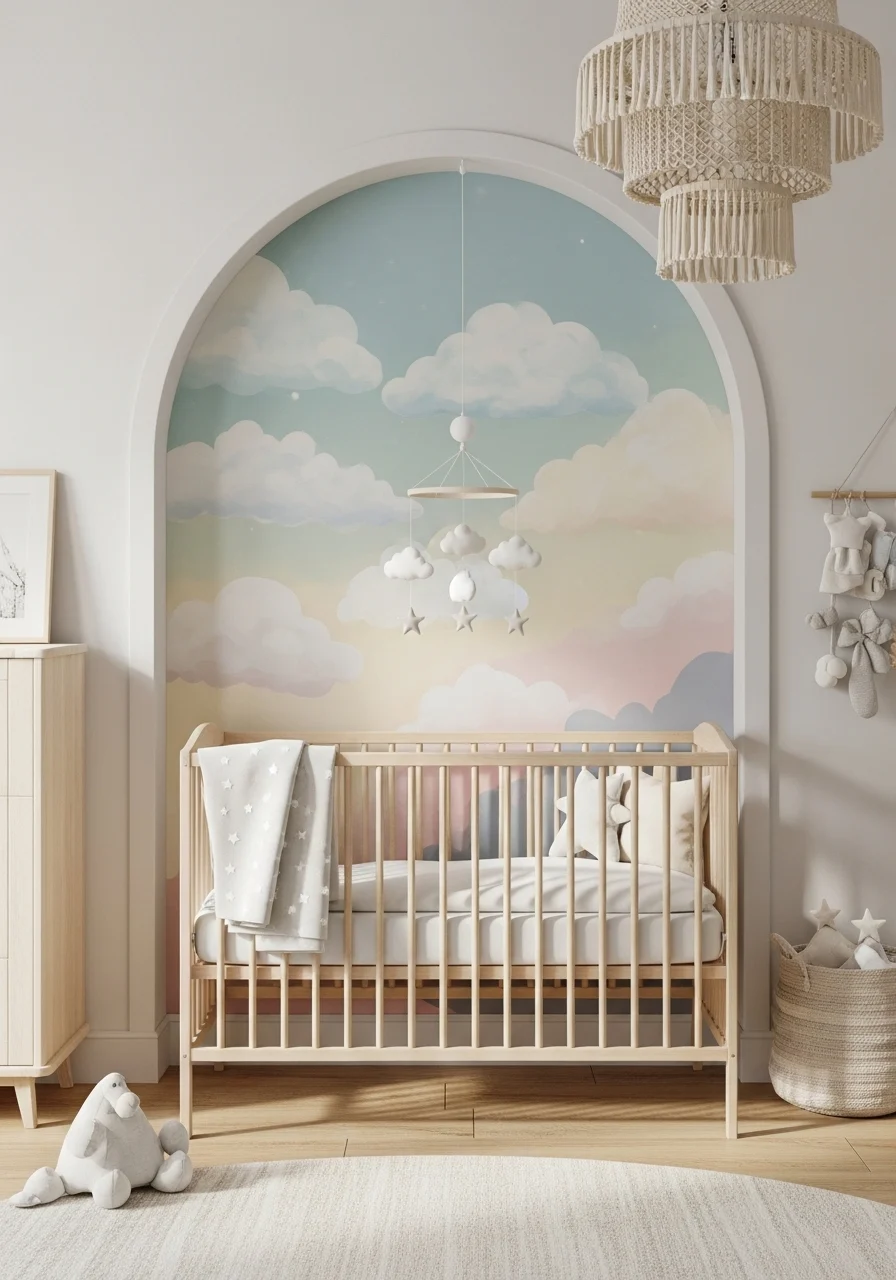
Painting a mural inside a POP recess turns the ceiling into art. Soft skies, geometric patterns, or botanical murals add personality without heavy structure. This suits kids’ rooms, studies, or creative spaces. You’ll find the room suddenly feels curated and joyful.
Key Elements
- POP recess framed for mural space
- Smooth, well-primed POP surface
- Acrylic mural paints (lightfast)
- Satin or eggshell protective varnish
- Clear edges and masking to protect perimeter
- Small spotlighting to highlight artwork
- Access for touch-up painting
- Moisture-resistant primer in humid rooms
- Sealant for longevity
How to Achieve This Look
- Prepare POP recess and prime with acrylic primer.
- Sketch mural design to scale and transfer lines.
- Block in base colors with acrylics.
- Layer details and add shadows/highlights.
- Seal with clear, non-yellowing varnish.
- Install soft spotlights to enhance colors.
- Allow ample drying time between coats.
- Keep touch-up paints and brushes for future fixes.
How to Style / Use It
Coordinate wall paint and textiles with mural colors. Use this in nurseries or creative areas to spark imagination. Dust gently and avoid moisture exposure. Change mural themes as your tastes evolve.
17. Monochrome Textured POP Ceiling Design
A monochrome textured POP ceiling adds quiet sophistication. Texture can be subtle stipple, fine knockdown, or brushed strokes. Sticking to one color keeps the look cohesive and modern. You’ll get tactile interest without loud contrast.
Key Elements
- POP ceiling with uniform textured finish
- Single-tone paint (soft gray, off-white)
- Micro-texture tools (roller, trowel)
- Matte or eggshell paint for depth
- Concealed lighting to wash texture
- Acoustic underlay optional
- Seamless skim around fixtures
- Dust-resistant sealant
- Touch-up kit for future repairs
How to Achieve This Look
- Choose texture style and test on sample board.
- Apply POP base and allow to set.
- Use texture tools to create uniform pattern.
- Prime and apply paint in consistent strokes.
- Install concealed lighting to accent texture.
- Seal with dust-resistant coat if needed.
- Touch up any imperfect areas.
- Keep a small sample for future matching.
How to Style / Use It
Pair with monochrome decor and layered textiles. Texture hides minor scuffs and gives depth in low light. Clean gently with a soft brush and avoid wet scrubbing. Works well in minimalist rooms.
18. POP Ceiling Design with Skylight & Cove Combo
Combining a skylight and cove POP ceiling gives you the best of natural and artificial light. The skylight brings daytime brightness while the cove provides evening ambiance. It’s ideal for kitchens, breakfast nooks, and studios. You’ll enjoy balanced light anytime.
Key Elements
- Skylight integrated into POP frame
- Perimeter cove with warm LED strips
- Insulated skylight flashing and seals
- Dimmable LED driver for cove
- Moisture-resistant POP where needed
- Diffuser or blind for skylight glare
- Concealed wiring for lights
- Smooth skim finish around roofing junction
- Thermal barrier to prevent heat loss
How to Achieve This Look
- Position skylight and plan cove perimeter.
- Install skylight and weatherproof flashing.
- Build POP cove framing around skylight.
- Add LED strip channels and run wiring.
- Prime and paint POP surfaces.
- Fit blinds or diffusers for light control.
- Test dimming and daylight balance.
- Check seals after heavy rain.
How to Style / Use It
Use skylight for plants and cove for evenings. Choose blinds that fold neatly to avoid blocking light. Maintain skylight seals annually. Great for year-round daylight optimization.
19. POP Ceiling Design with Integrated Ceiling Fan Cove
This POP ceiling design hides a ceiling fan inside a flush cove for a clean look. It keeps air circulation efficient and the ceiling sleek. Bedrooms and patios benefit from this hideaway approach. You’ll get comfort without a bulky fixture.
Key Elements
- POP cove sized for fan clearance
- Recessed mounting box for fan motor
- Vibration-dampening mounts
- Concealed wiring and remote control receiver
- Smooth plaster finish around cove
- Airflow-friendly spacing and clearances
- Access hatch or removable panel
- Matte paint to reduce glare
- Fan canopy matching ceiling color
How to Achieve This Look
- Select fan with compatible flush-mount design.
- Build cove with required clearance for blades and motor.
- Install vibration-dampening mounts in framing.
- Run power wiring and fit remote receiver.
- Attach fan and test for wobble or noise.
- Prime and paint cove to match ceiling.
- Fit removable panel for service access.
- Perform annual balance checks and cleaning.
How to Style / Use It
Pair with light linens and neutral tones for a breezy feel. Clean blades every few months and check mount stability. Use remote speed settings to save energy and control comfort.
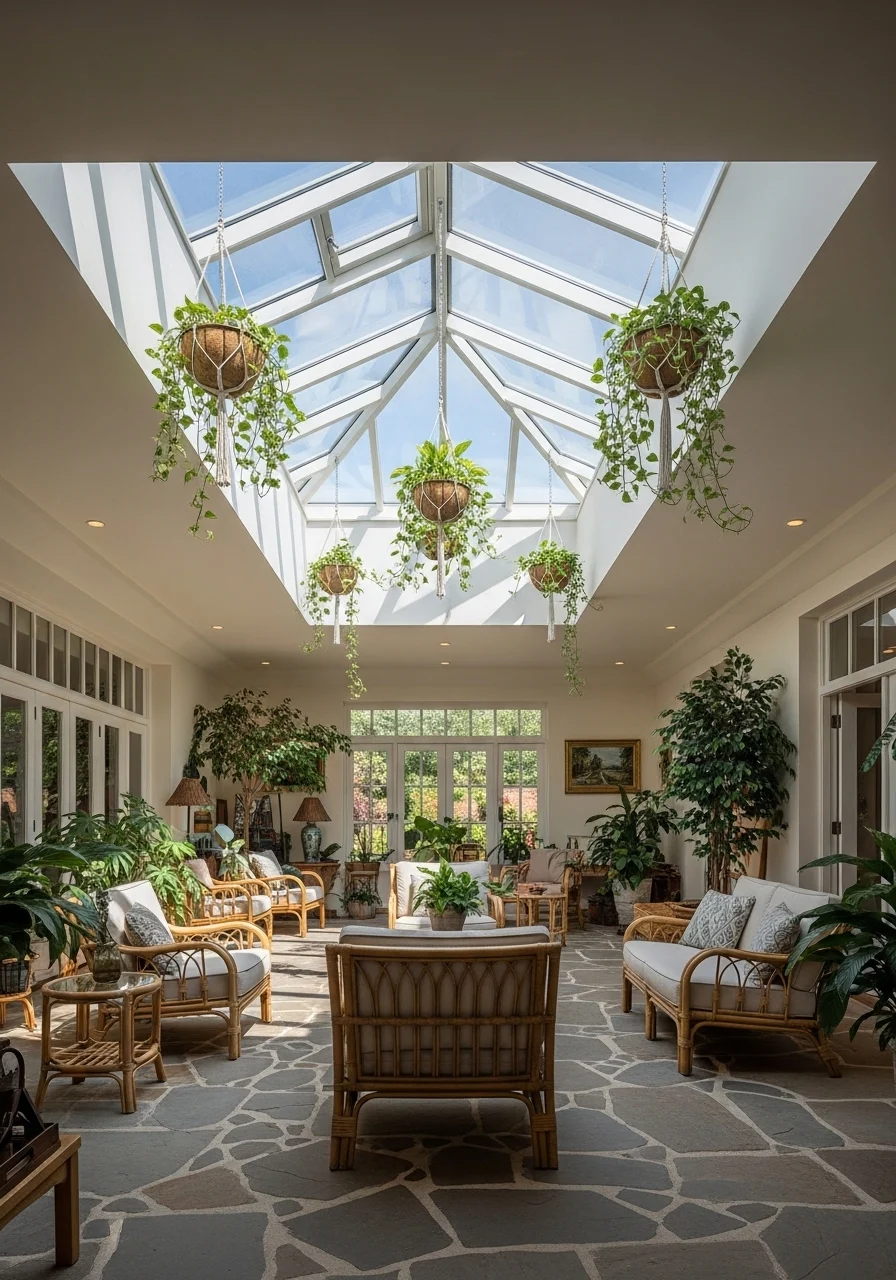
20. POP Ceiling Design with Recessed Plant Niche
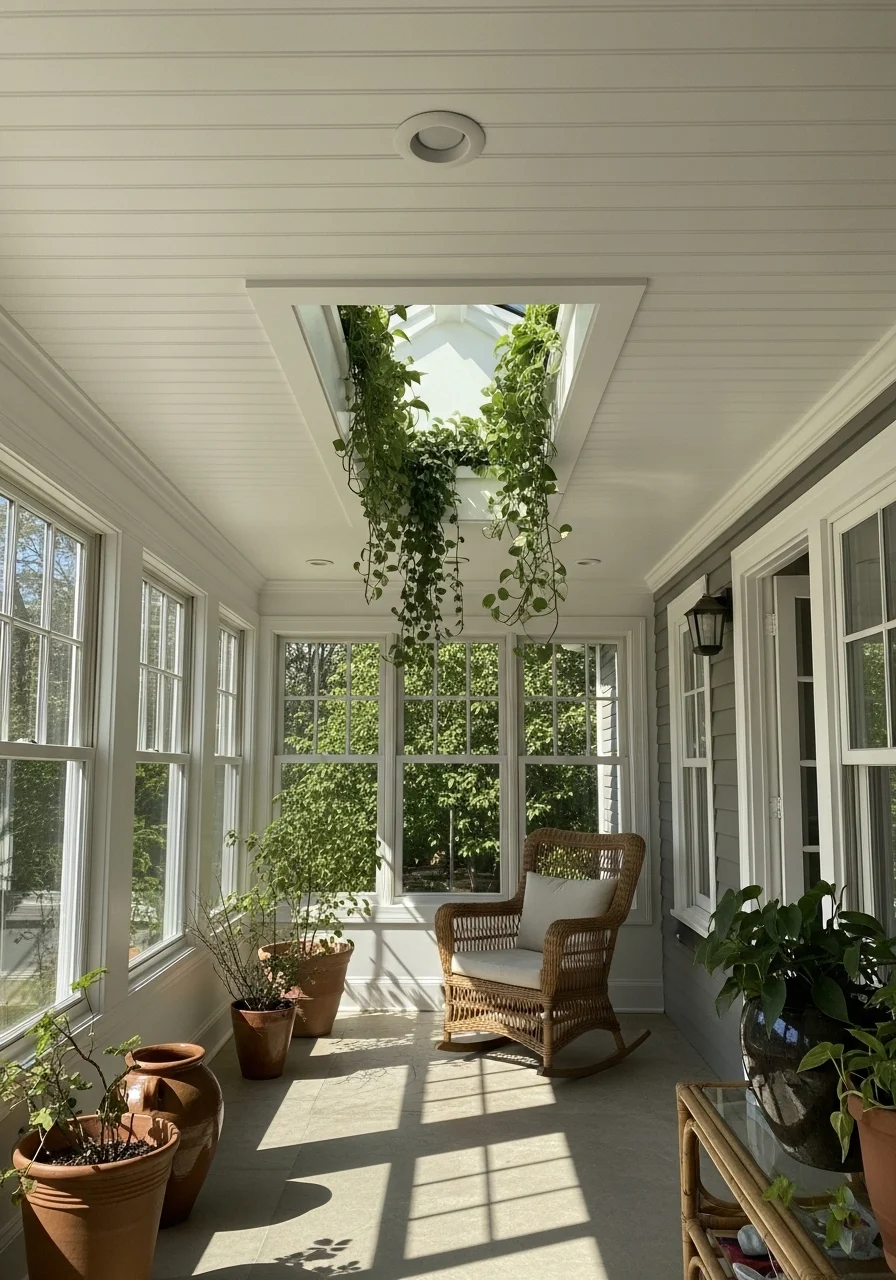
Adding a recessed plant niche to a POP ceiling brings greenery into your overhead plane. Suspended plants soften architecture and boost air quality. It’s ideal for sunrooms, conservatories, or covered patios. You’ll get a living focal point that feels fresh and alive.
Key Elements
- Shallow POP recess sized for hanging planters
- Drainage plan or waterproof tray above niche
- Recessed warm LED grow light if needed
- Concealed hooks or anchor points
- Moisture-resistant POP finish
- Lightweight planter systems
- Access for watering and maintenance
- Anti-rot materials for any wooden trims
- Clear protective sealant to prevent staining
How to Achieve This Look
- Plan niche size and drainage requirements.
- Build reinforced POP recess with anchors for planters.
- Install waterproof tray or drainage channel.
- Add grow LEDs if natural light is low.
- Prime and finish POP with moisture-resistant paint.
- Hang lightweight planters and run drip systems if needed.
- Check anchors and drainage regularly.
- Rotate plants for even growth and light exposure.
How to Style / Use It
Use trailing plants like pothos or string-of-pearls. Water carefully to avoid ceiling stains. Keep lightweight pots to reduce load. This brings nature into urban interiors beautifully.
22. POP Ceiling Design with Industrial Metal Grid
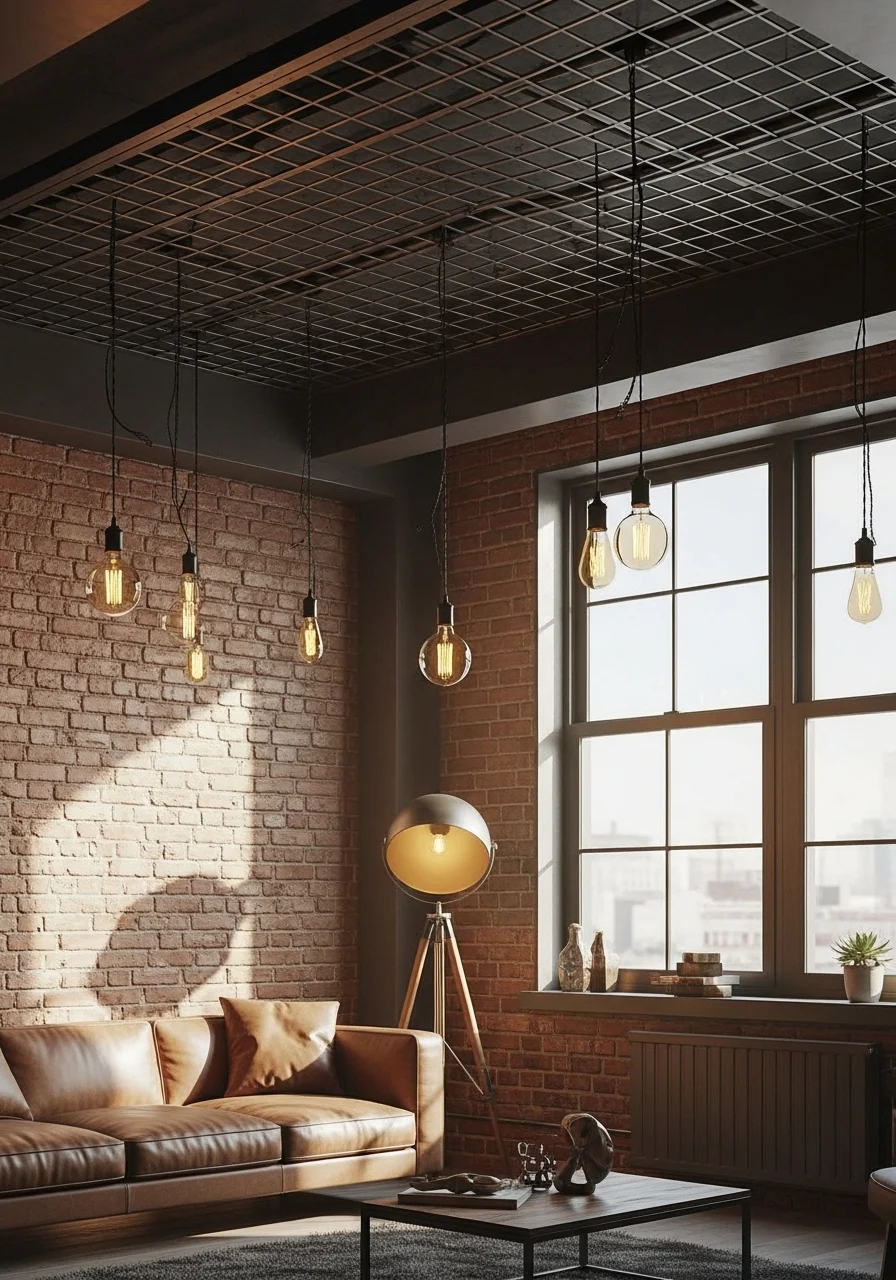
Pairing a POP ceiling with a metal grid adds an industrial edge while keeping the ceiling solid. The grid can hold lights, plants, or hanging decor. Use it in lofts, studios, or kitchens for a utilitarian yet refined feel. You’ll like the adaptable, tool-friendly setup.
Key Elements
- POP ceiling base with surface-mounted metal grid
- Powder-coated metal for durability
- Modular hooks and clamps for fixtures
- Integrated track lighting options
- Concealed anchor points in POP structure
- Matte white or dark gray POP finish
- Sound-absorbing pads where grid contacts POP
- Quick-release fittings for easy changes
- Protective sealant under grid contact areas
How to Achieve This Look
- Install POP ceiling base and ensure load bearing points.
- Secure anchor brackets into structural members.
- Fit metal grid and clamp to anchors.
- Run power and attach modular fixtures to grid.
- Paint or powder-coat metal if needed.
- Add accessories like hanging lamps or plants.
- Balance load distribution across anchors.
- Inspect fittings and fasteners occasionally.
How to Style / Use It
Use grids for flexible lighting and decor setups. Keep heavier items near structural supports. Dust metal grid with a soft brush and check fittings yearly. This is perfect for creative, changing spaces.
22. POP Ceiling Design with Starry Night Fiber Optic Lights

A fiber optic star ceiling in POP creates a magical night-sky effect. Tiny pinpoints of light mimic stars, perfect for bedrooms and home theaters. The POP surface conceals fiber ends for a clean install. You’ll get a calming, poetic atmosphere for relaxation.
Key Elements
- POP ceiling painted deep matte navy or black
- Fiber optic star heads with light engine (RGB or warm)
- Mounting plate and diffuser for the light engine
- Concealed wiring and access panel
- Star pattern guide and drilling map
- Satin or matte protective finish
- Dimmer or remote control for effects
- Insulation around light engine for heat control
- Patch kit for any future repairs
How to Achieve This Look
- Plan star map and mark drill points on POP.
- Drill tiny holes sized for fiber optic ends.
- Feed fibers to the concealed light engine location.
- Mount light engine in an accessible panel.
- Paint ceiling with matte dark paint after fibers fixed.
- Test star brightness and program effects.
- Seal access panel and tidy cabling.
- Keep spare fibers and a maintenance plan.
How to Style / Use It
Use this in bedrooms for soothing, low-light evenings. Pair with blackout curtains for the best effect. Replace light engine per manufacturer schedule. Avoid bright overhead fixtures that wash out stars.
23. POP Ceiling Design with Ceiling-Mounted Artwork Frame
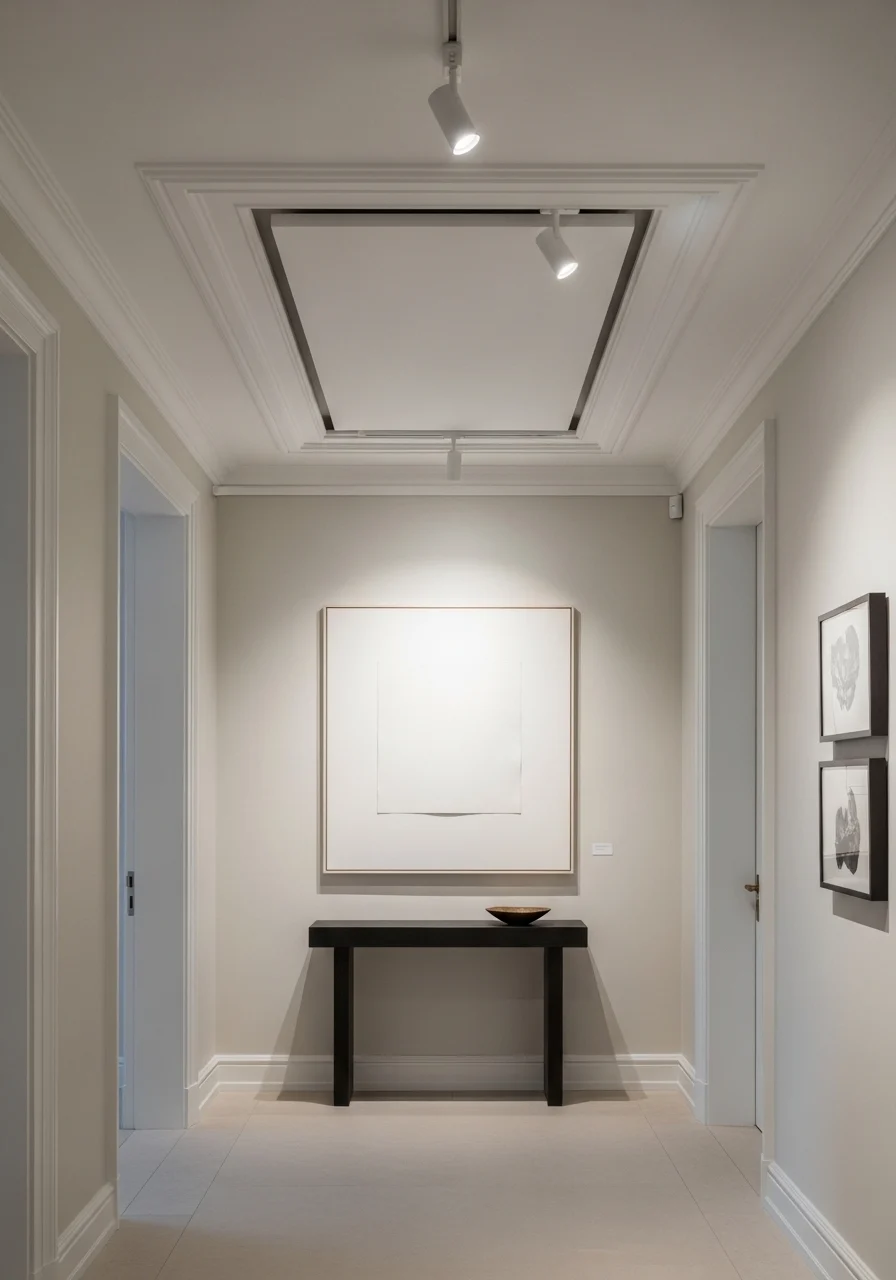
A ceiling-mounted artwork frame in POP turns the overhead into gallery space. Suspended artwork or panels add vertical interest and guide traffic flow. This suits long hallways, stair landings, or entryways. You’ll create a unique gallery experience.
Key Elements
- POP recessed frame sized for artwork panel
- Secure ceiling anchors and hanging hardware
- Track or spot lighting for highlighted art
- Lightweight framed panels or acrylic art
- Hidden access for wiring and fastening
- Satin ceiling paint for contrast
- Vibration-damping mounts
- Dust covers for artwork
- Maintenance hatch for changes
How to Achieve This Look
- Design the frame size and structural support requirements.
- Build POP recess and install reinforced anchors.
- Fit hanging hardware and test with weights.
- Install track lights and wire to switches.
- Hang artwork panels and secure locks.
- Prime and paint frame edges for a neat finish.
- Adjust lighting angles to avoid glare.
- Swap panels seasonally and store originals safely.
How to Style / Use It
Rotate artwork to keep the space fresh. Clean lights and frames regularly. Use lightweight, shatter-resistant panels in homes with pets or kids. This creates an elegant vertical gallery feel.
24. POP Ceiling Design with Floating Cloud Panels
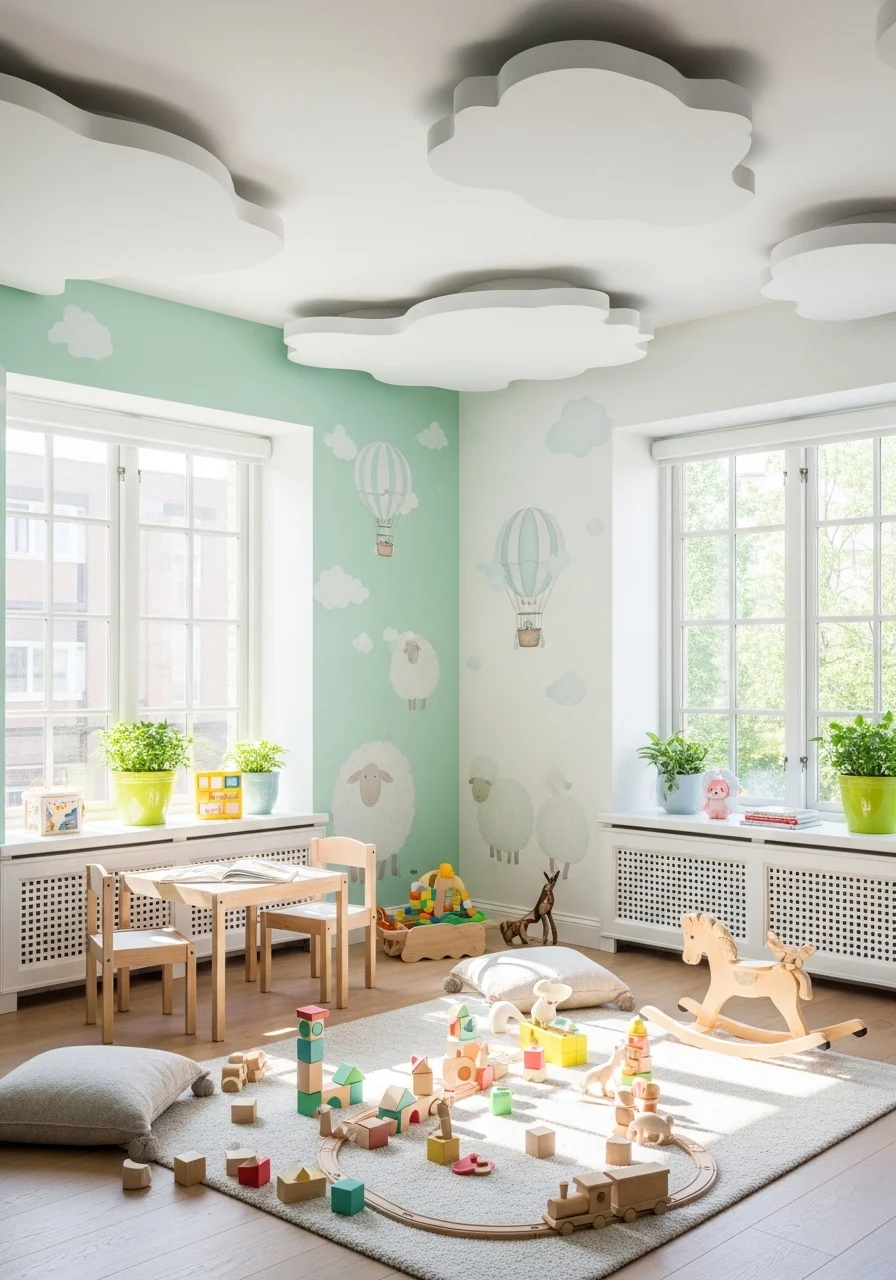
Floating cloud POP panels add whimsy and soft acoustics to playrooms and nurseries. These lightweight forms hang slightly below the ceiling, casting gentle shadows. They create playful shapes without permanent structure. You’ll get a soft, calming atmosphere for kids.
Key Elements
- Lightweight POP cloud panels or foam-backed POP
- Concealed thin suspension wires
- Soft matte white or pastel paint
- Acoustic padding between panels and ceiling
- Rounded edges for safety
- Secure fastenings to structural members
- Low-glare LED uplights (optional)
- Non-toxic paint and sealant
- Soft fabric or felt option for tactile panels
How to Achieve This Look
- Design cloud shapes and determine suspension heights.
- Build panels and reinforce hanging points.
- Attach suspension wires and test stability.
- Add acoustic padding where noise reduction is needed.
- Prime and paint panels with child-safe paints.
- Install soft uplighting if desired.
- Securely fasten all anchors and check regularly.
- Replace or repaint panels as designs change.
How to Style / Use It
Use in playrooms, nurseries, or creative studios. Keep panels at safe heights and inspect anchors annually. Use pastel accents and soft floor cushions to complete the look. Great for seasonal theme changes.
25. POP Ceiling Design with Integrated Skylight Garden
Combining POP ceiling framing with a skylight garden brings a mini atrium indoors. Hanging planters and a glass skylight create a green-focused ceiling feature. This is ideal for sunlit central courtyards, atriums, and high-ceiling stairwells. You’ll get a lush focal point and a daily dose of nature.
Key Elements
- Large skylight with POP framing and drainage plan
- Hanging planter system with lightweight pots
- Waterproof tray and drip system above ceiling
- Grow LEDs for low-light periods
- Reinforced anchors and accessible service hatch
- UV-stable paint and sealants
- Thermal break to prevent heat loss
- Integrated irrigation or manual access points
- Non-corrosive fasteners for humid conditions
How to Achieve This Look
- Plan skylight size and plant weight distribution.
- Install skylight and weatherproof flashing.
- Build POP frame and plan drainage above the ceiling.
- Fit hanging planter rail system and anchors.
- Install irrigation or drip trays for maintenance.
- Add grow lights if natural light is insufficient.
- Prime and finish POP surfaces with durable paint.
- Schedule regular plant care and inspect waterproofing.
How to Style / Use It
Choose trailing and compact plants that suit light conditions. Use a timed irrigation system for easy care. Inspect seals and drainage after heavy weather. This creates a living ceiling centerpiece that changes with the seasons.
You now have 25 POP ceiling design ideas for modern homes, covering everything from subtle cove lighting to dramatic sculptural forms. Try a few on paper, pin your favorites, and start with a small room or single feature before committing house-wide. Which POP ceiling design are you most excited to try? Save or share this list with friends who love home upgrades—you might inspire your next weekend project.