21 Headboard Design Ideas That Upgrade Your Bed
You stare at your bed every morning. It’s where you unwind, get ready, and sometimes work. A thoughtfully chosen headboard can change how the whole room looks and feels.
These 21 headboard design ideas show realistic, stylish options you can copy or adapt. You’ll find simple DIY headboard ideas, upholstered headboard looks, wooden and painted options, plus clever space-saving headboard ideas. Each idea includes key elements, step-by-step build or styling instructions, and tips for everyday use.
Whether you like modern minimal, cozy cottage, or bold statement pieces, these headboard design ideas will help you pick one that fits your style, budget, and skill level. Pin the ideas you love and try one this weekend.
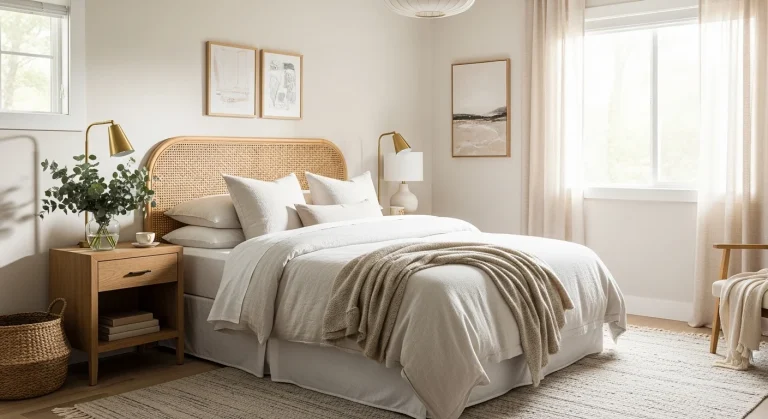
1. Plush Tufted Upholstered Headboard

What makes it special: The tufted upholstery reads luxe and soft. Rounded lines soften a structured bed frame. Velvet or linen adds tactile depth. It’s a classic feel that suits cozy, feminine, or guest rooms. You’ll love it if you want comfort and a refined look. The headboard invites touch and creates visual warmth.
Key Elements
- Deep button tufting pattern
- Velvet or linen upholstery (dove gray or blush)
- High-density foam padding (2–3 inches)
- Plywood or MDF backing (sanded)
- Nailhead trim or hidden welt
- Tall, slightly curved top profile
- Sturdy mounting brackets or floor legs
- Neutral bedding with layered textures
- Brass or matte black hardware
- Soft ambient bedside lighting
How to Achieve This Look
- Cut plywood to desired headboard shape and sand edges.
- Attach 2–3 inches of high-density foam with spray adhesive.
- Drape batting over foam and staple the edges to the plywood.
- Center the upholstery fabric and stretch tightly; staple to the back.
- For tufting, mark tuft points, drill holes, and use long screws with buttons.
- Pull thread through, secure buttons on the back with washers.
- Add nailhead trim or welt around the perimeter if desired.
- Attach mounting brackets to the frame or add floor legs.
- Hang on wall or bolt to bed frame and style bedding.
How to Style / Use It
Pair with soft, layered bedding and a mix of matte brass lamps. Use neutral walls or a pale smoky paint for contrast. Keep pillows minimal for a modern take or pile them for a hotel look. Vacuum fabric regularly and spot-clean stains quickly. Swap covers seasonally for a fresh color without rebuilding.
2. Reclaimed Wood Plank Headboard (Rustic Wood Headboard)
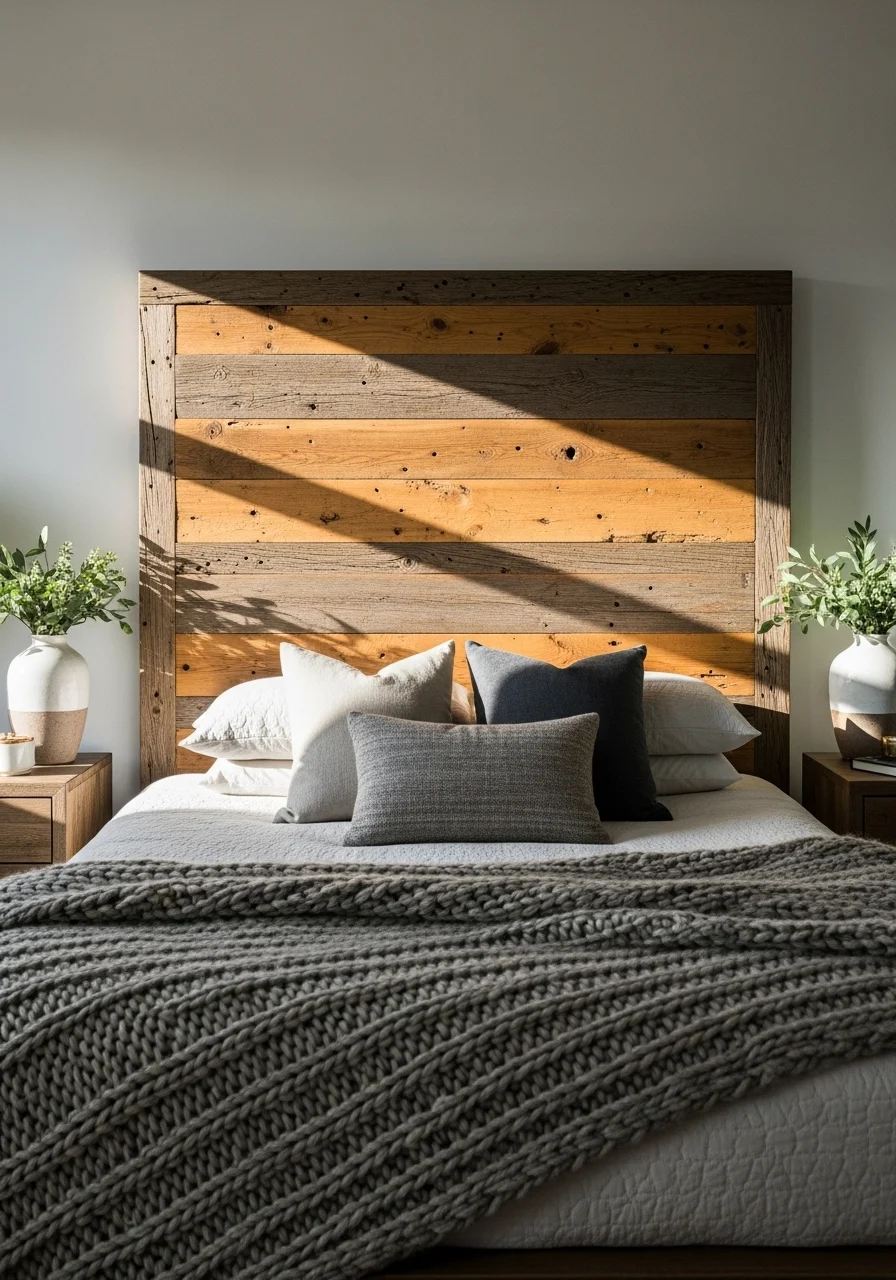
What makes it special: The reclaimed wood look brings warmth and character. Visible grain, knots, and nail marks give a lived-in feel. It fits farmhouse, cottage, and eclectic spaces. You’ll love this if you prefer eco-friendly materials and natural texture. It smells faintly of old pine and looks grounded.
Key Elements
- Reclaimed pine/slate/wood planks
- Mixed warm and gray tones
- Visible nail or screw accents
- Matte sealer or wax finish
- Horizontal or vertical plank layout
- Sturdy 2×4 support frame
- Exposed bracket or French cleat mount
- Distressed edges and varied plank widths
- Layered neutral bedding with leather accent
- Potted plant or woven basket nearby
How to Achieve This Look
- Source reclaimed planks or salvage new boards and distress lightly.
- Cut planks to equal length; plan staggered widths for interest.
- Build a 2×4 supporting frame at the height you want.
- Attach planks to the frame with exterior wood screws.
- Fill gaps or keep them for rustic charm.
- Sand edges lightly and clean dust.
- Apply a matte sealer or beeswax to protect the wood.
- Attach a French cleat to the wall and headboard for secure hanging.
- Style with warm linens and leather accents.
How to Style / Use It
Pair with woven textiles and terracotta ceramics. Balance heavy wood with light bedding and brass or black metal fixtures. Keep finishes matte for authenticity. Touch up the sealer yearly and re-tighten mounting hardware. For a modern twist, paint the planks a soft gray and keep the texture.
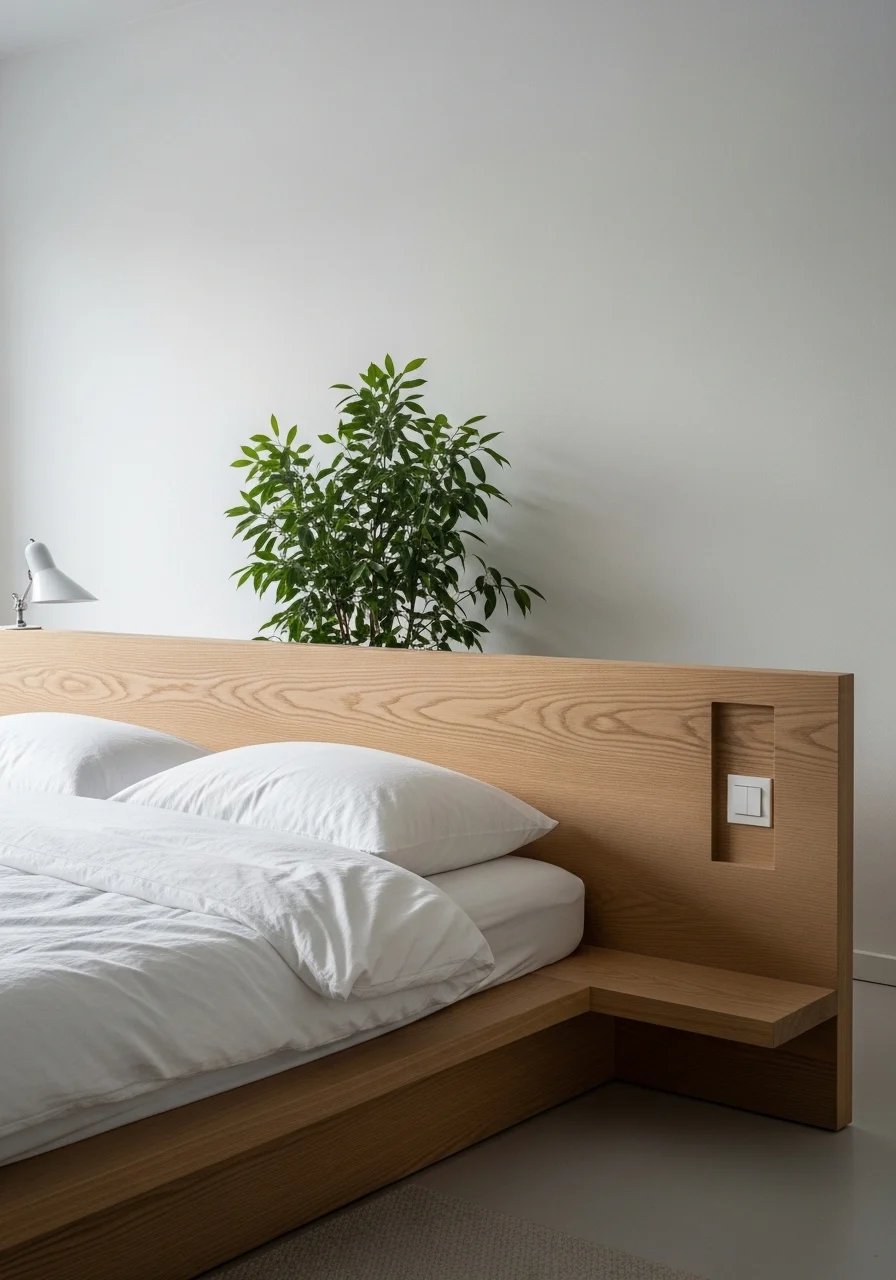
3. Modern Floating Panel – Headboard Design Ideas
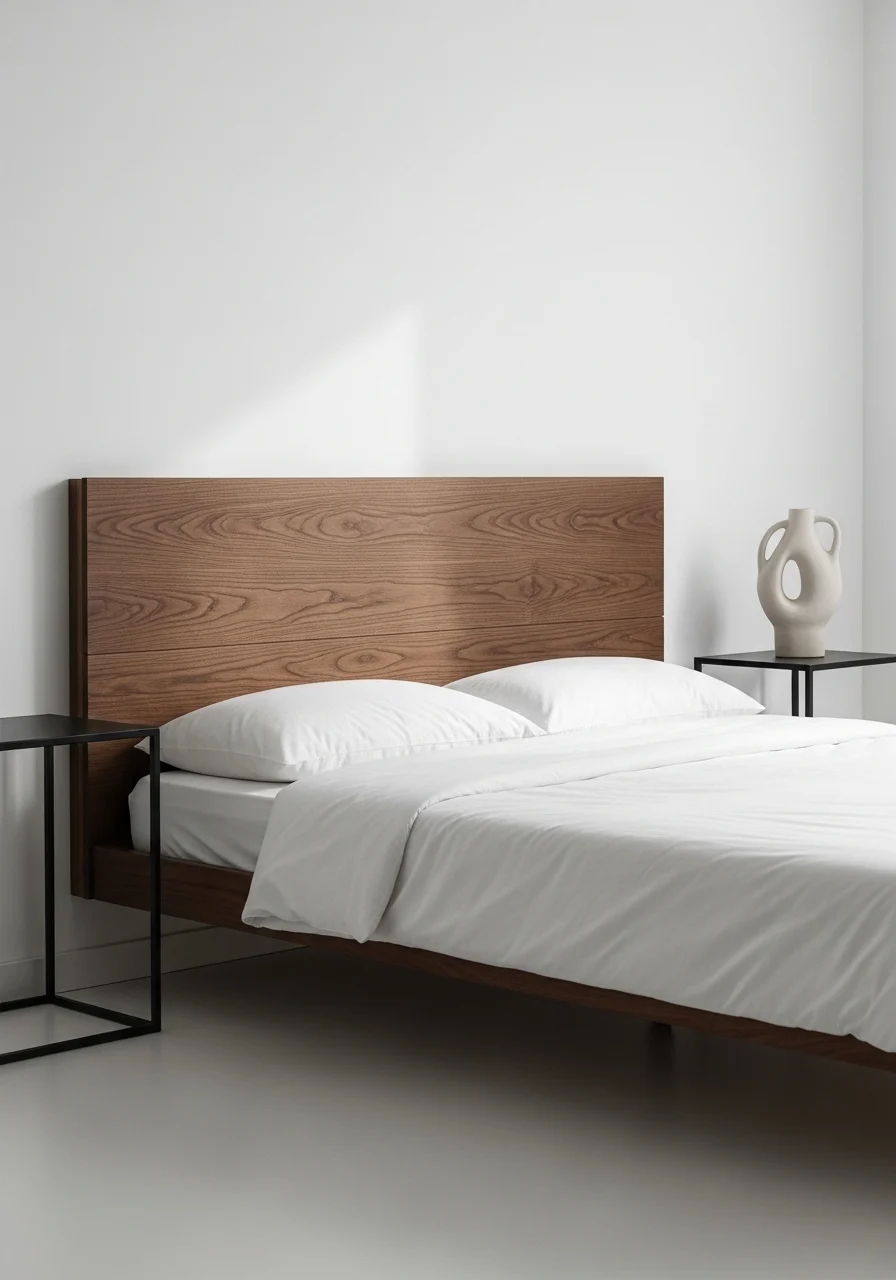
What makes it special: The floating panel is sleek and visually light. It creates the illusion of space by leaving open floor beneath. Perfect for minimal and mid-century rooms. You’ll love it if you want a contemporary, low-clutter look. The wood grain reads warm next to cool white bedding.
Key Elements
- Slim walnut or oak panel (1–1.5 inches)
- Concealed French cleat wall mounting
- Matte or oil finish
- Low-profile shape, rectangular or curved corners
- Neutral white or gray bedding
- Floating bedside shelves or slim sconces
- Minimal headboard height (20–28 inches)
- Matte black hardware accents
- Clean-lined bed frame
- Simple sculptural decor
How to Achieve This Look
- Cut a plywood panel to desired size and veneer with walnut or oak.
- Sand and apply an oil or matte finish.
- Attach a heavy-duty French cleat to the back.
- Locate studs and mount the wall cleat firmly.
- Lift the panel onto the cleat for a secure, floating effect.
- Add slim floating shelves or wall-mounted sconces at matching heights.
- Keep bedding simple to emphasize clean lines.
- Maintain the finish by wiping with a damp cloth as needed.
How to Style / Use It
Pair with mid-century bedside tables and sculptural lamps. Keep clutter off the floor to enhance the floating illusion. Use warm woods and tonal textiles for depth. Rotate decor pieces seasonally; floating panels are easy to swap for a new look.
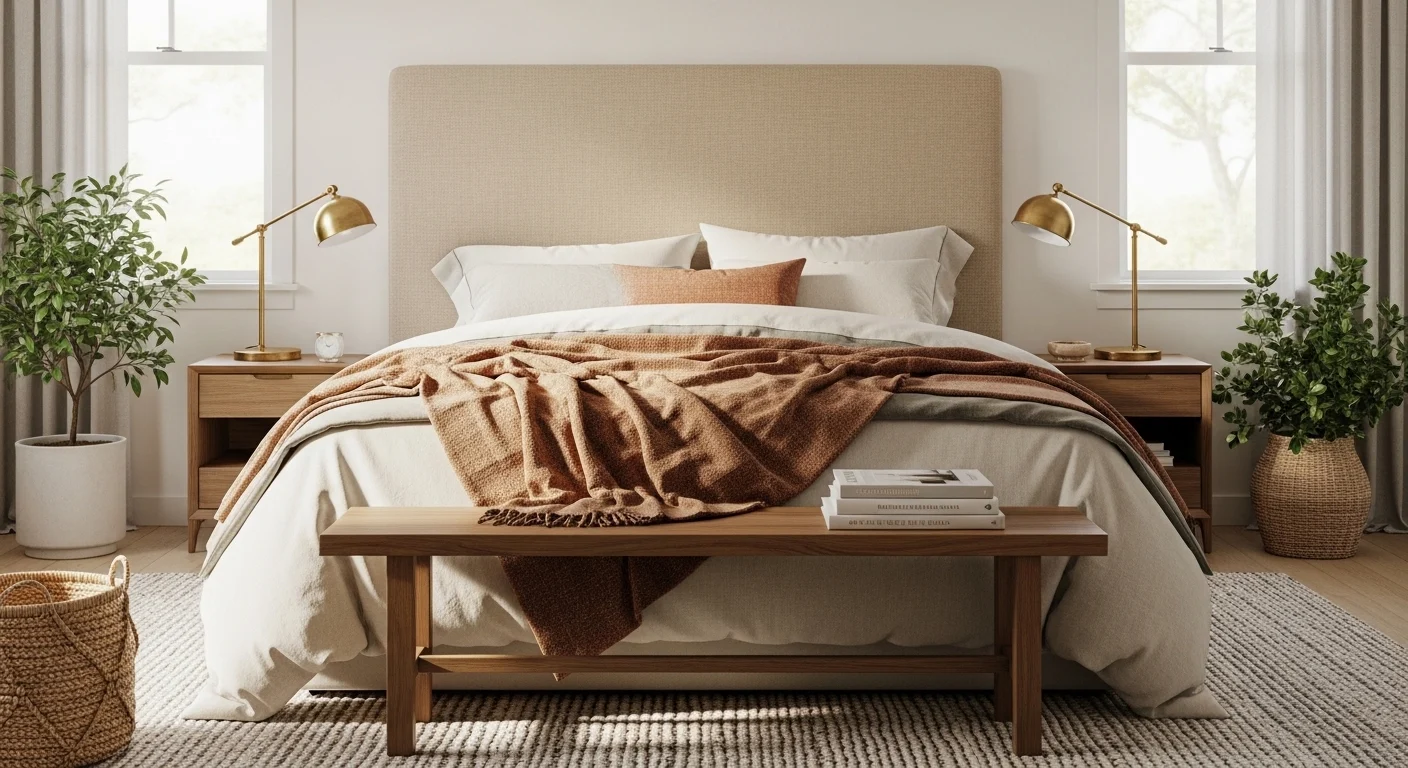
4. Tall Channel-Lined Velvet Headboard (Upholstered Headboard Designs)

Why it stands out: Vertical channels add height and structure. Velvet offers a plush, tactile surface that reads modern and luxe. This look elongates the wall and makes the bed feel grand. You’ll enjoy the drama without fuss. It feels like a boutique hotel room.
Key Elements
- Tall headboard height (36–60 inches)
- Vertical channel tufting
- Plush velvet fabric (emerald, navy, or charcoal)
- High-density foam inserts
- Plywood backing and batting
- Brass or nickel accent hardware
- Low-profile bed frame
- Matte paint backdrop in deep neutral
- Soft layered throw and textured pillows
- Directional reading lights
How to Achieve This Look
- Cut plywood sheet to tall headboard dimensions.
- Attach vertical foam strips or carve channels into foam.
- Cover with batting and staple to the back.
- Drape velvet fabric and pull tight; staple to backside.
- Sew or insert channel seams with internal stitching if needed.
- Add mounting brackets or floor legs.
- Hang on the wall or secure to bed frame.
- Add reading lights and style bedding for hotel flair.
How to Style / Use It
Use jewel tones for bold spaces or muted velvet for calming rooms. Place reading lights at eye level for task light. Velvet needs gentle vacuuming and careful spot cleaning. In humid areas, use a dehumidifier to keep fabric fresh.
5. Painted Geometric Headboard (DIY Painted Headboard)
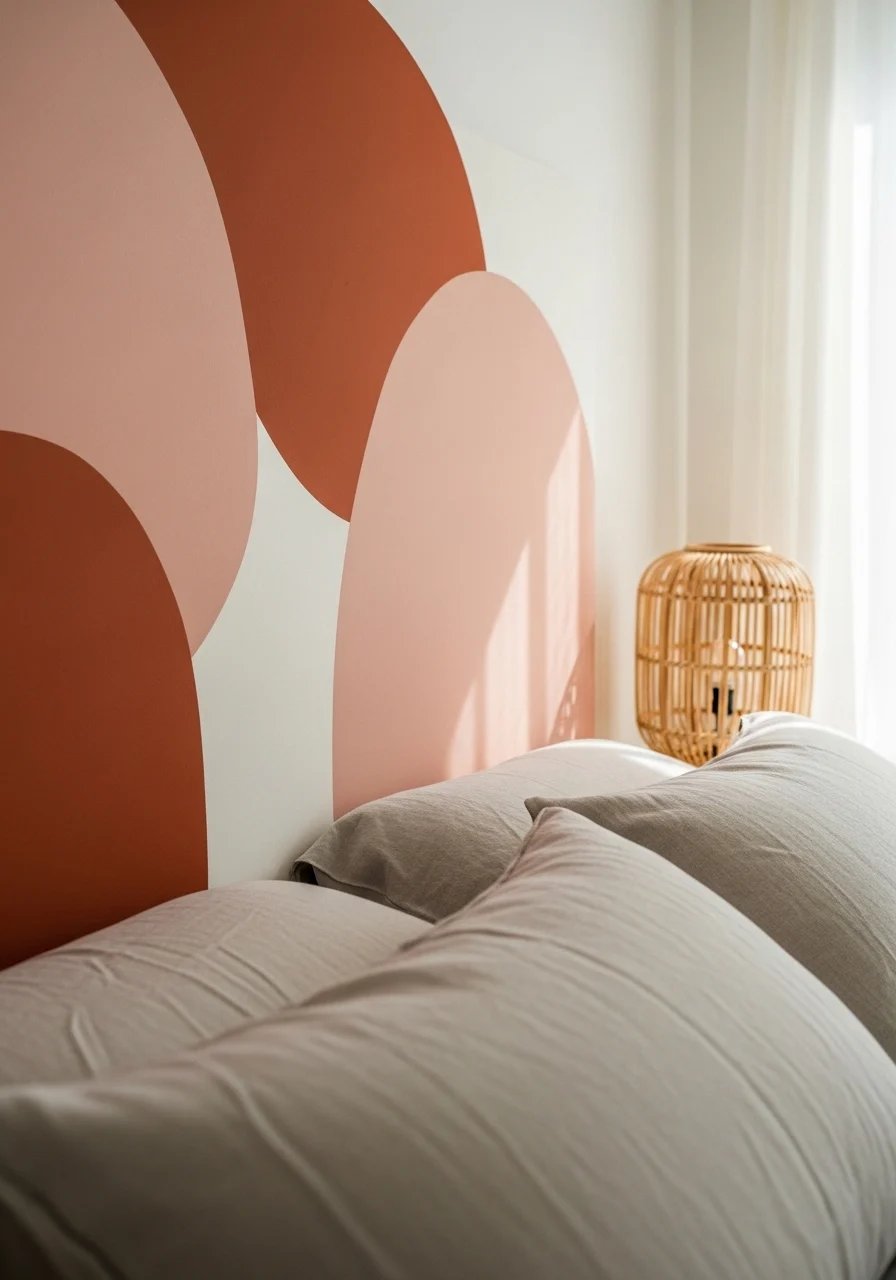
What makes it unique: Painted geometric headboards give instant visual interest without heavy construction. Color-block shapes create an artistic focal point. Great for renters and anyone on a budget. You’ll enjoy how color and pattern can change the room mood.
Key Elements
- Plywood or MDF headboard base
- Chalk or satin paint palette (3 complementary colors)
- Painter’s tape and level
- Semi-gloss finish for durability
- Clean-lined bed and neutral bedding
- Minimal art and sculptural lamp
- Matte white or soft beige walls
- Fine-grit sandpaper and primer
- Drop cloth and paint tray
How to Achieve This Look
- Cut and sand a plywood panel to size; prime the surface.
- Sketch your geometric layout and mark with pencil.
- Apply painter’s tape along lines using a level.
- Paint each section with two coats, letting dry fully.
- Remove tape carefully once semi-dry for crisp edges.
- Add a semi-gloss topcoat for durability.
- Attach cleat hardware and hang on the wall.
- Pair with simple linens and neutral decor.
How to Style / Use It
Match one bedding accent to a paint color for cohesion. Keep nightstands minimal to let pattern shine. For seasonal refresh, repaint one color block rather than the whole headboard. Wipe gently with a damp cloth to clean.
6. Pallet Headboard – Budget Headboard Design Ideas
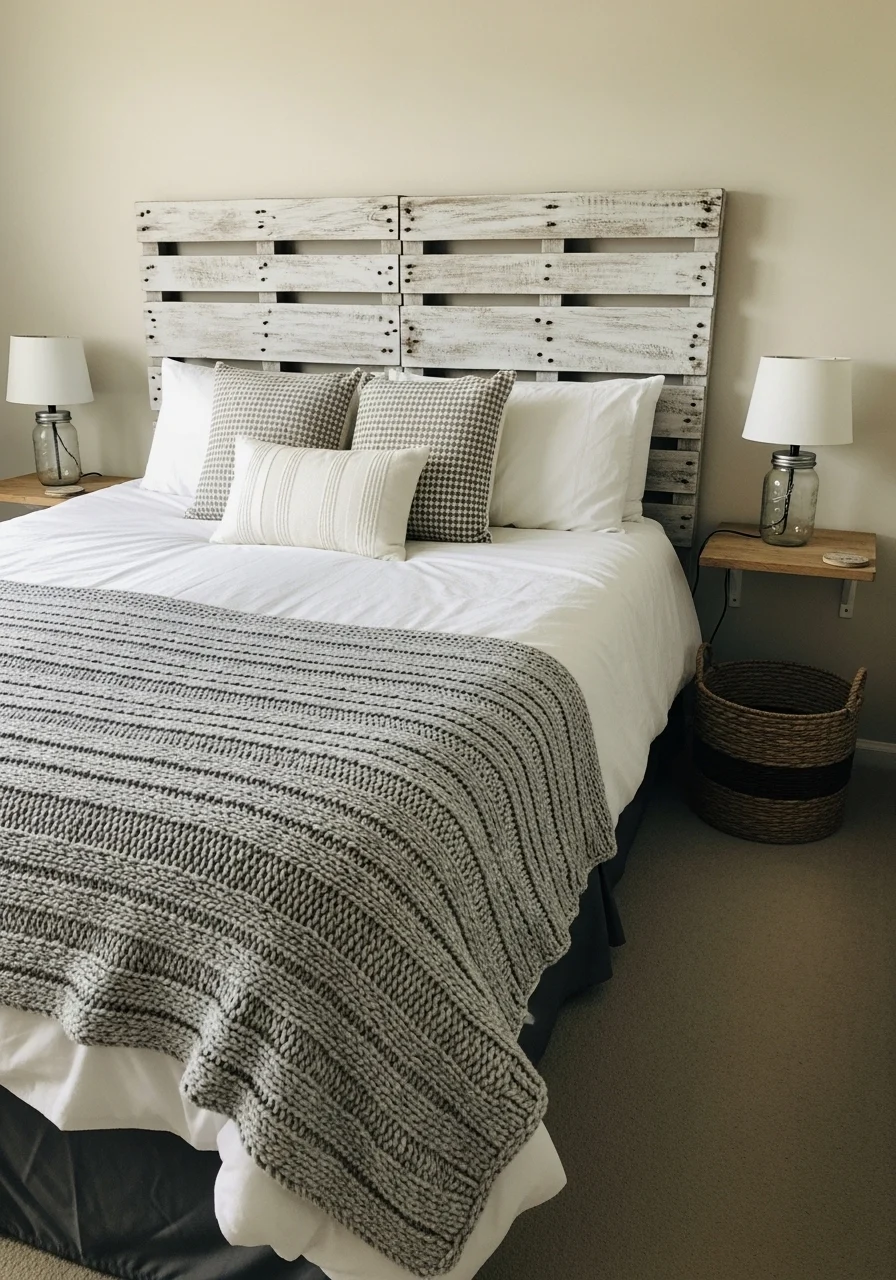
Why people like it: Pallet headboards are budget-friendly and customizable. They offer textured charm and a casual vibe. Perfect for first apartments or DIY lovers. You’ll appreciate how easy it is to add stain or paint for a fresh look.
Key Elements
- Reclaimed pallets or new pallet boards
- Whitewash or walnut stain
- Visible nails or industrial bolts
- Rough texture and varied plank widths
- 2×4 support frame or direct wall mount
- Simple bedding and farmhouse accents
- Mason-jar or industrial bedside lighting
- Protective sealer for longevity
- Sanding tools and safety gear
- Quick-drying wood glue or screws
How to Achieve This Look
- Source clean pallets and remove slats carefully.
- Sand rough edges and nails; repair splits with wood glue.
- Arrange planks horizontally or vertically for desired look.
- Cut to width and attach to a 2×4 support frame.
- Apply whitewash or stain; wipe off excess for desired tone.
- Seal with matte polyurethane to protect the finish.
- Mount with a French cleat or secure to studs.
- Style with cozy throws and warm bedside lighting.
How to Style / Use It
Pair with vintage linens and woven baskets for a farmhouse feel. Touch up sealer every season if used heavily. Avoid pallets from unknown sources—use food-grade or new pallet wood. Add a row of string lights for a soft glow.
- Built-In Shelved Headboard (Storage Headboard Idea)
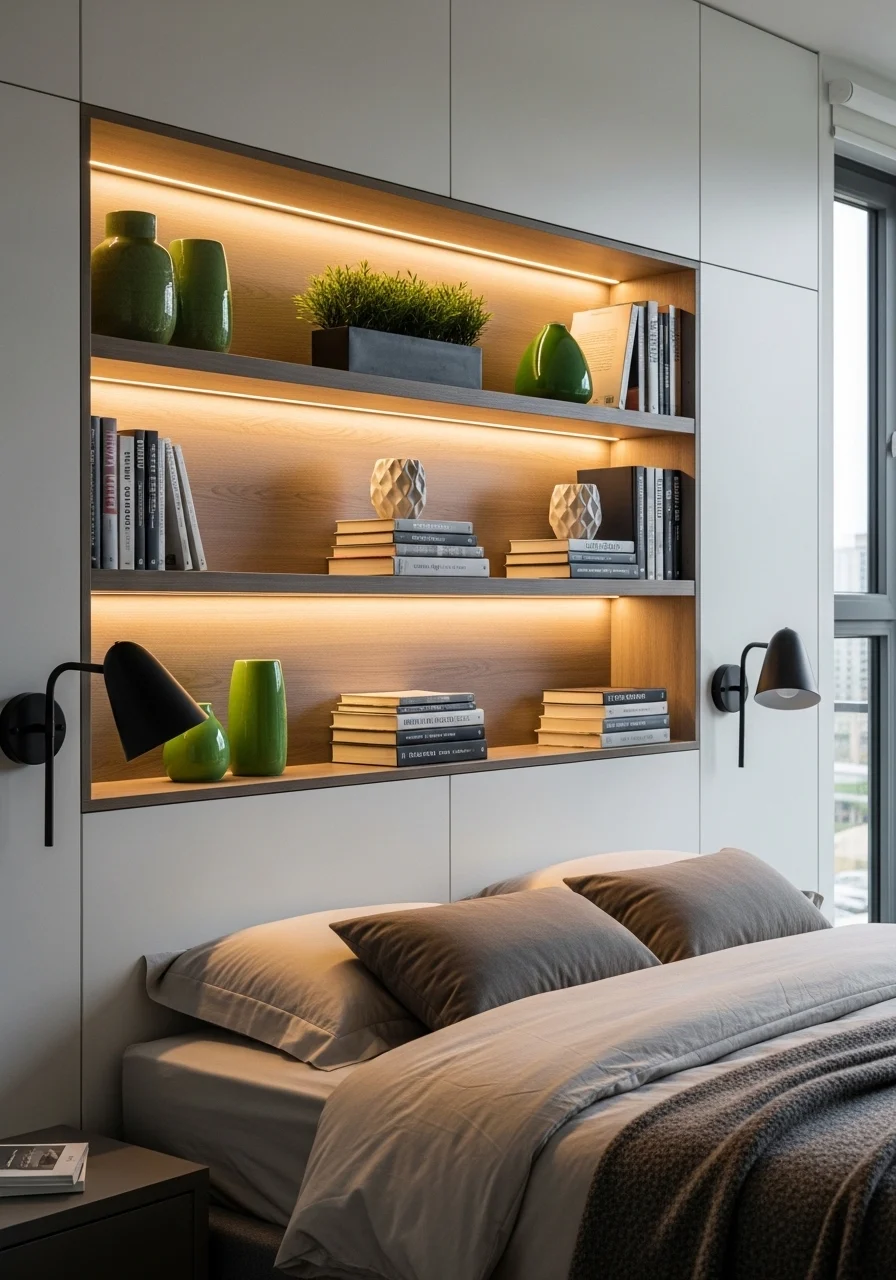
What makes it useful: Built-in headboard shelves add storage and display. They reduce the need for bedside tables and free floor space. Ideal for small rooms or people who like organized spaces. You’ll like keeping books, lamps, and plants within arm’s reach.
Key Elements
- Recessed shelves or cubbies
- LED strip or puck lighting
- Smooth painted finish or wood veneer
- Integrated USB outlets or power
- Backing board and hidden fasteners
- Soft-close shelf brackets
- Neutral bedding to keep focus on storage
- Decorative book stacks and small planters
- Wall anchors or studs for heavy loads
- Painter’s caulk and trim for seamless look
How to Achieve This Look
- Plan shelf dimensions to fit your mattress width.
- Build a framed box that mounts to studs or the bed frame.
- Add internal dividers and back panel.
- Wire LED lighting and outlets before final assembly.
- Sand and paint or veneer the exterior.
- Attach to wall studs using heavy-duty anchors.
- Install soft-close shelf brackets or floating shelf hardware.
- Style with a mix of books, decor, and a bedside lamp.
How to Style / Use It
Keep essentials handy: book, glasses, and a charge cable. Use baskets on lower shelves to hide clutter. Rotate decor seasonally to keep it fresh. For renters, build a freestanding unit that slides behind the bed.
- Rattan Arch Headboard (Boho Headboard Idea)
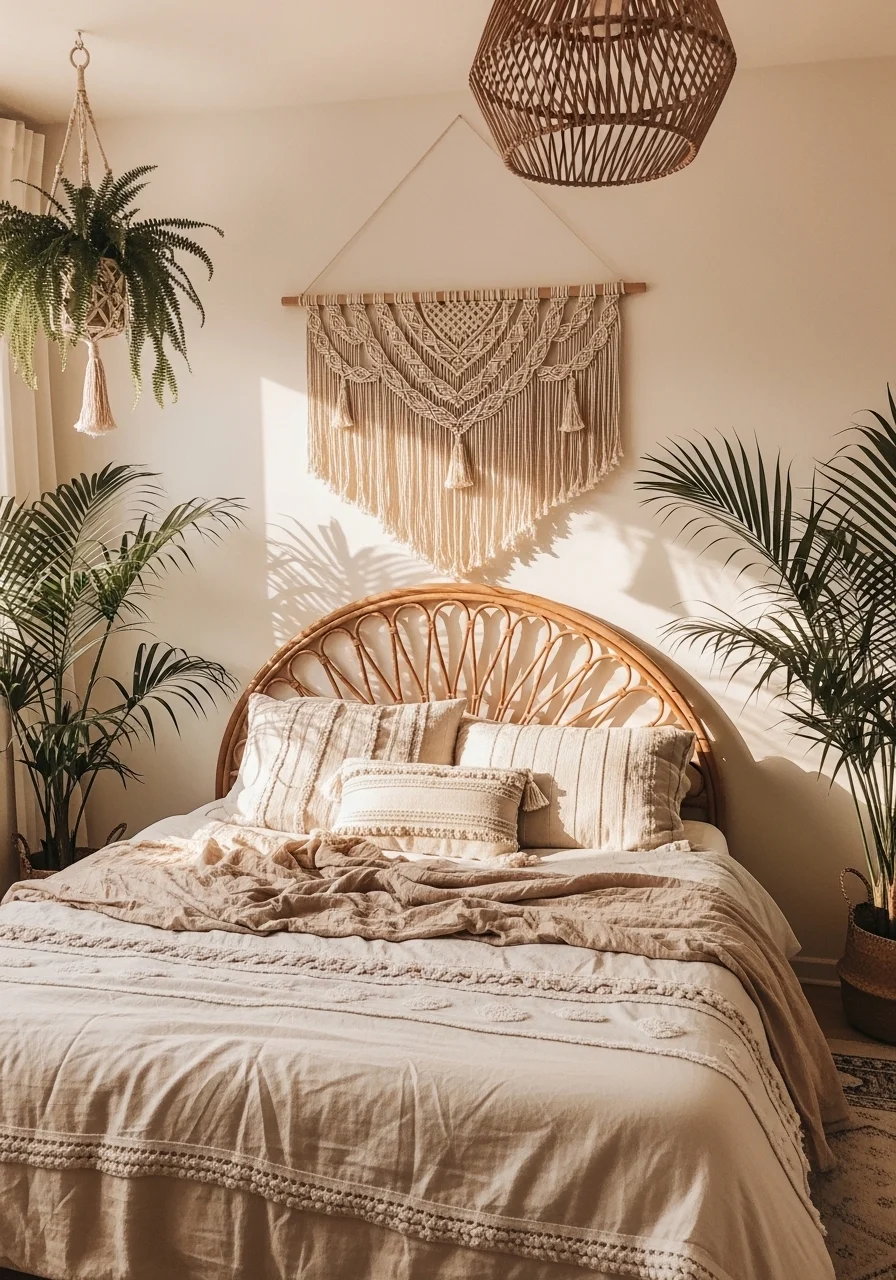
Why it reads boho: Rattan arch shapes add light texture and organic lines. The natural tones feel fresh and relaxed. It’s ideal for coastal, boho, or tropical-inspired rooms. You’ll love the airy, handmade vibe it brings.
Key Elements
- Arched rattan or cane headboard
- Natural woven texture and warmth
- Soft, neutral bedding fabrics
- Macramé or woven wall art
- Terracotta or clay accent pieces
- Potted plants for greenery
- Light wood or cane bedside tables
- Linen or cotton throws and pillows
- Matte white painted walls
- Lightweight mounting hardware
How to Achieve This Look
- Purchase a pre-made rattan or cane arch headboard.
- Prep wall and locate studs for mounting.
- Use brackets that distribute weight across studs.
- Hang headboard centered behind the bed.
- Add layered textiles—linen sheets, woven throw.
- Place plants and natural ceramics nearby.
- Keep lighting warm and soft with paper or rattan lamps.
- Dust rattan regularly and avoid direct prolonged sun.
How to Style / Use It
Pair with warm neutrals and plant life for a relaxed feel. Use rattan lamps and baskets to match texture. Protect rattan from moisture to prevent warping. For seasonal flair, swap pillow covers and throws.
- Boho Headboard Design Ideas — Macramé and Textile Wall
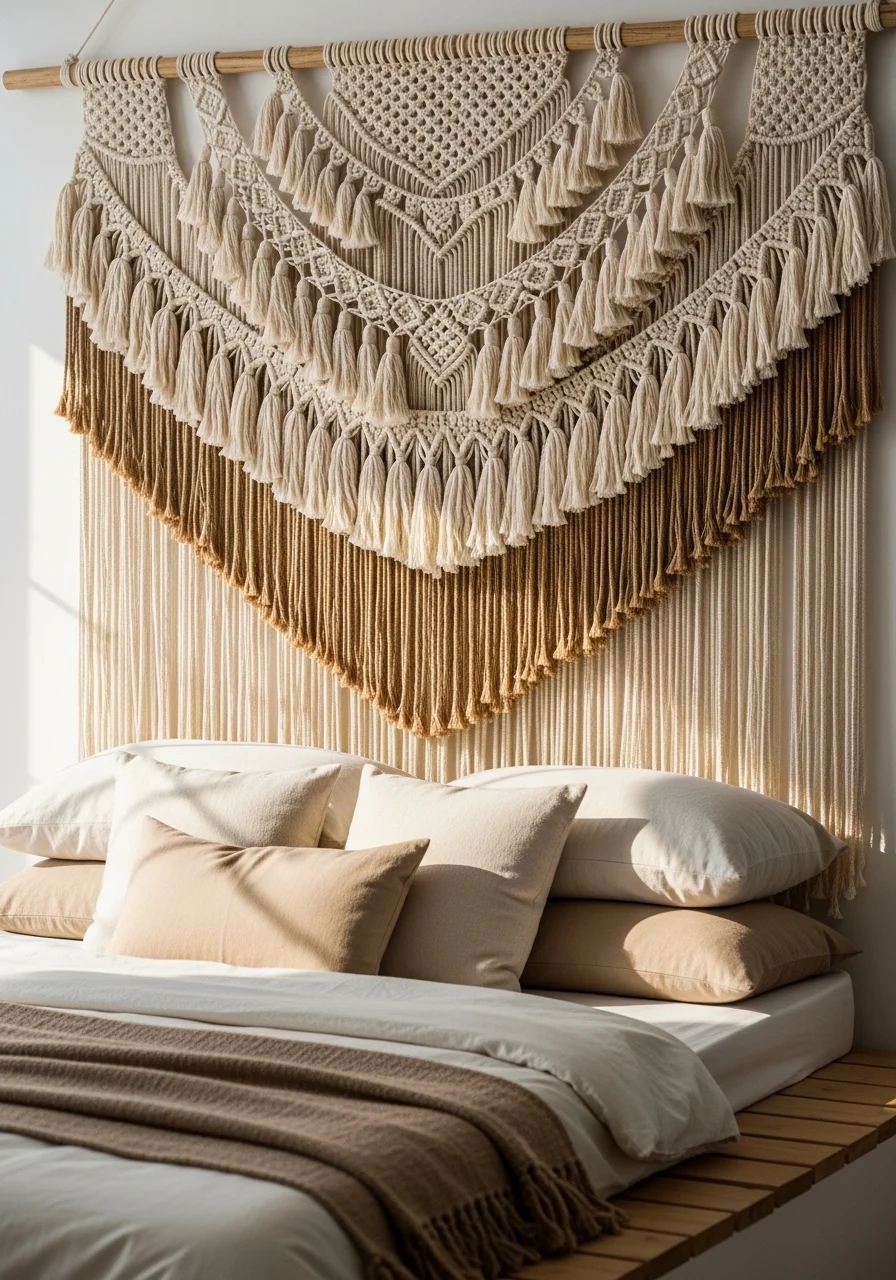
What makes it creative: A textile or macramé headboard adds softness and visual warmth without carpentry. It’s lightweight and renter-friendly. Great for creative, bohemian, or minimalist spaces. You’ll love the movement and tactile detail.
Key Elements
- Large-scale macramé or woven tapestry
- Natural cotton rope or wool fibers
- Wooden dowel or brass rod for hanging
- Neutral palette with texture
- Low platform bed for balance
- Fringe or tassel details
- Layered pillows in linen and cotton
- Potted greenery and woven basket
- Mounting hooks and wall anchor kit
- Gentle ambient lighting
How to Achieve This Look
- Select a large macramé piece to fit bed width.
- Attach a sturdy wooden dowel or brass rod to the macramé.
- Find wall studs and install anchors at the proper height.
- Hang the rod evenly centered behind the bed.
- Layer bedding and pillows to complement texture.
- Add plants and woven baskets for depth.
- Keep colors soft to maintain a serene vibe.
- Wash textile carefully per fiber instructions.
How to Style / Use It
Use macramé for bedrooms that need a soft focal point. Keep bedside decor minimal to highlight texture. Avoid heavy candles directly on woven materials. Rotate textiles seasonally for fresh mood shifts.
- Shiplap Full-Width Headboard Wall
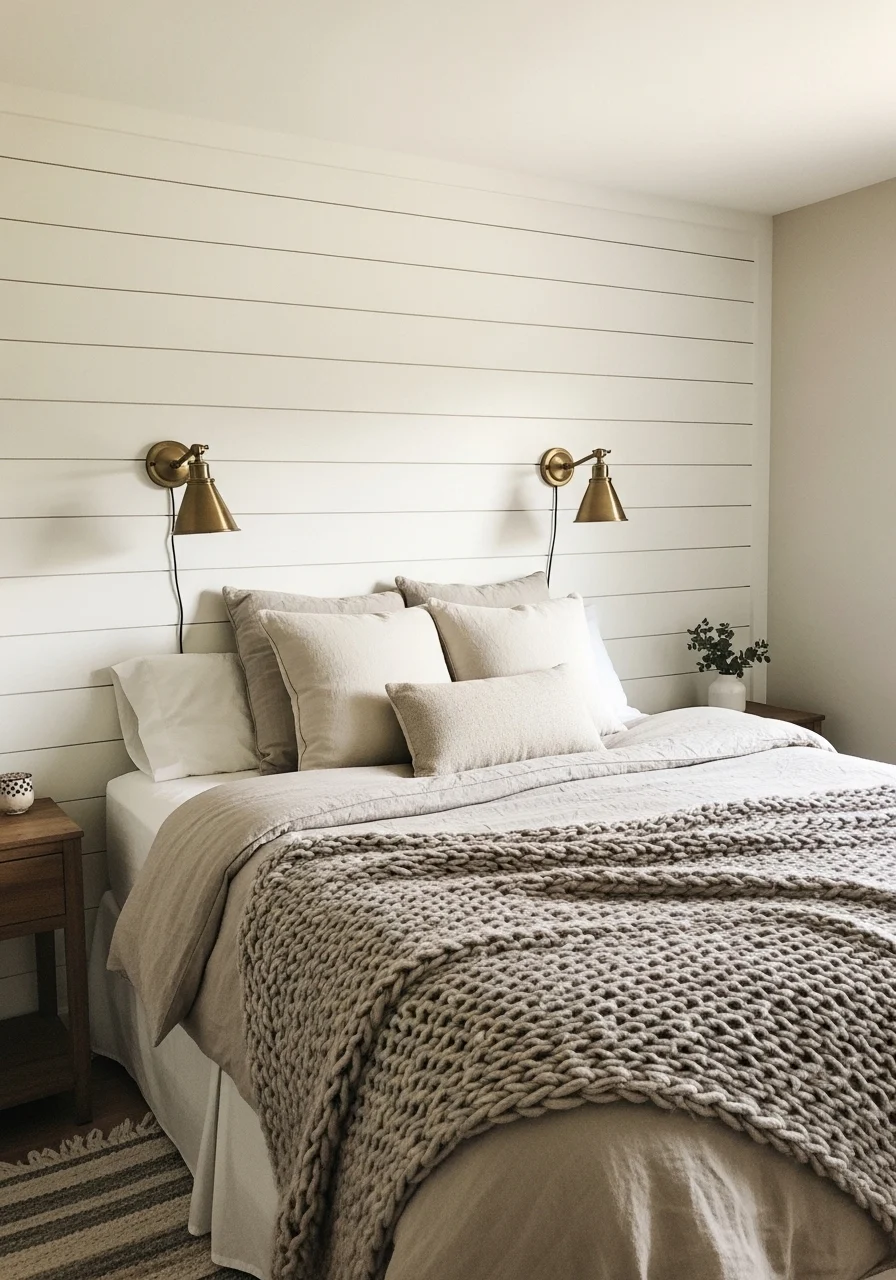
Why it works: A shiplap wall creates a built-in, cohesive backdrop. It gives texture without added furniture. Ideal for coastal, farmhouse, or Scandinavian rooms. You’ll like how it frames the bed and ties together trims and color palette.
Key Elements
- Full-width shiplap boards (horizontal)
- Matte paint (white, soft gray, or warm beige)
- Subtle shadow lines between boards
- Matching trim and baseboard
- Recessed or mounted reading lights
- Neutral bedding with natural fibers
- Hardwood or painted floors
- Simple bedside tables and woven rugs
- Caulk and finish nails for clean seams
- Primer and semi-matte paint
How to Achieve This Look
- Measure wall and cut shiplap to fit.
- Locate studs and fasten shiplap to studs using finish nails.
- Use caulk to fill small gaps for a seamless look.
- Prime and paint shiplap in two coats.
- Add trim to match room baseboards.
- Install reading lights or sconces before finishing.
- Style bed centered on shiplap wall with layered linens.
- Touch up paint and caulk after installation.
How to Style / Use It
Use a shiplap wall to anchor neutral decor and add farmhouse charm. Clean painted shiplap annually with a mild cleaner. For a more casual vibe, leave gaps slightly visible and use a whitewash stain.
- Headboard With Integrated Lighting (Headboard Lighting Ideas)
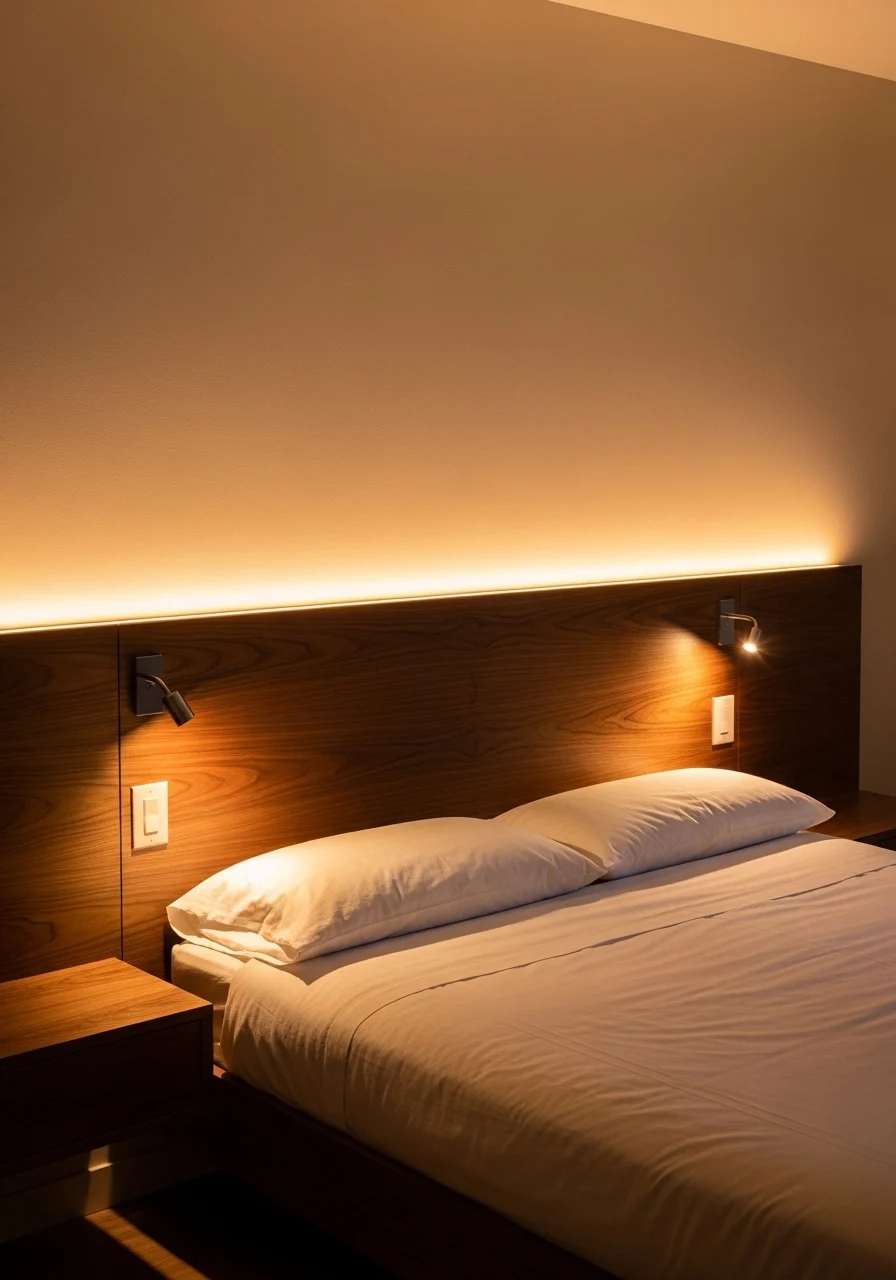
Why it’s clever: Built-in lighting gives function and mood. LED strips create soft backlight and reduce the need for table lamps. Perfect for readers and night owls. You’ll love the cozy halo effect and hands-free convenience.
Key Elements
- LED strip lights or puck lights
- Dimmer switch or smart control
- Recessed reading lamps or swivel sconces
- Headboard with hollow channel for wiring
- Concealed power outlet access
- Warm color temperature (2700K–3000K)
- Walnut or painted finish for headboard
- Cord channels or wire raceways
- Low-profile shelving for small items
- Soft, layered bedding to diffuse light
How to Achieve This Look
- Plan light placement before building headboard.
- Cut channels in headboard for LED strips and wiring.
- Run wiring to a nearby outlet; install a hidden power box.
- Install LED strips with adhesive backing.
- Wire a dimmer or smart switch for adjustable brightness.
- Mount recessed reading lights or swing sconces.
- Attach headboard to wall and conceal wiring.
- Test lights and adjust color temperature as needed.
How to Style / Use It
Use warm LEDs for a relaxing bedroom glow. Pair with blackout curtains for a restful sleep. Clean LED strips occasionally to remove dust. Use smart dimmers to automate lighting scenes by time of day.
- Statement Upholstered Wingback Headboard
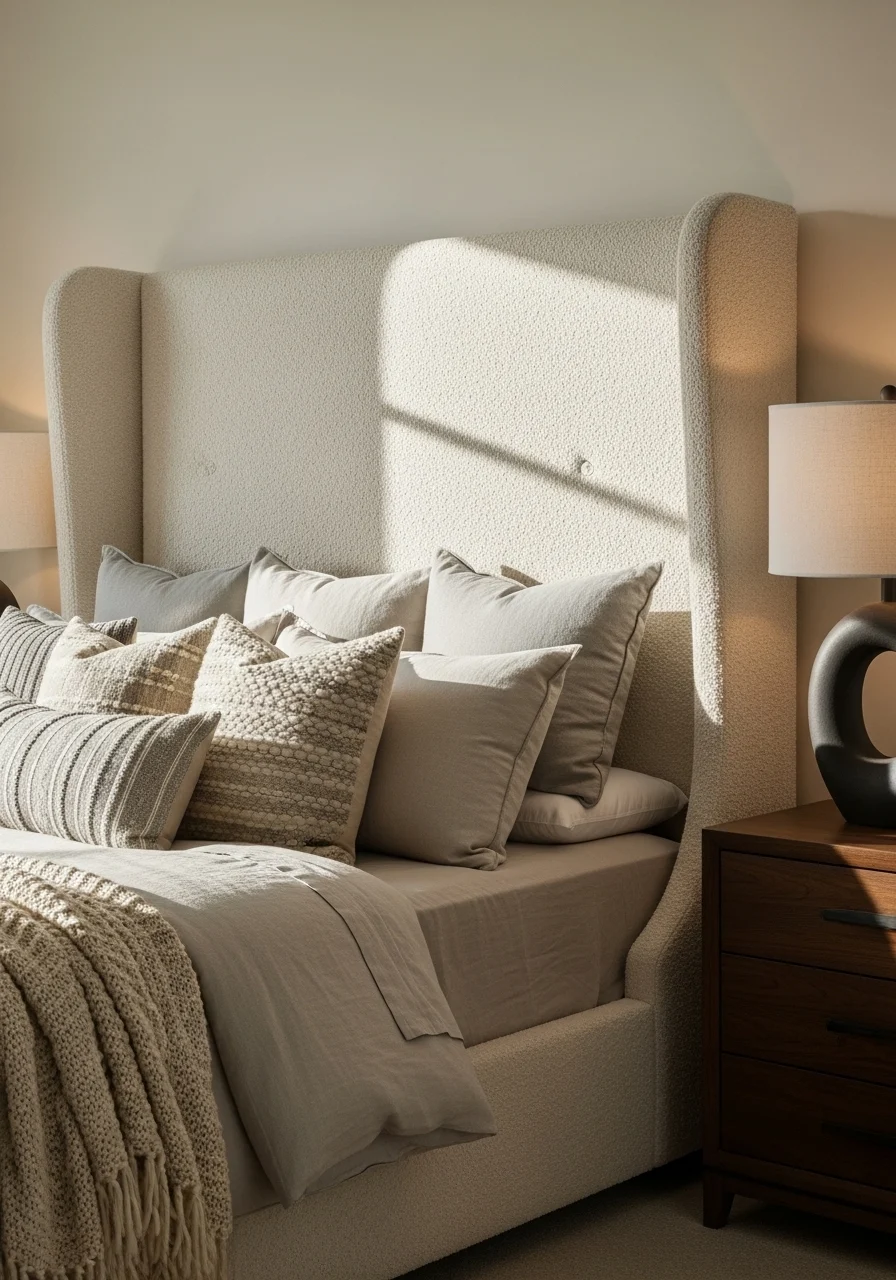
What makes it bold: Wingback shapes anchor the bed and frame your sleep space. Upholstery in boucle or textured fabric adds cozy sophistication. Ideal for master bedrooms or high-ceiling rooms. You’ll love the dramatic silhouette and soft touch.
Key Elements
- Oversized wingback silhouette
- Bouclé, boucle-like, or textured linen
- Thick foam padding and batting
- Plywood backing cut to shape
- Tall height (48–72 inches)
- Sturdy leg or wall mounting system
- Neutral color palette or statement hue
- Pairing with substantial bedside furniture
- Soft area rug for balance
- Upholstery welt or nailhead detail optional
How to Achieve This Look
- Trace wingback shape on plywood and cut carefully.
- Attach thick foam and contour for wings.
- Cover with batting and staple fabric to the back.
- Sew or tuck wings for crisp edges.
- Add legs or a mounting bracket for support.
- Install onto wall studs or bolt to bed frame.
- Style with heavy linens and complimentary furniture.
- Maintain fabric with gentle vacuuming.
How to Style / Use It
Pair with bold small-scale prints or keep everything tonal for drama. Use low lighting around the wings to soften their scale. Bouclé likes low-moisture environments and needs gentle care.
- Upholstered Panel Grid Headboard (Modern Headboard Design Ideas)
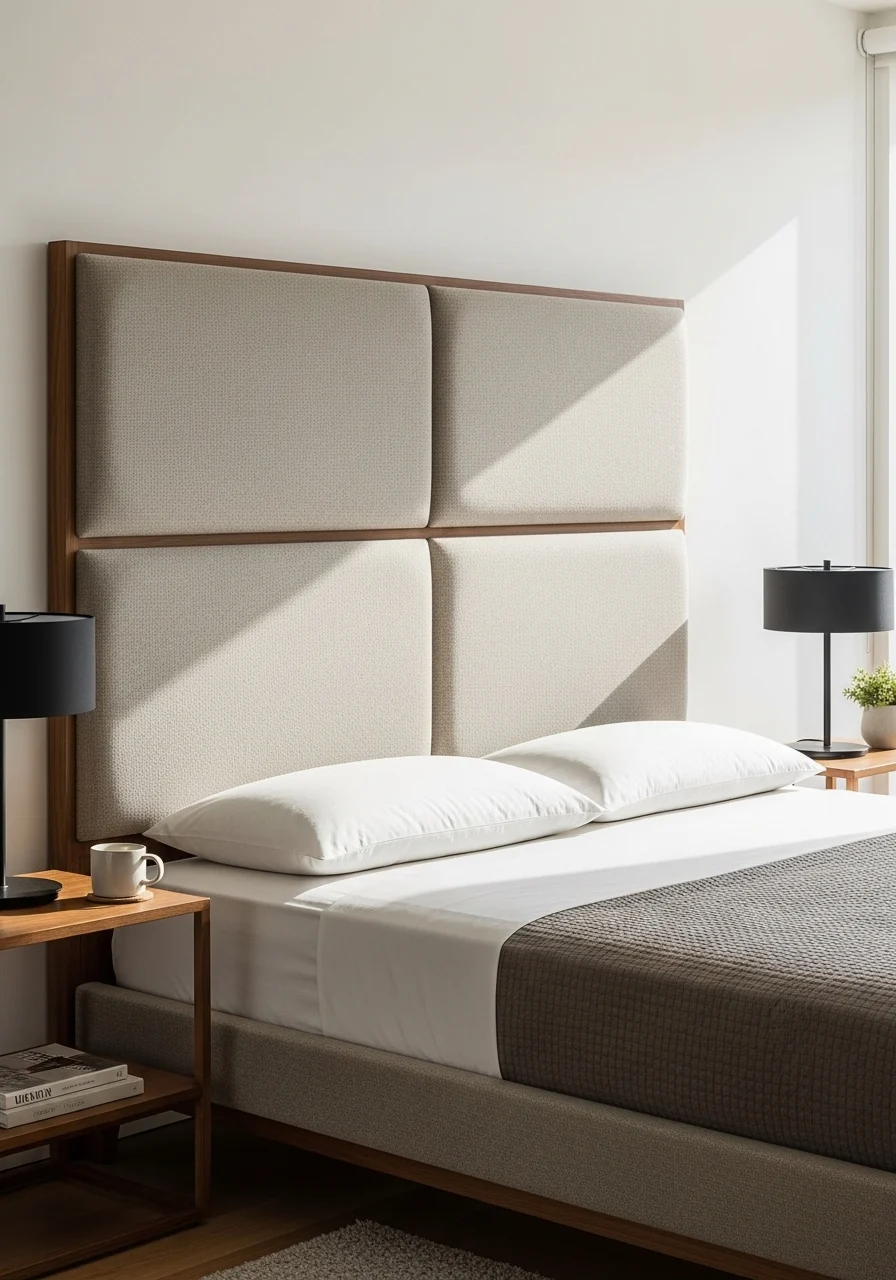
Why it’s modern: Panel grids are clean and modular. The rhythm of repeated panels creates a calming, architectural backdrop. Suits minimalist and contemporary bedrooms. You’ll like how easy it is to scale the design across sizes.
Key Elements
- Equal-sized padded panels (2–4 across)
- Neutral tightly woven fabric
- Foam backing and batting
- Plywood or MDF panels for stability
- Concealed mounting for floating effect
- Matte metal or wood bedside accents
- Geometric or linear lighting
- Low-profile bedding
- Simple wall color to emphasize panel texture
- Velcro or removable fabric covers option
How to Achieve This Look
- Cut plywood panels into equal sizes for your bed width.
- Attach foam and batting to each panel with adhesive.
- Wrap panels in fabric and staple neatly to the back.
- Add mounting hardware to each panel’s rear.
- Mount panels on the wall in grid formation, level carefully.
- Leave small gaps for crisp lines or butt them together.
- Add matching bedside accents for cohesion.
- Consider removable covers for easy cleaning.
How to Style / Use It
Mix panel colors for a subtle pattern or keep one tone for calm. Use thin metal accents to add contrast. Removable fabric covers are practical for homes with kids or pets.
- Canopy-Style Headboard Frame (Canopy Headboard Idea)
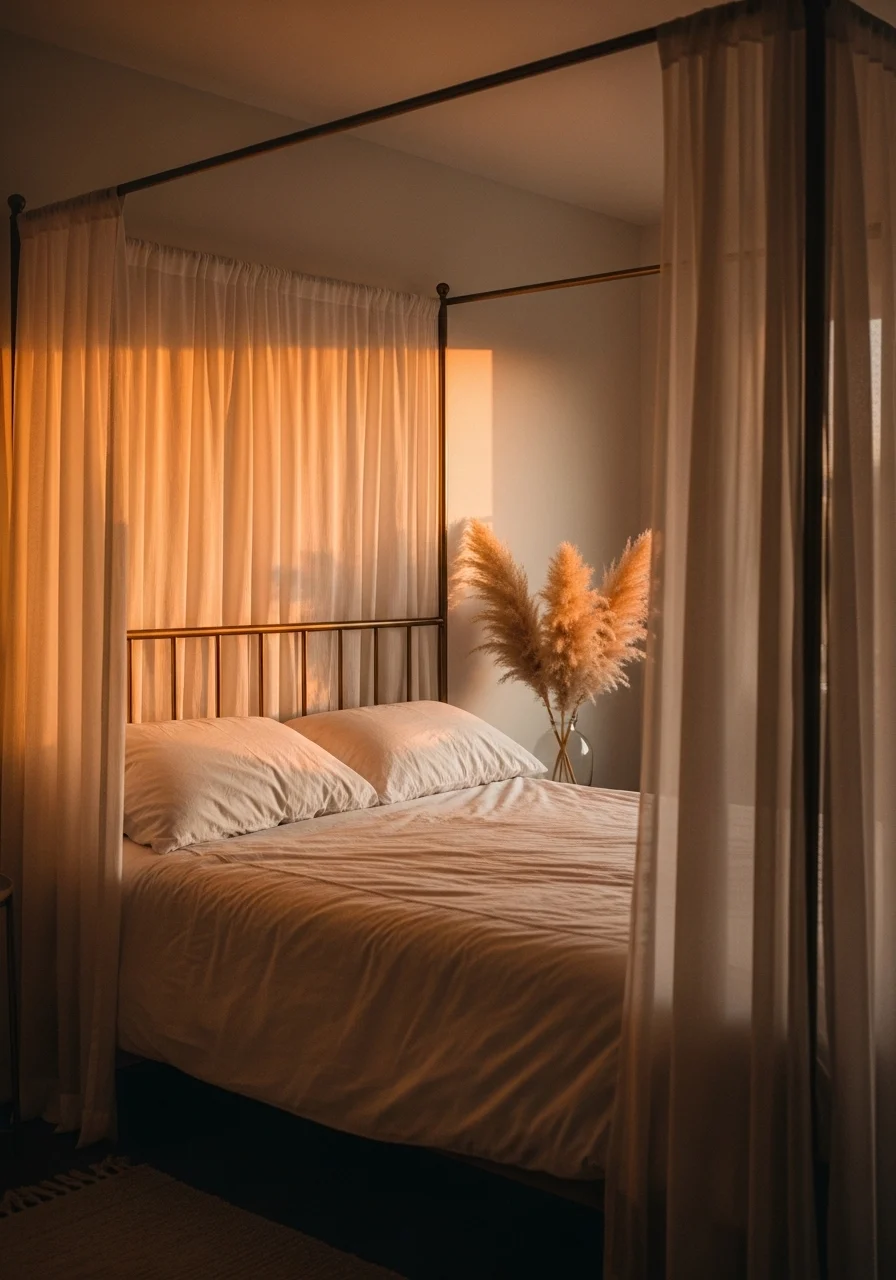
Why it appeals: The canopy frame adds vertical drama and softness. Sheer drapes create privacy and a cozy nest. Great for romantic, vintage, or eclectic rooms. You’ll love curling up under the soft fabric canopy.
Key Elements
- Thin brass or black metal tubing frame
- Sheer curtain panels (linen or voile)
- Floor-to-ceiling height for drama
- Secure wall or ceiling anchors
- Light, neutral bedding with texture
- Pampas grass or tall plants nearby
- Warm ambient or string lighting
- Low bed platform to balance scale
- Coordinated metal finishes in room
- Curtain tiebacks or clips
How to Achieve This Look
- Measure bed footprint and desired canopy height.
- Build or purchase a lightweight metal frame.
- Secure frame to wall studs or ceiling anchors.
- Hang sheer panels and adjust drape length.
- Add string lights or a softly dimmed fixture inside canopy.
- Style bedding with soft linens and layered pillows.
- Secure tiebacks for daytime openness.
- Clean drapes regularly to keep them fresh.
How to Style / Use It
Wear the canopy with warm lighting for cozy nights. Use heavier curtains for privacy or blackout panels for sleeping. Match metal finishes to bedside lights for a cohesive look. Sheer fabrics should be washed per care label.
- Budget Headboard Design Ideas — Painted Plywood Molding
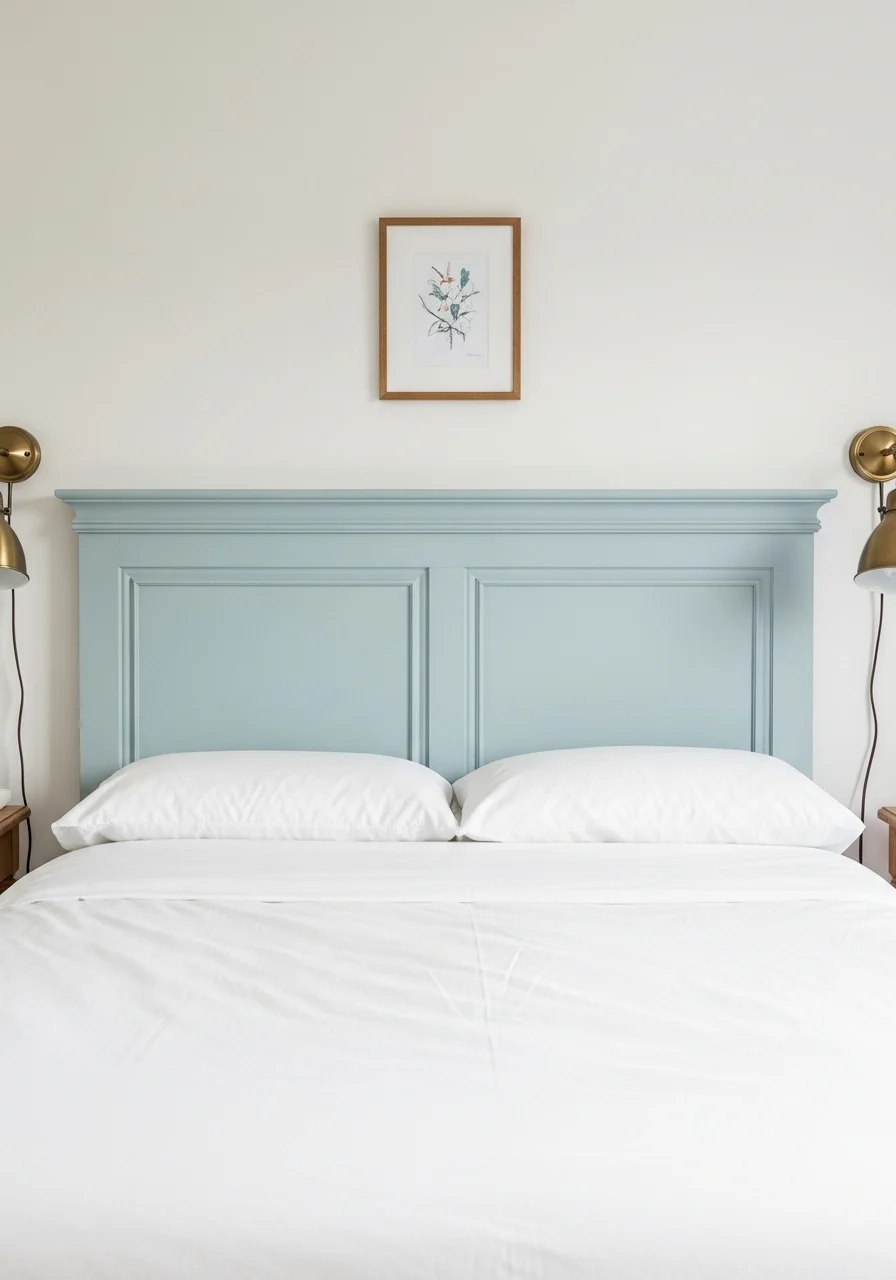
Why it’s smart: Painted plywood with trim gives a bespoke look for little money. Molding adds architectural interest without heavy carpentry. Great for renters if mounted safely. You’ll enjoy the tailored appearance and easy color swaps.
Key Elements
- Plywood base cut to bed width
- Decorative molding strips (finger-jointed pine)
- Primer and semi-matte paint
- Wood glue and finish nails
- Smooth sanding and filler for seams
- Wall cleat or bracket mounting
- Neutral or bold paint color choice
- Coordinated bedding and small art
- Caulk for seamless finish
- Painter’s tape and drop cloth
How to Achieve This Look
- Cut plywood to the desired headboard size.
- Sand and prime the surface.
- Attach molding strips in a pattern using glue and nails.
- Fill nail holes and sand seams smooth.
- Prime the molding and paint with two coats.
- Install a French cleat or brackets to hang.
- Hang headboard and caulk any small gaps.
- Add bedding and simple wall art above if desired.
How to Style / Use It
Use bold paint for a focal-point or soft neutrals for subtlety. Repaint easily for seasonal changes. Use lightweight molding for a modern look; heavier profiles read classic. Check wall anchors regularly for secure mounting.
- Gallery Wall Headboard (Artistic Headboard Concept)
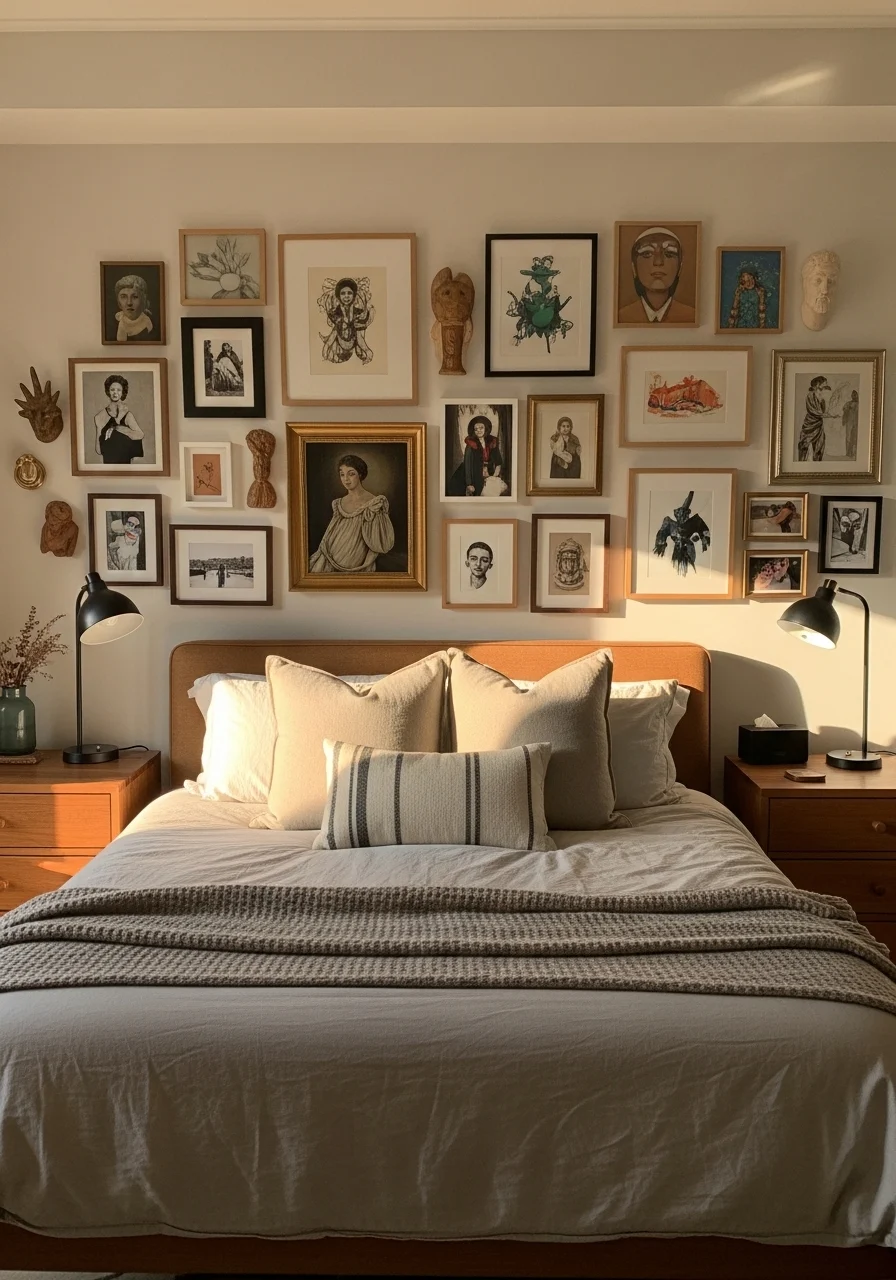
Why it’s creative: A gallery wall replaces a physical headboard with art. It personalizes the space and can evolve over time. Perfect if you love collecting art or photos. You’ll enjoy the storytelling quality and easy refreshability.
Key Elements
- Mixed frame sizes and finishes
- Cohesive color palette in artwork
- Center artwork aligned with bed center
- Picture hanging rail or secure hooks
- Layered pieces and small sculptural items
- Neutral bedding to anchor visuals
- Accent lighting or picture lights
- Mats in consistent tones for cohesion
- Level and measuring tools for layout
- Spare hooks for additions
How to Achieve This Look
- Choose a focal piece to center above the bed.
- Lay out frames on the floor to test composition.
- Measure and mark wall positions; use a level.
- Hang central piece at eye level, build outward symmetrically.
- Add small shelves or sculptural pieces for depth.
- Install picture lights if desired.
- Step back and tweak spacing for balance.
- Rotate art to keep the wall fresh.
How to Style / Use It
Keep bedding simple to let art shine. Add seasonal or travel pieces to keep the wall personal. Ensure frames are securely anchored. Gallery walls work well in tall-ceiling rooms and small spaces alike.
- Mirrored Headboard (Glam Headboard Idea)
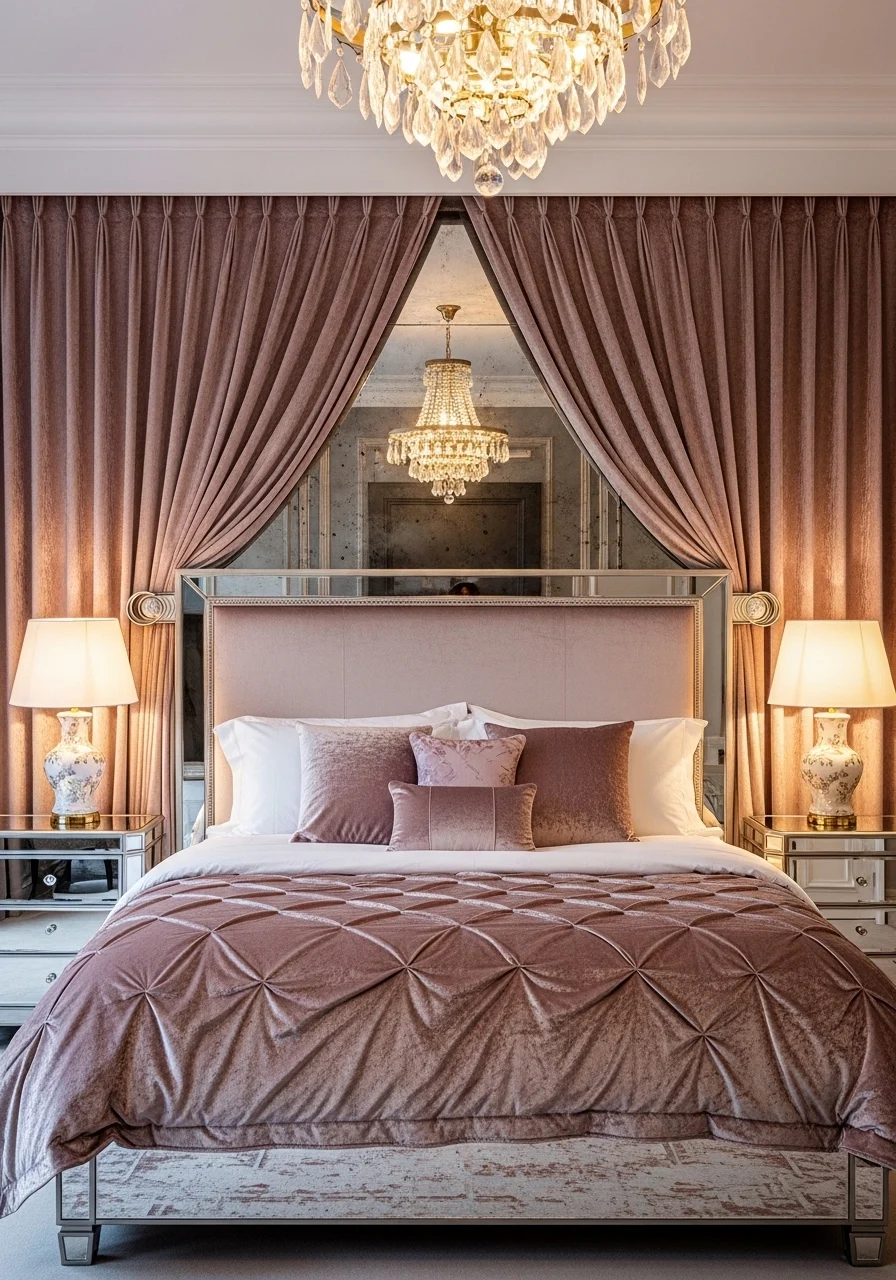
Why it’s glamorous: Mirrors bounce light and visually enlarge the room. A mirrored headboard adds Hollywood-glam and brightness. Ideal for smaller rooms that need reflectivity or for glam aesthetics. You’ll love the sparkle and light play.
Key Elements
- Mirrored panels or a single mirror
- Beveled edges or framed mirror tiles
- Secure mirror mounting hardware
- Backing frame in polished silver or gold
- Low-profile bed and soft linens
- Accent chandelier or pendant
- Dust-free environment and microfiber cloths
- Safety film for mirror backing
- Neutral carpet or rug to soften reflections
- Small decorative trays for jewelry
How to Achieve This Look
- Measure and select mirror panels or a pre-made mirrored headboard.
- Add safety film to mirror backs for security.
- Attach mirror to a backing board or frame for support.
- Locate studs and use appropriate anchors for mounting.
- Hang mirror securely and seal edges as needed.
- Add soft ambient lighting to play off reflections.
- Style bedding in soft, matte fabrics to balance shine.
- Clean mirrors gently with a microfiber cloth.
How to Style / Use It
Use mirrored headboards to brighten north-facing rooms. Avoid clutter near mirrors to prevent amplified mess. Pair with matte finishes to balance shine. Keep mirrors clean for the best effect.
- Industrial Pipe Headboard (Industrial Headboard Idea)
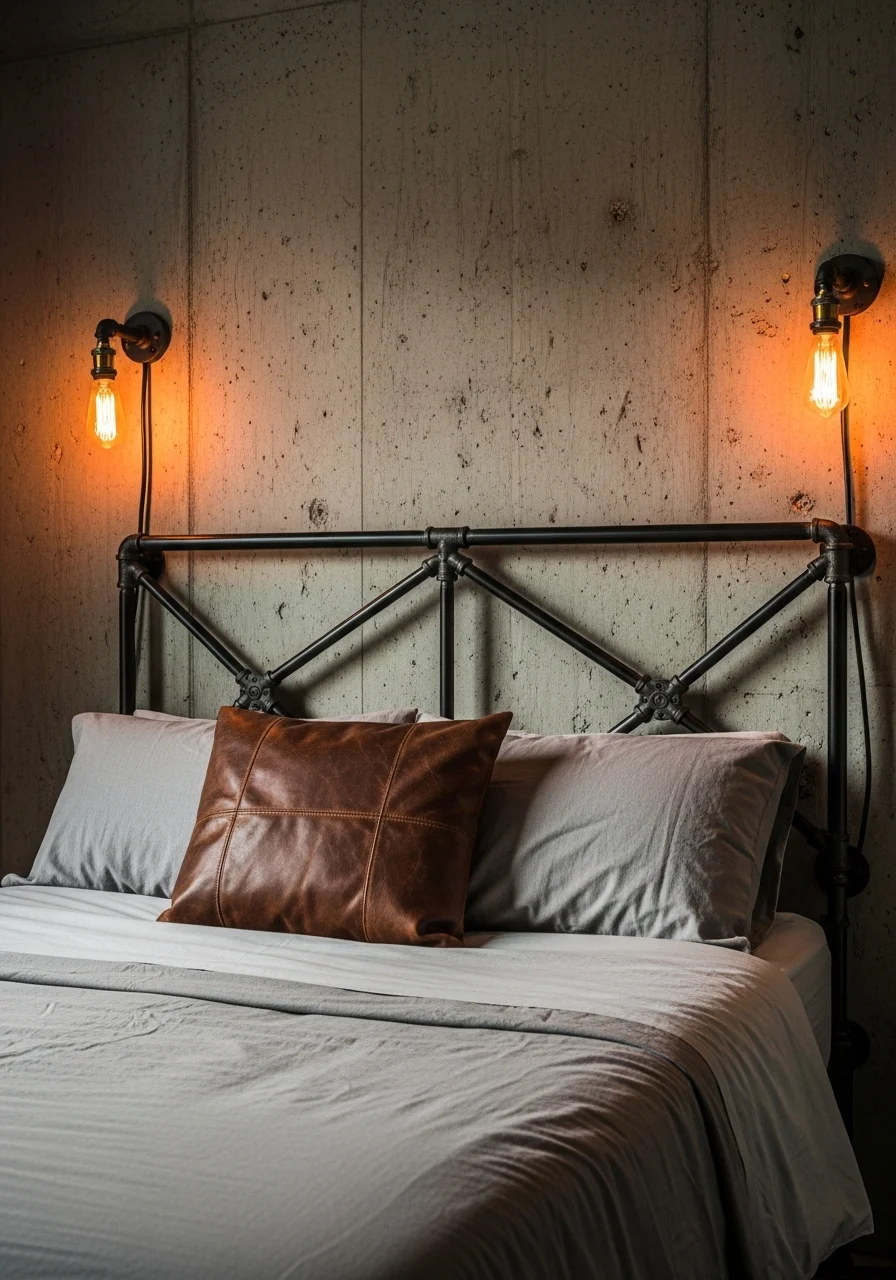
Why it’s edgy: Pipe headboards are sturdy and have an industrial loft vibe. The metal frame reads utilitarian and modern. Great for urban apartments and lofts. You’ll enjoy the architectural lines and simple assembly.
Key Elements
- Black iron pipes and flanges
- Threaded pipe connectors and elbows
- Matte finish and visible hardware
- Concrete or exposed brick backdrop
- Leather or canvas textiles
- Edison bulb or filament lighting
- Secure flange mounting into studs
- Industrial bedside tables
- Protective coating to prevent rust
- Basic pipe-cutting tools and thread sealant
How to Achieve This Look
- Measure bed width and desired headboard height.
- Assemble pipe frame dry-fitting pieces first.
- Thread pipes and connect elbows; tighten with wrench.
- Install flanges onto studs or use heavy-duty anchors.
- Mount frame securely to wall.
- Optionally add wooden slats between pipes for support.
- Style with leather accents and warm bulbs.
- Apply a protective wax or clear coat to metal if needed.
How to Style / Use It
Pair with warm woods and leather for a balanced loft look. Use soft textiles to soften hard metal edges. Periodically check pipe tightness and dust crevices lightly. Use rust-proofing in humid climates.
- Chalkboard or Painted Chalk Paint Headboard (Interactive Headboard Idea)
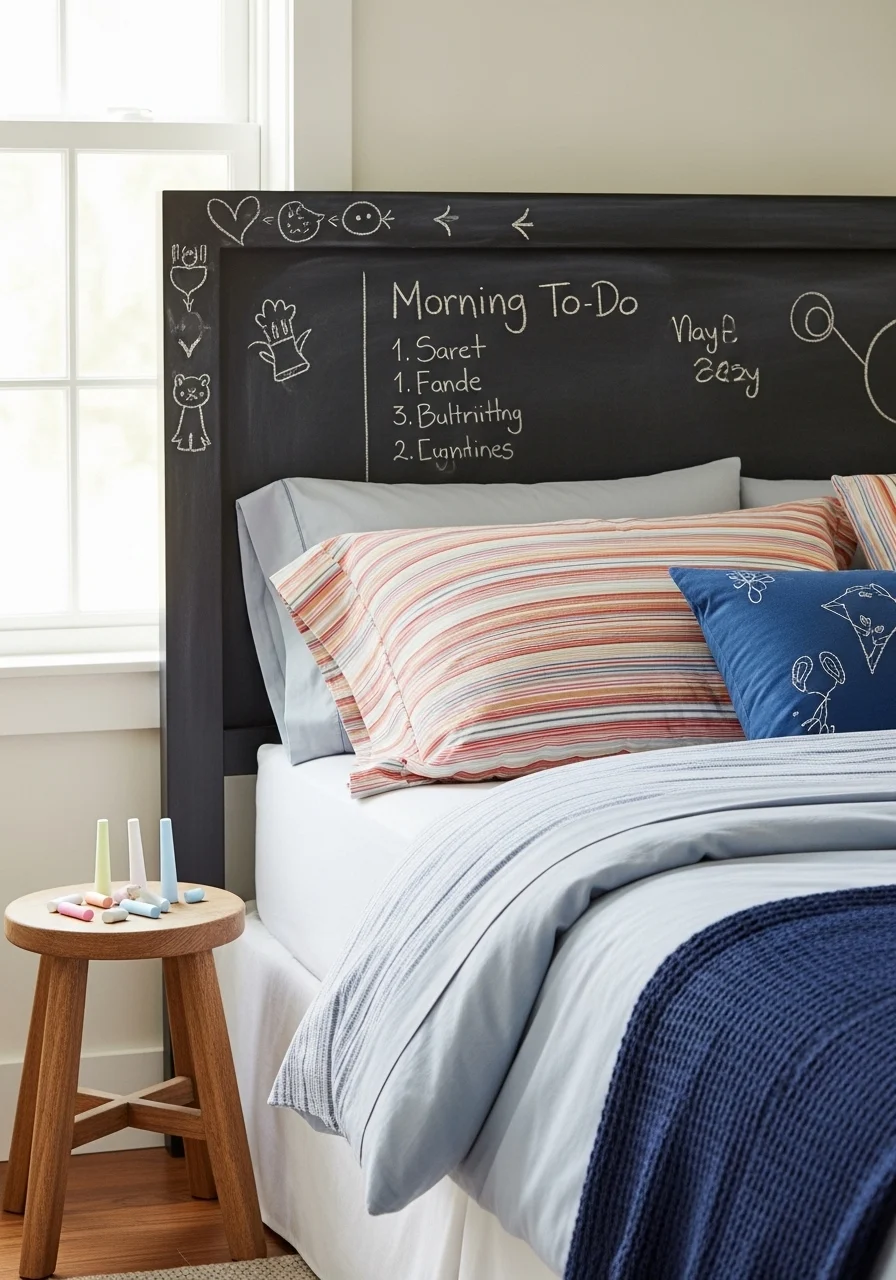
Why it’s playful: A chalkboard headboard is interactive and kid-friendly. It allows notes, doodles, and rotating quotes. Great in guest rooms, kids’ spaces, or creative studios. You’ll enjoy the daily changeability and low cost.
Key Elements
- Smooth plywood or MDF panel
- Chalkboard paint (black or colored)
- Chalk or chalk markers
- Framed perimeter for a finished look
- Lightweight wall cleat for mounting
- Easy-to-clean damp cloth
- Neutral, durable bedding
- Chalk tray or small shelf
- Non-toxic paint for kids’ rooms
- Level and painter’s tape
How to Achieve This Look
- Cut and sand plywood to headboard size.
- Prime and apply 2–3 coats of chalkboard paint.
- Let cure fully per product instructions.
- Add a frame around perimeter for polish.
- Mount with a strong cleat or brackets.
- Season the chalkboard by rubbing full chalk across it, then erase.
- Add chalk tray or small shelf for supplies.
- Wipe clean with a damp cloth when refreshing the surface.
How to Style / Use It
Use for daily reminders, artwork, or guest notes. Keep chalk markers for finer writing. Avoid abrasive cleaners that remove paint. Repaint every few years if surface wears.
- Floor-to-Ceiling Padded Headboard Wall
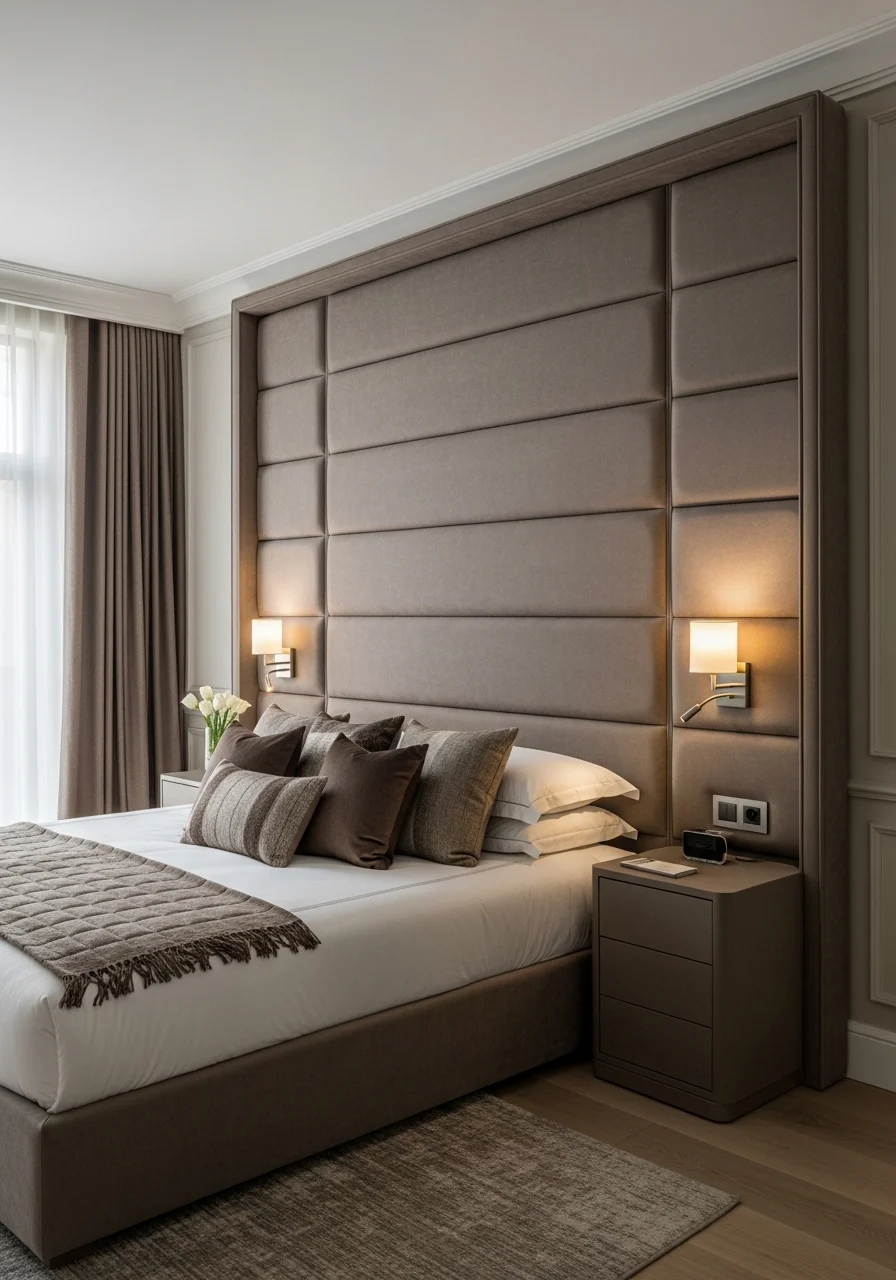
Why it’s dramatic: Padded headboard walls wrap the bed in softness and sound absorption. They feel hotel-caliber and cozy. Ideal for large rooms or when you want a strong focal point. You’ll enjoy the enveloping comfort and neat lines.
Key Elements
- Wall-to-wall padded panels
- Upholstery-grade fabric (velvet, linen blend)
- High-density foam layers for sound dampening
- Vertical or horizontal seams for rhythm
- Concealed electrical wiring for lights
- Sturdy backing and anchoring for each panel
- Coordinated bedding in luxe textures
- Integrated reading lights or sconces
- Professional upholstery tools or foam board
- Soft rug to complete the space
How to Achieve This Look
- Plan panel grid size and measure wall precisely.
- Attach plywood backing to studs in sections.
- Glue and staple foam to backing; add batting.
- Wrap fabric and staple neatly to backs.
- Mount panels sequentially for seamless fit.
- Wire lighting and outlets before final mounting.
- Add sconces and test electrical elements.
- Style with thick rugs and layered linens.
How to Style / Use It
Use neutral fabrics for restful bedrooms or jewel tones for drama. Padded walls reduce noise—great for busy households. Schedule professional installation if you’re unsure about large-scale upholstery.
- Low Minimal Platform Headboard (Scandi Minimal Headboard Idea)
Why it’s calming: Low platform headboards keep sightlines open and make rooms feel airy. The Scandi minimal look uses light woods and simple shapes. Perfect for small bedrooms and modern minimalists. You’ll feel calm and uncluttered.
Key Elements
- Low-profile headboard (8–12 inches above mattress)
- Light ash or birch wood
- Matte clear finish or oil
- Simple rectangular or slightly curved profile
- Minimal bedding in white or soft gray
- Single decorative object on one nightstand
- Natural fiber rug and plant
- Exposed wood grain for warmth
- Clean-lined frame and legs
- Easy-to-clean surfaces
How to Achieve This Look
- Cut a light wood board to bed width and sand.
- Apply oil or matte finish to showcase grain.
- Attach low mounting brackets or legs for support.
- Mount securely to bed frame or wall studs.
- Keep bedding minimal—white sheets and one throw.
- Add a single framed print or plant for personality.
- Maintain wood with periodic oiling to prevent drying.
- Keep nightstands small to preserve openness.
How to Style / Use It
Pair with pale walls and natural light for the full Scandi effect. Use minimal decor and functional items. The low profile makes small rooms look bigger. Clean dust and oil the wood occasionally.
You now have 21 fresh headboard design ideas to try and adapt. From tufted velvet and reclaimed wood to budget-friendly painted and pallet options, there’s a style for every room and skill level. Pin your favorites, try one on a weekend, and tweak details to match your color palette.
Which headboard design ideas are you most drawn to? Try one and share a photo with a friend who loves decor. You might inspire someone else to refresh their bedroom too.