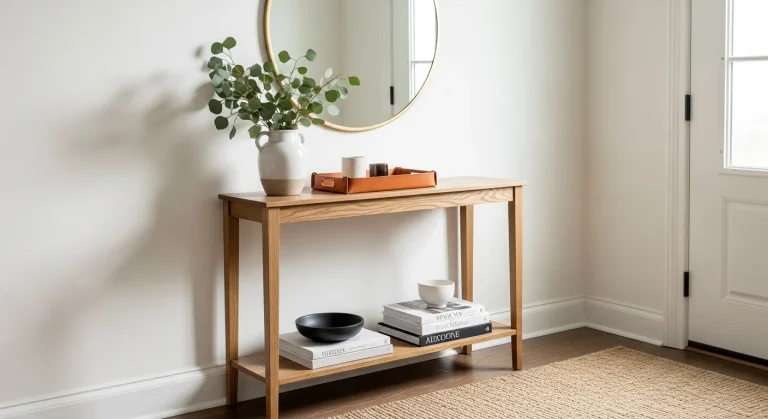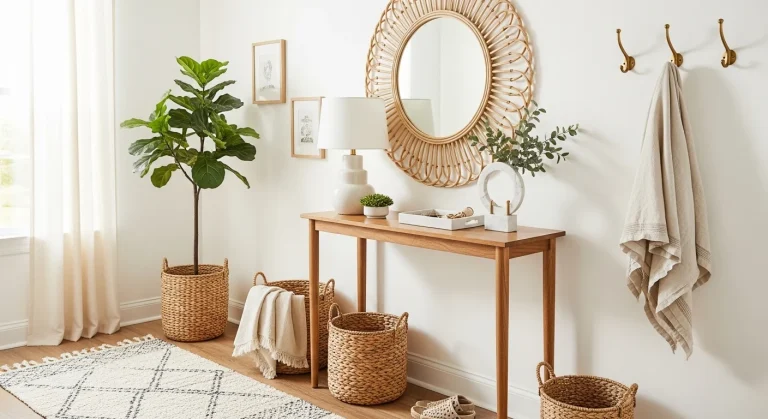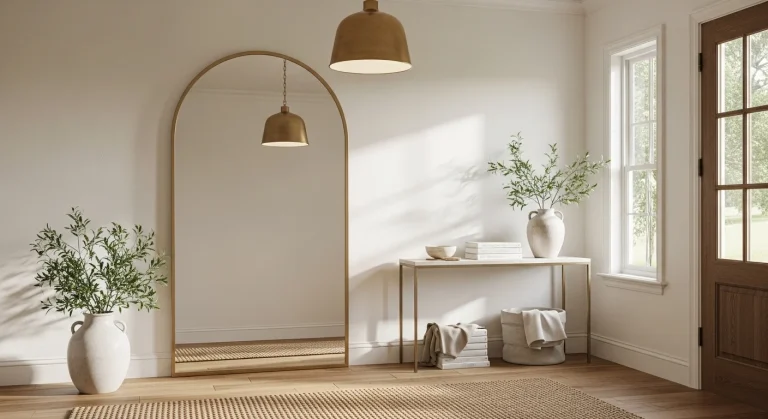
23 Entryway Shoe Storage Ideas That Keep Things Neat
You know that moment when you open the front door and see a pile of shoes scattered across the floor? It’s a small chaos that greets you every day. You can fix that without a full remodel.
These 23 Entryway Shoe Storage ideas help you tame footwear clutter while keeping the space stylish. I’ve included bench options, vertical racks, hidden cabinets, and DIY hacks. Each idea has a visual prompt, key elements, simple steps, and styling tips.
Pick ideas that match your space and budget. You’ll find options for tiny hallways, family homes, and minimalist apartments. Save the ones you love and pin for later. Now let’s get your entryway working and looking great.
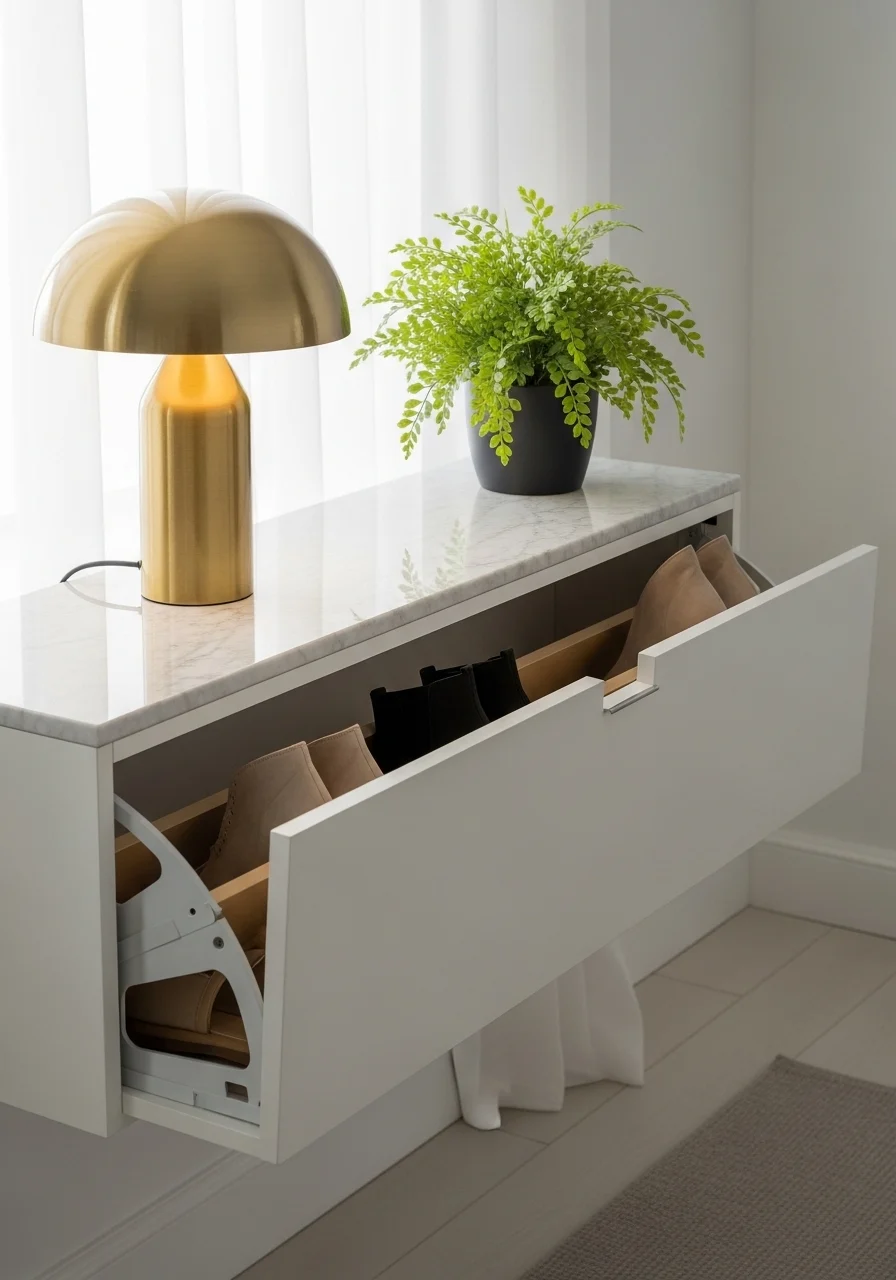
1. Built-In Bench with Drawer Entryway Shoe Storage
What makes it work:
This idea hides shoes behind drawers for a clean look. The bench reads cozy and structured. It balances form and function. Families and neat freaks will love the hidden storage. The cushioned top invites you to sit and put shoes on.
Key Elements
- Built-in bench frame, painted white or soft gray
- Padded cushion in linen or cotton, muted tone
- Pull-out drawers on smooth glides
- Brass or matte black drawer pulls
- Interior dividers or shoe racks inside drawers
- Durable plywood or MDF construction
- Jute runner in front of bench
- Wall hooks above for coats and bags
How to Achieve This Look
- Measure your entry width and bench height.
- Build or order a bench box to fit the space.
- Install three shallow drawers with full-extension slides.
- Add interior dividers to separate pairs.
- Upholster the top with 2" foam and linen fabric.
- Paint or stain the bench and attach hardware.
- Place a runner and add hooks above.
- Load shoes into drawers sorted by type.
- Test drawer slides and adjust as needed.
How to Style / Use It
Sit on the cushion to put shoes on. Keep daily shoes near the top drawer. Store seasonal or guest shoes lower. Wipe drawer interiors now and then. Add a small tray for keys on the bench.
2. Open Cubby Shelf with Baskets
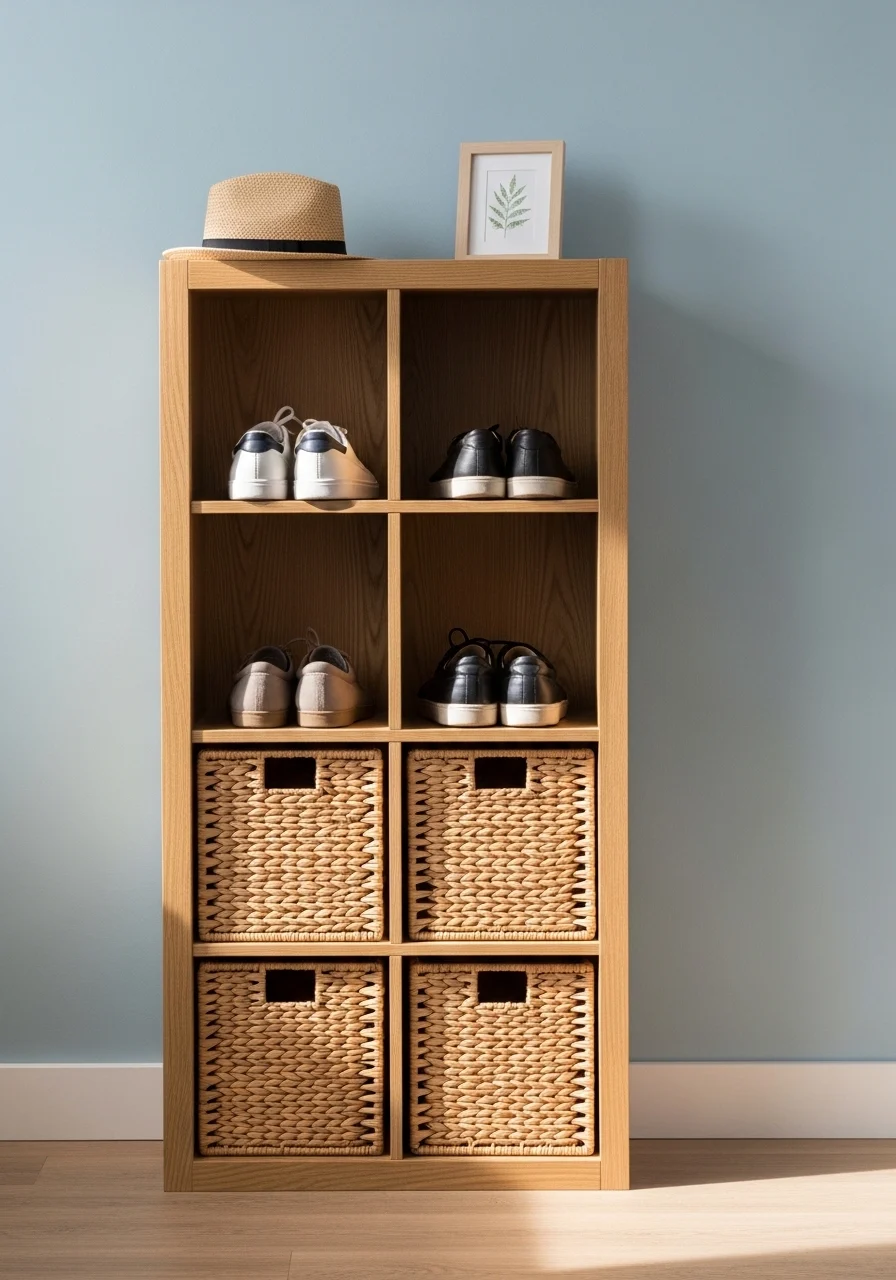
What makes it work:
Open cubbies keep things visible but tidy. Baskets soften the look and hide smaller items. The mix of open and closed storage feels casual and curated. Small households and renters will appreciate the flexibility. The texture of wicker adds warmth.
Key Elements
- Slim oak cubby shelf, vertical design
- Woven baskets for lower cubbies
- Open cubbies sized for sneakers and heels
- Painted wall in soft blue or sage
- Ceramic tray for keys on top
- Small potted plant and stack of mail
- Non-slip liner on shelves
- Soft overhead natural light
How to Achieve This Look
- Choose a slim cubby unit that fits your entry.
- Measure shoe dimensions to assign cubbies.
- Place woven baskets in selected cubbies.
- Add liners to prevent scuff marks.
- Arrange shoes by frequency of use.
- Use top surface for a tray and plant.
- Rotate basket contents seasonally.
How to Style / Use It
Place daily shoes at eye level. Use baskets for mittens, dog leashes, or sandals. Keep heavier shoes on lower cubbies. Dust shelves weekly and air out shoes occasionally.
3. Vertical Shoe Ladder for Minimal Entries
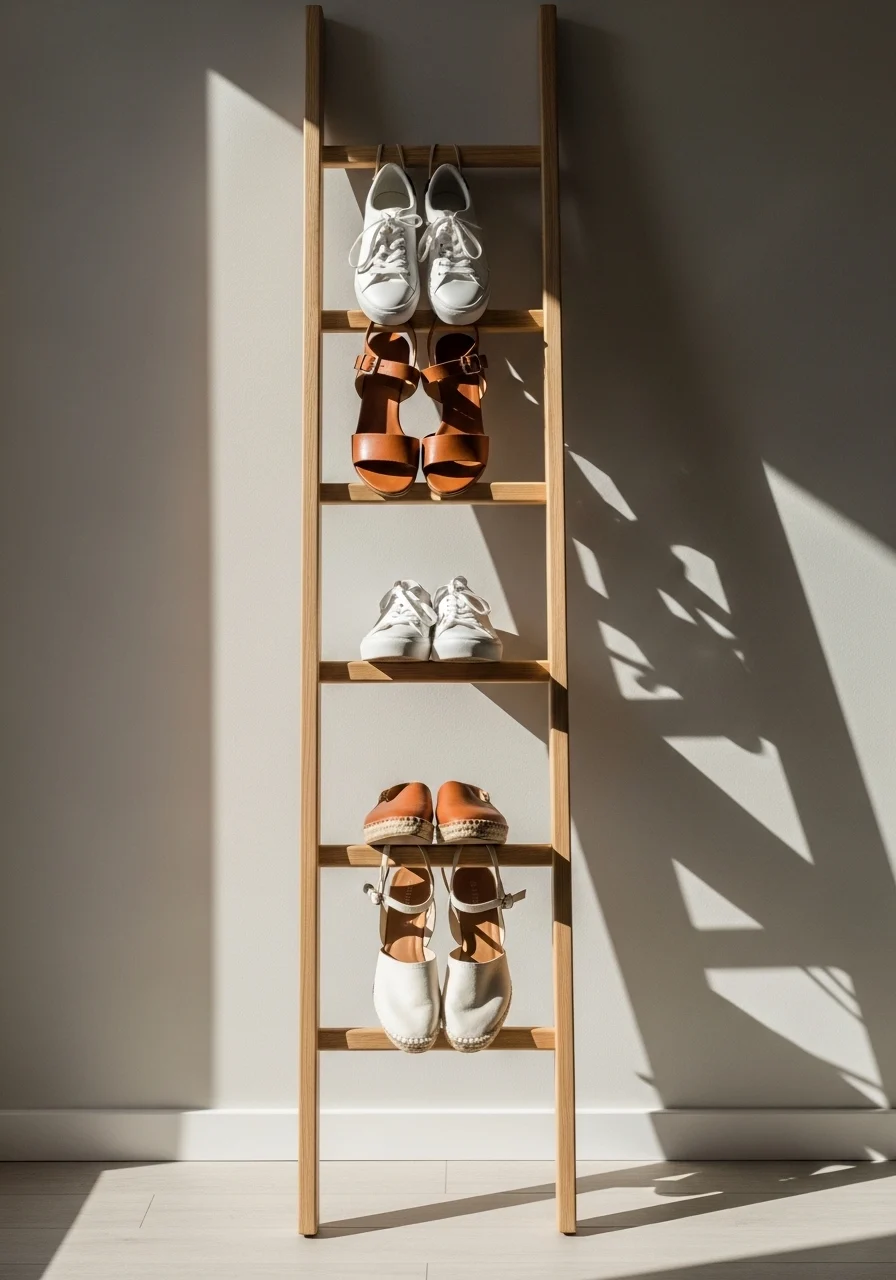
What makes it work:
A shoe ladder saves floor space and looks sculptural. Shoes draped over rungs become decor. It suits narrow or modern entryways. Minimalists and renters will love the low-commitment setup. The wood grain adds cozy texture.
Key Elements
- Leaning ladder in oak or walnut
- Wide rungs to hold shoes securely
- Non-slip feet pads
- Neutral wall paint
- Mix of sneakers and slip-ons for display
- Small mat beneath ladder
- Wall anchor for safety if needed
- Soft natural lighting
How to Achieve This Look
- Choose a ladder with sturdy rungs.
- Place it leaning at a slight angle against the wall.
- Position non-slip pads on the floor and top to prevent marks.
- Arrange shoes by type—flats near bottom.
- Anchor the ladder to the wall if you have kids.
- Add a slim runner to protect flooring.
How to Style / Use It
Show off favorite shoes on the top rungs. Keep frequently worn pairs lower for easy reach. Use ladder for guests’ shoes during visits. Clean rungs and wipe shoes to keep the area tidy.
4. Floating Shoe Shelves with Accent Wall
What makes it work:
Floating shelves make shoes feel curated. The accent wall draws attention and hides clutter. It’s a chic way to display a small collection. Fashion lovers and those with stylish shoes will enjoy the gallery effect. The contrast creates visual drama.
Key Elements
- Matte black floating shelves, thin profile
- Textured plaster or bold paint on accent wall
- LED strip lighting beneath shelves
- Shoes arranged as art pieces
- Minimalist brass coat hook nearby
- Concrete or slate floor finish
- Small bench or stool for putting shoes on
- Dust-free environment
How to Achieve This Look
- Pick a wall that’s visible on entry.
- Paint or texture it a bold tone.
- Install floating shelf mounts secured into studs.
- Place shelves at varied heights for different shoes.
- Add thin LED lighting under each shelf.
- Arrange shoes with space between pairs.
- Place a bench beneath for function.
How to Style / Use It
Rotate shoes seasonally for a fresh display. Use lighting to highlight favorite pairs. Keep cleaning supplies nearby for quick touch-ups. Limit number of pairs to keep it editorial.
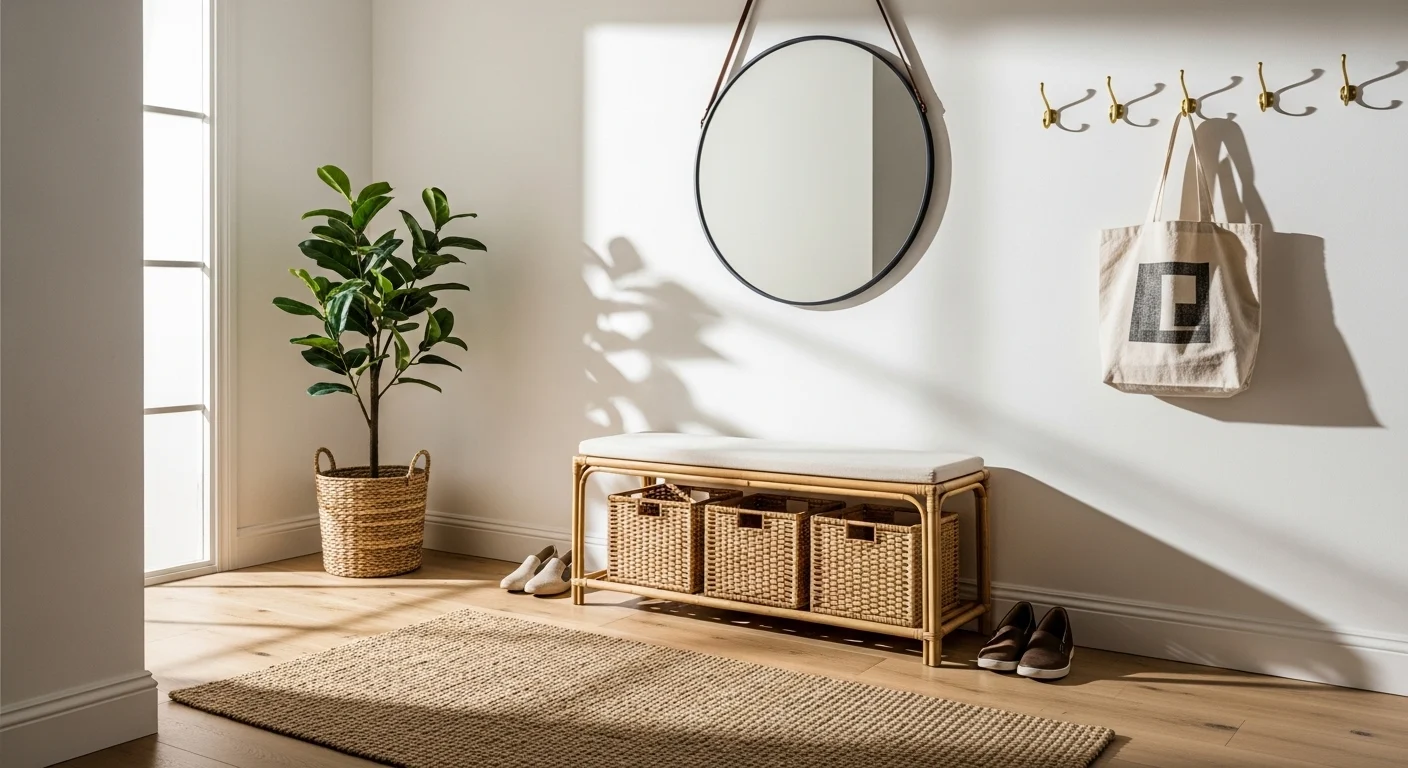
5. Bench with Shoe Cubbies — Entryway Shoe Storage Classic
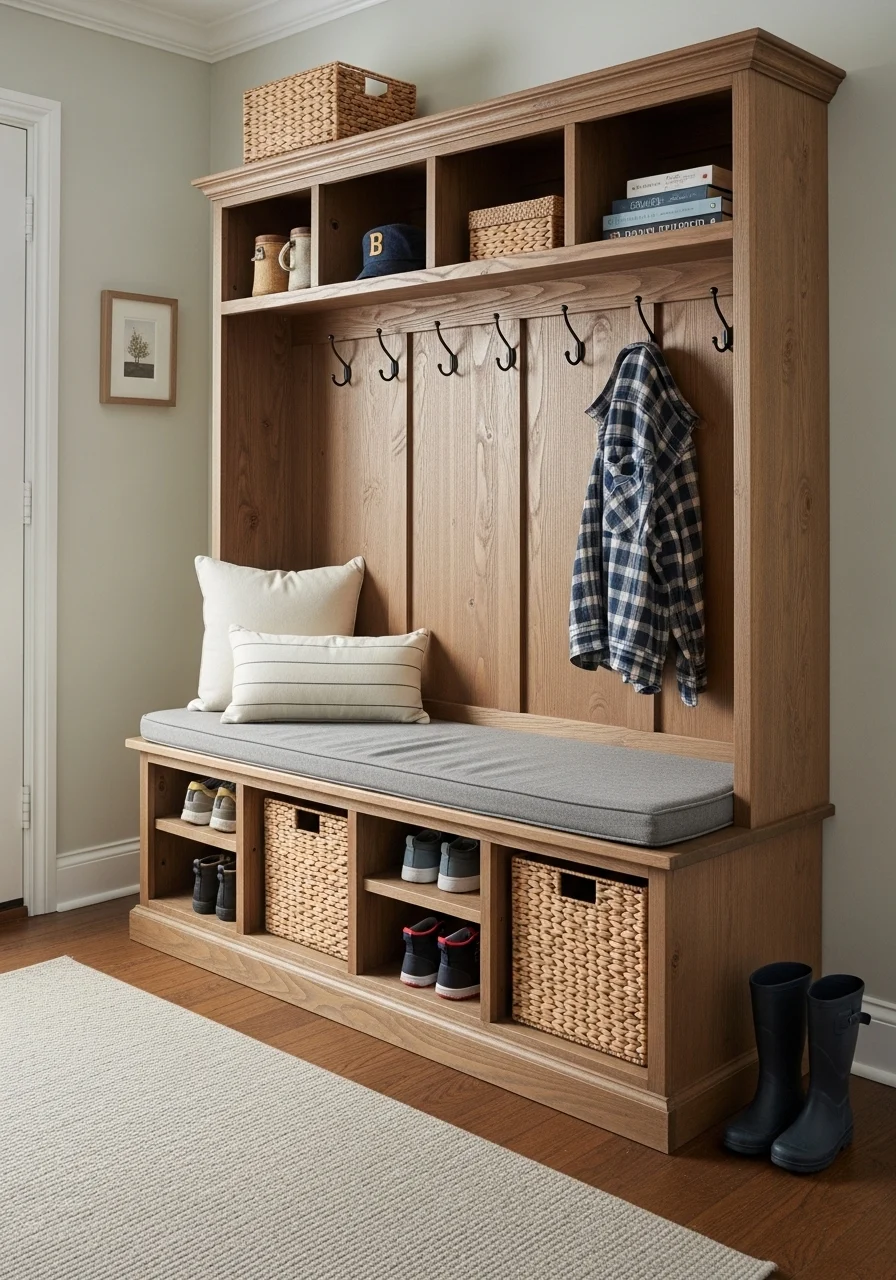
What makes it work:
This classic keeps shoes organized and accessible. Cubbies give each pair a home and keep shoes off the floor. It fits families, entryways with kids, and practical households. The rustic wood and soft cushion feel homey.
Key Elements
- Solid wood bench with multiple cubbies
- Padded cushion in durable fabric
- Wicker baskets for odd cubbies
- Kids’ boot tray for wet shoes
- Wall-mounted hook rack above
- Durable finish to resist scuffs
- Non-skid pads under bench
- Neutral palette with warm wood tones
How to Achieve This Look
- Measure the width and choose cubby sizes.
- Build or buy a bench with equal cubby spacing.
- Add a foam cushion covered in washable fabric.
- Place baskets in select cubbies for accessories.
- Assign cubbies by family member or shoe type.
- Add a boot tray next to the bench for wet footwear.
How to Style / Use It
Keep boots in lower cubbies for easy access. Use baskets for scarves and hat storage. Sweep under cubbies weekly. Add labels for kids to maintain order.
6. Slim Metal Shoe Rack for Narrow Hallways
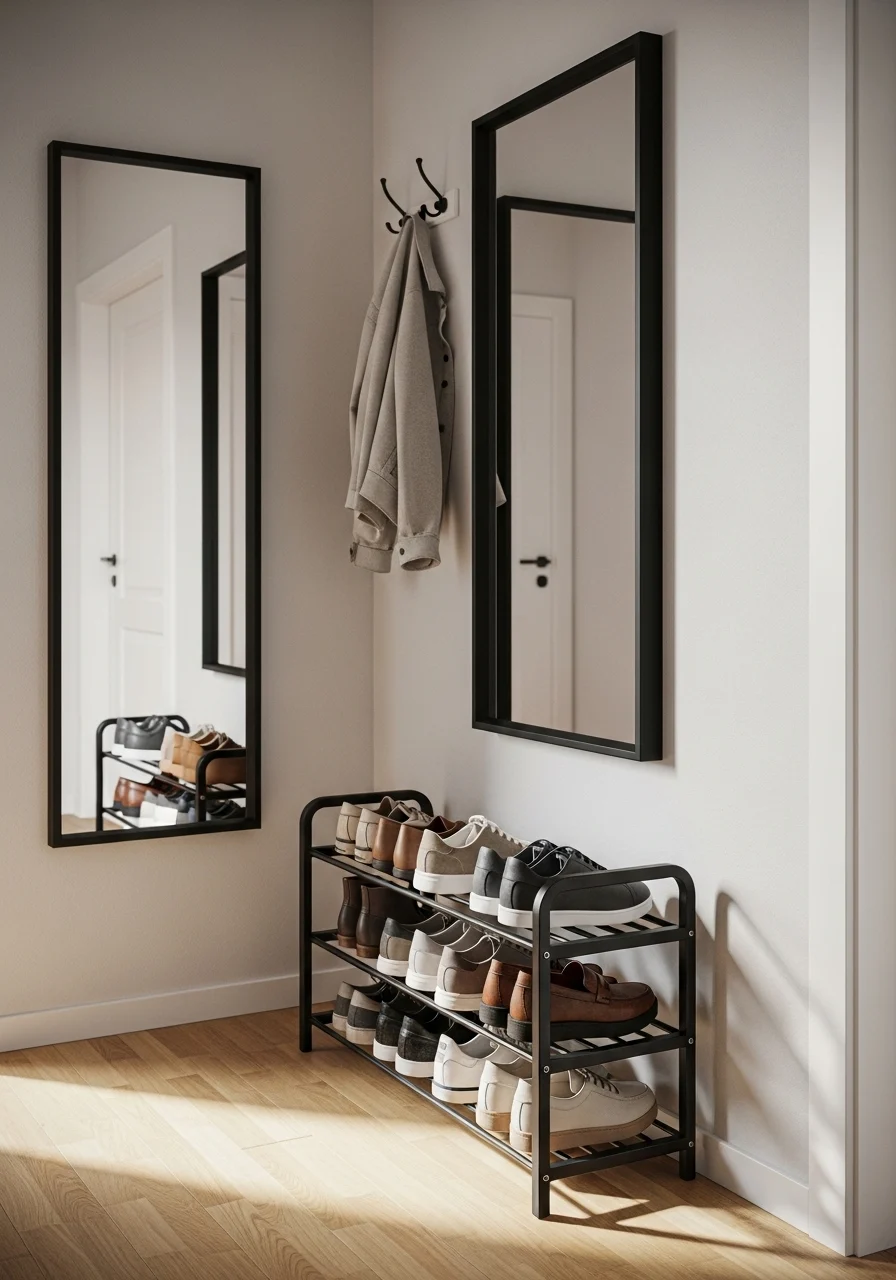
What makes it work:
A slim metal rack fits tight spaces easily. It looks industrial and neat. The open structure keeps shoes ventilated. It suits studio apartments and narrow corridors. The metal finish offers clean lines.
Key Elements
- Powder-coated black metal frame
- Two or three narrow tiers
- Anti-slip shelf grips
- Lightweight, easy to move
- Minimal shoes per tier
- Small doormat in front
- Wall mirror opposite for balance
- Matte finish to avoid glare
How to Achieve This Look
- Measure hallway width before buying.
- Choose a slim rack with sturdy shelves.
- Place near door but not blocking traffic flow.
- Store only daily shoes to avoid overload.
- Wipe metal occasionally with a damp cloth.
- Use the top tier for small baskets or keys.
How to Style / Use It
Limit each tier to 2–3 pairs for a tidy look. Pair with a slim wall hook for jackets. Move rack seasonally to clean floors. Rust-proof if placed near mudroom with moisture.
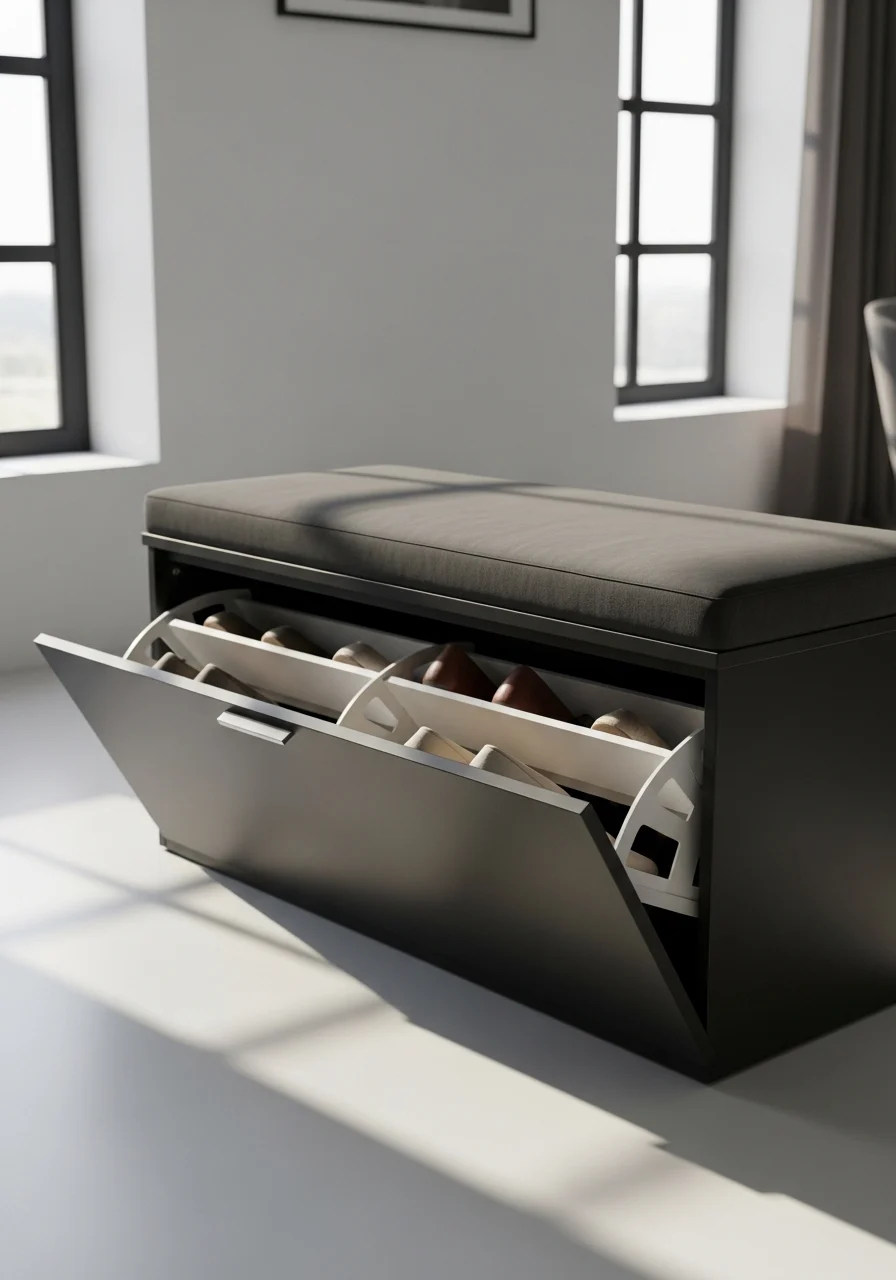
7. Tiered Shoe Cabinet — Smart Entryway Shoe Storage
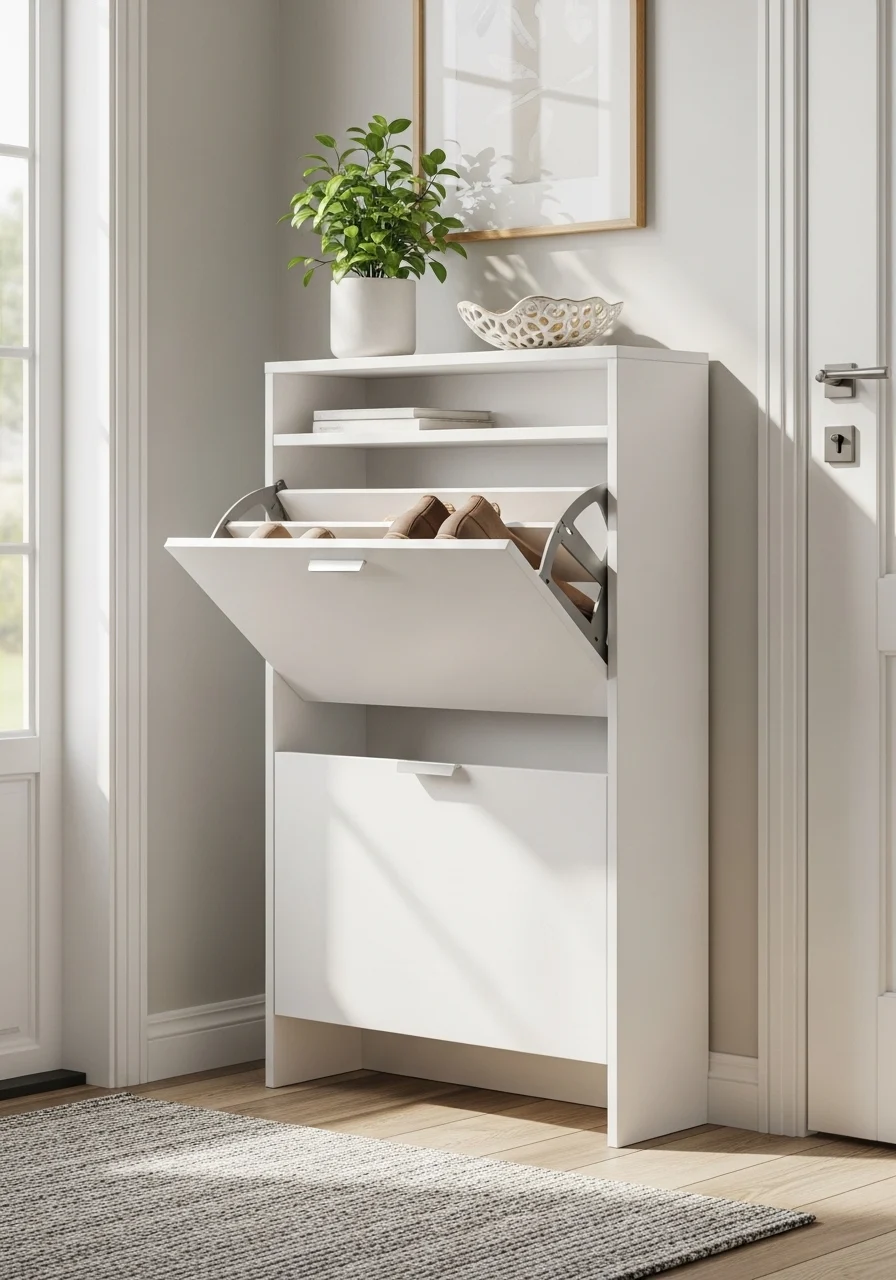
What makes it work:
A tiered cabinet hides shoes while keeping them accessible. Tilt-out doors use depth efficiently. It keeps the entry minimalist and neat. Small families and rental spaces benefit from the discreet storage. The cabinet top doubles as a catchall.
Key Elements
- Slim tilt-out shoe cabinet, white or light wood
- Multiple tiers inside for stacked pairs
- Soft-close hinges or smooth pivots
- Decorative bowl for keys on top
- Ventilation holes to prevent odors
- Cabinet anchored to wall for safety
- Non-marking feet to protect flooring
- Neutral runner or rug in front
How to Achieve This Look
- Measure your space for width and depth.
- Choose a tiered cabinet with adequate shoe capacity.
- Install with wall anchors if required.
- Place a decorative tray on top for keys and mail.
- Arrange shoes by frequency in tiers.
- Open doors occasionally to air out shoes.
How to Style / Use It
Use the cabinet top for seasonal decor. Keep a small deodorizer inside to fight odors. Store seldom-used shoes in the back. Wipe the cabinet exterior weekly.
8. Under-Stair Shoe Closet Nook
What makes it work:
Under-stair space becomes a dedicated shoe zone. Pull-out shelves maximize depth and access. It’s perfect for multi-pair households. The enclosed nook makes the entry tidy instantly. The lighting keeps the space inviting.
Key Elements
- Custom pull-out shelving system
- LED strip lighting inside the closet
- Ventilation to prevent moisture
- Slim rug in front of the opening
- Umbrella and bag hooks nearby
- Painted interior to match decor
- Pull handles flush with doors
- Magnetic catch or soft-close hinges
How to Achieve This Look
- Measure the under-stair cavity carefully.
- Design pull-out trays sized for shoes.
- Install smooth drawer slides rated for weight.
- Add LED strips inside for visibility.
- Paint interior a warm neutral tone.
- Add a small dehumidifier pack for moisture control.
How to Style / Use It
Assign shelves by family member or season. Use trays for quick access to daily shoes. Keep the closet door closed to hide clutter. Inspect for drafts or moisture occasionally.
9. Pegboard Shoe Wall — Flexible Entryway Shoe Storage
What makes it work:
A pegboard wall adapts to your changing shoe collection. You can rearrange pegs for boots or flats. It adds a creative, workshop-chic vibe. DIY lovers and those who like modular systems will enjoy it. The display feels interactive and custom.
Key Elements
- Full-wall wooden pegboard or slotted panel
- Assorted pegs, hooks, and small shelves
- Shoe-specific peg attachments for heels or flats
- Baskets for accessories
- Painted or stained finish
- Small stool in front
- Runners or mat beneath
- Simple hardware for adjustments
How to Achieve This Look
- Mount the pegboard securely into studs.
- Choose peg types sized for shoes.
- Test peg spacing with a few pairs.
- Add small shelves for folded accessories.
- Place baskets on lower pegs for mittens.
- Reconfigure layout as shoe tastes change.
How to Style / Use It
Group shoes by style or color for visual order. Use pegs to hang flats and heels vertically. Keep heavy boots lower and anchored. Wipe pegboard and pegs monthly.
10. Banded Bench with Hanging Shoe Pockets
What makes it work:
Hanging pockets keep pairs visible and off the floor. The side pockets add function without bulk. It’s great for renters and renters who can’t build in cabinetry. The textile pockets bring soft texture to the entry.
Key Elements
- Upholstered bench with side banding
- Canvas or cotton hanging pockets
- Reinforced stitching and grommets
- Neutral cushion fabric like linen
- Wall mirror to enlarge the space
- Light wood bench legs
- Shoe-sized pockets for flats and flip-flops
- Small rug to define the zone
How to Achieve This Look
- Choose a bench with side rails or attachable bands.
- Buy hanging pockets with grommets and reinforced edges.
- Secure pockets to the bench side with adhesive loops or clips.
- Insert shoes into labeled pockets.
- Ensure pockets don’t drag the bench down.
- Rotate pocket contents seasonally.
How to Style / Use It
Use pockets for daily slip-ons and kids’ shoes. Keep heavier shoes on the bench floor. Wash canvas pockets occasionally. Add a small basket for spare laces.
11. Rotating Shoe Carousel for Tight Spaces
What makes it work:
A carousel uses vertical space cleverly. Shoes rotate for easy access. It fits deep but narrow closets or corners. Tech-savvy homeowners who like compact solutions will enjoy it. The motion adds playful function.
Key Elements
- Multi-tier rotating carousel unit
- Smooth swivel mechanism
- Narrow footprint with deep tiers
- Non-scratch shelf surfaces
- Mounted base for stability
- Small top ledge for keys
- Plastic or wooden construction
- Neutral finish to blend in
How to Achieve This Look
- Measure floor-to-ceiling height and available footprint.
- Buy or build a rotating carousel sized to fit.
- Secure the base to prevent wobble.
- Place shoes around tiers with heels inward.
- Limit per-tier footwear to avoid overload.
- Test rotation and adjust spacing.
How to Style / Use It
Keep daily shoes on middle tiers for quick reach. Use the top for a small plant or bowl for keys. Clean tiers and lubricate the swivel yearly. Keep heavier footwear low.
12. Narrow Console with Hidden Shoe Compartment — Entryway Shoe Storage Sleek
What makes it work:
A narrow console keeps a sleek silhouette while hiding shoes. The hidden compartment avoids clutter. It suits modern apartments and anyone who prefers a refined look. The top surface doubles as a drop zone for essentials.
Key Elements
- Slim console table with flip-front compartment
- Marble or wood top surface
- Interior slotted organizer for shoes
- Soft-close hinge mechanism
- Small decorative lamp and tray on top
- Neutral or dark finish for contrast
- Rubber feet to protect flooring
- Vent slots for airflow
How to Achieve This Look
- Measure for a slim console that won’t crowd the walkway.
- Choose a flip-front with secure hinges.
- Install slotted organizers inside to separate shoes.
- Use the top as a mail and key station.
- Store seasonal shoes inside and daily sneakers on top if needed.
- Keep a small deodorizer inside to manage smells.
How to Style / Use It
Layer a mirror above to expand the space visually. Keep decorative items minimal to avoid clutter. Use inside storage for dress shoes. Wipe the marble or wood top weekly.
13. Open Bench with Shoe Slats — Entryway Shoe Storage Breezy
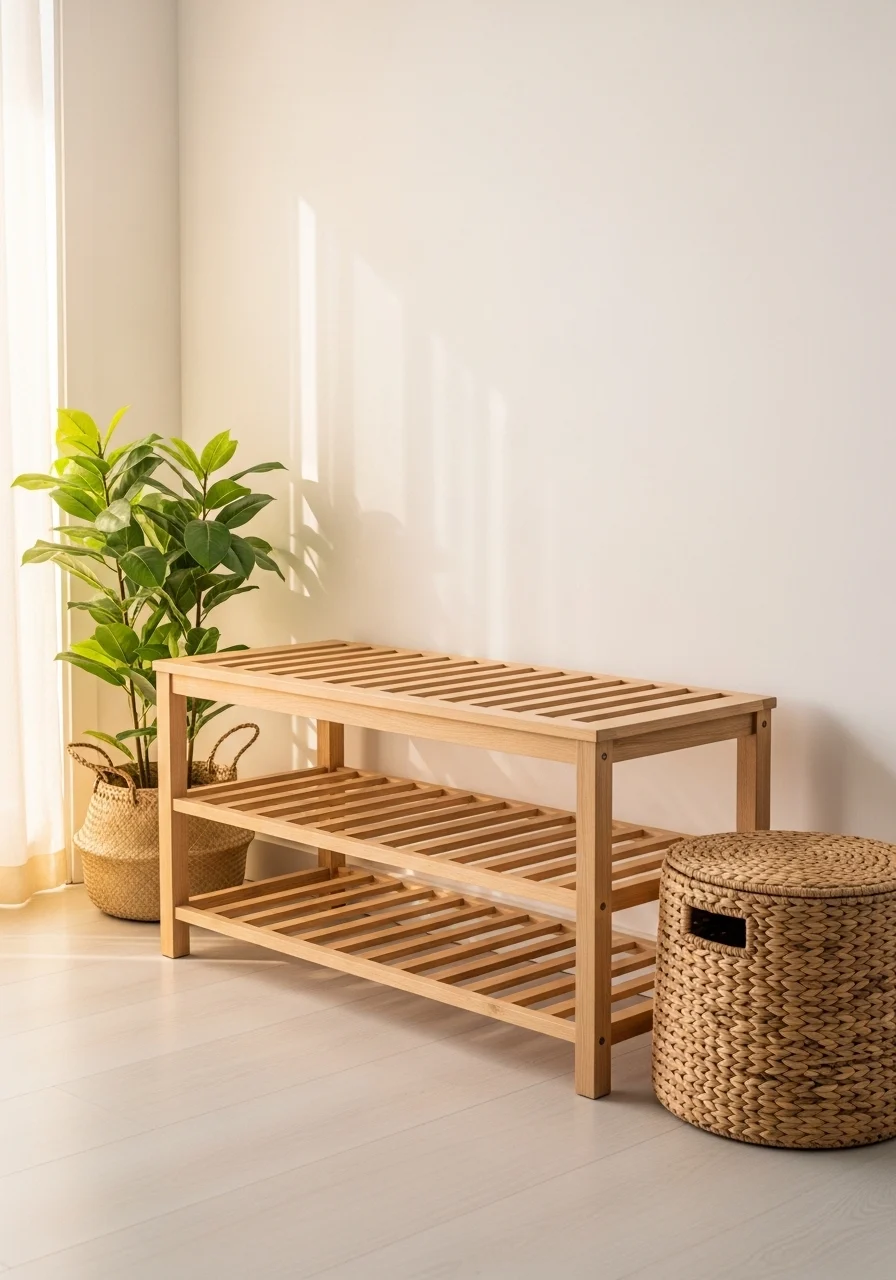
What makes it work:
Slatted storage breathes and prevents odor build-up. The open design keeps things casual and light. It fits coastal, Scandinavian, and cottage styles. You’ll enjoy the breezy, easy-clean setup. Slats create a rhythm visually.
Key Elements
- Slatted bench shelf in light wood
- Wide slats to accommodate shoe soles
- Cushioned bench seat in natural fabric
- Wicker basket for extras
- Wall hooks above for hats
- Natural fiber rug in front
- Sealant to protect wood from moisture
- Soft neutral palette
How to Achieve This Look
- Build or buy a bench with evenly spaced slats.
- Seal the wood for durability.
- Add a foam cushion with linen cover.
- Place shoes directly on slats for airflow.
- Use baskets for small accessories.
- Maintain by sweeping and wiping slats.
How to Style / Use It
Keep frequently worn shoes on slats for quick grab. Use baskets for odd pairs or slippers. Rotate shoes to prevent wear marks. Use in both mudrooms and airy coastal foyers.
14. Rolling Shoe Cart that Slides Under a Bench

What makes it work:
A rolling cart hides shoes and slides out when needed. It’s a flexible, renter-friendly choice. The cart uses under-bench dead space well. It’s ideal if you want hidden storage without permanent changes. Wheels add mobility.
Key Elements
- Slim rolling cart with durable casters
- Metal frame with wooden or wire shelves
- Smooth gliding wheels with locks
- Bench with adequate clearance
- Neutral cushion and top styling
- Non-marking wheels to protect floors
- Compact dimensions for narrow entries
- Handles or tug points for easy pull-out
How to Achieve This Look
- Measure bench clearance before purchasing a cart.
- Choose a rolling cart that fits snugly under the bench.
- Load shoes with heavier pairs on the bottom shelf.
- Lock casters when cart is parked.
- Pull cart out to access shoes and push back to hide.
- Clean wheels and track periodically.
How to Style / Use It
Store overflow or seasonal shoes on the cart. Use baskets on cart shelves for smaller accessories. Lock wheels to avoid accidental movement. Wipe cart and wheels monthly.
15. Tiered Wall-Mounted Shoe Racks
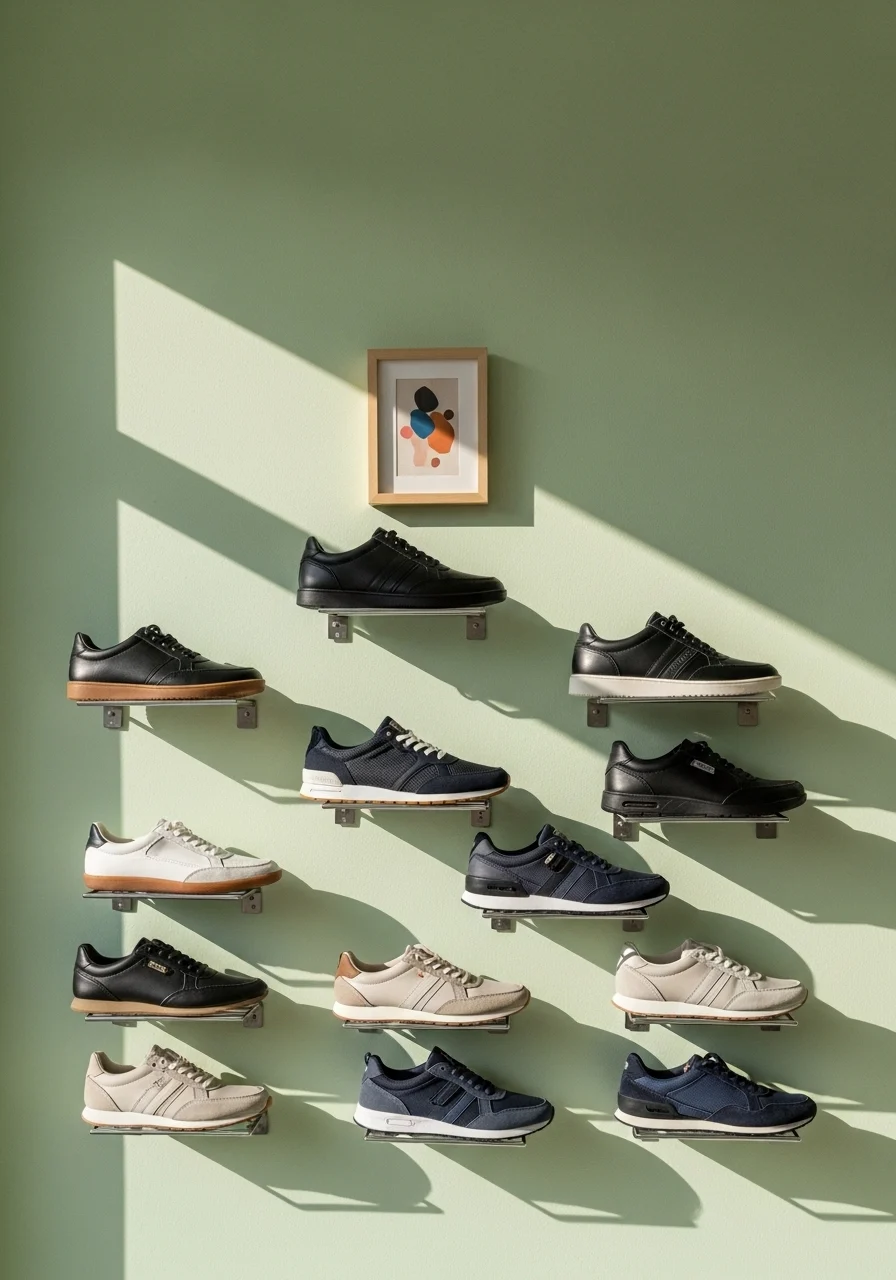
What makes it work:
Wall-mounted tiers free up floor space. They make storage feel light and organized. Ideal for narrow entries and modern homes. The staggered layout adds a decorative rhythm. It works well for visible, neat collections.
Key Elements
- Multiple slim wall-mounted metal racks
- Staggered spacing for different shoe heights
- Anchors installed into studs
- Powder-coated finishes like white or black
- Small shelf for keys near the top
- Rubber or felt pads on racks to protect soles
- Neutral paint backdrop
- Simple hardware for installation
How to Achieve This Look
- Plan rack placement and spacing.
- Mark and drill into studs for secure mounting.
- Install racks at varying heights for different shoes.
- Place daily shoes on middle racks.
- Add a small decorative ledge above for accessories.
- Inspect mounts annually for stability.
How to Style / Use It
Use staggered racks for visual interest. Keep heavier shoes lower and easy to reach. Rotate display shoes for freshness. Dust racks with a microfiber cloth regularly.
16. DIY Crate Stack Shoe Storage

What makes it work:
Crates are affordable and customizable. Stacking creates asymmetry and personality. It fits eclectic and rustic entries. You can paint, stain, or leave them raw for texture. It’s great for weekend DIYers.
Key Elements
- Vintage wooden crates or new pine crates
- Paint or stain in coordinating tones
- Screws or brackets to secure stacks
- Non-slip pads under crates
- Mixed shoe styles for varied display
- Small decorative accents like plants
- Protective finish to prevent splinters
- Rug or runner to define the base
How to Achieve This Look
- Source clean crates in similar sizes.
- Sand and paint or stain if desired.
- Arrange crates in a staggered stack for interest.
- Secure crates together with screws or bracket hardware.
- Place shoes inside each crate sorted by type.
- Add plants or baskets for texture and function.
How to Style / Use It
Use crates for casual, seasonal footwear. Keep the top crate for keys and small items. Rotate paint color for seasonal refresh. Sweep inside crates to remove debris.
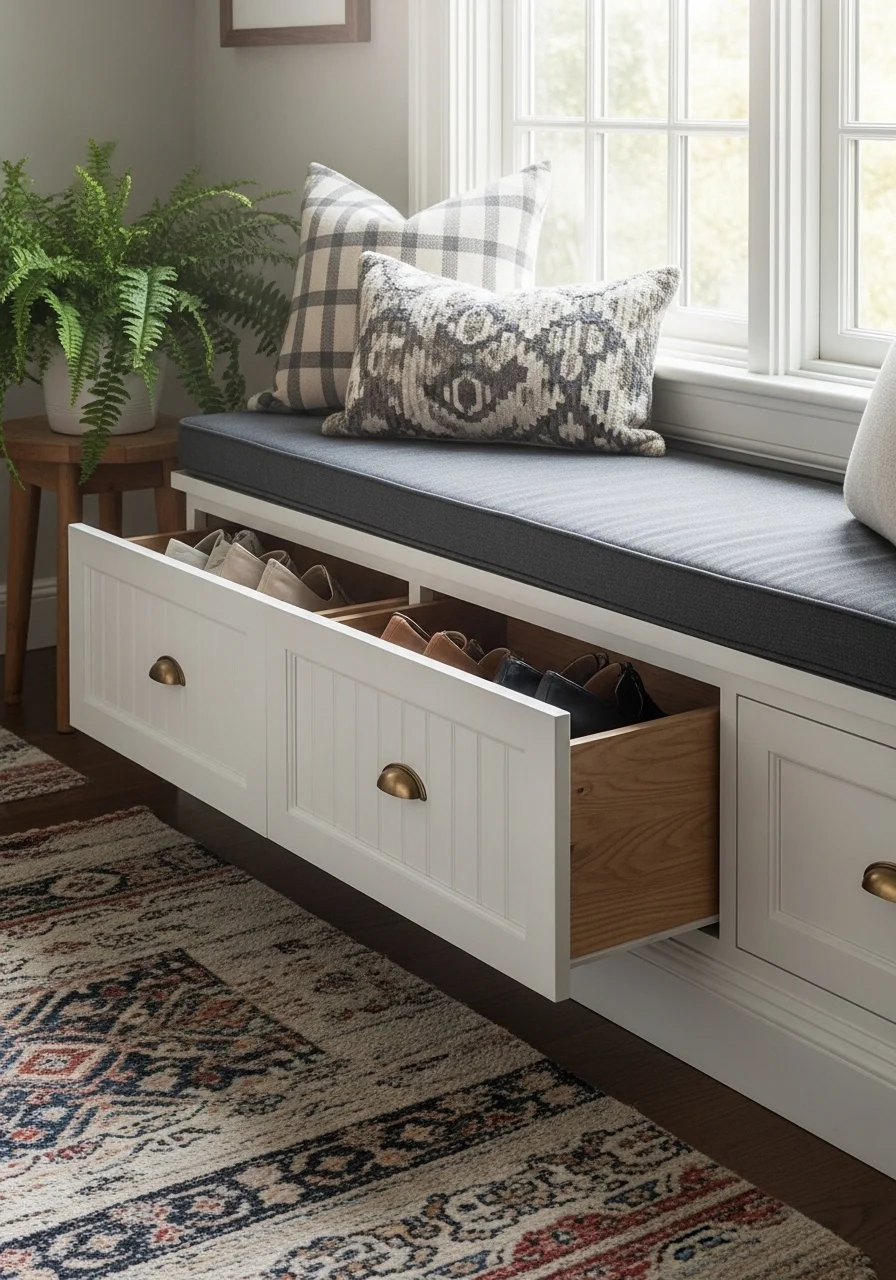
17. Bench with Slide-Out Shoe Trays
What makes it work:
Slide-out trays make shoe storage hidden but accessible. Trays keep shoes aligned and protect flooring. It suits neat, modern households. The motion is satisfying and efficient. The design remains streamlined.
Key Elements
- Bench with pull-out shallow trays
- Soft-close drawer slides
- Foam cushion top with washable cover
- Painted or stained bench exterior
- Rubber-lined tray bottoms
- Small handles or edge pulls
- Neutral runner in front
- Airing time allowed by pulling trays occasionally
How to Achieve This Look
- Build a bench with shallow tray cutouts.
- Install full-extension drawer slides for smooth pulls.
- Line tray bottoms with rubber matting.
- Upholster bench seat with removable cover.
- Store shoes heel-to-toe in trays.
- Pull trays regularly for airing and cleaning.
How to Style / Use It
Reserve top trays for everyday shoes. Clean tray liners occasionally. Use bench top as a sitting area. Keep heavier boots on the floor if trays are shallow.
18. Hanging Shoe Organizer Behind Door
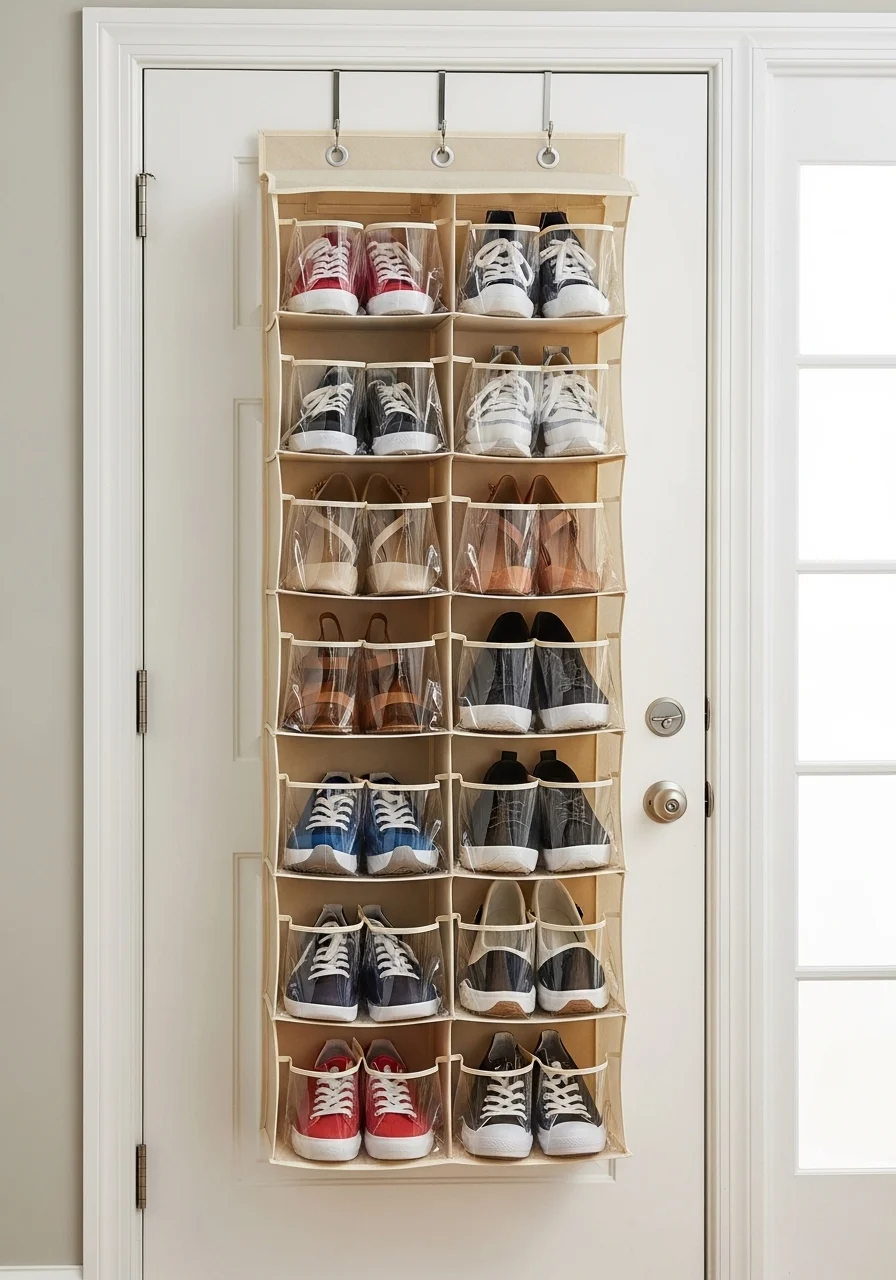
What makes it work:
A behind-the-door organizer uses otherwise wasted space. It’s simple, affordable, and effective. Great for small apartments and renters. You’ll clear floor clutter without buying furniture. The organizer keeps pairs accessible.
Key Elements
- Over-the-door fabric or clear-pocket organizer
- Sturdy hooks that fit door thickness
- Reinforced fabric and stitching
- Pairs of shoes in individual pockets
- Door protection padding to avoid scuffs
- Thin heels and flats fit best
- Neutral fabric to match room decor
- Door that opens smoothly with organizer in place
How to Achieve This Look
- Measure door thickness and choose compatible hooks.
- Hang organizer on the inside of the entry door.
- Place shoes in pockets starting from top.
- Avoid overloading pockets to keep the door balanced.
- Swap heavier shoes for lighter ones to protect fabric.
- Remove and wash the organizer periodically.
How to Style / Use It
Use for seasonal shoes or kids’ footwear. Keep the front visible to quickly grab what you need. Wash the fabric if it gets dirty. Ensure door still closes properly with the organizer installed.
19. Shoe Drawer in Console with Mail Sorter
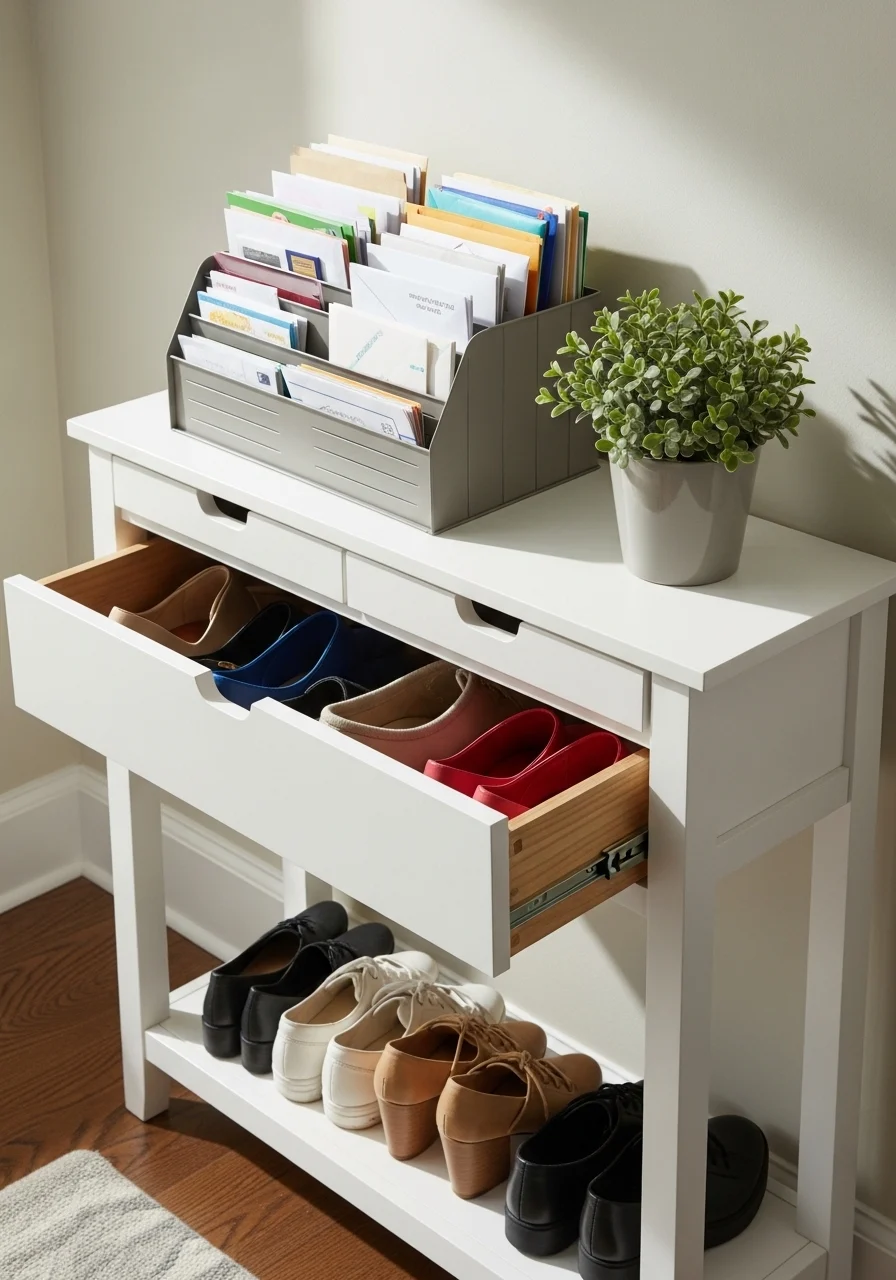
What makes it work:
Combining a mail sorter and shoe drawer streamlines the daily drop zone. It keeps shoes and mail out of sight. This combo suits entranceways where function must be tidy. The slim profile keeps traffic flowing.
Key Elements
- Console table with at least one shallow shoe drawer
- Built-in mail sorting slots on top
- Drawer dividers for shoe pairs
- Smooth sliding mechanisms
- Decorative bowl and plant on the console top
- Neutral finish to match the hallway
- Small rug under the console
- Ventilation for drawer interiors
How to Achieve This Look
- Pick a console with a shallow drawer depth.
- Add dividers inside the drawer for pairs.
- Use top slots for incoming mail.
- Store flats and smaller shoes in the drawer.
- Rotate contents seasonally.
- Wipe drawer and sort mail weekly.
How to Style / Use It
Reserve drawer for daily flats and slippers. Use mail slots to keep paper tidy. Add a slim tray for keys and sunglasses. Keep the top clutter-free for a polished entry.
20. Shoe Bench with Wire Basket Inserts
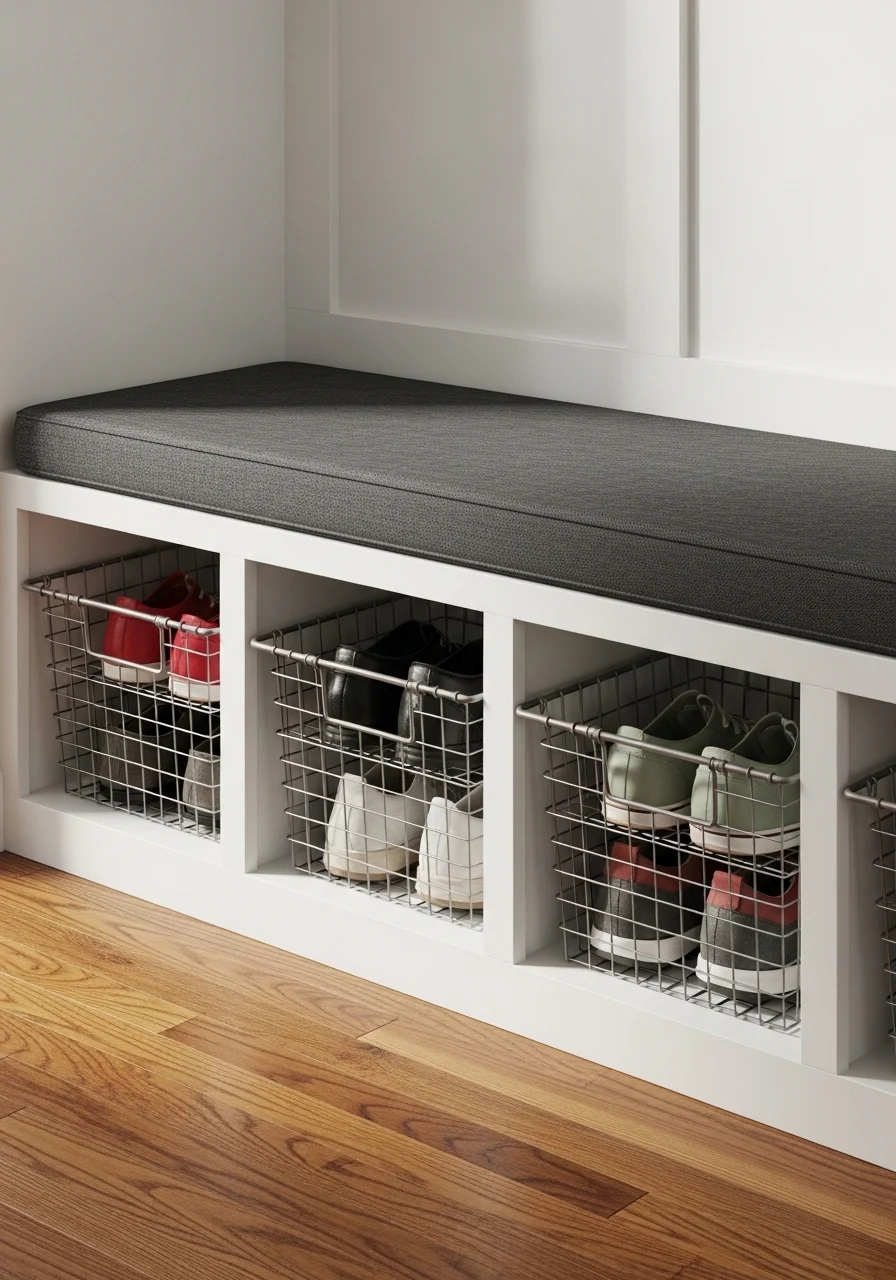
What makes it work:
Wire baskets keep shoes contained yet visible. They add industrial texture and are easy to move. This option suits casual homes and those who like modular storage. Baskets are easy to clean and rearrange.
Key Elements
- Wooden bench with open cubbies
- Wire baskets sized to cubby dimensions
- Cushioned top in durable fabric
- Soft-close hardware optional
- Basket handles for easy removal
- Neutral palette with metal accents
- Rug to define the entry space
- Ventilated baskets prevent odors
How to Achieve This Look
- Measure cubby interiors before buying baskets.
- Place wire baskets snugly in each slot.
- Assign baskets to family members or shoe types.
- Pull baskets out to access shoes easily.
- Clean baskets with a damp cloth periodically.
- Rotate basket contents seasonally.
How to Style / Use It
Keep daily shoes in top baskets. Use lower baskets for boots or heavier footwear. Add labels to baskets for family organization. Air shoes out before placing them back.
21. Shoe Storage Ottoman with Hidden Compartment
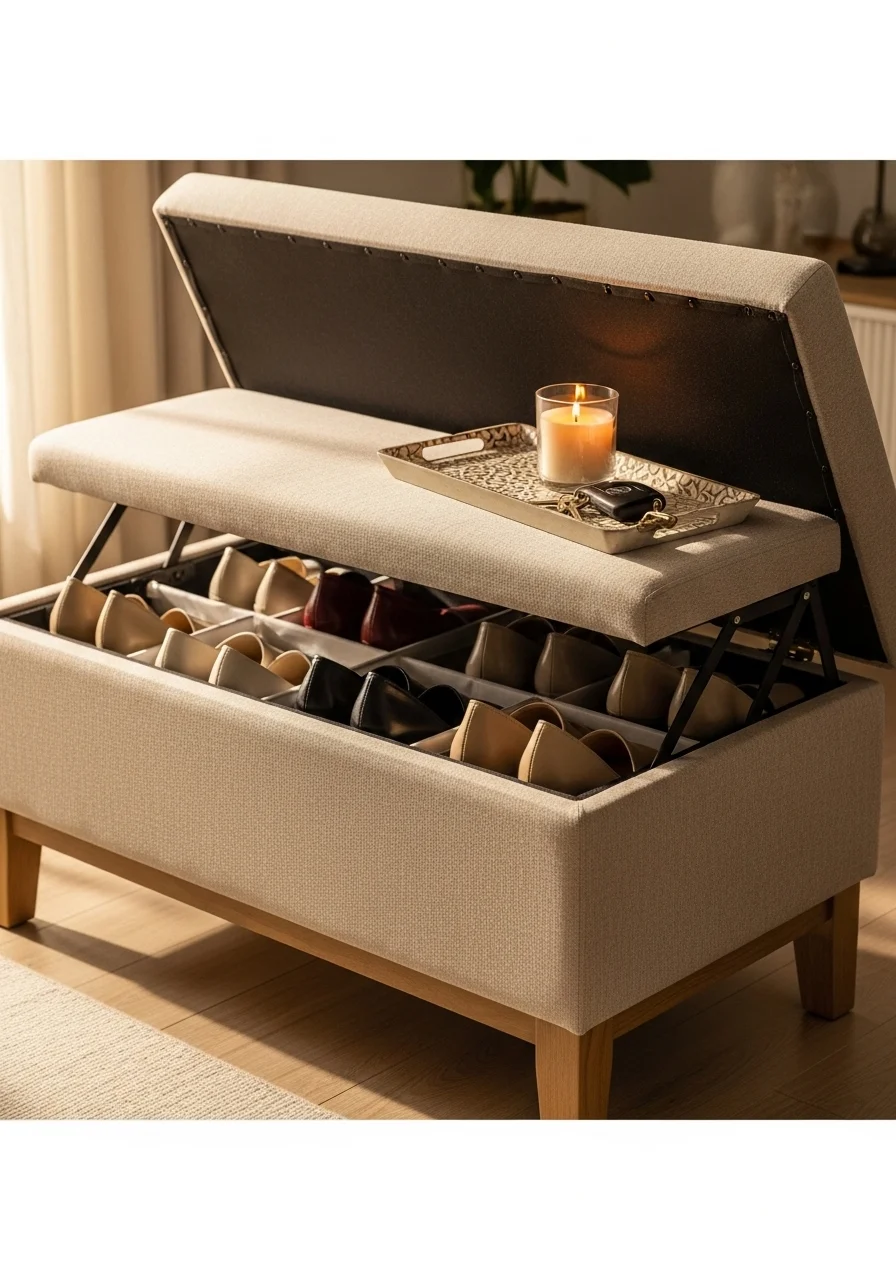
What makes it work:
An ottoman hides shoes while providing seating. The hinged lid keeps the entry neat. It’s perfect for small foyers and multipurpose spaces. Stylish upholstery makes it a decorative piece too. The hidden compartment hides clutter instantly.
Key Elements
- Upholstered ottoman with hinged lid
- Internal shelving or dividers for shoes
- Durable fabric like cotton or performance weave
- Sturdy legs to support seating
- Soft-close hinge to prevent slams
- Neutral or pattern fabric options
- Small tray on top for keys
- Ventilation strategy to prevent odors
How to Achieve This Look
- Choose an ottoman that fits your entry footprint.
- Ensure the interior has shallow shelves or dividers.
- Pick easy-clean fabric for practical use.
- Place it where you need both seating and storage.
- Arrange shoes inside with toes facing out.
- Air out shoes periodically before closing the lid.
How to Style / Use It
Use the top as a seat to put on shoes. Keep seasonal shoes inside. Rotate upholstery choices for a fresh look. Remove shoes occasionally for airing.
22. Shoe Tray with Dividers for Muddy Seasons
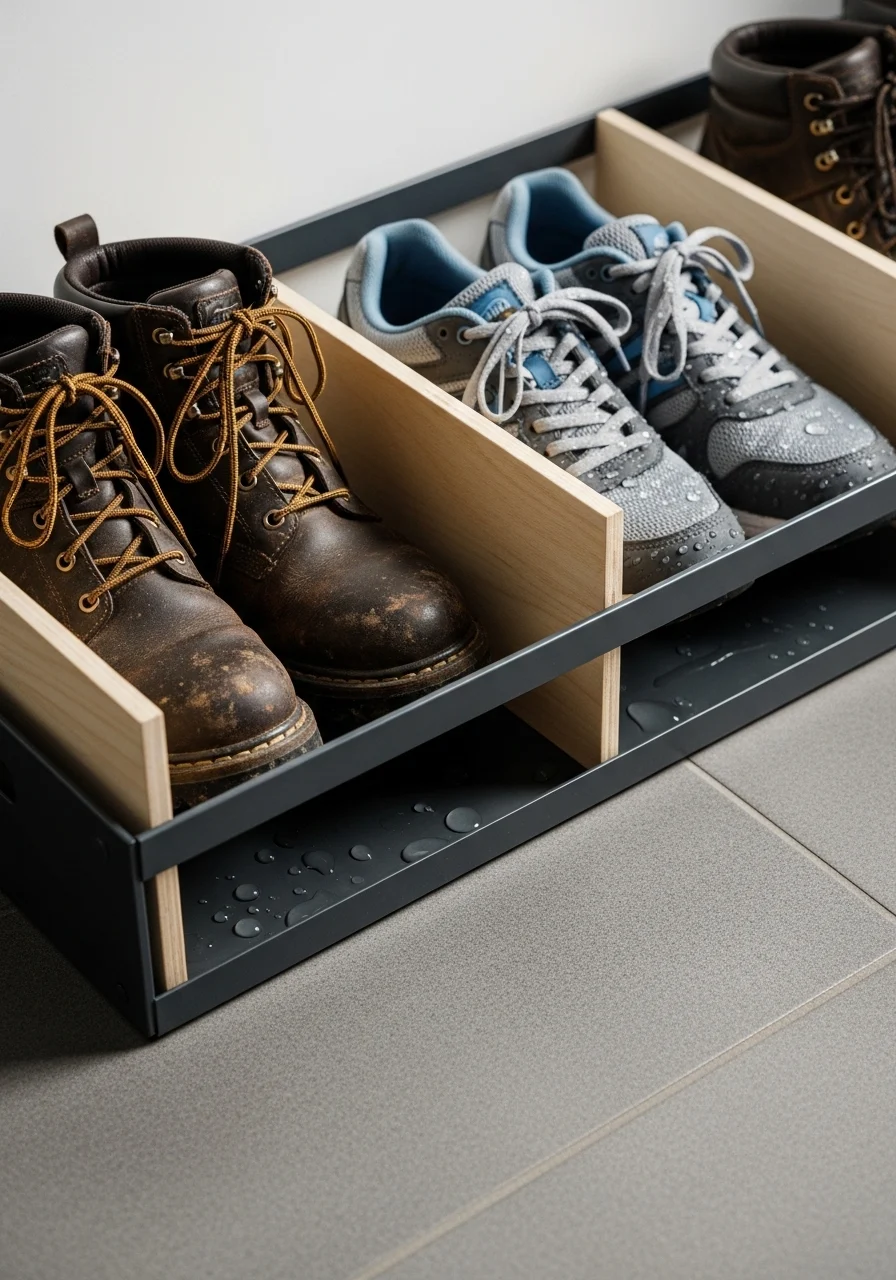
What makes it work:
A divided tray keeps mud and moisture contained. It’s ideal for rainy climates and active households. Dividers separate shoe types and protect floors. The tray makes cleanup quick after walks or hikes.
Key Elements
- Sturdy metal or plastic shoe tray
- Removable wooden or plastic dividers
- Raised edges to contain water
- Non-slip base to keep tray in place
- Drain or removable liner for easy cleaning
- Neutral finish to blend with decor
- Placement near the door or in a mudroom
- Absorbent mat or boot brush nearby
How to Achieve This Look
- Choose a tray sized for your typical footwear volume.
- Install dividers to create compartments.
- Place the tray on a tiled or easily cleaned surface.
- Use a removable liner for quick dumping of debris.
- Rinse and dry the tray after heavy use.
- Keep a boot brush nearby to reduce mud inside.
How to Style / Use It
Use the tray for wet and muddy shoes only. Empty and rinse after storms. Store extra liners for quick swaps. Pair with a hanging umbrella stand.
23. Shoe Shelf with Mirror and Charging Station
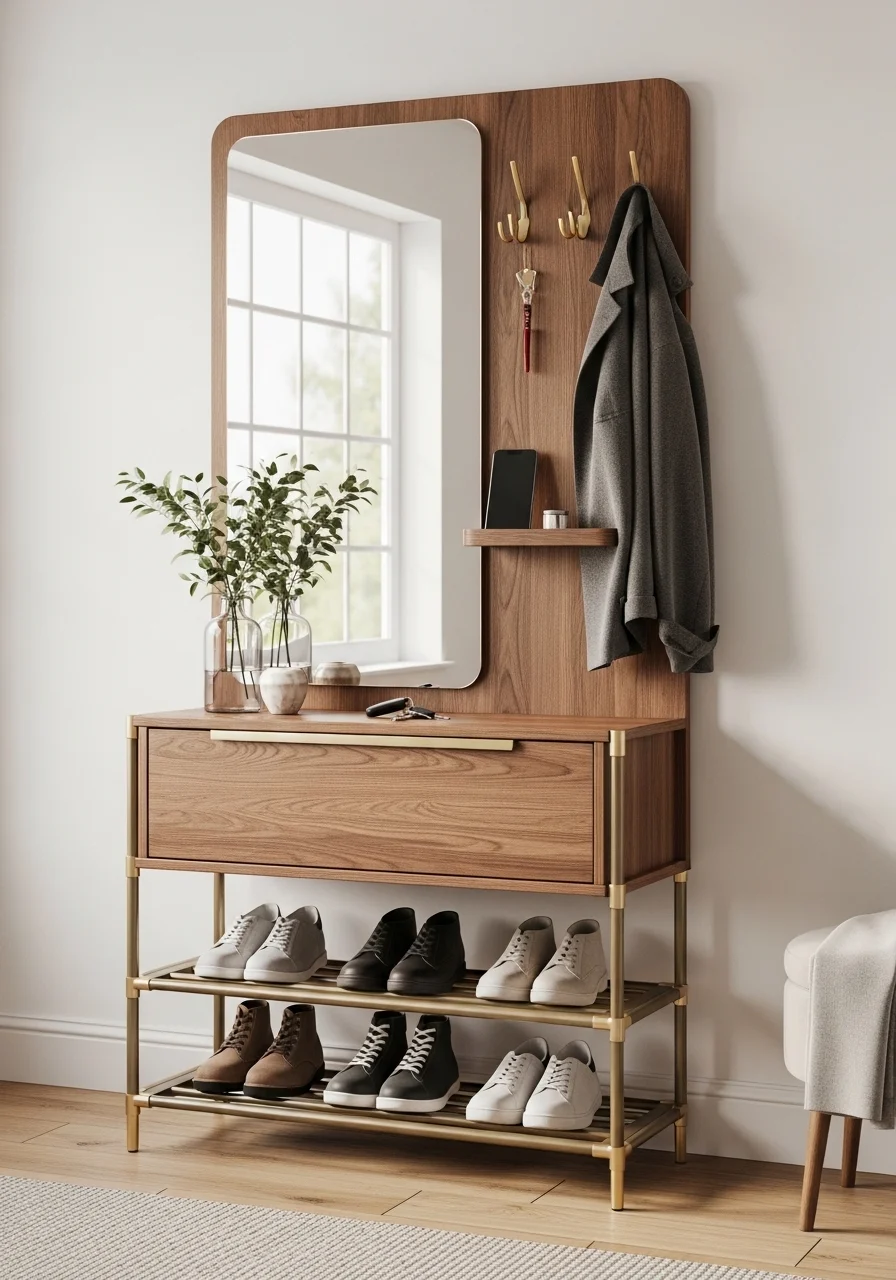
What makes it work:
This combo keeps shoes, tech, and appearance checks in one place. The mirror is handy for last-minute looks. The charging station keeps essentials powered and in one spot. It’s ideal for busy mornings and multitaskers.
Key Elements
- Low shoe shelf with two tiers
- Wall-mounted mirror centered above shelf
- Small charging tray with cable management
- Brass hooks for bags and keys
- Cord channels or clips hidden behind shelf
- Neutral decorative accents like a small plant
- Durable finish to protect against scuffs
- Non-slip pads under shelf feet
How to Achieve This Look
- Install the low shelf at a comfortable height for shoes.
- Mount the mirror centered above the shelf.
- Add a charging tray on the top surface with a power strip concealed behind.
- Route cables through clips to keep them tidy.
- Place daily shoes on the lower tier for quick reach.
- Maintain with weekly dusting and cord checks.
How to Style / Use It
Use the charging tray for phones and small devices. Keep one mirror for quick outfit checks. Store lighter shoes on the top tier and boots on the bottom. Keep cables tucked and replace worn cords.
You’ve now got 23 practical, stylish ways to manage footwear in your entryway. From hidden drawers to pegboard walls, there’s a solution for small spaces, active households, and design-focused homes. Try one that fits your floor plan and shoe habits. Pin the ideas you love so you can reference them later.
Which idea will you try first? Share this list with family or roommates who always leave shoes by the door. Your entryway can be calm and useful — and you can do it one smart storage idea at a time.