20 Bed Back Design Ideas for a Stylish Bedroom
You want a bedroom that feels like a retreat the moment you walk in. A thoughtful bed back design turns a simple bed into a focal point, anchoring the room with texture, color, and personality. Whether you prefer cozy, minimalist, boho, or luxe looks, these 20 bed back design ideas show you how to make your sleeping space feel curated and calm.
Below you’ll find practical, stylish concepts you can recreate at home. Each idea includes a visual prompt, a short description, a detailed elements list, step-by-step build or styling instructions, and tips for daily use. Pin the ones you love and try one project at a time to refresh your bedroom without a full overhaul.
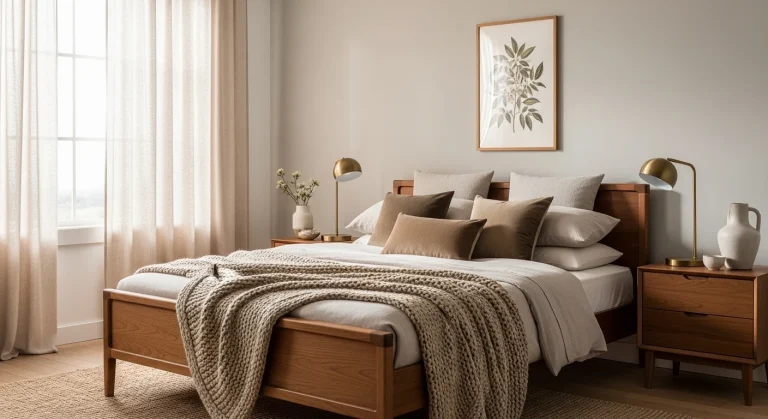
- Upholstered Velvet Panel Bed Back Design
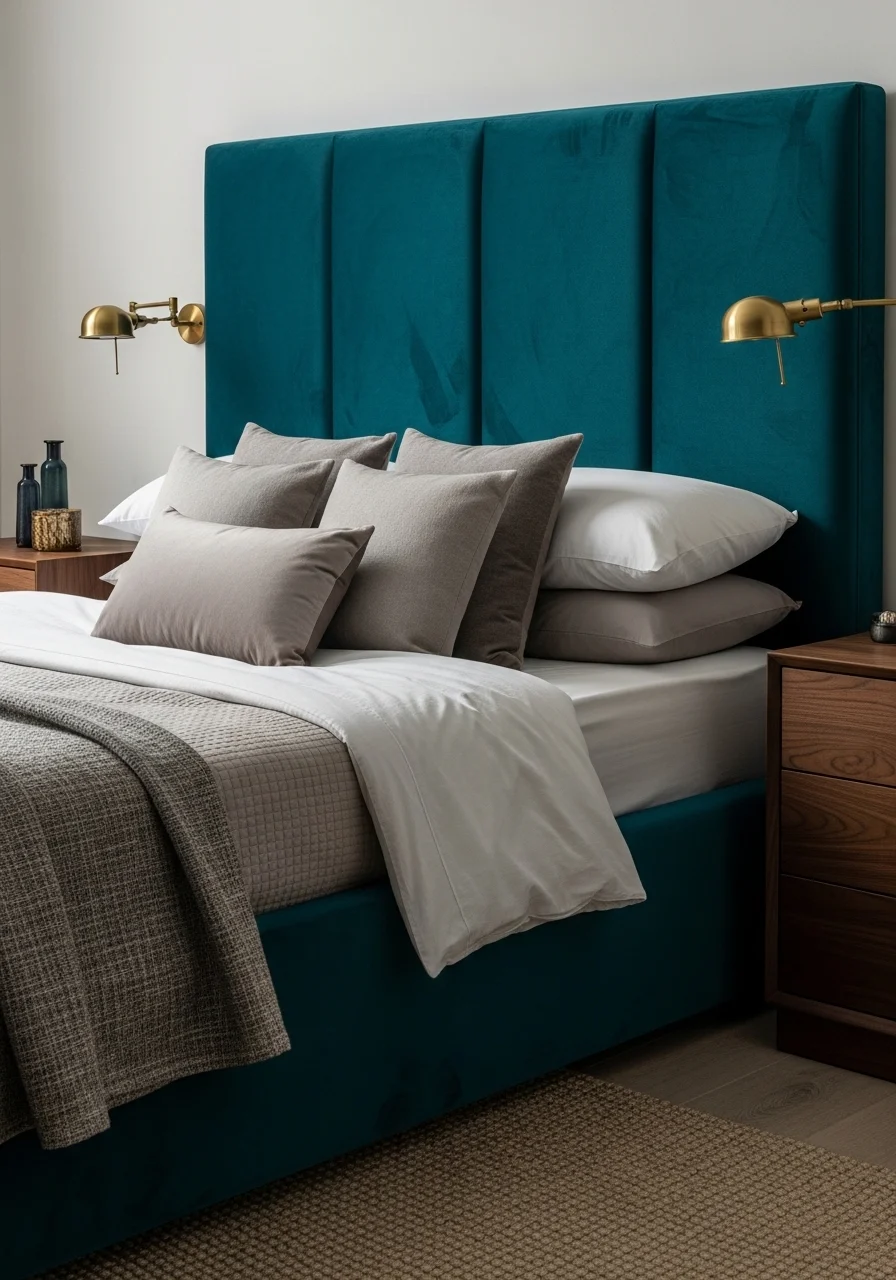
This velvet panel bed back design adds instant softness and sophistication. The rich velvet brings depth, while the panel keeps the look tailored. It works well in both modern and classic bedrooms. You’ll love the tactile feel and quiet, luxe vibe it creates.
Key Elements — upholstered headboard materials
- Velvet fabric (teal, emerald, or blush)
- Padded MDF or plywood panel base
- High-density foam (2–4 inches)
- Batting for smooth finish
- Tufting buttons (optional)
- Staple gun and heavy-duty staples
- Brass or matte black reading lights
- Walnut or oak nightstands
- Neutral linen duvet and textured pillows
- Rug with low pile in warm tones
How to Achieve This Look (DIY upholstered headboard)
- Measure the width of your bed and cut panel to size.
- Attach foam to the panel with spray adhesive.
- Add batting over foam and smooth out wrinkles.
- Wrap velvet fabric around the panel and staple to the back.
- Add tufting buttons if desired; mark holes and secure buttons through foam.
- Mount the panel to the wall or a cleat behind the bed.
- Install bedside lights for layered lighting.
- Style with neutral bedding and a mix of textures.
How to Style / Use It
Use jewel tones for a luxe feel or muted velvet for calm. Pair with brass lamps and dark wood for contrast. Rotate pillows seasonally for freshness. Spot-clean stains with a velvet-safe cleaner. This bed back works well for both small and large bedrooms.
- Reclaimed Wood Slat Bed Back Design
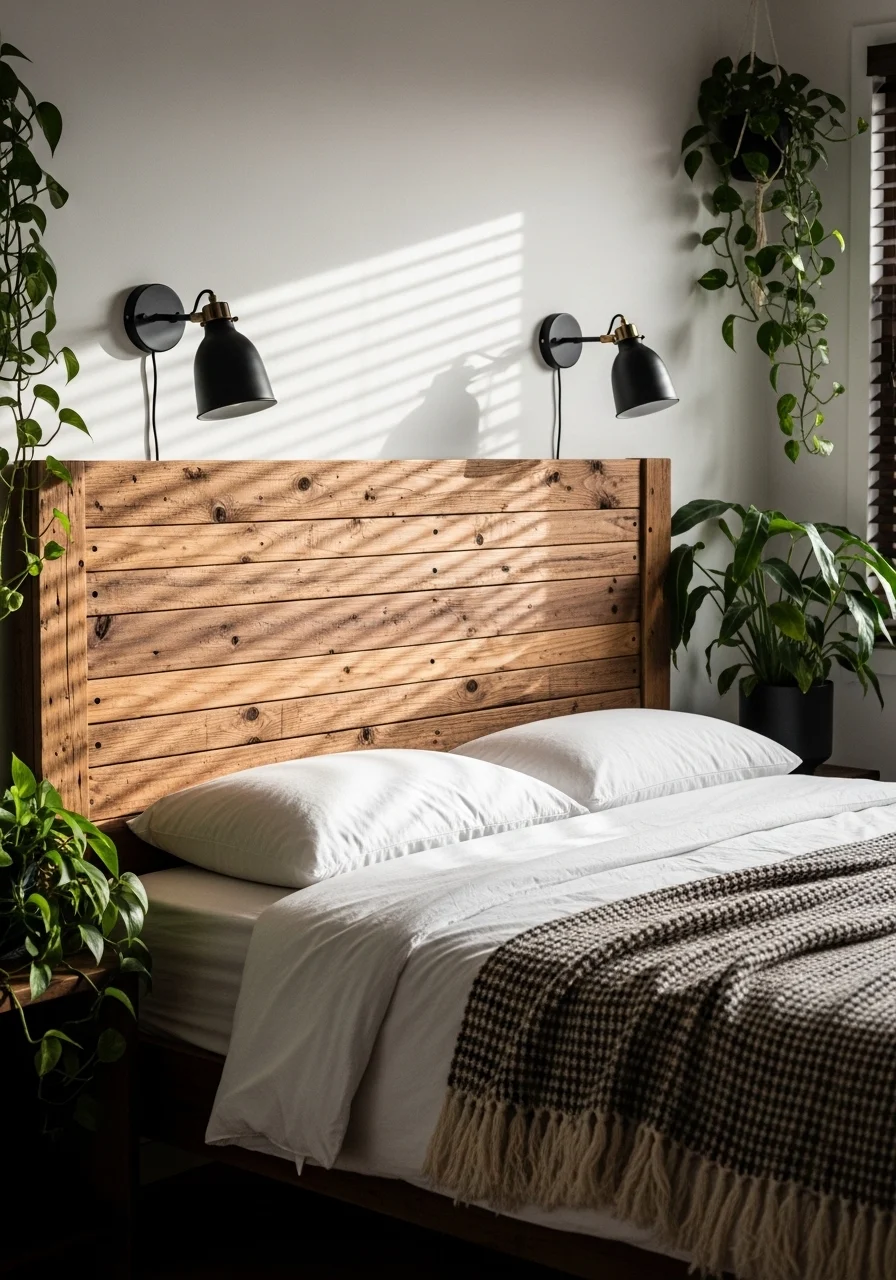
The reclaimed wood slat bed back design brings warmth and texture. Slats add vertical lines that make ceilings look higher. It’s a great choice if you like organic materials and a relaxed, cozy vibe. Ideal for those who love rustic or Scandinavian styles.
Key Elements — natural wood and finishes
- Reclaimed wood boards or new wood finished to look reclaimed
- Varied plank widths for visual interest
- Matte wood stain or clear finish
- Wall cleats or mounting brackets
- Black metal sconces or pendant lights
- Neutral cotton bedding
- Woven throw and textured pillows
- Live-edge nightstand or simple stools
- Indoor plants (snake plant, pothos)
- Jute or sisal rug
How to Achieve This Look (simple build)
- Choose wood and cut to desired height and width.
- Sand boards lightly, keeping some character.
- Stain or seal wood for protection.
- Space slats evenly with guides and screw them to horizontal supports.
- Attach supports to a wall-mounted cleat system.
- Add wall lights or plugs for bedside lamps.
- Arrange bedding and natural textiles.
- Add plants and a woven rug for warmth.
How to Style / Use It
This bed back design pairs with linen bedding and ceramic lamps. Keep the palette earthy to highlight wood tones. Use a humidifier in dry climates to prevent cracking. The rustic look ages beautifully with small scuffs and natural wear.
- Padded Channel-Tufted Bed Back Design
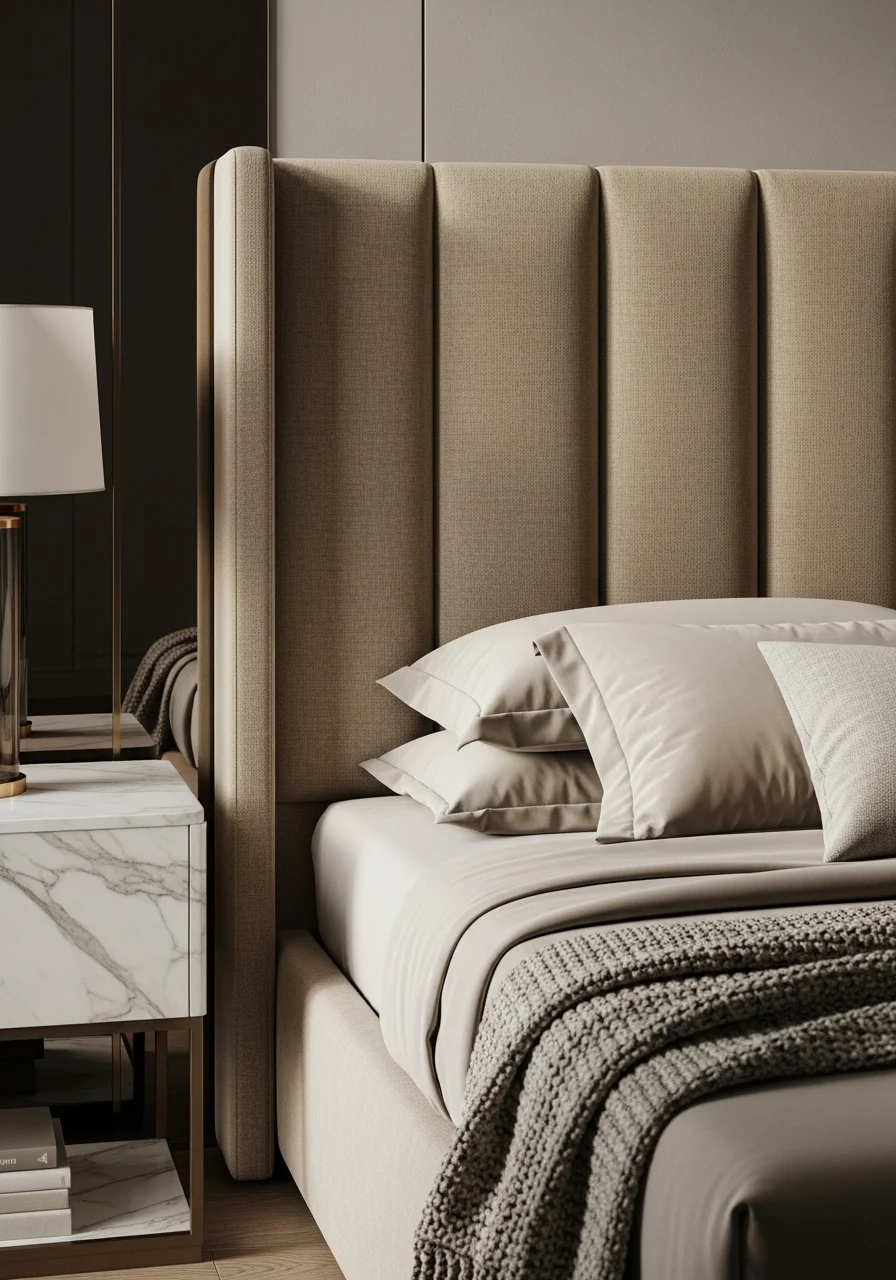
Channel-tufting creates a sleek, modern bed back design with architectural lines. The vertical channels draw the eye upward, giving a sculptural yet soft effect. This style suits contemporary and mid-century bedrooms. You’ll enjoy a neat, tailored look and plush comfort against the wall.
Key Elements — upholstery and structure
- Durable upholstery fabric (linen, boucle, or velvet)
- Thick foam strips for channels
- Plywood or MDF backing
- Batting for smooth finish
- Hidden cleat or bracket mounts
- Slim bedside tables
- Textured bedding in tonal colors
- Metal bedside lamps
- Decorative pillows in mixed textures
- Plush area rug
How to Achieve This Look (tailored installation)
- Cut backing panel to bed width and desired height.
- Create channel templates for consistent spacing.
- Attach foam strips to the panel with adhesive.
- Add batting over foam strips.
- Wrap fabric tightly and staple to the back.
- Mount panel to wall with cleat system.
- Place bed against it and arrange bedding.
- Add slim nightstands and lighting to complete the look.
How to Style / Use It
Choose neutral tones for a calm bedroom or bold colors for contrast. Keep bedding simple to let channels stand out. Vacuum fabric regularly and spot-clean spills. Works well in apartments since it mounts to the wall and saves floor space.
- Floor-to-Ceiling Painted Bed Back Design
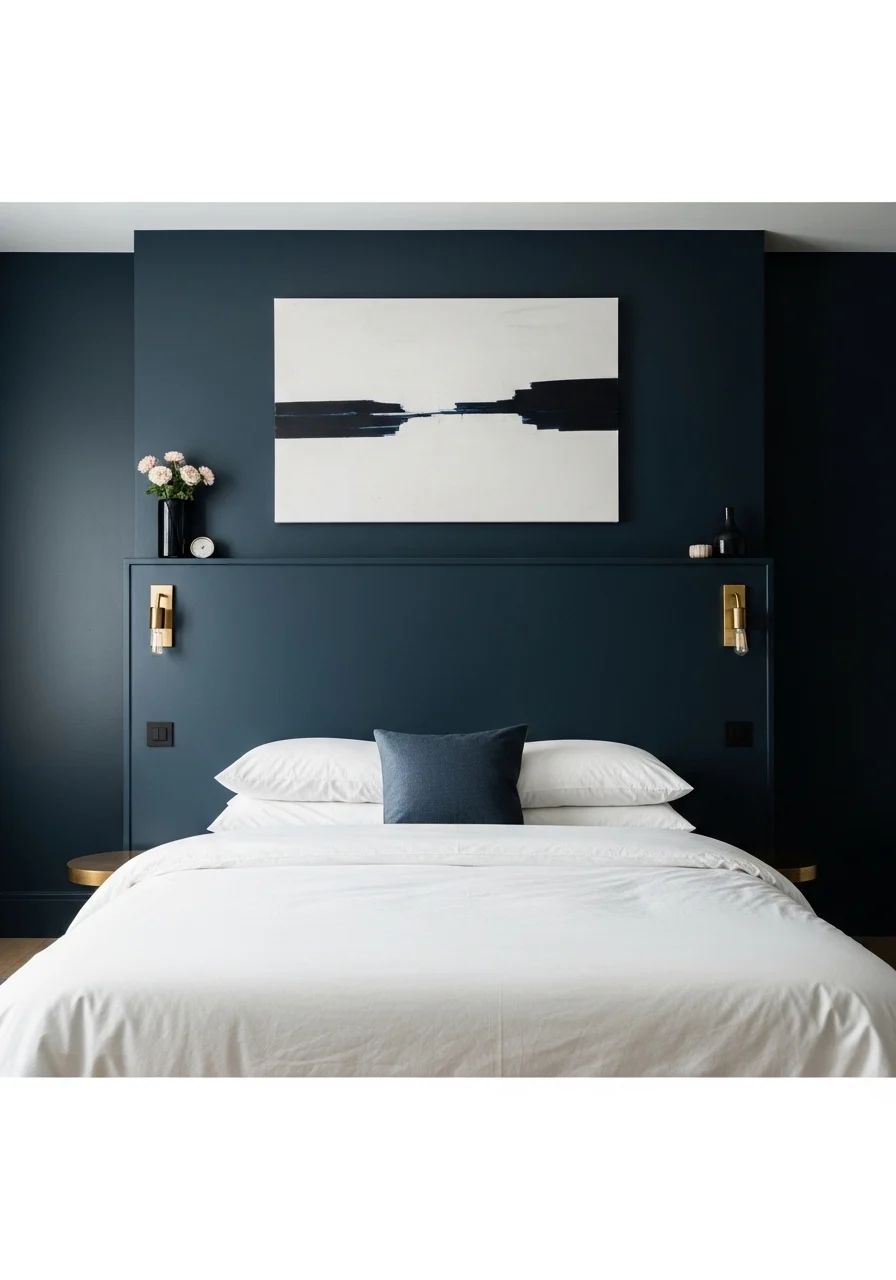
A painted floor-to-ceiling bed back design makes the wall itself the headboard. Using a bold color or soft tone defines the bed area without bulky pieces. It’s an affordable way to make a big design statement. Perfect for renters with paint permission or homeowners wanting bold impact.
Key Elements — color and finishes
- High-quality matte or eggshell paint
- Painter’s tape and drop cloths
- Color choice (navy, sage, terracotta)
- Contrasting bedding (white or soft neutrals)
- Oversized wall art or slim shelves
- Brass or black hardware accents
- Textured throw and pillows
- Minimal nightstands to keep focus
- Soft ambient lighting
How to Achieve This Look (painting steps)
- Prep wall: clean, sand, and patch holes.
- Tape edges and protect floors.
- Prime if changing from dark to light color.
- Apply two coats of paint for rich coverage.
- Let paint dry fully between coats.
- Add wall art or narrow shelving to frame bed.
- Place bed and style bedding with contrast pieces.
- Add layered lighting for atmosphere.
How to Style / Use It
Pick colors that complement existing decor. Use lighter bedding to balance a dark wall. For small rooms, paint only the bed wall to add depth. Touch up paint yearly to keep edges crisp.
- Built-In Bookshelf Bed Back Design
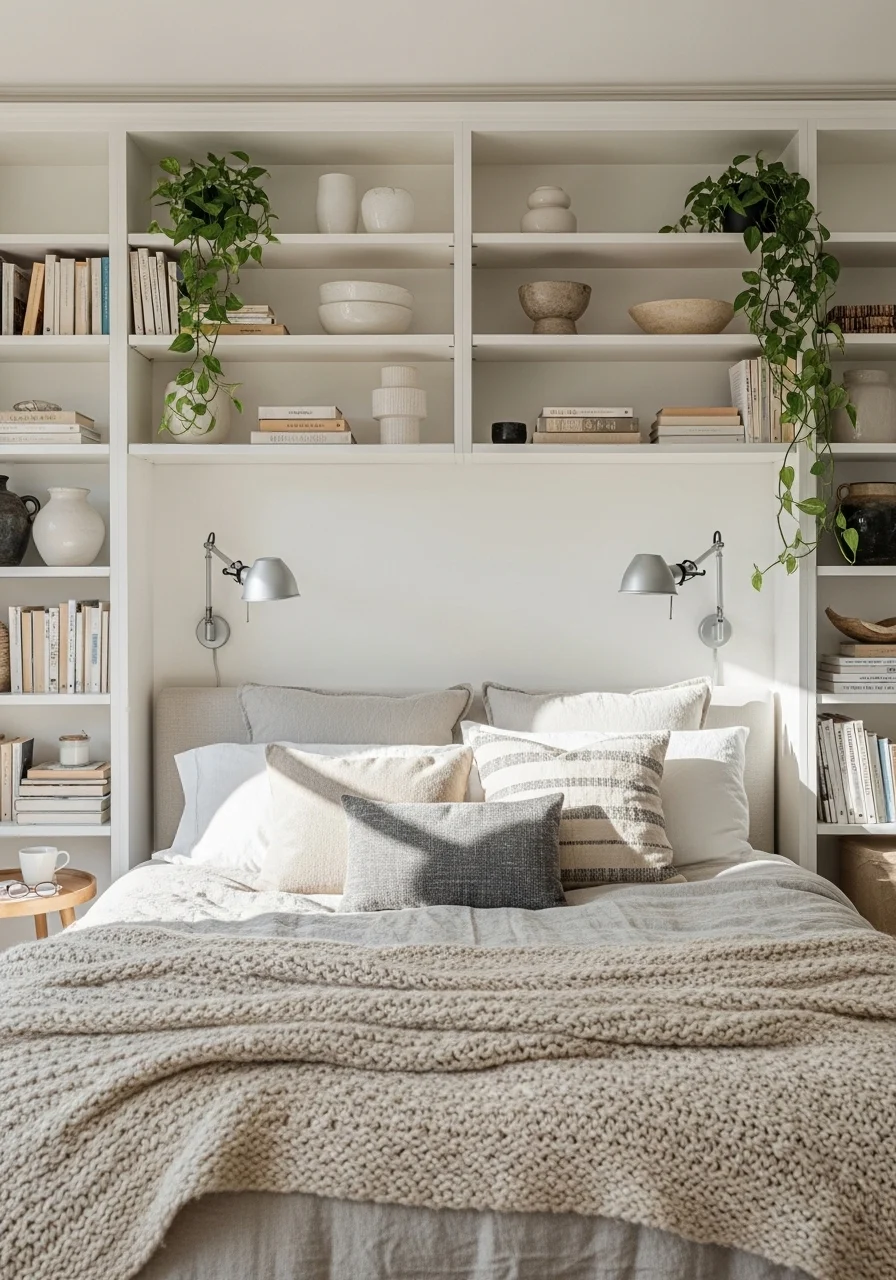
The built-in bookshelf bed back design blends storage and style. Shelves frame the bed and create a functional headboard alternative. It’s excellent for small rooms needing storage, or anyone who loves books and curated decor. The result feels cozy and intentional.
Key Elements — shelving and styling pieces
- Built-in shelving units or wall-mounted shelves
- Back panel paint or wallpaper for contrast
- LED strip or puck lighting for shelves
- Variety of books and curated decor
- Ceramic vases, small plants, and framed photos
- Integrated reading lamps or sconces
- Neutral bedding and layered throws
- Ladder or step stool for high shelves
- Concealed outlets for plugged lamps
How to Achieve This Look (install and style)
- Measure the wall width and height.
- Decide on open shelves or closed cabinets.
- Install plywood framing and secure to studs.
- Paint or wallpaper shelf backs for contrast.
- Add electrical outlets and lighting if needed.
- Style shelves with books and decorative items.
- Position bed and keep bedside essentials within reach.
- Add soft textiles to soften the built-in look.
How to Style / Use It
Balance decor with functional items like baskets. Use LED strips for a warm glow at night. Keep everyday items on lower shelves for easy access. Periodically refresh vignettes to avoid clutter.
- Mid-Century Splayed Wood Bed Back Design
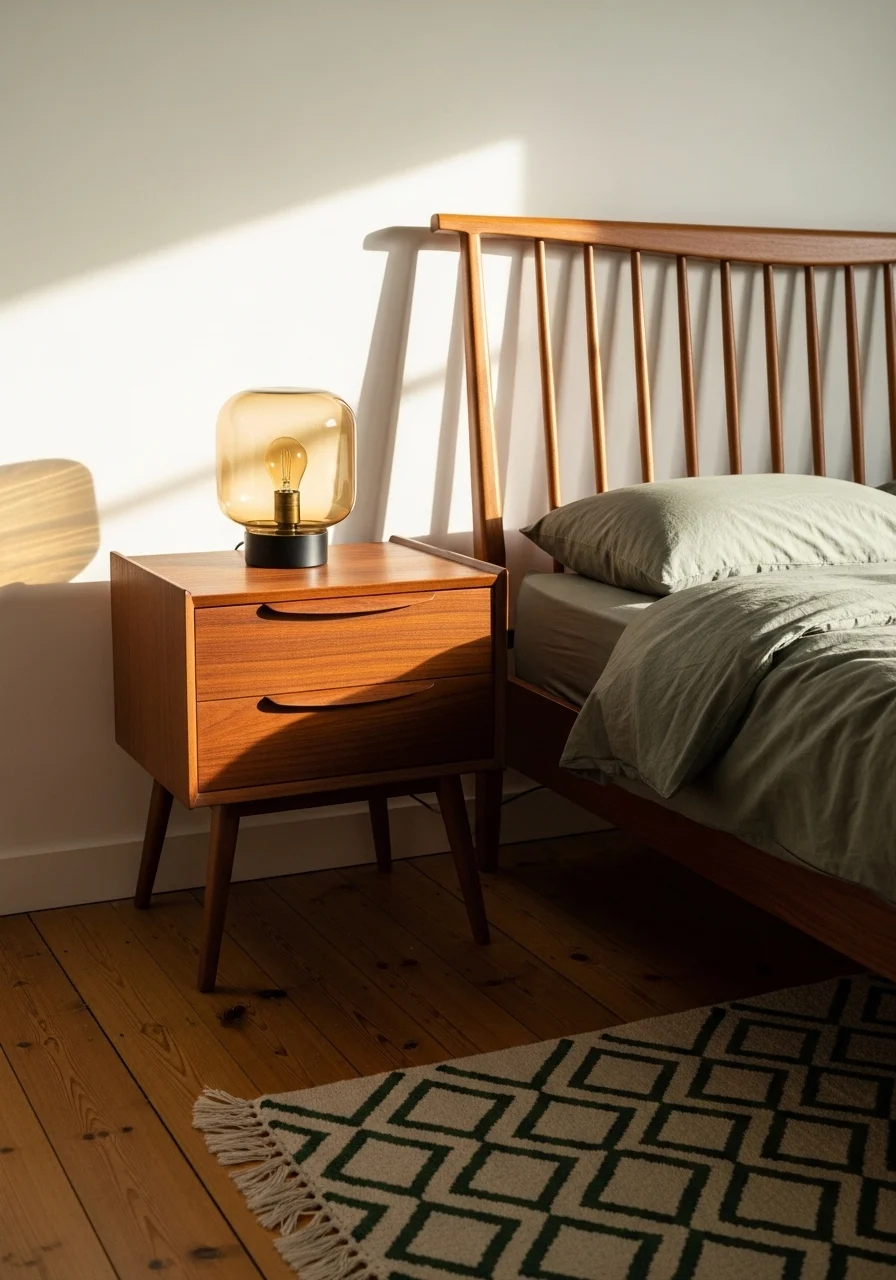
A mid-century splayed wood bed back design brings vintage charm and clean lines. Slatted splay creates a dynamic silhouette without feeling heavy. It suits lovers of retro flair and warm wood tones. The look is both relaxed and refined.
Key Elements — retro materials and shapes
- Teak or walnut veneer slats
- Angled or splayed slat design
- Low-profile bed frame
- Geometric patterned rug
- Amber glass or brass lamps
- Cotton or linen bedding in muted hues
- Small potted plants for life
- Rounded-edge nightstands
- Satin or matte finishes on wood
How to Achieve This Look (assembly)
- Sketch slat spacing and angle for the design.
- Cut wood slats and sand edges smooth.
- Attach slats to horizontal supports with screws.
- Finish wood with oil or satin varnish.
- Mount the panel securely behind the bed.
- Place bed and add mid-century furnishings.
- Layer rugs and textiles to complement wood tones.
- Add plants and retro accessories.
How to Style / Use It
Pair with mustard or olive accents for period authenticity. Keep lines simple to honor mid-century form. Wax wood annually to keep the finish fresh. Works well in both large and modest bedrooms.
- Boho Macramé & Rattan Bed Back Design
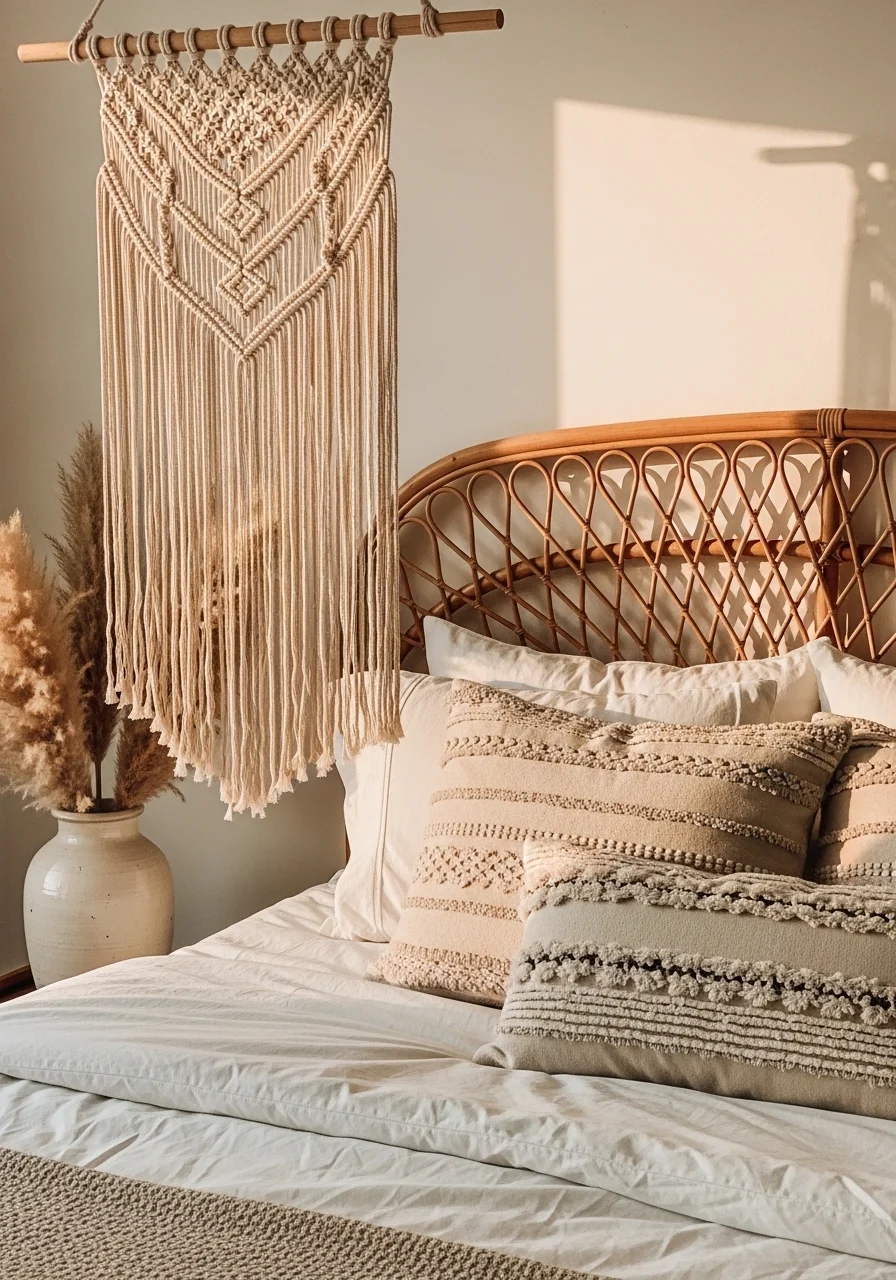
A macramé and rattan bed back design feels light and handcrafted. The woven textures add organic charm and a casual, layered look. It’s ideal for boho lovers who want a relaxed, artisanal bedroom. The natural fibers feel warm and inviting.
Key Elements — boho textiles and natural fibers
- Large macramé wall hanging or DIY macramé panel
- Rattan or cane headboard frame
- Linen or cotton bedding in creams
- Mixed textured pillows (embroidered, tufted)
- Pampas grass or dried florals
- Woven baskets for storage
- Wooden bedside tables with a natural finish
- Soft warm lighting (string lights or paper lanterns)
- Layered area rugs (flatweave + fluffy)
How to Achieve This Look (styling steps)
- Choose a rattan headboard or build a wooden frame for macramé.
- Hang macramé centrally using a sturdy hook.
- Add a rattan frame around or behind the macramé.
- Layer neutral bedding and textured pillows.
- Place pampas grass in a tall vase on one side.
- Use woven baskets for bedside storage.
- Add string lights for warm evening glow.
- Refresh dried florals seasonally.
How to Style / Use It
Pair with plants and warm wood tones for a cohesive boho look. Keep textiles light to prevent heaviness. Dust rattan gently with a soft brush. Macramé holds up well; spot-clean as needed.
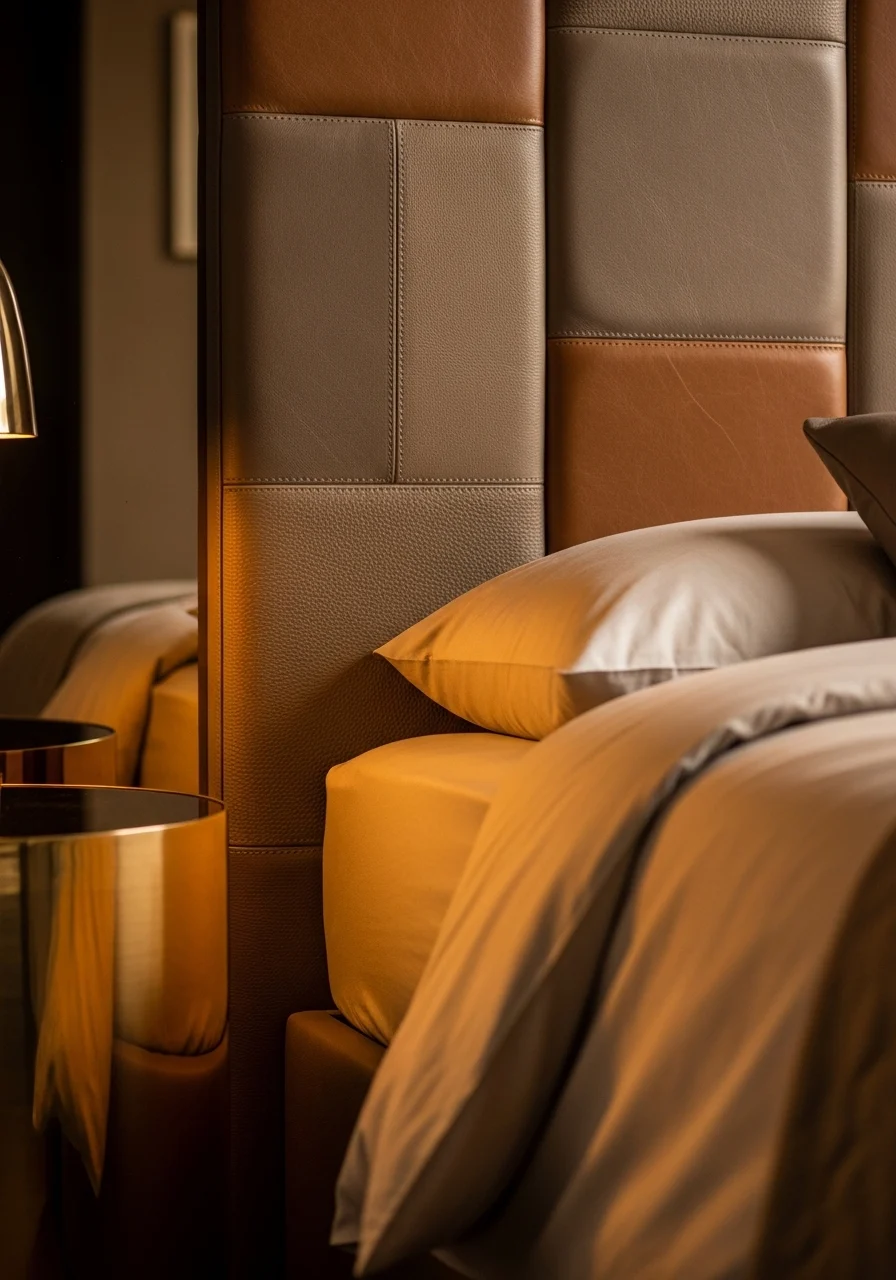
- Leather-Paneled Bed Back Design
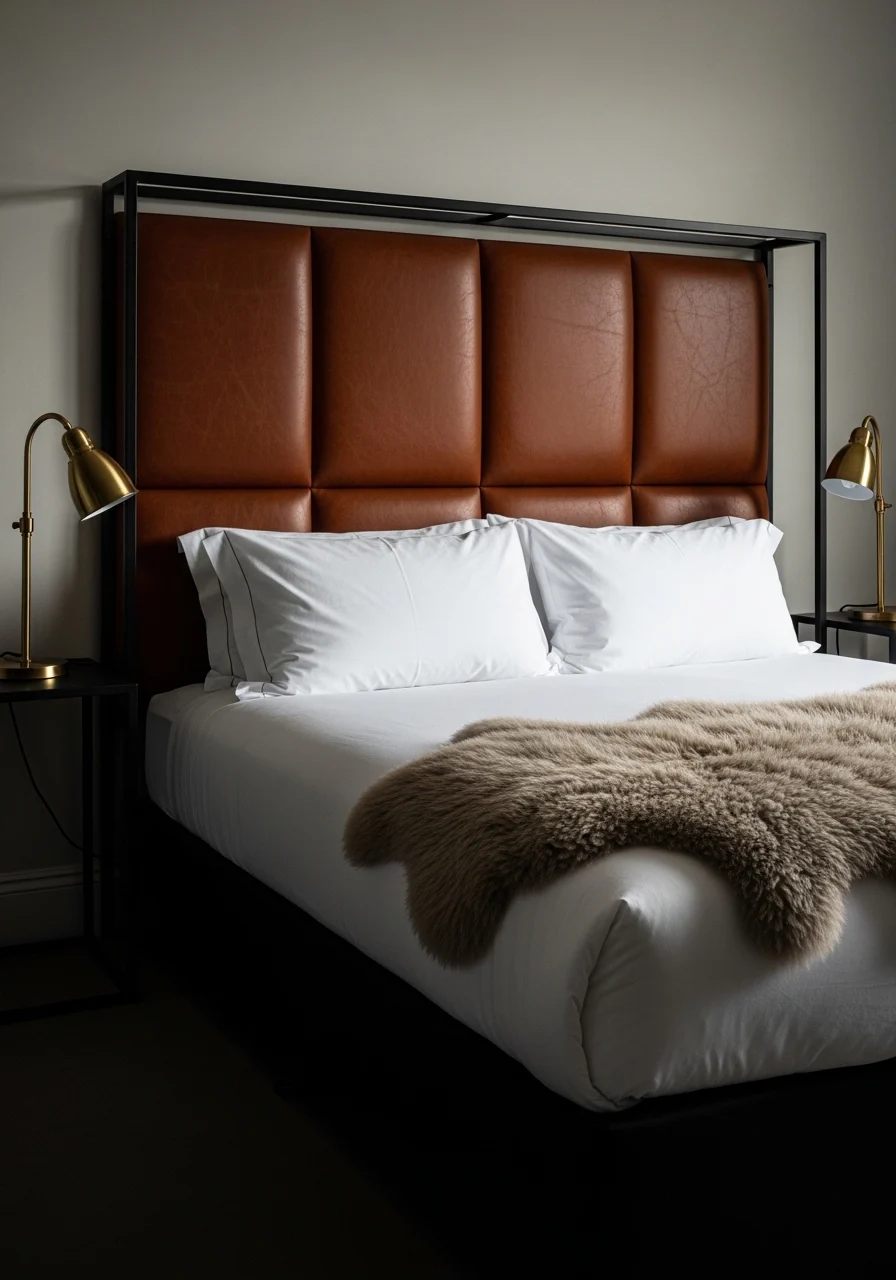
Leather panels give a bed back design a rich, tactile sophistication. The material ages beautifully, gaining character over time. This look suits masculine, modern, or luxe industrial bedrooms. You’ll get a durable, striking focal point.
Key Elements — leather and accents
- Genuine or vegan leather panels
- Plywood backing and high-density foam
- Rich tones (cognac, brown, black)
- Brass or black industrial lighting
- Crisp white or neutral bedding
- Leather care products for maintenance
- Metal-framed nightstands
- Sheepskin or faux fur throw
- Minimal wall decor to let leather stand out
How to Achieve This Look (installation)
- Cut backing panel to size and attach foam strips.
- Wrap leather around the panel and staple securely.
- Add horizontal seams or stitched panels for structure.
- Mount panel to the wall with cleats.
- Install bedside lights to frame the leather.
- Place contrasting bedding to soften leather’s look.
- Use leather conditioner every 6–12 months.
- Keep direct sunlight minimal to avoid fading.
How to Style / Use It
Pair leather with warm metals and natural fibers. Use light bedding for contrast. Condition leather occasionally to keep it supple. Great for guest rooms that need a bold anchor.
- Painted Mural Bed Back Design
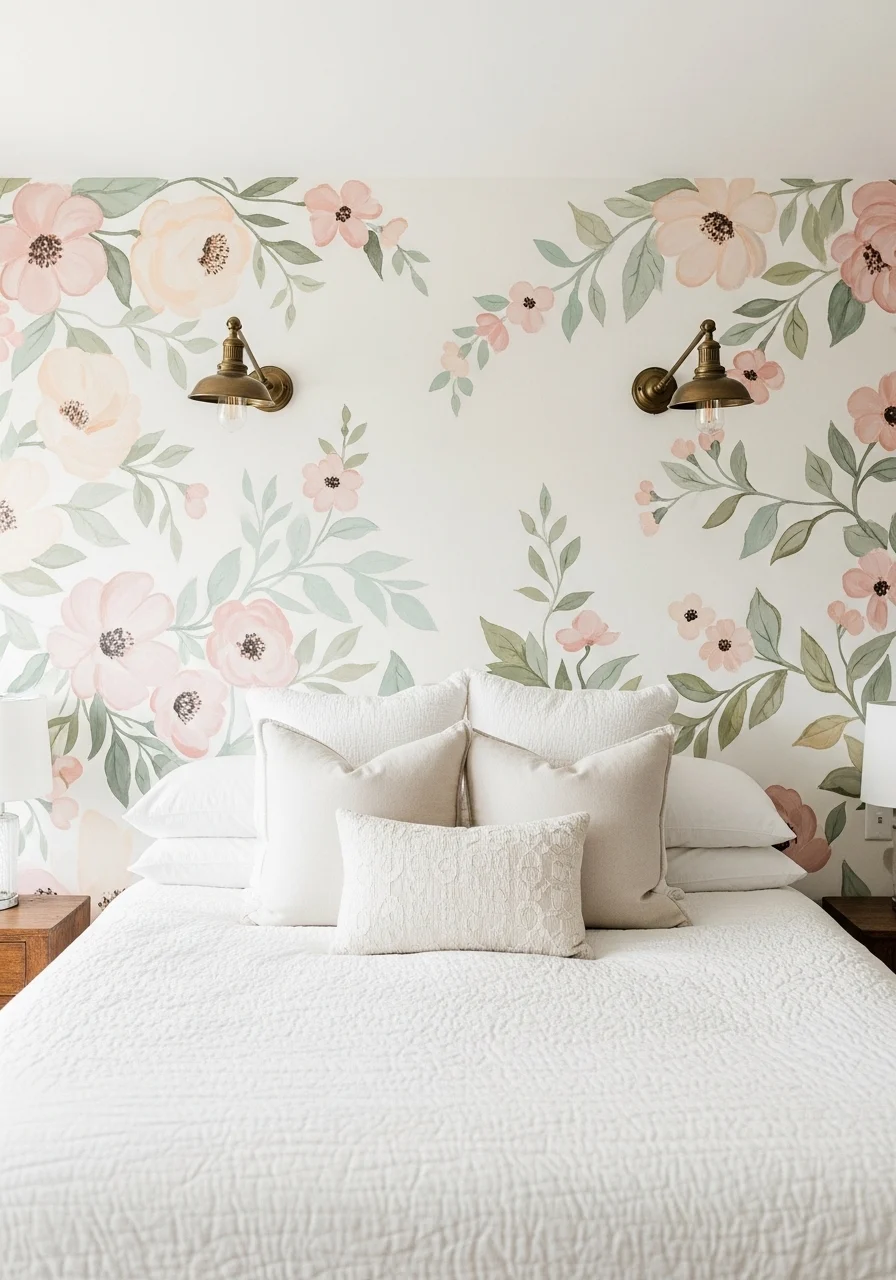
A painted mural turns your bed back design into art. Florals, abstract shapes, or geometric patterns make the wall memorable. This idea works for both maximalist and minimalist styles, depending on scale. It’s perfect if you want a custom, personal touch.
Key Elements — paint and art materials
- Wall paint in chosen palette (matte finish)
- Artist brushes and rollers
- Pencil for sketching outlines
- Drop cloths and painter’s tape
- Reference art or stencil if needed
- Neutral bedding to balance the mural
- Statement bedside lighting
- Small decorative accents echoing mural colors
- Varnish or matte sealant for durability
How to Achieve This Look (painting process)
- Plan mural size and sketch composition lightly on the wall.
- Prime wall if needed for a clean base.
- Block in large shapes with rollers.
- Add details and shading with brushes.
- Let paint dry between layers.
- Apply a matte sealant to protect the work.
- Position bed against the mural and style with complementary bedding.
- Light the piece gently at night to enhance depth.
How to Style / Use It
Keep surrounding decor minimal to let artwork shine. Consider removable wallpaper mural if renting. Re-touch paint chips as needed. Swap pillow colors to match changing seasons.
- Floating Shelf & Gallery Bed Back Design
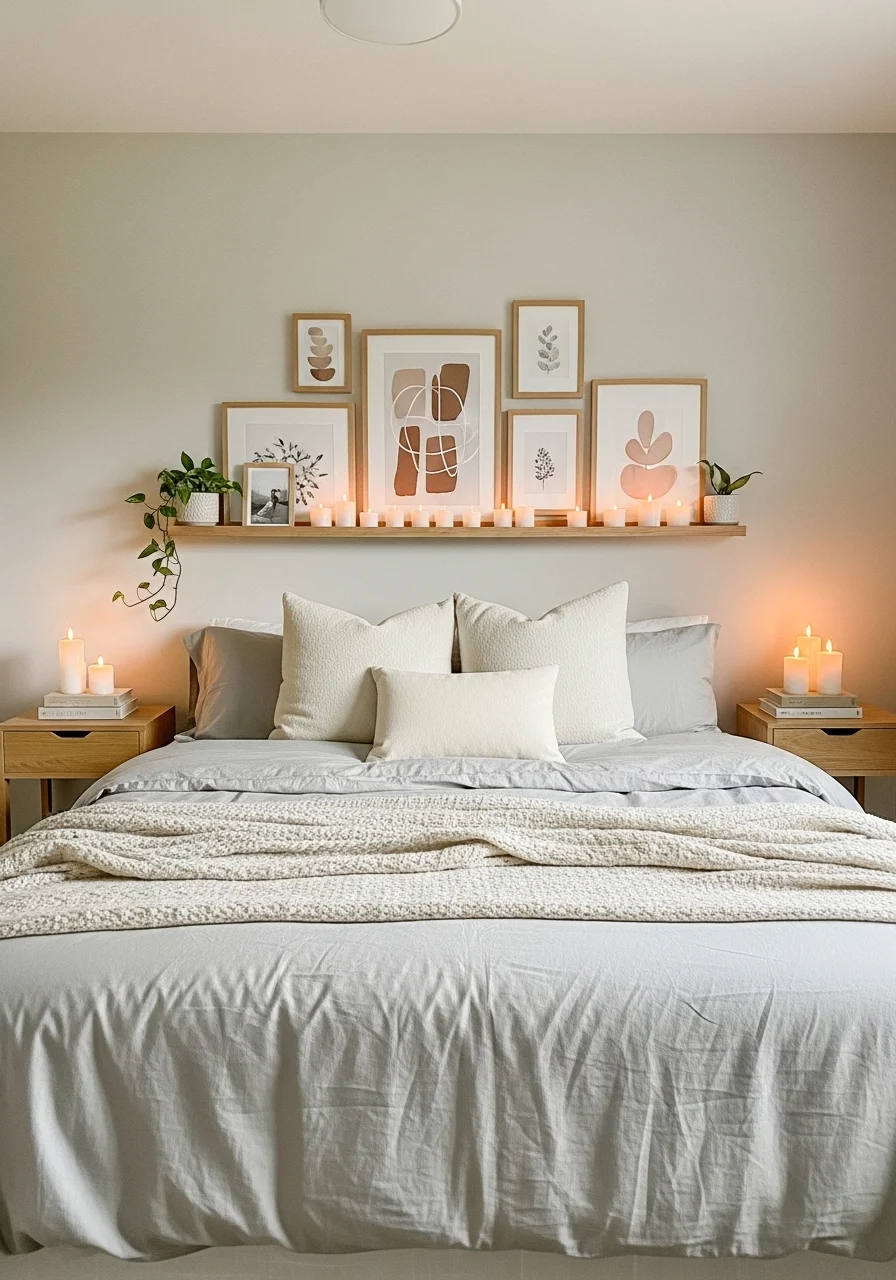
A floating shelf and gallery combination makes a versatile bed back design. You get storage, display, and a customizable focal point. It’s ideal for people who like to swap art and change vignettes frequently. This approach keeps the look fresh and personal.
Key Elements — shelving and decor
- Long floating shelf or slim ledge
- Mixed gallery frames and prints
- Small plants and ceramics for depth
- Pillar candles or brass accents
- Neutral bedding and textured throws
- Picture hanging hardware and level
- Low-profile bedside tables
- Adjustable wall lighting
- Seasonal decor swaps
How to Achieve This Look (setup)
- Choose shelf height and secure studs for strong mounting.
- Install a long floating shelf centered above the bed.
- Arrange frames and decor on the shelf before hanging.
- Hang a few pieces directly on the wall for layered depth.
- Add small plants and candles to break up frames.
- Place bed and style bedding to complement shelf colors.
- Change art or decor seasonally for variety.
- Keep heavier items low to prevent accidents.
How to Style / Use It
Use the shelf to display favorite photos and travel finds. Rotate pieces to keep the look lively. Keep heavier items off the edge for safety. Works well in rentals with minimal wall damage.
- Canopy Frame Bed Back Design
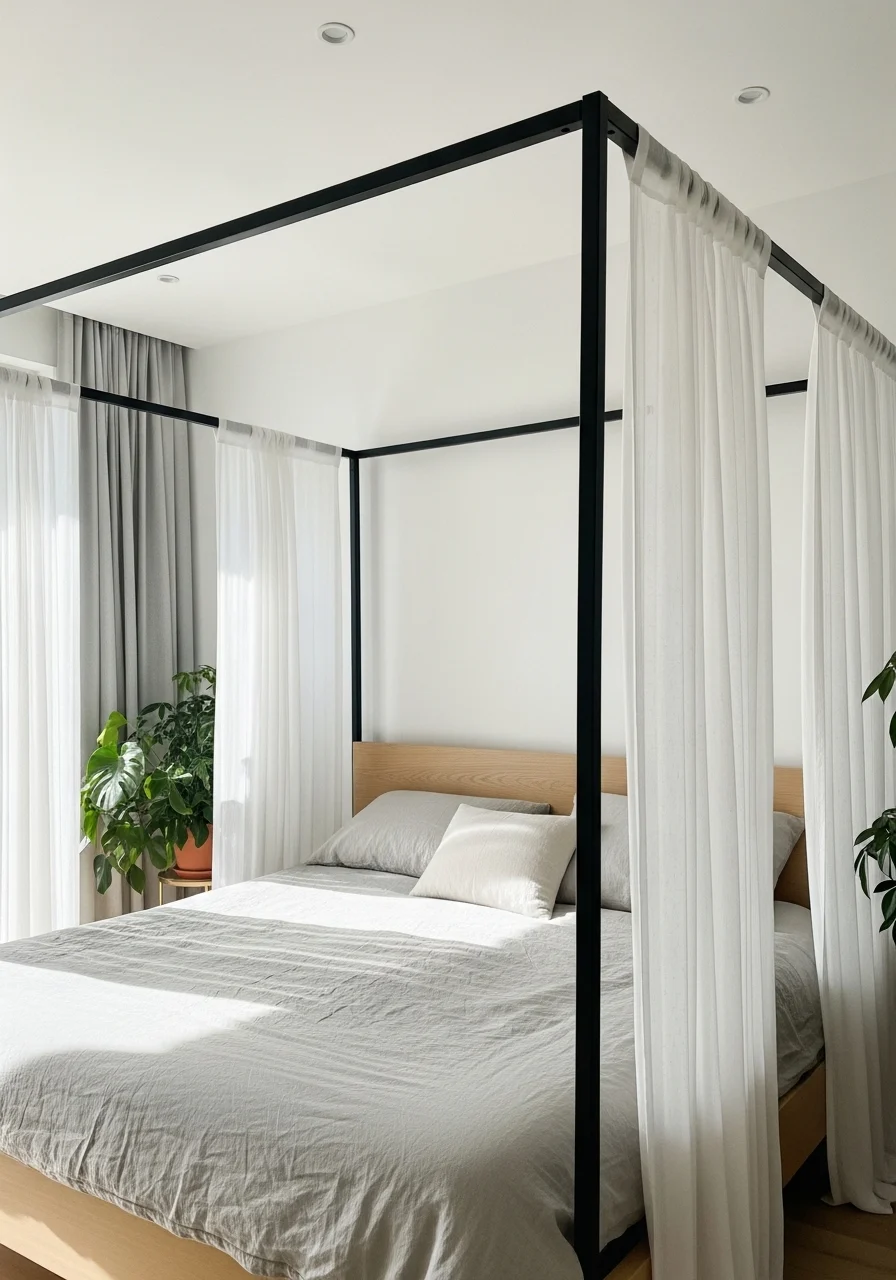
A canopy frame bed back design gives an architectural outline to your bed. Without full drapes, it reads clean and modern. You’ll get a bedroom that feels both intimate and open. Great for lofts or tall-ceilinged rooms.
Key Elements — frame and textiles
- Slim metal or wooden canopy frame
- Mounting brackets and screws
- Semi-sheer drapery or canopy panels
- Neutral linen bedding
- Simple pendant or hanging lights
- Minimal bedside furniture
- Decorative pillows in soft colors
- Tall plants for vertical balance
How to Achieve This Look (assembly)
- Measure for canopy height and width above your bed.
- Order or weld a slim metal frame to those specs.
- Secure frame to ceiling or wall with appropriate anchors.
- Hang semi-sheer panels for soft privacy if desired.
- Add pendant lights or bedside lamps to integrate lighting.
- Place bed centered under the frame and add bedding.
- Add plants to emphasize height and soften metal lines.
- Tie back drapes for an open look or close for coziness.
How to Style / Use It
Keep lines minimal for modern spaces. Drapes can make it cozier for winter months. Choose rust-proof hardware in humid climates. Frame works well with minimalist and contemporary furniture.
- Mirrored Panel Bed Back Design
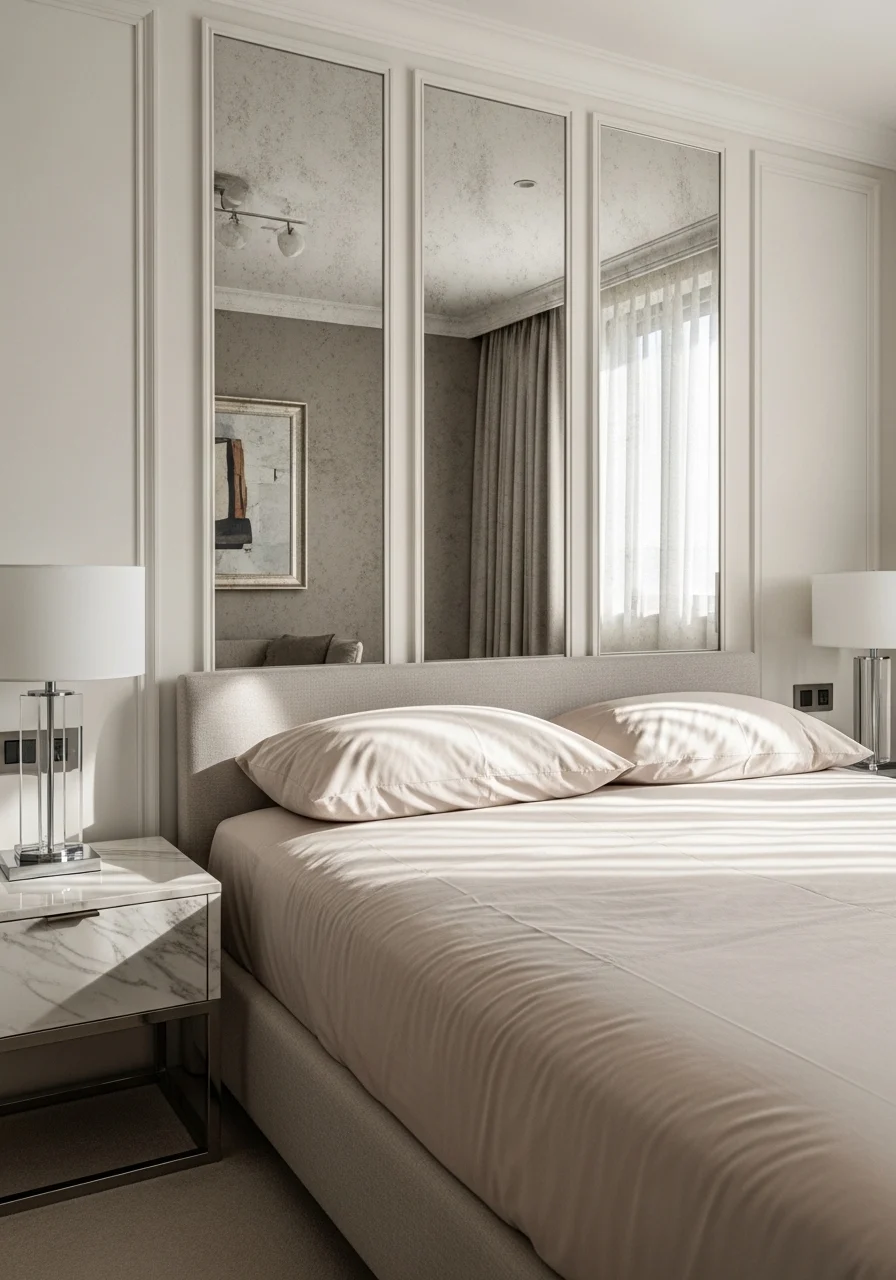
Mirrored panels turn a bed back design into a light-enhancing feature. Mirrors reflect light and make rooms feel larger. Use slim or segmented mirrors for a modern touch. Ideal for compact bedrooms that need brightness and depth.
Key Elements — mirrors and hardware
- Tall mirrored panels (frameless or thin brass frames)
- Secure wall mounting hardware
- Filled-in seams or decorative dividing strips
- Neutral bedding to avoid visual clutter
- Chrome or brass bedside accents
- Anti-fog and anti-tarnish mirror treatments
- Soft area rug to ground space
- Dimmable bedside lighting
How to Achieve This Look (installation)
- Choose mirror size based on wall and bed dimensions.
- Mark studs and plan mirror placement carefully.
- Use professional-grade mirror clips or French cleats.
- Install mirrors with help to avoid breakage.
- Add thin metal strips between panels for a finished look.
- Position bedding and keep patterns minimal near reflections.
- Install dimmable lights to control glare.
- Clean mirrors with a vinegar solution for streak-free shine.
How to Style / Use It
Keep bedside decor minimal to avoid clutter in reflections. Mirrors are great for small rooms needing light. Use rugs and textiles to soften reflected hard surfaces. Avoid heavy hanging above mirrors to limit visual chaos.
- Concrete Texture Panel Bed Back Design
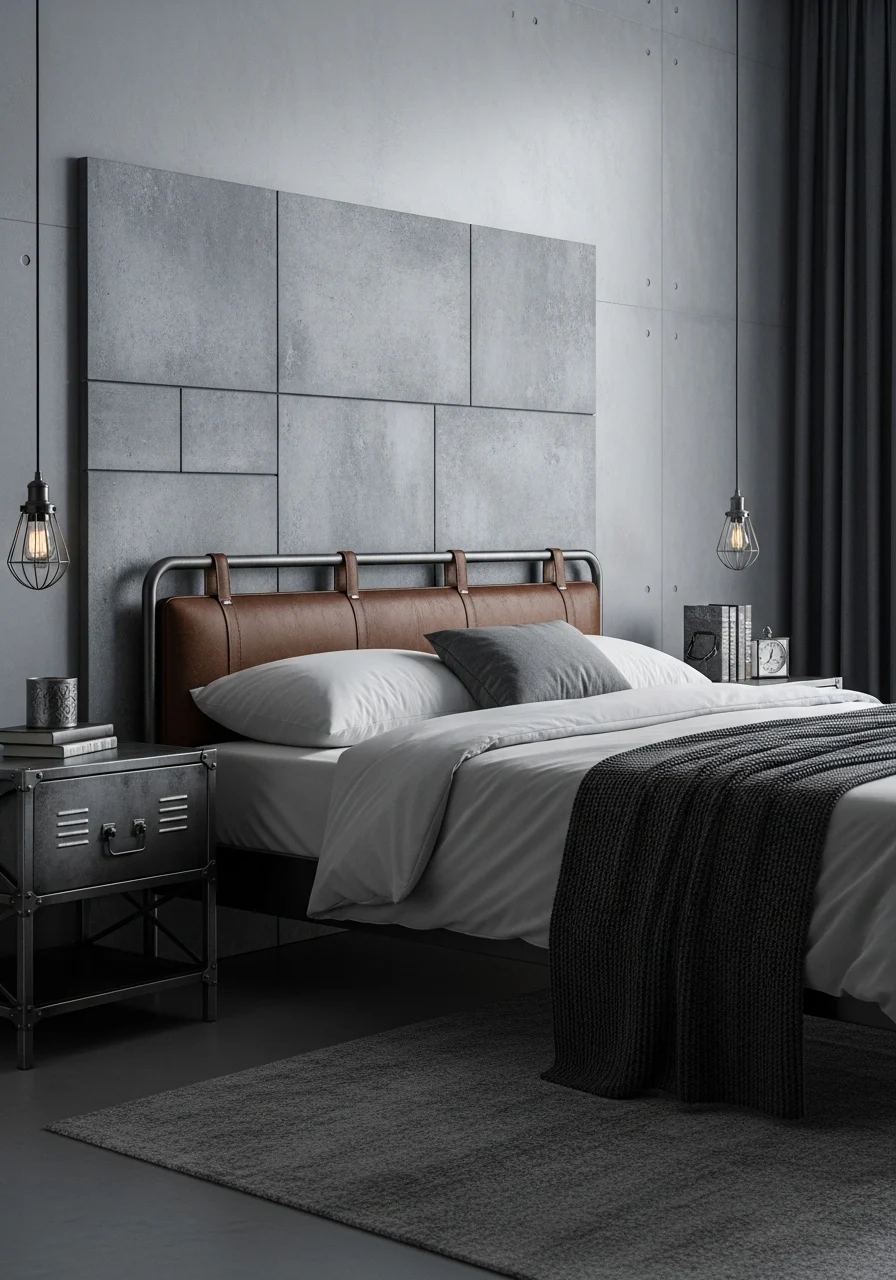
A faux-concrete panel bed back design gives an industrial, modern edge. Texture adds interest without heavy color. This look suits lofts and urban homes. You’ll get a sophisticated, minimalist backdrop that pairs well with metals and leather.
Key Elements — finishes and accents
- Faux-concrete panels or plaster finish
- Cool gray paint tones
- Metal bedside tables or frames
- Leather or linen bedding
- Black or matte metal lighting
- Concrete-look accessories (vases, trays)
- Rug for warmth and texture
- Wall sealing product to protect finish
- Mounting cleats or adhesive for panels
How to Achieve This Look (application)
- Prepare wall and install backer board if needed.
- Apply a base coat in a medium gray tone.
- Use a trowel to create subtle texture with microcement or plaster.
- Blend with a dry brush for mottled effect.
- Seal surface with a matte sealer for durability.
- Mount bed and arrange industrial-style furnishings.
- Add warm textiles to balance cool concrete tones.
- Keep decor minimal to highlight texture.
How to Style / Use It
Pair with warm wood or leather to soften the industrial edge. Use area rugs to add warmth underfoot. Avoid overly bright colors; choose tonal accents instead. Regular dusting keeps the textured surface crisp.
- Quilted Leather Patchwork Bed Back Design
A quilted leather patchwork bed back design blends craftsmanship and comfort. Patchwork panels create pattern and subtle variation. This look fits warm, masculine, or eclectic interiors. It’s a tactile, durable choice that adds a tailored yet cozy feel.
Key Elements — patchwork and stitching
- Leather or high-quality faux leather pieces
- Quilting needle and heavy-duty thread
- Plywood backing and foam
- Batting for softened seams
- Brass or matte black hardware
- Textured bedding in warm neutrals
- Accent pillows in suede or velvet
- Leather conditioner for maintenance
- Durable mounting system
How to Achieve This Look (sewing and assembly)
- Cut leather pieces in desired shapes and sizes.
- Sew pieces together into a single panel with quilting stitch.
- Attach batting and foam to plywood backing.
- Wrap the quilted panel and secure the edges.
- Mount to wall behind bed with cleat system.
- Add bedside accents to complement leather tones.
- Condition leather every few months to maintain suppleness.
- Use strong tools and gloves for safe assembly.
How to Style / Use It
Pair with warm wood and brass for a rich palette. Keep bedding soft to offset leather’s structure. Condition leather to extend its life. Patchwork hides small marks as the headboard ages.
- Shelf-Lit Headboard with Hidden Storage Bed Back Design
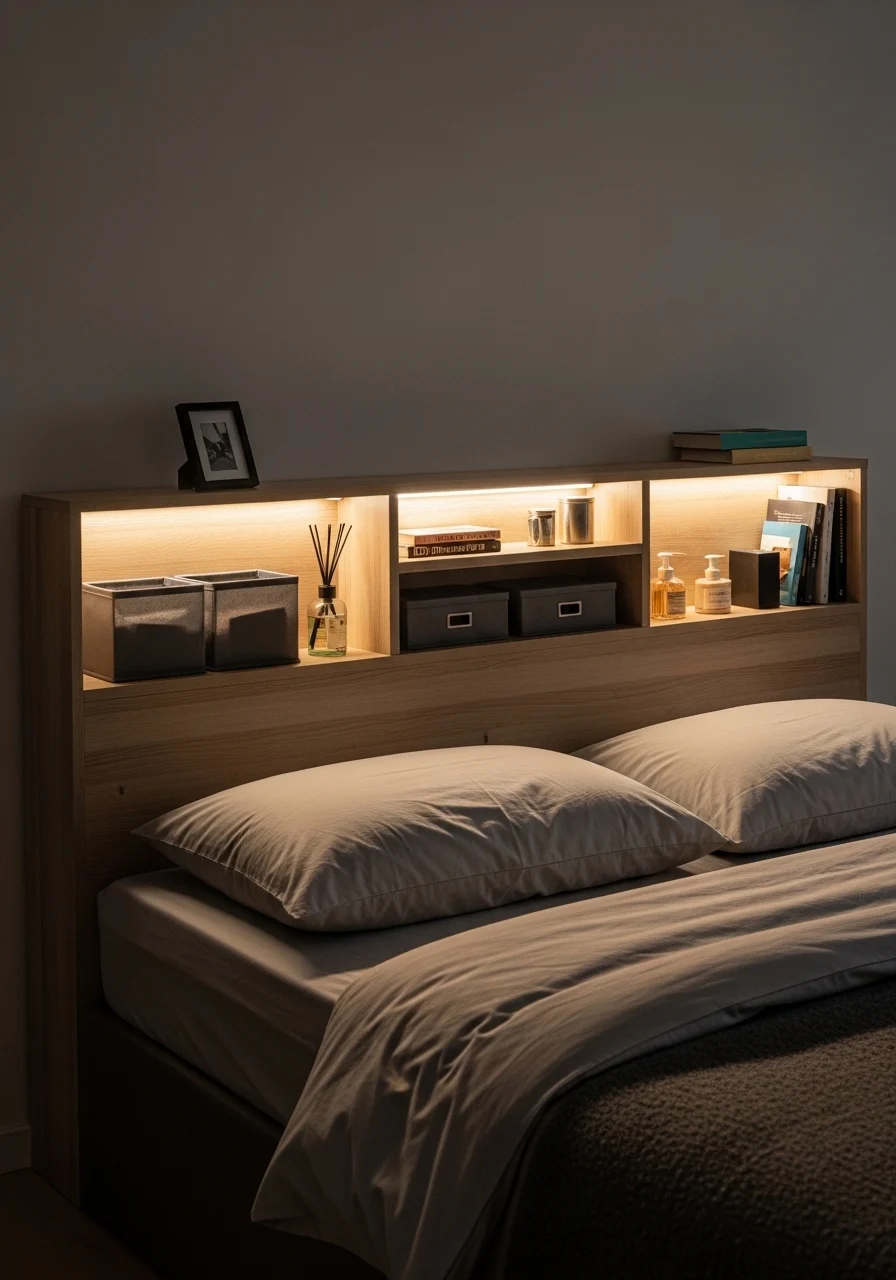
A shelf-lit headboard with hidden storage offers form and function. Integrated LEDs create ambiance while storage hides clutter. This is ideal if you like a clean bedside surface. You’ll get a practical, sleek bed back design suitable for modern life.
Key Elements — lighting and storage
- Built-in headboard with recessed shelves
- LED strip lighting with dimmer switch
- Push-latch cabinet doors for hidden storage
- Soft-touch finishes (matte laminate or wood veneer)
- Cord management for charging devices
- Neutral bedding and minimal decor
- Nightstand alternatives like wall-mounted trays
- Small organizer baskets inside storage
How to Achieve This Look (build and wiring)
- Plan headboard depth to fit shelves and storage.
- Build a frame using plywood and attach to wall studs.
- Install recessed LED strips with a dimmer switch.
- Fit push-latch doors or drawers for hidden compartments.
- Add cable channels for neat charging set-up.
- Test lighting and ensure safe electrical installation.
- Style shelves with a few essentials and candles.
- Keep bedside surfaces minimal to highlight clean lines.
How to Style / Use It
Use warm LED tones for cozy evenings. Keep frequently used items in easy-to-reach compartments. Charge devices discreetly inside storage. Clean regularly to avoid dust buildup in shelves.
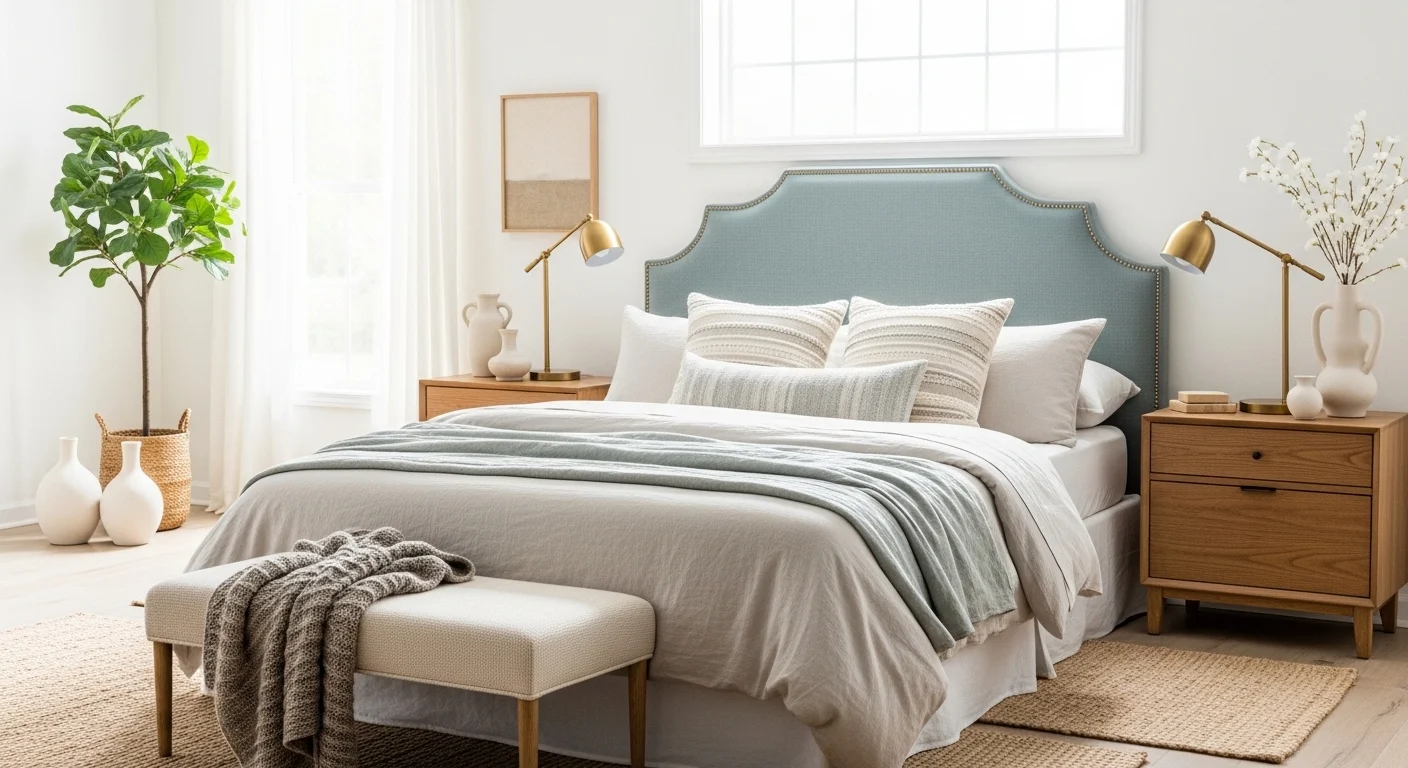
- Arch-Top Fabric Headboard Bed Back Design
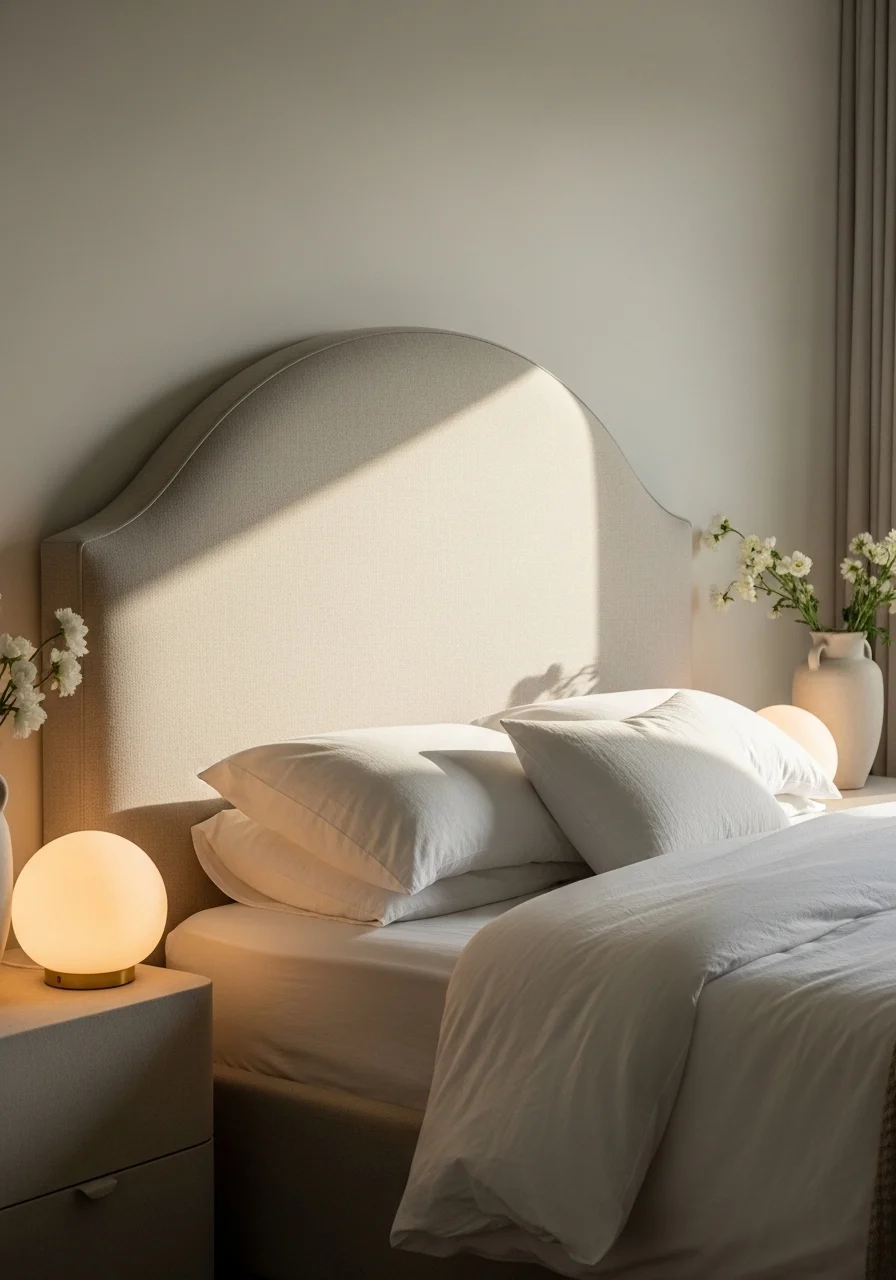
An arch-top fabric headboard creates a soft, elegant bed back design. The curved silhouette adds romance and contrast to straight room lines. It works beautifully in cottage, traditional, or modern-feminine bedrooms. You’ll appreciate the gentle, calming presence it provides.
Key Elements — shape and upholstery
- Curved plywood or MDF panel
- Soft upholstery fabric (linen or cotton blend)
- High-density foam for padding
- Batting for clean edges
- Neutral bedding with soft prints
- Rounded bedside lamps or sconces
- Decorative pillows with scalloped edges
- Light wood or painted nightstands
- Upholstery tools and staple gun
How to Achieve This Look (DIY steps)
- Draw the arch shape and cut plywood to match.
- Attach foam and batting to the panel.
- Wrap upholstery fabric tightly and staple to the back.
- Add piping around edges for a finished look.
- Mount to the wall using a cleat system.
- Place bed and add soft, layered bedding.
- Pair with rounded lighting and ceramics.
- Maintain fabric with gentle vacuuming.
How to Style / Use It
Use pastel or neutral palettes to enhance the arch’s softness. Rounded furniture complements the shape. Replace pillows seasonally to refresh the look. Spot-clean upholstery to maintain a fresh appearance.
- Industrial Pipe Frame Bed Back Design
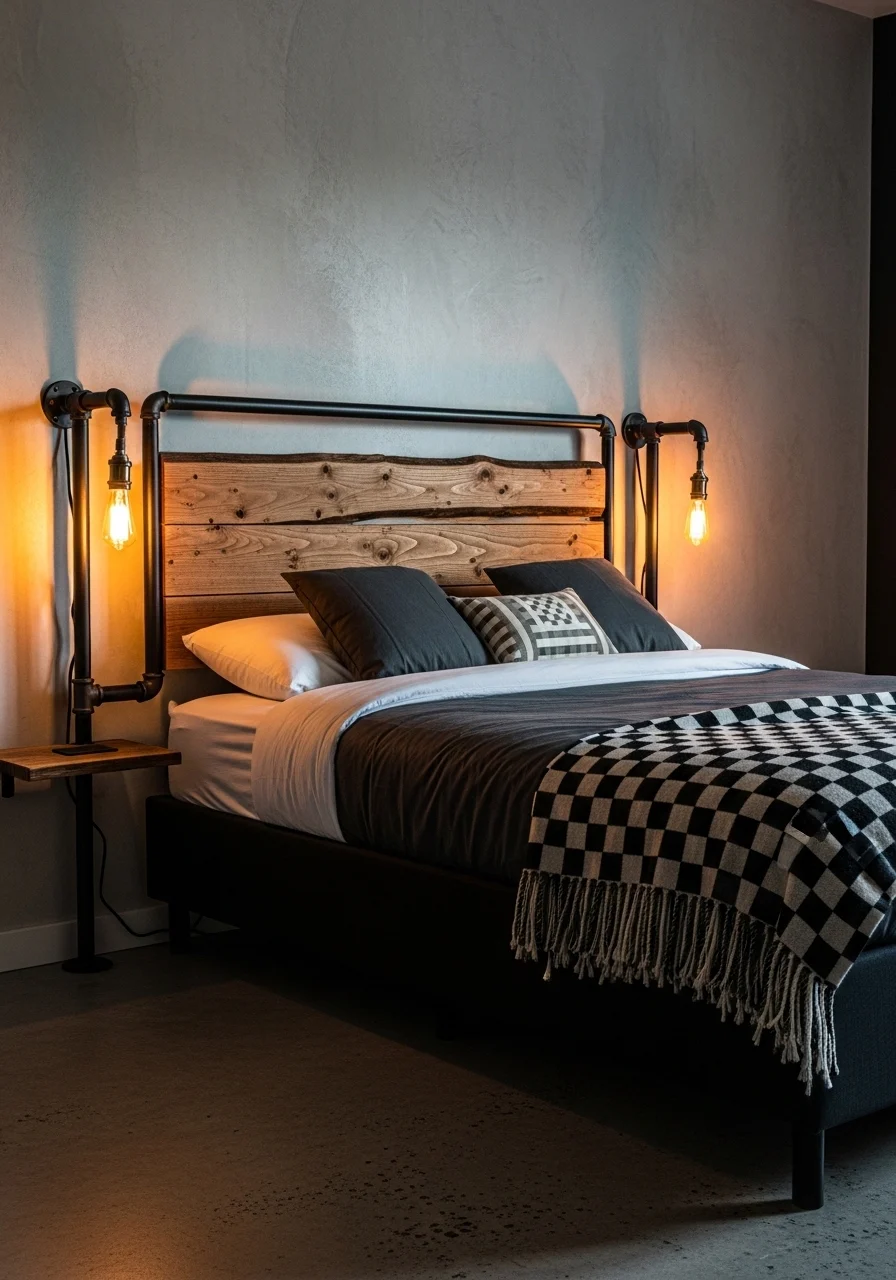
An industrial pipe frame makes a rugged, graphic bed back design. Pipes outline the bed and support shelves or lighting. It’s perfect for lofts or industrial-themed rooms. You’ll get an edgy, workshop-chic focal point with DIY-friendly materials.
Key Elements — metal and wood combo
- Black iron pipes and fittings
- Raw or stained wood panels
- Edison-style bulbs and industrial sconces
- Pipe shelf brackets for books or plants
- Neutral cotton or canvas bedding
- Concrete-look accents or rugs
- Metal nightstands or crates
- Pipe thread sealant for assembly
How to Achieve This Look (assembly)
- Plan pipe frame dimensions and buy fittings.
- Assemble frame on the floor to test fit.
- Attach wood panels within the frame.
- Secure frame to wall studs or floor anchors.
- Install industrial lighting and test wiring.
- Add pipe shelves for bedside storage.
- Style with rugged textiles and metal accents.
- Tighten fittings after a few weeks of settling.
How to Style / Use It
Balance hard materials with soft textiles. Use warm bulbs to soften the industrial edge. Paint pipes if you want a less stark finish. Great for renters if frame is freestanding and non-invasive.
- Upholstered Wingback Bed Back Design
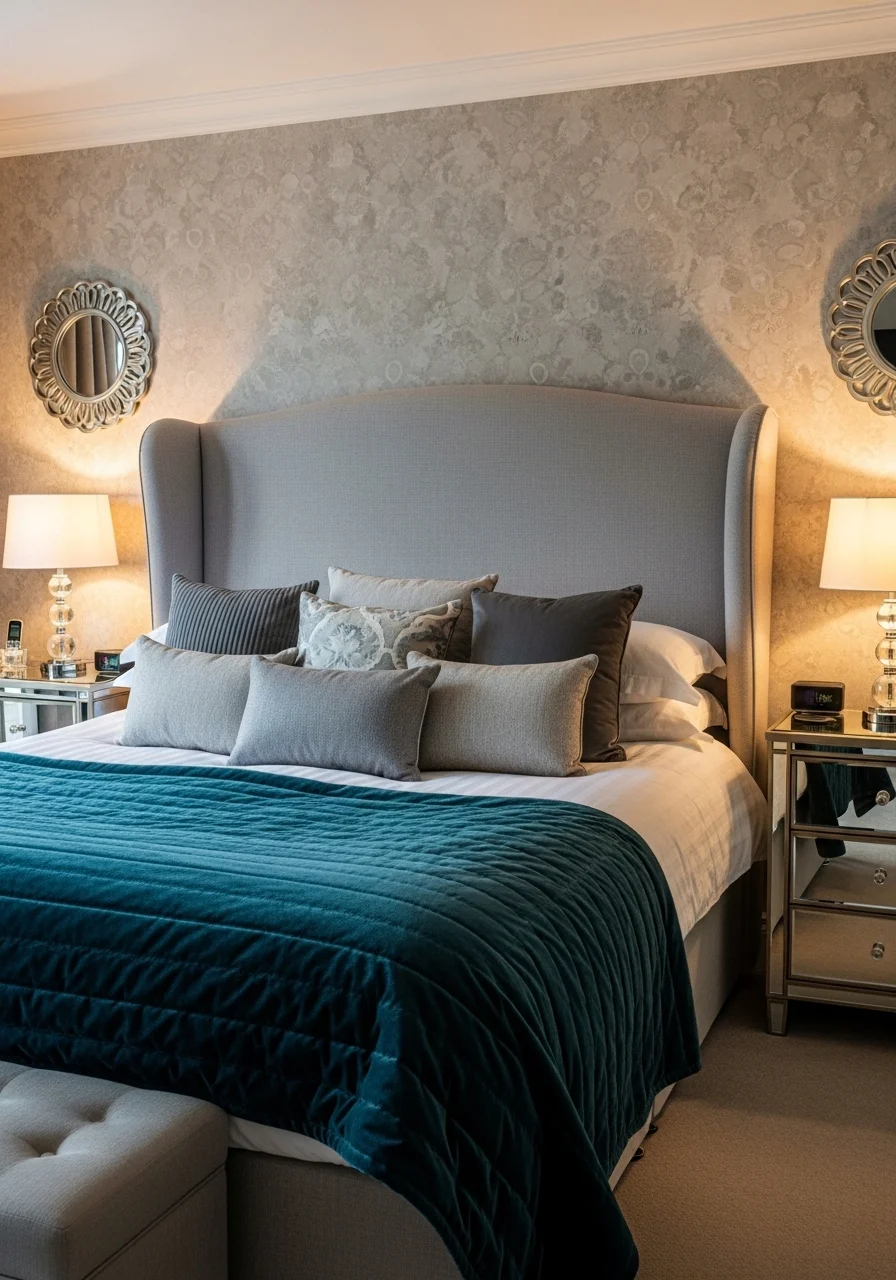
A wingback upholstered bed back design feels grand and cocooning. The winged sides create a sense of privacy and luxury. It’s ideal for master bedrooms or rooms where you want a statement piece. The wingback invites you to lounge and relax.
Key Elements — wings and upholstery
- Tall plywood backing with winged sides
- Plush foam and batting
- Elegant fabric (velvet, boucle, or linen)
- Button tufting or clean finish
- High-end bedding and throws
- Mirrored or lacquered nightstands
- Tall bedside lamps for scale
- Robust mounting hardware
- Footboard bench for balance
How to Achieve This Look (construction)
- Design wings and cut plywood backing.
- Attach foam and batting over the entire shape.
- Wrap chosen fabric and staple to edges.
- Add tufting if desired and secure buttons.
- Mount the large piece securely to wall studs.
- Style with luxe bedding and a bench at the foot.
- Keep wings dusted and fabric cared for.
- Use a step to reach higher tufting if adjustments are needed.
How to Style / Use It
Pair with layered lighting and soft rugs. Use the wings to create a cozy reading nook feel. Choose durable upholstery for regular use. Rotate pillows to prevent imprinting in fabric.
- Japanese-Inspired Shoji Bed Back Design
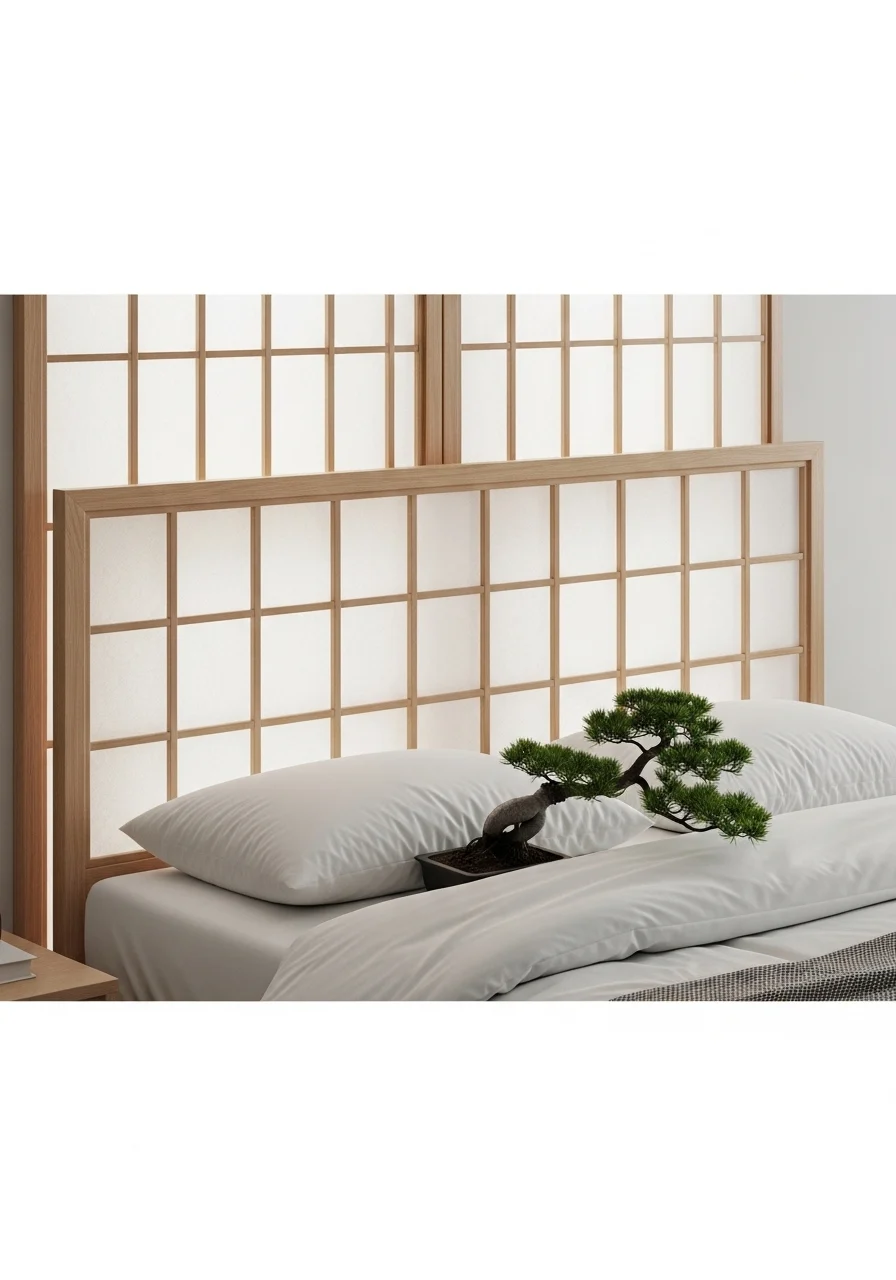
A Shoji-inspired bed back design offers calm, minimalist structure. The lattice and translucent panels diffuse light softly. It’s perfect if you prefer serene, uncluttered bedrooms. The aesthetic brings a Zen-like quality to your sleep space.
Key Elements — lattice and translucency
- Light wood lattice frame
- Rice paper or translucent acrylic panels
- Soft neutral bedding (white or beige)
- Low-profile platform bed
- Minimal bedside tables or floor lamps
- Japanese-inspired decor (bonsai, ceramics)
- Tatami-style rug or woven mat
- Soft ambient lighting
How to Achieve This Look (building steps)
- Construct a light wood frame with lattice pattern.
- Cut rice paper or acrylic to fit lattice panels.
- Attach panels carefully to avoid tearing.
- Mount the unit behind a low platform bed.
- Add simple bedding and a few decor objects.
- Use soft indirect lighting to highlight translucency.
- Replace paper panels if they show wear.
- Keep overall room minimal to maintain calm.
How to Style / Use It
Use natural fibers and minimal decor to reinforce the Zen vibe. Place plants for life and balance. Keep lighting soft to emphasize the paper glow. Avoid heavy patterns that disrupt serenity.
- Convertible Chalkboard & Pegboard Bed Back Design
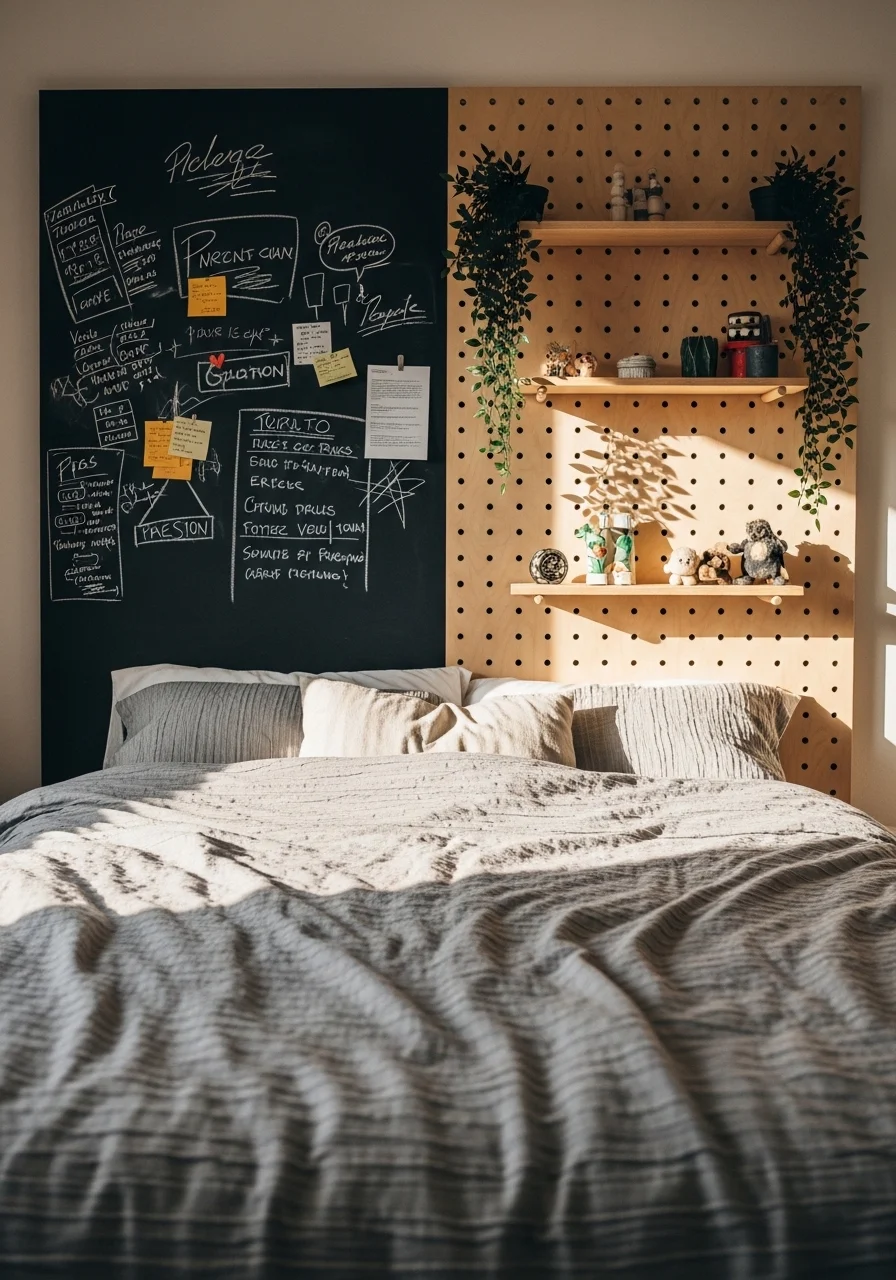
A chalkboard and pegboard combo makes a playful, flexible bed back design. It’s perfect for creative types who like to change layouts often. Use chalk for quotes and pegboard hooks for plants or storage. This bed back design adds personality and function.
Key Elements — writable and modular surfaces
- Matte chalkboard paint section
- Pegboard (painted or natural)
- Assortment of pegboard hooks and shelves
- Chalk and eraser set
- Small plant pots and hanging planters
- Task lighting or clip lamps
- Casual, easy-care bedding
- Slim bedside shelves or caddies
How to Achieve This Look (DIY setup)
- Decide split proportions for chalkboard and pegboard.
- Prep wall and apply chalkboard paint in area designated.
- Install pegboard securely on the other side.
- Add hooks, small shelves, and hanging planters.
- Mount bedside lighting for reading and tasks.
- Use chalk for rotating messages or drawings.
- Keep pegboard organized with labeled baskets.
- Wipe chalkboard seasonally to refresh.
How to Style / Use It
Change the chalkboard message for motivation or reminders. Use pegboard for practical storage like glasses or books. Keep planters small to avoid overloading. Great for teens, creatives, or multifunctional bedrooms.
You now have 20 bed back design ideas to suit every style, budget, and skill level. From soft upholstered panels to functional pegboard walls, these concepts show how a focused bed back design can reshape your room’s mood. Try one idea this weekend and pin the images that inspire you most.
Which bed back design are you tempted to try first? Save this list for later and share it with a friend who’s ready for a bedroom refresh. Your next cozy, stylish bedroom is closer than you think.