21 Hall Wall Decor Ideas That Add Personality
You walk into your home and the hall greets you like a blank page. That hallway wall is prime real estate for personality, not just functionality. These 21 hall wall decor ideas will help you make the most of that space with styles that match your mood and routine.
Inside you'll find gallery walls, textured panels, clever storage, and playful accents. Each idea includes a quick visual, exact materials, step-by-step setup, and styling tips. The focus is on realistic pieces you can source or DIY. Whether you love boho textures, modern minimalism, or cozy cottage charm, there’s a hall wall idea here for you.
Use these hall wall decor ideas that add personality to guide a weekend makeover or inspire a gradual refresh. Pin the looks you love, try one idea, or mix elements across ideas. Let your hallway show a bit of who you are — stylish and lived-in.
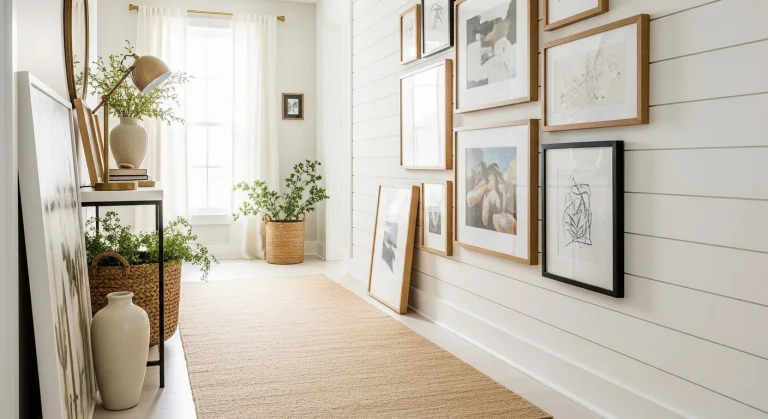
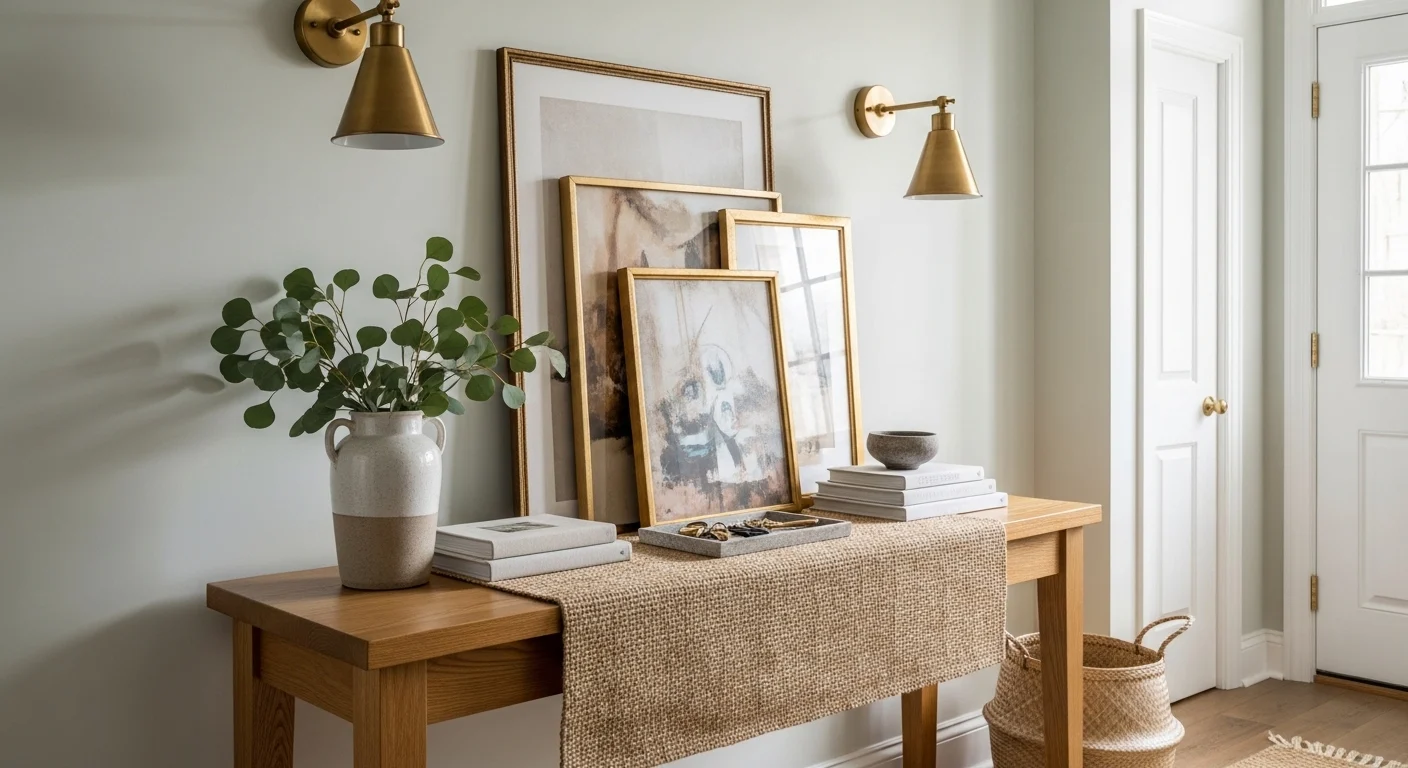
1. Hall Wall Decor Ideas That Add Personality: Curated Gallery Wall
This curated gallery wall feels collected over time. It balances framed art, photos, and small objects for visual rhythm. The mix of frame finishes and mat sizes keeps it lively. It fits entryways, narrow halls, or a stairway run. You’ll love this if you like storytelling walls with personality and depth. The vibe is cozy, slightly vintage, and personal.
Key Elements
- 3–5 medium black frames (8x10s) with white mats
- 2 wooden frames with natural grain (11×14)
- 1 gold or brass frame for contrast (5×7)
- 1 small woven basket or shadowbox
- 1 botanical print or pressed flower frame
- 2 family photos printed on matte paper
- One statement piece (large print 16×20)
- Small floating shelf (12–18 inches)
- Gallery hanging template or kraft paper
- Level, pencil, and painter’s tape
How to Achieve This Look
- Lay prints on the floor and arrange until the composition feels balanced.
- Cut kraft paper to frame sizes to test placements on the wall.
- Mark centers with pencil and use painter’s tape to preview layout.
- Start with the largest piece at eye level (about 57–60 inches).
- Work outward placing medium frames, then smaller ones to fill gaps.
- Hang a floating shelf near the bottom and style it with a small vase.
- Add the woven basket tucked into an empty corner for texture.
- Step back and adjust spacing to 2–3 inches between frames.
- Tighten hooks and ensure frames are level.
- Swap seasonal prints to refresh the wall.
How to Style / Use It
Hang near your entry to welcome guests with character.
Pair with a slim console and a textured runner.
Swap prints or photos seasonally for freshness.
Keep dusting light; framed glass needs gentle cloth cleaning.
Use removable hooks if you rent or change layouts often.
2. Oversized Statement Mirror with Floating Shelf (Entryway Decor)
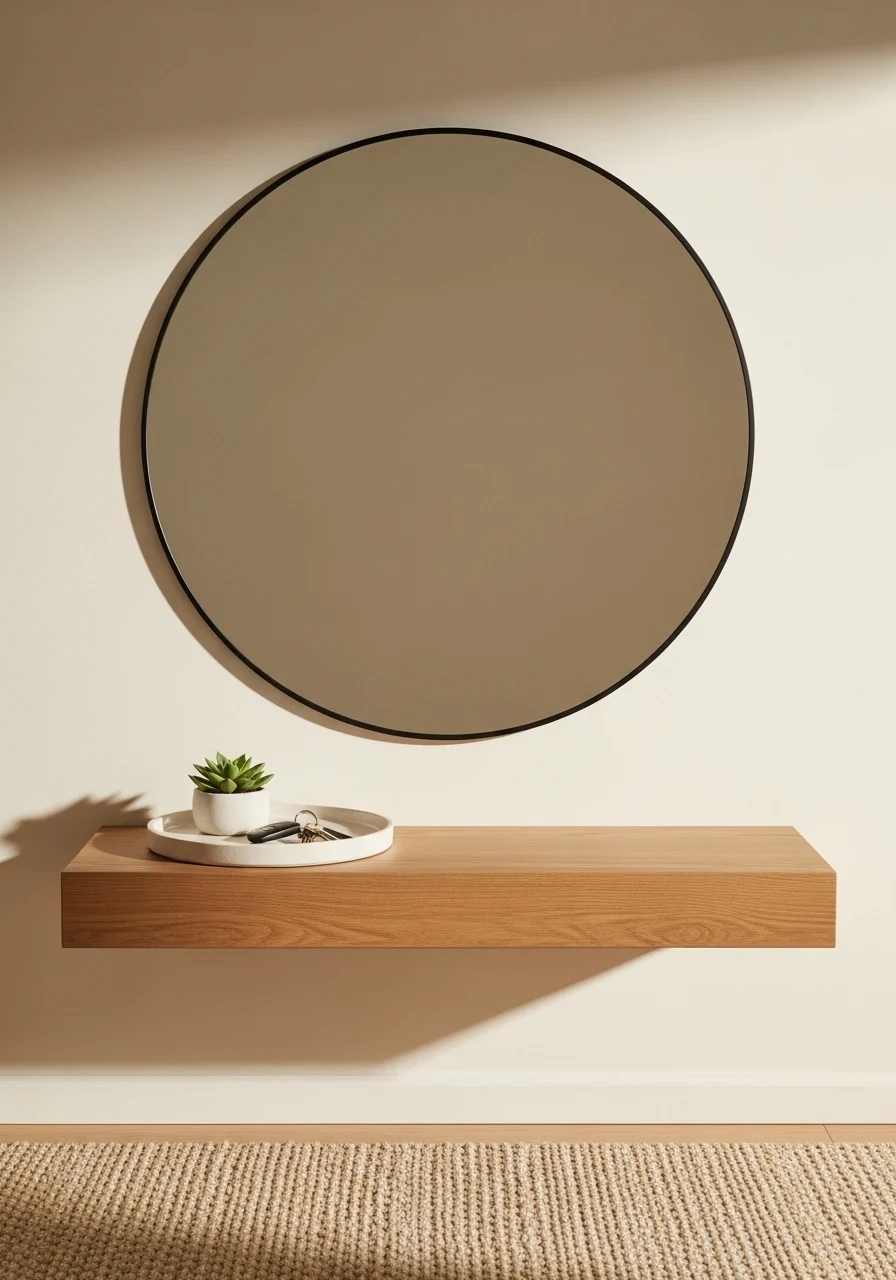
A large statement mirror instantly opens the hall and reflects light. Add a floating shelf under it for keys and decor. The look blends function and form in one sweep. It’s ideal for small halls that need brightness and a drop zone. You’ll enjoy how the mirror makes the space feel wider and more personal.
Key Elements
- Round or arched mirror (30–40 inches)
- Slim floating shelf in oak or matte black
- Ceramic catchall tray for keys
- Small potted plant or succulent
- Wall anchors and heavy-duty brackets
- Soft runner or rug beneath
- Warm brass hooks or small peg rail
- Minimal art print or card leaning on shelf
- LED picture light for evening
- Masking tape and level
How to Achieve This Look
- Measure wall width and center point at eye level.
- Mark the mirror hanging points and install anchors.
- Mount the floating shelf 6–8 inches below mirror bottom.
- Secure shelf with brackets and check for level.
- Place a ceramic tray left on shelf for everyday items.
- Add a small plant and one leaning art print for personality.
- Install 1–2 brass hooks nearby for coats or totes.
- Position a runner that aligns with shelf width.
- Mount an LED picture light above if the hall is dim.
- Step back and tweak accessory placement.
How to Style / Use It
Use the mirror for last-minute outfit checks before leaving.
Swap greenery with tall winter stems seasonally.
Keep the catchall tray clutter-free daily.
Consider a lower shelf height for families with kids.
Match mirror frame finish to other hardware in your entry.
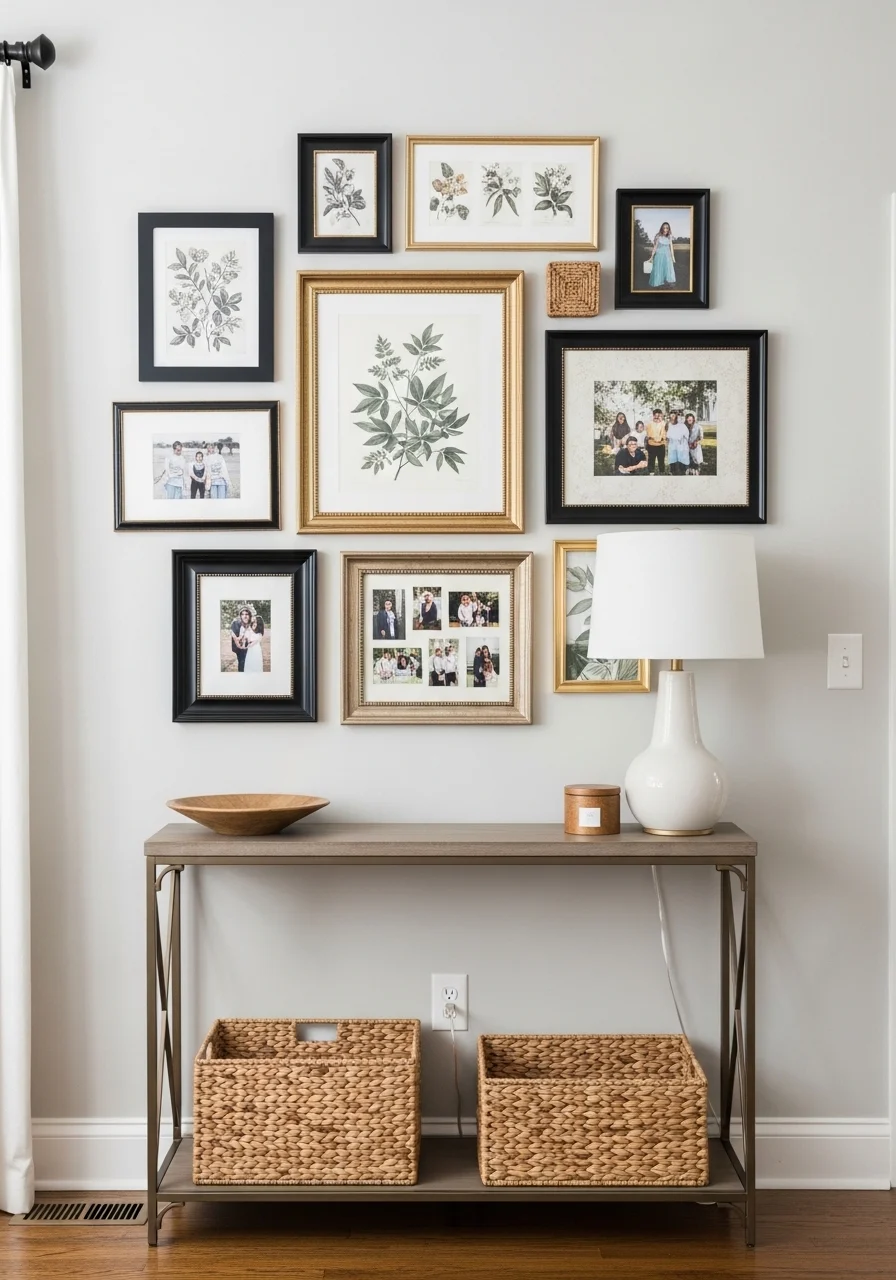
3. Vintage Frame Mix with Antique Clock (Timeless Hall Wall Decor)
Combining vintage frames and a patina clock creates a timeless tableau. The mixture of sepia photos, botanical prints, and a worn clock adds charm. It suits cottage, farmhouse, and eclectic modern styles. You’ll like the lived-in warmth and the story each piece tells. The overall mood is calm, nostalgic, and tactile.
Key Elements
- One antique round clock (metal or wood)
- 4–6 mismatched vintage frames
- Sepia or black-and-white photo prints
- One botanical print on aged paper
- Distressed wooden console table
- Brass candleholder or small oil lamp
- Linen runner or braided rug
- Natural fiber basket for umbrellas
- Picture-hanging wire and D-rings
- Microfiber cloth for gentle cleaning
How to Achieve This Look
- Collect frames at thrift stores or online vintage shops.
- Clean frames with a soft brush; preserve patina.
- Arrange frames flat and decide a loose cluster pattern.
- Hang the antique clock slightly off-center as a focal point.
- Position larger frames first, then fill gaps with smaller ones.
- Add the botanical print near the clock for variety.
- Style the console with a brass candleholder and a stack of books.
- Place a basket for practical storage beside the console.
- Light candles safely for evening ambiance.
- Rotate photos occasionally to keep the wall fresh.
How to Style / Use It
Pair with warm wood furniture and brass accents.
Use layered rugs in colder months for extra coziness.
Keep candle use supervised; switch to LED candles when needed.
Display a seasonal flower or branch in a vase on the console.
This layout works well along stair landings too.
4. Floating Shelf Display with Decorative Objects
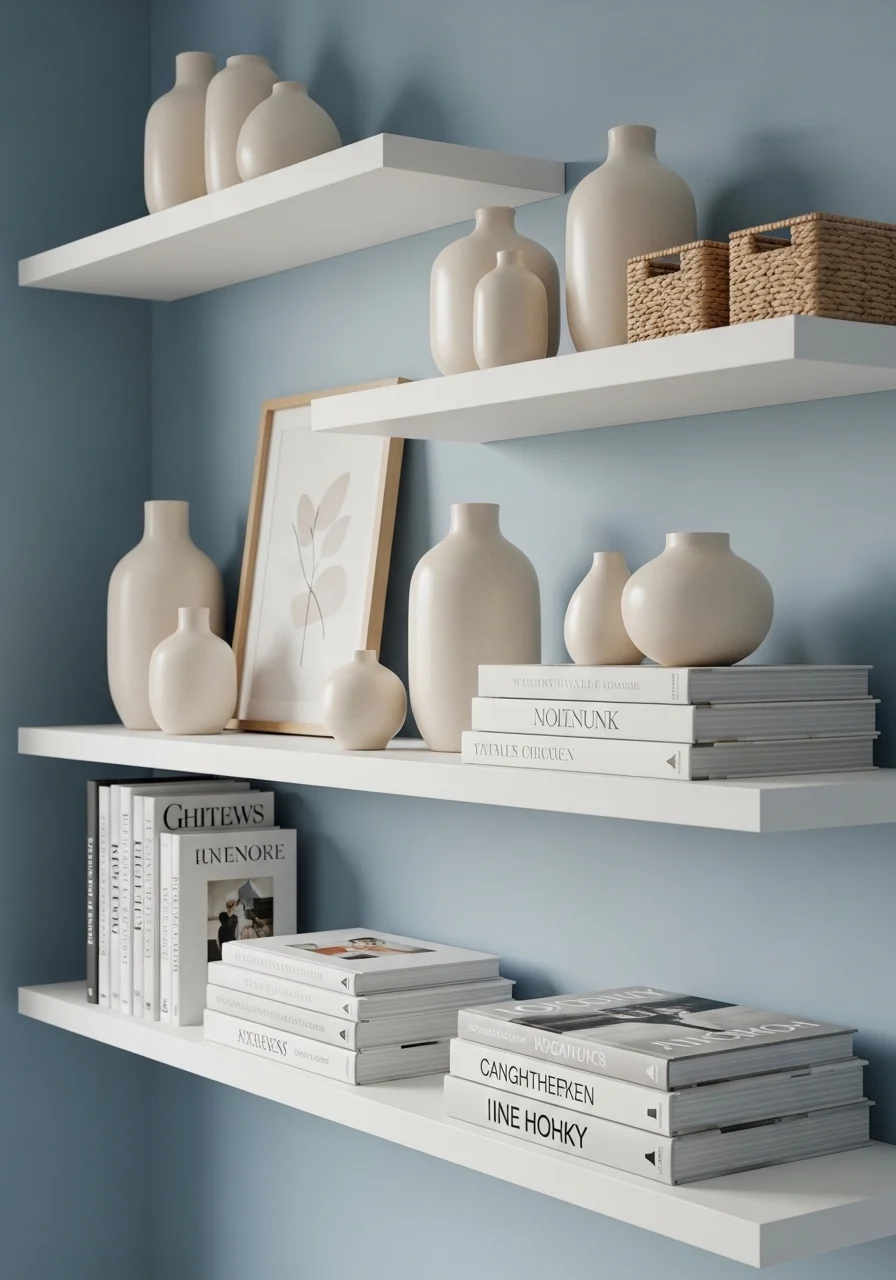
Floating shelves let you mix art with practical storage. Staggered heights create movement on long hall walls. You can swap accessories or use the shelves as a mini library. It suits modern, Scandinavian, and eclectic interiors. You’ll love being able to reshuffle the look without rehanging frames.
Key Elements
- 3–4 floating shelves in varied lengths
- Ceramic vases in mixed textures
- Small woven baskets for keys or sunglasses
- Stack of 2–3 coffee table books
- A framed postcard or small print
- A compact table lamp or LED puck
- Wall anchors rated for shelf weight
- Decorative bowl or catchall tray
- Small sculptural object (stone or wood)
- Lint-free cloth for styling
How to Achieve This Look
- Measure and mark shelf spacings to create balance.
- Install heavy-duty anchors at each bracket point.
- Mount shelves starting with the longest at eye level.
- Place largest objects first to anchor each shelf.
- Layer books horizontally and vertical objects for contrast.
- Use baskets to hide small clutter items.
- Add a light source on one shelf for warmth.
- Step back and add a small piece to fill empty stretch.
- Tighten screws and test shelf stability.
- Refresh accessories monthly to keep it lively.
How to Style / Use It
Use lower shelves for practical storage and top for art.
Group items in odd numbers for visual interest.
Rotate seasonal decor, like shells in summer and pinecones in winter.
Dust shelves weekly to maintain the clean look.
Pair with a simple mirror across from the shelves.
5. Textured Paneling or Wainscoting for Depth (Architectural Decor)
Adding textured paneling like wainscoting gives the hall immediate depth. Paint it a contrasting tone for drama. This approach pairs well with framed art or simple hooks. It suits traditional, cottage, and modern classic homes. You’ll notice the space feels grounded and polished.
Key Elements
- Beadboard or shaker panels (height 36–48 inches)
- High-quality primer and eggshell paint
- Slim bench or console with linen cushion
- Matte black or brass wall hooks
- Decorative molding and corner blocks
- Sanding block and caulk for seams
- Painter’s tape and drop cloths
- Small basket for shoes or umbrellas
- Soft runner to match panel tone
- Oil-based trim paint for durability
How to Achieve This Look
- Measure wall and determine panel height.
- Cut panels to size; dry-fit before glueing or nailing.
- Install panels with finishing nails and adhesive.
- Caulk seams and fill nail holes; sand smooth.
- Prime the entire surface and let dry fully.
- Paint with two coats of eggshell or satin trim paint.
- Attach hooks to studs or use anchors.
- Place a slim bench beneath and add a cushion.
- Lay a runner that complements panel color.
- Touch up paint after bench installation.
How to Style / Use It
Use hooks for coats and bags without adding clutter.
Match the bench cushion fabric to nearby textiles.
Choose washable paint for easy maintenance.
Add a bold art piece above panels for contrast.
This finish increases perceived value and permanence.
6. Statement Wallpaper Accent (Patterned Hall Wall Ideas)
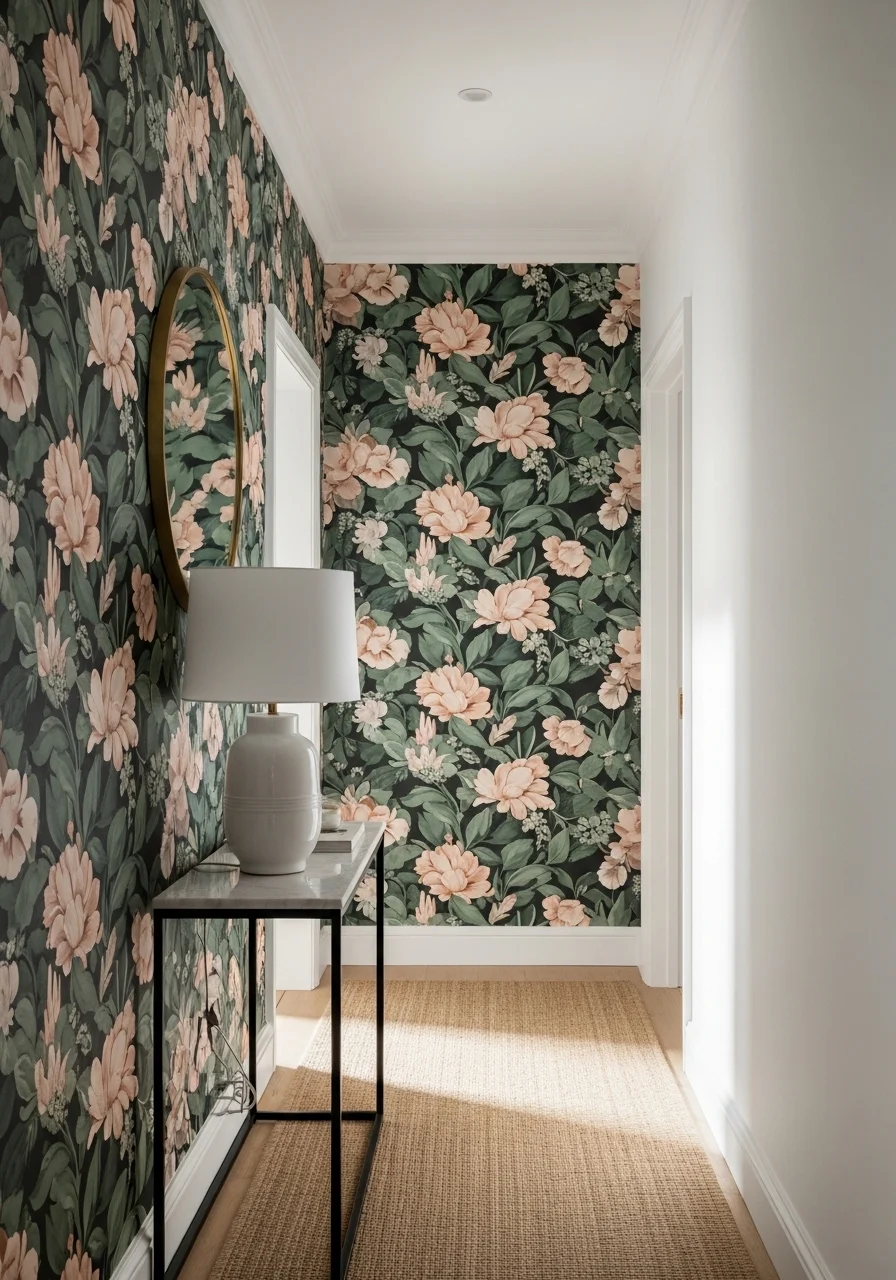
Patterned wallpaper adds instant personality to a hall wall. Pick a scale and colorway that complements nearby rooms. A single accent wall keeps it balanced. This suits bold, vintage, or maximalist lovers. You’ll enjoy the pattern’s energy every time you pass through.
Key Elements
- One roll of high-quality peel-and-stick or paste wallpaper
- Small-scale or medium-scale pattern for narrow halls
- Neutral trim paint to frame the paper
- Slim console or ledge to anchor the look
- Simple art or mirror to avoid visual overload
- Seam roller and smoothing tool
- Utility knife and straightedge
- Cleaning cloth and mild detergent
- Matching runner or rug
- Wallpaper seam adhesive (if needed)
How to Achieve This Look
- Select a pattern scale suited to wall width.
- Prepare wall by smoothing and priming if needed.
- Measure and mark a plumb line for the first strip.
- Apply wallpaper from top to bottom, smoothing out air bubbles.
- Trim excess at baseboards with a sharp blade.
- Match pattern across strips carefully at seams.
- Install a slim console against the wallpapered wall.
- Add a simple mirror or small art piece to break pattern.
- Clean any paste residue with a damp sponge.
- Maintain by dusting and avoiding moisture exposure.
How to Style / Use It
Pair patterned walls with simple furniture.
Choose rugs that pick up one or two colors from the paper.
Use wallpaper in entry halls or short runs, not full long corridors.
Try removable paper if you like frequent updates.
Consider metallic accents for evening shine.
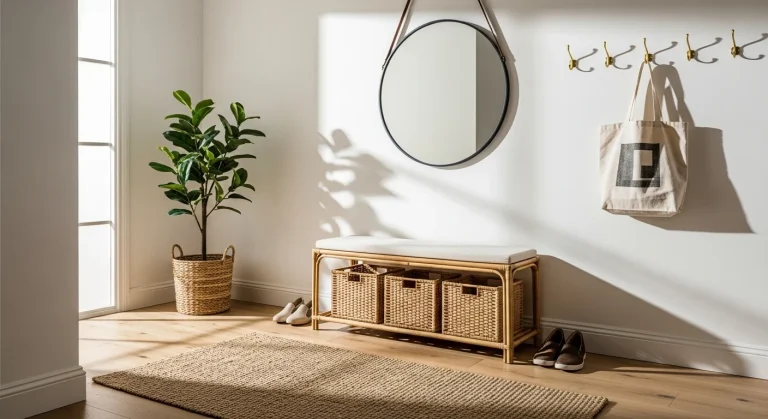
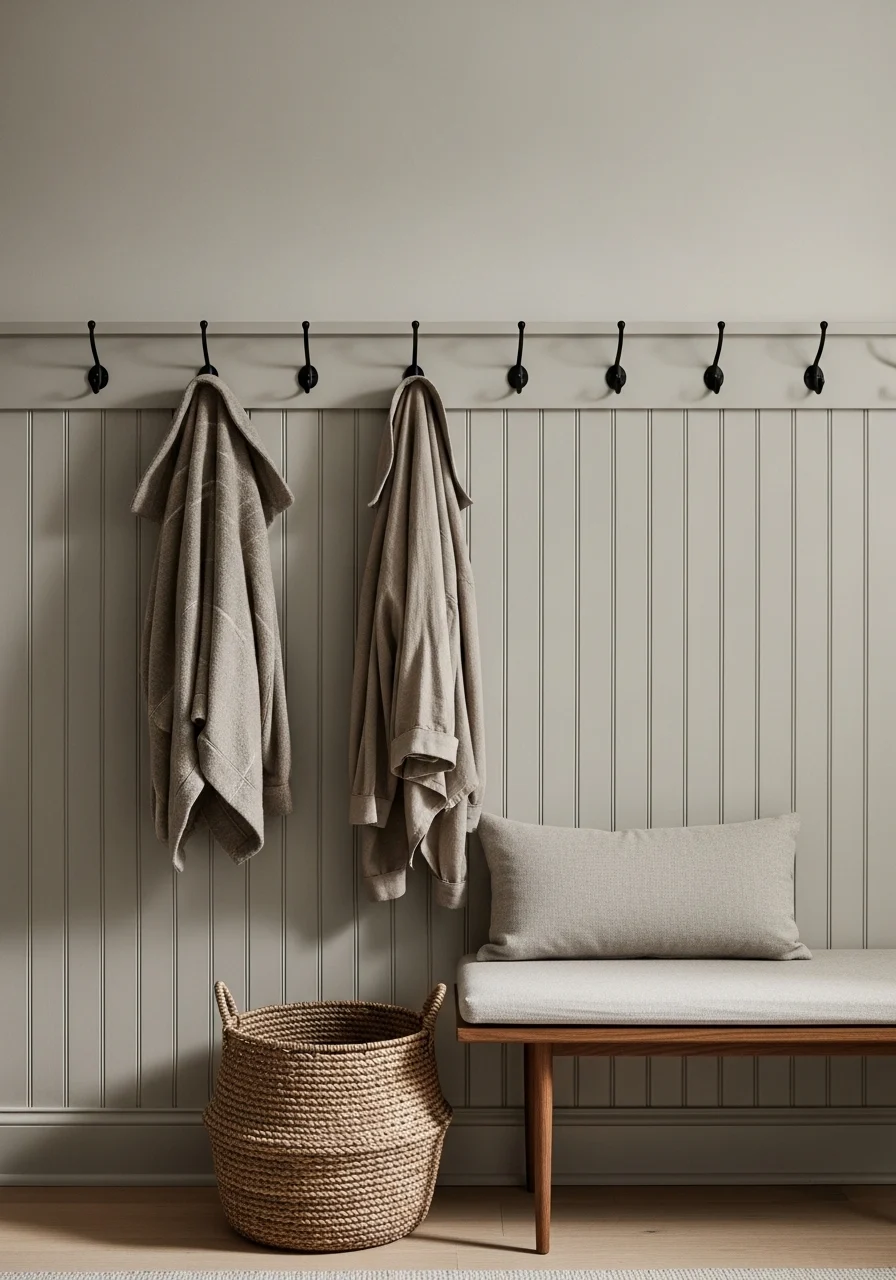
7. Hall Wall Decor Ideas That Add Personality: Mixed-Material Hooks and Bench

A mix of materials in hooks and a bench brings tactile interest. Peg rails, leather straps, and metal hooks create a rich look. It works brilliantly for busy family halls. You’ll love the practicality and the layered textures. The vibe is functional, stylish, and welcoming.
Key Elements
- Wall-mounted peg rail or rail with mixed hooks
- Leather strap hooks for bags
- Matte black metal hooks for coats
- Small wooden bench with woven cushion
- One shallow tray for gloves and masks
- Rug with durable fiber (sisal or wool blend)
- Wall anchors and stud finder
- A hanging basket for scarves
- Natural fiber throw for bench
- Mirror or small shelf above bench
How to Achieve This Look
- Find wall studs for secure peg rail installation.
- Mark rail height so hooks are reachable for all family members.
- Attach the peg rail using long screws into studs.
- Install a bench beneath, centered on the rail.
- Add leather strap hooks for bags at one end.
- Place metal coat hooks for outerwear toward one side.
- Stage a tray on the bench for small essentials.
- Add a woven basket under bench for shoes or umbrellas.
- Place a durable runner along the floor.
- Teach family members where each hook is for efficiency.
How to Style / Use It
Designate hooks for each family member to reduce clutter.
Use leather hooks for purses; metal ones for wet coats.
Wipe hooks and bench weekly to prevent wear.
Swap cushion covers seasonally for new color pops.
This setup helps keep daily routines smooth.
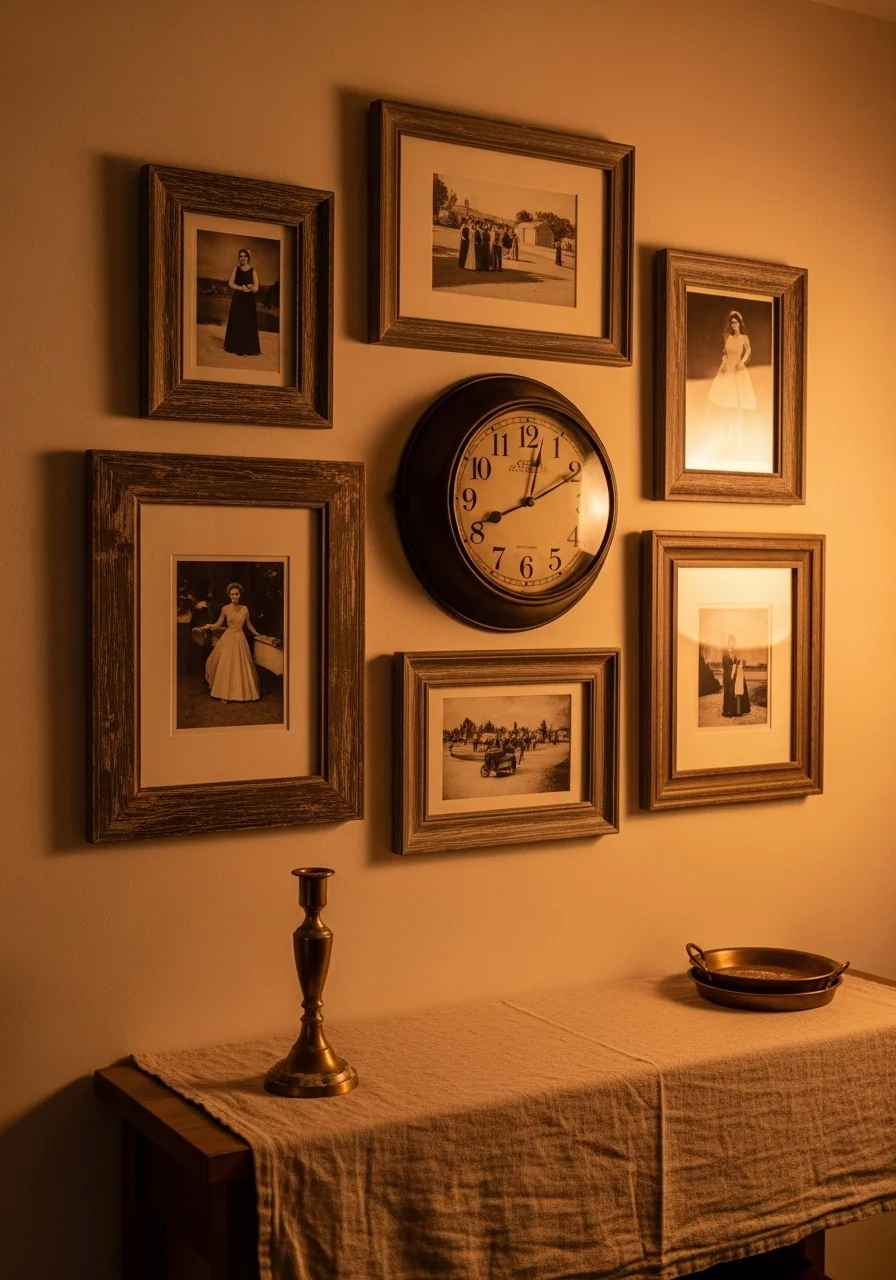
8. Hall Wall Decor Ideas That Add Personality: Overscaled Wall Clock Gallery
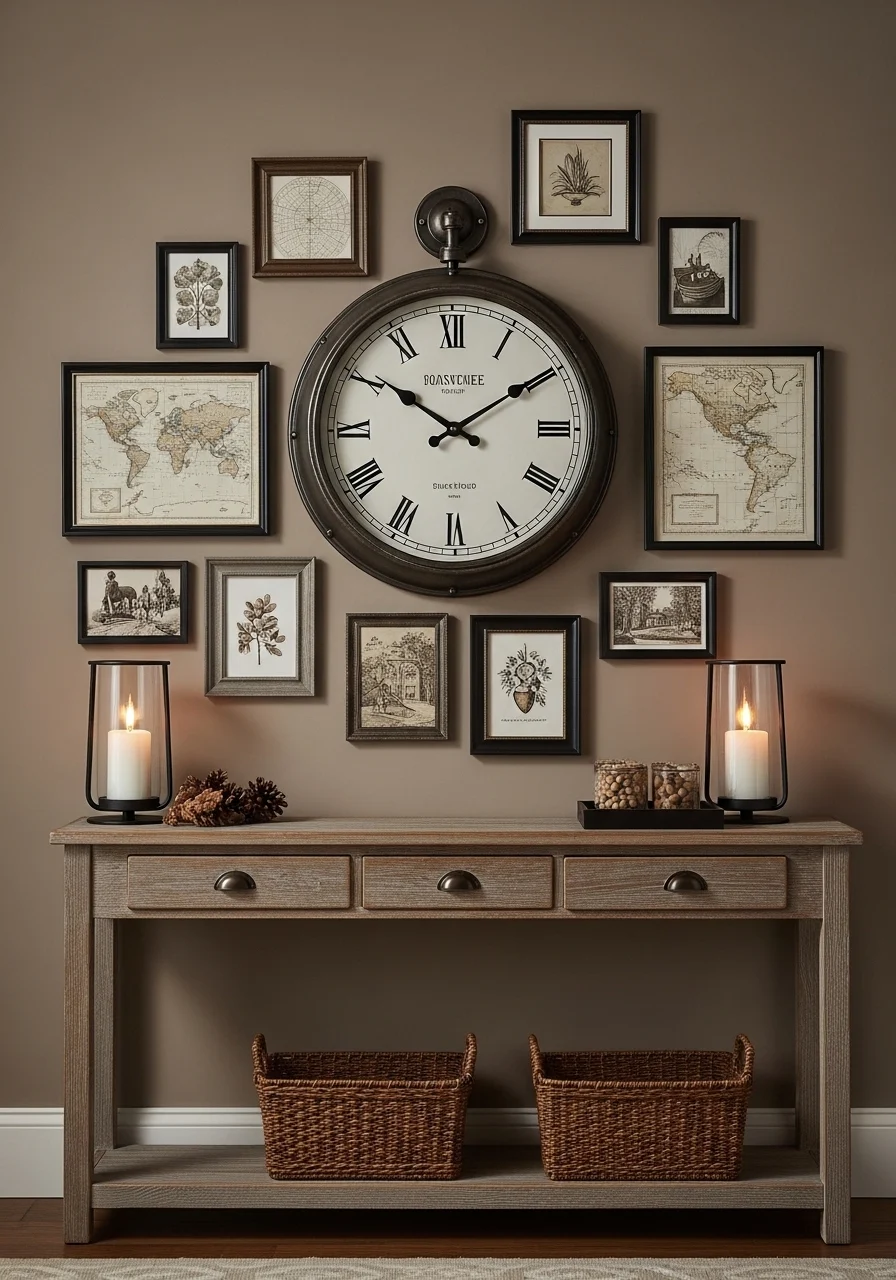
An overscaled clock commands the wall while smaller frames complement it. This gallery is bold but balanced. It works well in long halls or at the end of a corridor. You’ll enjoy the clock as both decor and a functional focal point. The scene feels anchored and slightly antique.
Key Elements
- One oversized wall clock (30–36 inches)
- 3–4 small framed maps or prints
- Vintage brass accent or candleholder
- Slim console with a dark finish
- Woven floor runner to add warmth
- Anchors and heavy-duty hanging kit
- One small planter for greenery
- Staggered frame heights to create rhythm
- Cleaning brush and microfiber cloth
- Match metal finishes across accessories
How to Achieve This Look
- Measure and mark the clock center at eye level.
- Install heavy-duty anchor for the clock.
- Hang the clock and step back to confirm placement.
- Arrange small frames around the clock’s perimeter.
- Keep spacing tight for a compact composition.
- Place a console beneath and style with a brass accent.
- Add a runner that mirrors the clock’s warm tones.
- Position a plant for a fresh, living touch.
- Check that frames are level and secure.
- Clean clock face gently to avoid scratches.
How to Style / Use It
Let the clock be the star; keep surrounding decor minimal.
Pair with warm woods and brass for cohesion.
Use at the end of a corridor for dramatic impact.
Dust metal surfaces to keep the finish bright.
Change small frames seasonally for variation.
9. Layered Mirrors for Light and Motion
Layering mirrors of different shapes creates reflective interest and motion. This trick multiplies light and visually expands the hall. It suits narrow passages and windowless entryways. You’ll notice how mirrors add a little theatrical sparkle. The effect is airy, modern, and practical.
Key Elements
- One large mirror and two smaller mirrors in mixed shapes
- Thin black or brass frames for consistency
- Soft bench or console beneath mirrors
- Warm-toned runner to anchor floor
- Hanging hardware rated for glass weight
- Dusting cloth and glass cleaner
- Small hanging plant to reflect greenery
- Picture wire and D-rings for secure mounting
- Decorative tray or bowl for keys
- Soft cushion for bench
How to Achieve This Look
- Arrange mirror shapes on the floor to choose composition.
- Mark a centerline and hang the largest mirror first.
- Add smaller mirrors offset around the large one.
- Ensure all mirrors are hung securely into studs or with anchors.
- Place a bench or console below for balance.
- Add a hanging plant to one side for reflection.
- Install warm lighting to increase reflected glow in evenings.
- Clean mirrors weekly to maintain sparkle.
- Adjust spacing to avoid crowding the wall.
- Replace fragile frames with shatterproof options if needed.
How to Style / Use It
Use mirrors to reflect a favorite art piece across the hall.
Pair with warm textiles to prevent a cold look.
Avoid mirrors facing a direct light source that causes glare.
Use mirrored clusters in rental spaces with removable hooks.
Works especially well in compact homes.
10. Minimalist Art with Bold Negative Space
Minimal art with bold negative space makes a sophisticated statement. Larger margins around pieces bring calm. This look suits modern and Scandinavian spaces. You’ll enjoy the quiet elegance and how breathing room feels luxe. The result is refined, airy, and intentional.
Key Elements
- Three large minimal prints with generous white margins
- Thin black or white frames with museum glass
- Slim console in light wood
- Sculptural ceramic vase or bowl
- Neutral runner with fine texture
- Picture-hanging kit and level
- Linen napkin or small tray for small items
- Low-metallic accent like a brass bookend
- Soft ambient wall light option
- Duster for frame glass
How to Achieve This Look
- Choose prints with significant white space for calm effect.
- Measure wall width and center the middle print at eye level.
- Space prints evenly, about 4–6 inches apart.
- Hang frames using appropriate anchors and check for level.
- Place a slim console beneath with one sculptural object.
- Add a runner to anchor the floor visually.
- Turn on a low wall wash to enhance art in evenings.
- Keep accessories sparse to maintain minimal aesthetic.
- Clean glass with microfiber to avoid streaks.
- Rotate prints if you want seasonal color shifts.
How to Style / Use It
Pair with monochrome furniture and tactile textiles.
Use this look for calming transitions between rooms.
Keep lighting soft to maintain a tranquil vibe.
Use museum glass to reduce reflections in bright halls.
Ideal for small spaces that need a quiet focal point.
11. Functional Chalkboard or Message Wall
A chalkboard wall doubles as decor and a family command center. Use it for reminders, doodles, and seasonal quotes. It suits busy households and creative types. You’ll appreciate how it keeps everyone on the same page. The look is practical, playful, and changeable.
Key Elements
- Framed chalkboard paint area or removable chalkboard panel
- Chalk set and white chalk markers
- Small wooden shelf for chalk jar
- Mini calendar print or magnet board
- Hanging basket for mail or receipts
- Damp cloth or chalk eraser
- Painter’s tape and level for framing
- Lightweight frame molding for finished edge
- Cork strips for pinned notes
- Protective wax or finisher for longevity
How to Achieve This Look
- Tape off the chalkboard area and prime if needed.
- Apply 2–3 coats of chalkboard paint, drying between coats.
- Add a thin frame molding around the painted area for a finished look.
- Mount a small shelf beneath for chalk storage.
- Write a weekly schedule or quote to seasonally personalize.
- Add a small basket for incoming mail to keep counters clear.
- Use chalk markers for bold, smudge-resistant details.
- Wipe clean weekly to prevent buildup of ghost marks.
- Refresh with a coat of chalkboard paint every few years as needed.
- Train household members to use designated sections.
How to Style / Use It
Reserve sections for grocery lists, to-dos, and doodles.
Use colored chalk to prioritize items visually.
Keep a damp cloth nearby for quick corrections.
Use the board seasonally for holiday messages or party info.
Pair with a simple bench for a quick note-writing spot.
12. Textile Art and Macramé Wall Hangings
Textile art brings warmth and soft texture to a hall wall. Macramé, woven panels, and kilims add a handmade feel. This suits boho, Scandinavian, and cozy cottage styles. You’ll love the softness and how textiles absorb sound. The vibe is tactile, relaxed, and inviting.
Key Elements
- Large macramé or woven wall hanging
- Wooden dowel or brass hanger
- Small collection of woven mini-tapestries
- Wicker basket for extra throws
- Linen or cotton throw on nearby bench
- Neutral or warm-toned wall color
- Heavy-duty hook or anchor for hanging
- Soft lighting to highlight texture
- Fabric-safe vacuum attachment for cleaning
- Optional fringe-weight or beads for added detail
How to Achieve This Look
- Choose a wall with enough vertical space for a large piece.
- Install a secure hook or anchor rated for textile weight.
- Hang the main macramé centered at eye level.
- Add smaller woven pieces around to create a layered look.
- Place a basket nearby for additional textiles.
- Use soft directional light to reveal knots and texture.
- Fluff fringes occasionally to keep shape.
- Vacuum gently with a fabric attachment to remove dust.
- Rotate pieces outside for fresh airing if possible.
- Replace if fibers show signs of wear.
How to Style / Use It
Use textiles to soften echo in long halls.
Pair with natural woods and plants for a boho feel.
Keep colors cohesive with nearby rugs and cushions.
Avoid direct sunlight to prevent fading.
Great for renters using removable hooks.
13. Vertical Plant Wall with Minimal Planters
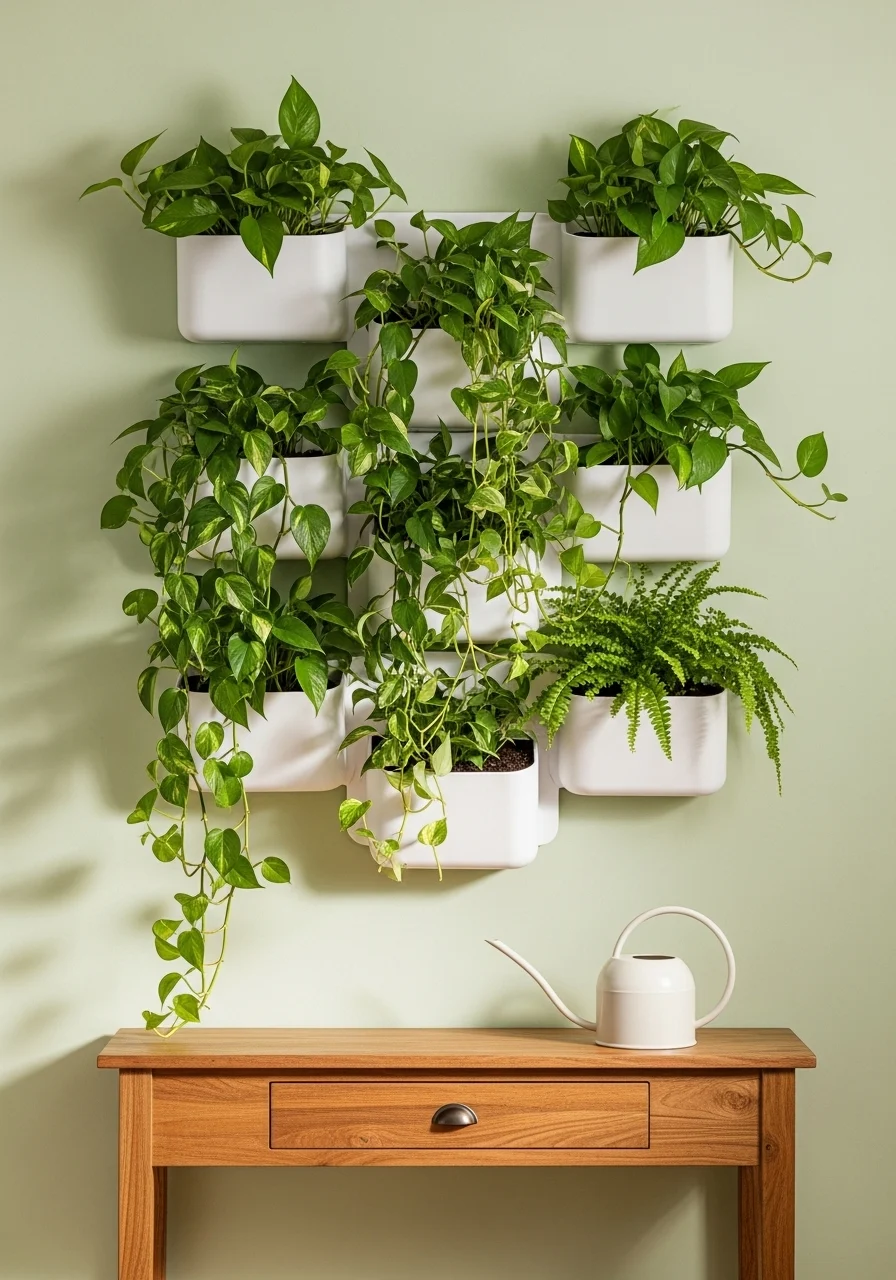
A vertical plant wall injects life and freshness into a hallway. Minimal planters keep the look clean and modern. It’s perfect for plant lovers or those craving greenery indoors. You’ll enjoy better air and a calming, living focal point. The atmosphere becomes cooler and more relaxed.
Key Elements
- 4–6 wall planters (ceramic, matte, or terracotta)
- Trailing plants like pothos, ivy, or string of hearts
- Moisture-resistant wall anchors
- Small watering can and moisture meter
- Propagation cuttings for fuller coverage
- Drip trays or saucers to protect walls
- LED grow light for darker halls
- Wall-mounted plant shelf for pots
- Plant-friendly potting mix with good drainage
- Microfiber cloth for leaves
How to Achieve This Look
- Choose healthy trailing plants and size planters appropriately.
- Mark and install planters in a staggered vertical pattern.
- Plant pots with mix and compact soil gently.
- Fit drip trays to each planter to protect the wall.
- Add a grow light if natural light is insufficient.
- Water sparingly and check with a moisture meter.
- Prune to encourage fuller trailing growth.
- Rotate pots occasionally for even light exposure.
- Wipe leaves to remove dust buildup.
- Replace any plants that decline for overall health.
How to Style / Use It
Pair with organic textiles and rattan accents for nature-forward aesthetics.
Use different pot colors for contrast, or keep them uniform for calm.
Group plants by water needs to simplify care.
Plant wall works well near a window or with a grow light.
Consider faux plants for low-maintenance options.
14. Hall Wall Decor Ideas That Add Personality: Photo Ledge with Rotating Prints
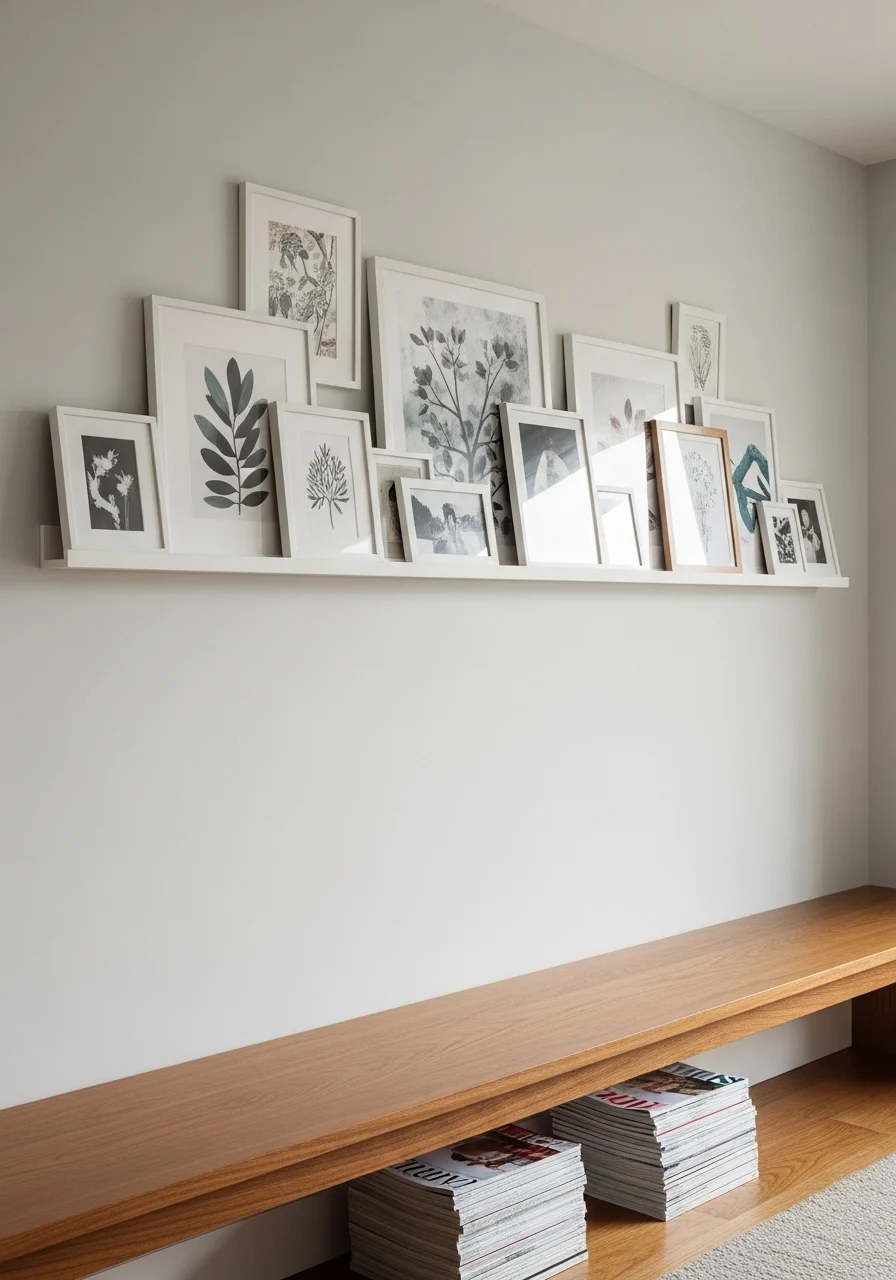
A photo ledge offers quick-change flexibility for prints and frames. Rotate seasonal art or family photos without rehanging. This suits busy creatives and families who like to refresh often. You’ll love swapping pieces for holidays or mood shifts. The feel is casual, curated, and adaptable.
Key Elements
- One long photo ledge (36–72 inches)
- Assorted frame sizes (5×7, 8×10, 11×14)
- Small sculptural objects to break frames
- A stack of rotating prints or postcards
- Lightweight vases or candles for depth
- Secure wall anchors and bracket system
- Lint-free cloth for glass care
- A bench or console beneath
- Painter’s tape to plan layout
- Labels or tags for seasonal rotation
How to Achieve This Look
- Install the ledge centered on the wall at eye level.
- Start with a large frame placed slightly off-center.
- Layer medium frames behind smaller ones for depth.
- Add a sculptural object to interrupt the straight line.
- Keep a few prints tucked behind for quick swaps.
- Change prints each season or for special occasions.
- Use lightweight frames to avoid overloading the ledge.
- Keep the bottom of the ledge clear if you have small kids.
- Dust frames and glass regularly to maintain crispness.
- Rearrange composition once every few months.
How to Style / Use It
Use ledges to tell a visual story; theme by color or era.
Pair with a bench for an easy photo-viewing spot.
Use removable frames if you rent or move often.
Rotate to highlight travel photos, kids’ art, or seasonal posters.
Perfect for long halls where holes are hard to manage.
15. Hall Wall Decor Ideas That Add Personality: Vintage Coat Rack Gallery
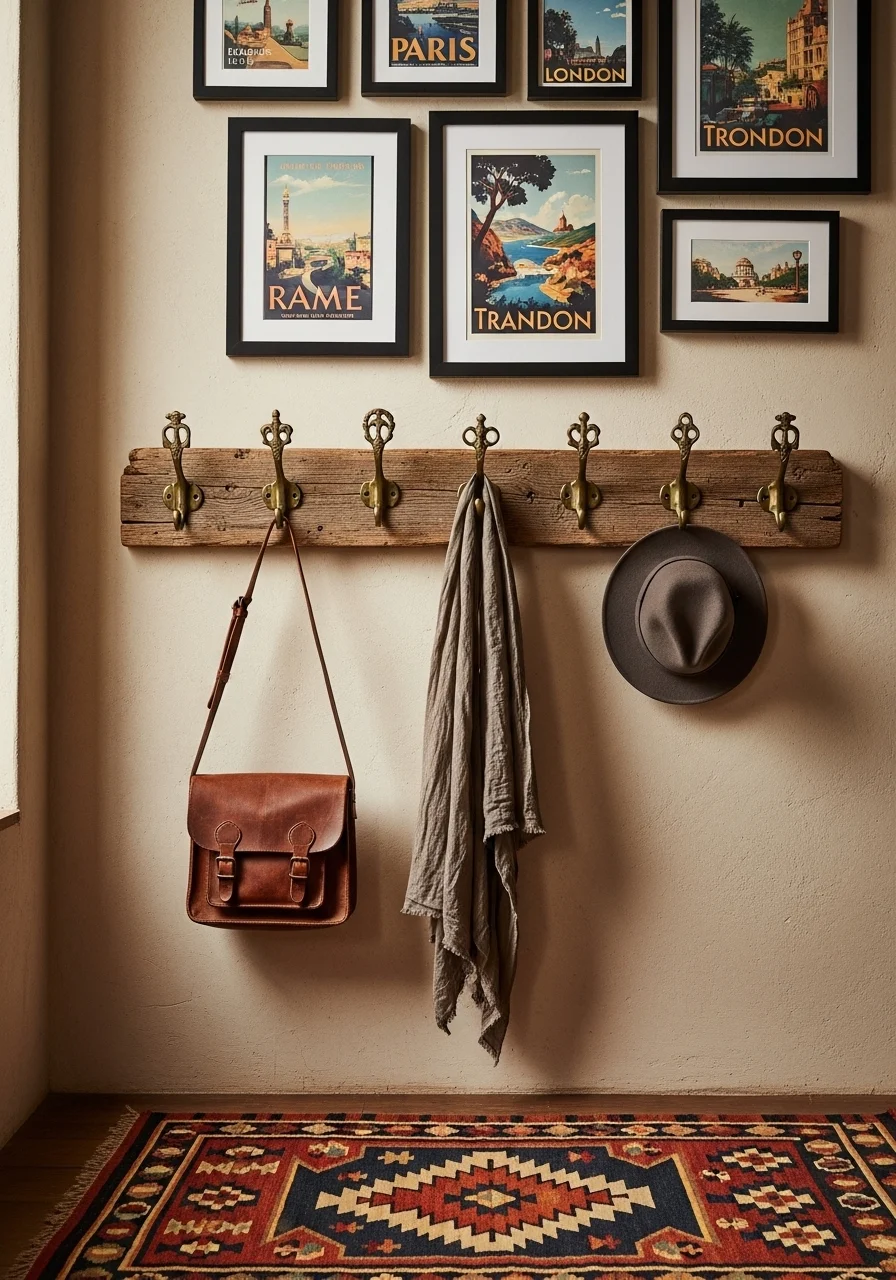
A vintage coat rack becomes an anchor for framed travel posters or art. It blends function with curated visuals. This setup works in wide halls and mudrooms. You’ll like the mix of utility and personality. The vibe is worldly, collected, and practical.
Key Elements
- Reclaimed wood coat rack with brass hooks
- 3–4 vintage travel posters in slim frames
- Woven runner or braided rug
- Ceramic umbrella stand nearby
- Key dish or hanging pouch for small items
- Stud finder and long screws for secure mount
- Light wall sconce for evening
- Soft cushion on a nearby bench
- Leather or canvas hanging straps
- Mild cleaner for brass polish
How to Achieve This Look
- Securely mount the coat rack into studs using long screws.
- Hang travel posters around or above the rack to frame it.
- Place a runner that coordinates with poster colors.
- Add an umbrella stand near the base for rainy days.
- Use leather straps on some hooks for a layered look.
- Keep a cushion on a bench for shoe changes.
- Polish brass occasionally to keep it warm and bright.
- Teach family where to hang items to keep the wall tidy.
- Add a sconce to highlight the posters at night.
- Swap posters for new travels or prints over time.
How to Style / Use It
Designate specific hooks for daily essentials.
Match poster frames to rack finish for cohesion.
Use the rack as a staging area for outfit prep.
Add a small top shelf above posters for display.
This idea brings practical storage with vintage flair.
16. DIY Frame Collage with Color-Blocked Background
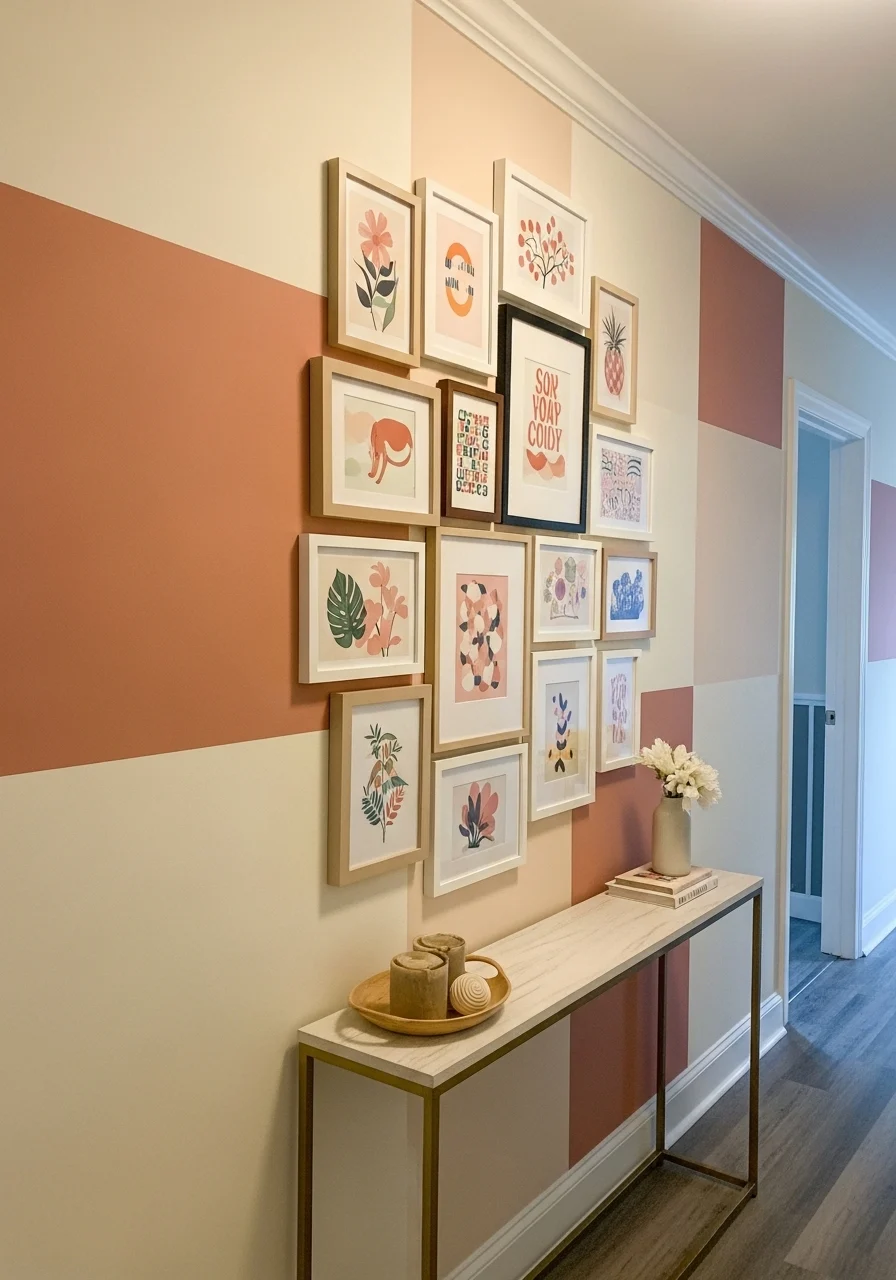
A color-blocked backdrop unifies mismatched frames and creates cohesion. This playful technique works for bold personalities. It’s ideal if you enjoy DIY and color experiments. You’ll love the custom look and how the wall feels intentional and artistic.
Key Elements
- Two complementary wall paint colors
- Selection of mismatched frames (wood, metal, painted)
- Painter’s tape and level for precise color blocks
- Sample paints for testing tones
- Bubble-level and ruler for straight lines
- Prints that pick up color hues
- Slim console to anchor composition
- Small potted plant for contrast
- Painter’s drop cloth and trays
- Touch-up paint for any mishaps
How to Achieve This Look
- Choose two paint colors that complement each other.
- Map out the color-block area with painter’s tape.
- Prime the section and paint the lighter tone first.
- After drying, tape the second block and paint.
- Remove tape carefully to reveal clean lines.
- Arrange frames over the blocks, placing large ones first.
- Hang frames, keeping spacing consistent across blocks.
- Add a console and simple styling beneath.
- Stand back and tweak frame alignment for balance.
- Seal with touch-up paint as needed.
How to Style / Use It
Use seasonal color changes for a lively refresh.
Pair with textiles that echo the paint tones.
Keep the console styling minimal to let the wall shine.
Use removable wallpaper if you prefer non-paint options.
Great for renters if you use removable peel-and-stick paint effects.
17. Industrial Pipe Shelves with Edison Lighting
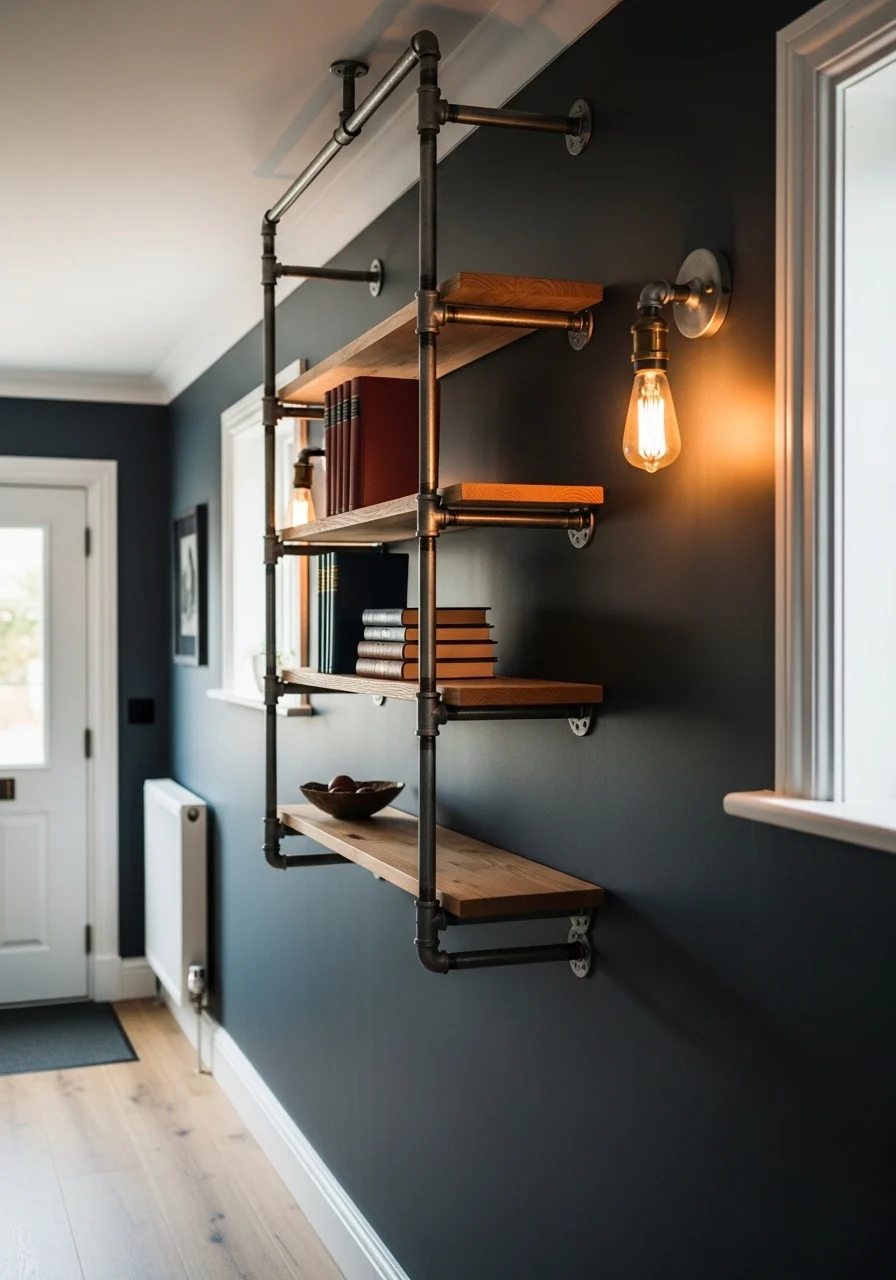
Industrial pipe shelves add character and sturdy display space. Edison lighting enhances the raw, warm aesthetic. This suits lofts, urban flats, and mixed-material interiors. You’ll enjoy the robust look and flexibility for storage. The feel is rugged, warm, and functional.
Key Elements
- Metal pipe brackets and fittings in black or matte
- Wood planks with aged finish for shelves
- Edison bulb wall sconce or string lights
- Leather-bound books and small potted plants
- Heavy-duty anchors for wall stability
- Sandpaper and sealant for shelf finishing
- Small baskets for concealed storage
- Socket wrench and drill for installation
- Wall-mounted dimmer for lighting control
- Dust cloth and light oil for metal care
How to Achieve This Look
- Design shelf layout and measure wall studs for support.
- Assemble pipe brackets and attach securely to studs.
- Cut and finish wood planks to shelf lengths.
- Secure planks to pipe brackets with screws.
- Install Edison bulb sconce beside shelving for mood light.
- Place heavier items on lower shelves for stability.
- Add decorative objects and small plants for warmth.
- Fit baskets to hide cables or small clutter.
- Adjust dimmer to set cozy lighting levels.
- Maintain metal with light oil to prevent rust.
How to Style / Use It
Use lower shelves for practical items and top for decor.
Pair with leather and warm woods for cohesive look.
Keep lighting warm to avoid harsh industrial glare.
Use baskets for kid-friendly storage.
Works well near laundry or mudroom transitions.
18. Layered Frame Shelves with Sculptural Elements
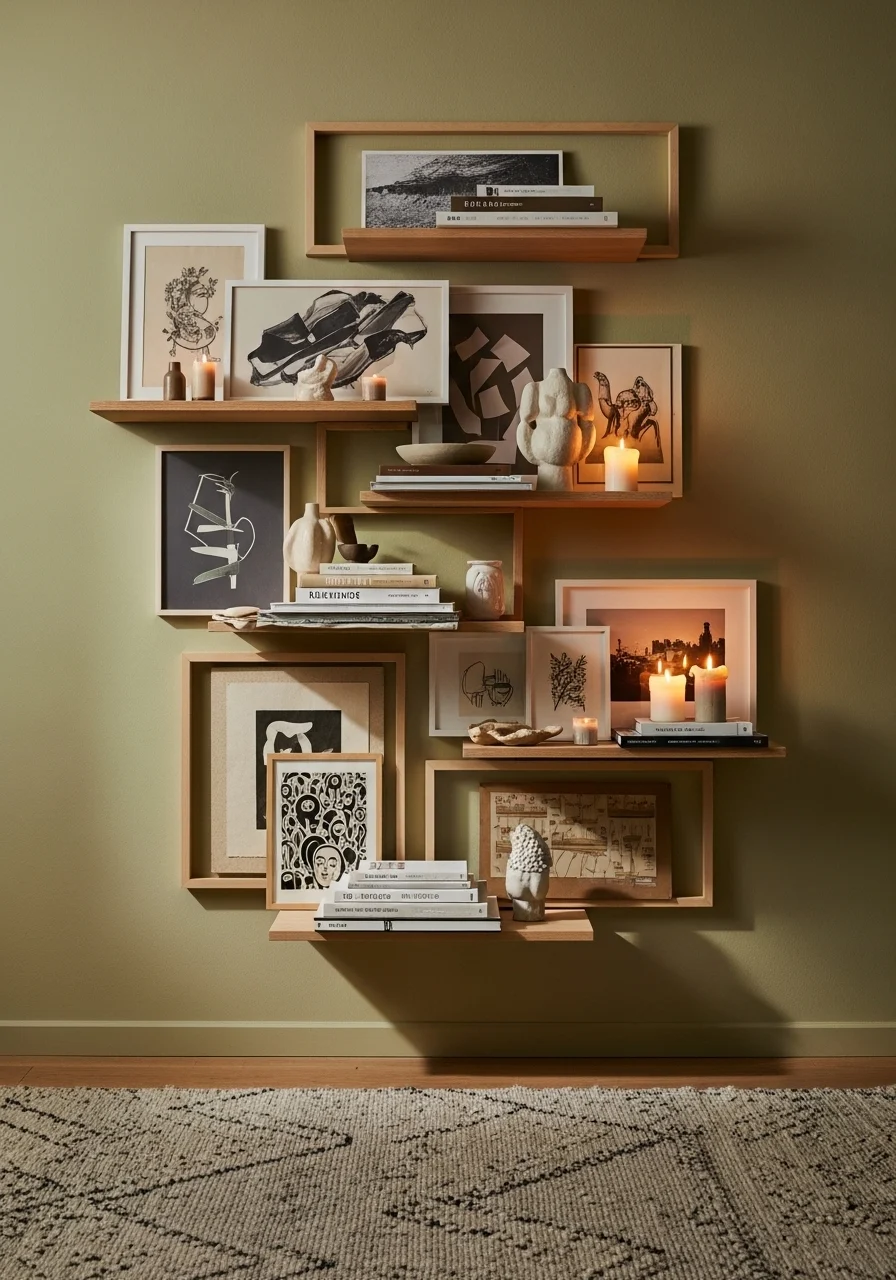
Layered frame shelves combine art with sculpture for a gallery-like effect. The depth comes from leaning and overlapping pieces. It fits creative households and gallery-minded decorators. You’ll love the three-dimensional feel and the ability to rearrange. The result is artful, tactile, and personal.
Key Elements
- Multiple narrow ledges for leaning frames
- Mix of framed art and small sculptures
- Candles or LED votives for ambiance
- Frames in varied finishes but similar scale
- Soft runner to align with ledges
- Museum putty to secure sculptures
- Picture-hanging kit for ledge installation
- Dusting brush for sculptures
- A small stool for styling adjustments
- Neutral wall paint to let art pop
How to Achieve This Look
- Install ledges at staggered heights for layered depth.
- Lean largest frames first, then overlap with medium ones.
- Add a small sculpture to break the linear look.
- Use museum putty to secure small objects safely.
- Add candles on one ledge for evening warmth.
- Avoid heavy frames that may shift and fall.
- Keep the bottom ledge clear if you have small kids or pets.
- Rotate frames and sculptures periodically.
- Use a stool to reach top ledges safely.
- Clean dust from sculptures gently with a soft brush.
How to Style / Use It
Keep color tones consistent for cohesion.
Use sculptures to add tactile contrast to framed art.
Switch art out for new inspirations regularly.
Candles add atmosphere but use battery-operated for safety.
Great for long hallways where vertical art feels too static.
19. Framed Textile Panels (Rugs, Scarves, and Embroideries)
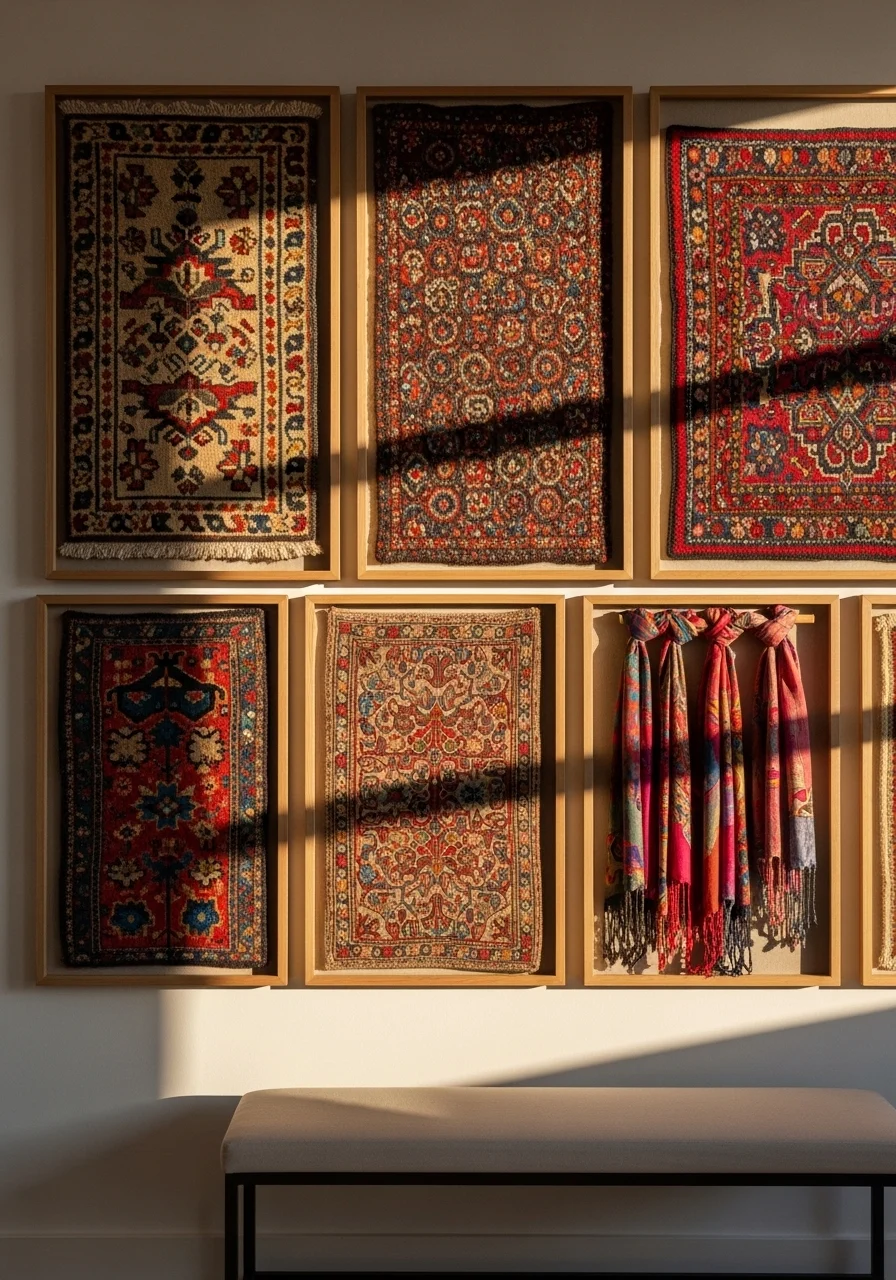
Framing textile pieces lets you display fabrics as art. Small rug fragments, scarves, and embroideries feel museum-grade on a hall wall. This suits collectors and lovers of global textiles. You’ll enjoy the color, pattern, and tactile history. The space becomes richly layered and textured.
Key Elements
- Framed textile panels in shadowbox frames
- Vintage or hand-embroidered textiles
- Acid-free backing for preservation
- UV-protective glass to reduce fading
- Slim bench with neutral cushion
- Archival tape and mounting corners
- Dust cover and gentle vacuum accessory
- Matching or complementary frame finishes
- Soft gallery lighting to highlight details
- Storage for rolled textiles not on display
How to Achieve This Look
- Choose textiles that are clean and stable for framing.
- Use acid-free backing and mounting corners to secure fabric.
- Select shadowbox frames to allow depth around the textile.
- Use UV protective glass to protect colors from fading.
- Hang pieces at eye level and spread color across the wall.
- Add a bench or console nearby for viewing rest.
- Light softly to reveal textures without overheating.
- Rotate textiles seasonally to preserve any delicate fibers.
- Keep humidity levels stable to prevent warping.
- Consult a framer for valuable or fragile textiles.
How to Style / Use It
Group textiles by color or pattern for a story wall.
Pair with natural materials and muted furniture.
Avoid direct sunlight to preserve fibers.
Use this approach for heirloom pieces or travel finds.
It makes a unique, cultural-focused hallway gallery.
20. Smart Wall Storage with Built-In Charging Station
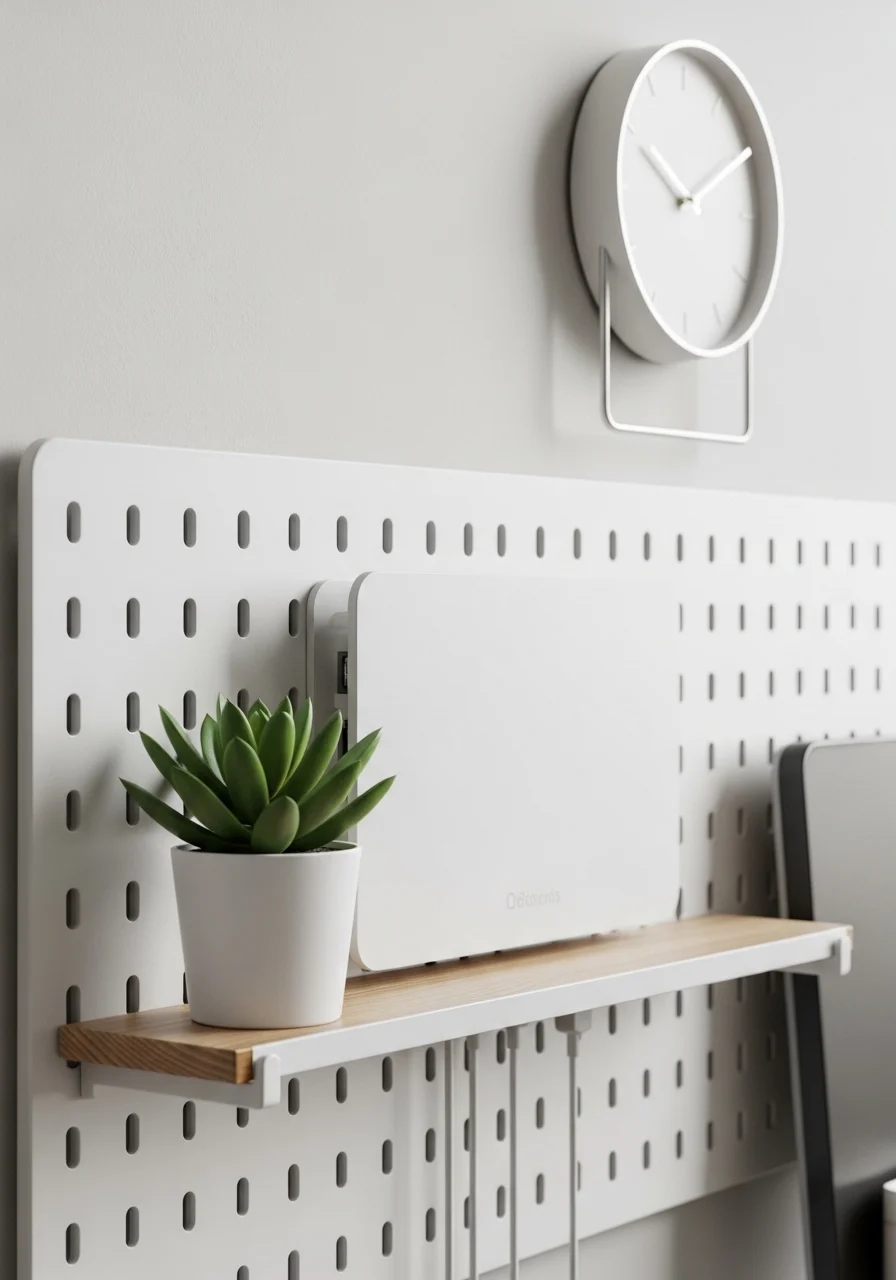
Built-in smart storage keeps daily tech organized and charged. Conceal cords and add a small shelf for mail. This modern solution suits busy households and tech-savvy users. You’ll appreciate the clean look and convenience. The hall becomes a functional hub that still looks tidy.
Key Elements
- Wall-mounted charging station with USB ports
- Slim shelf above charger for keys and mail
- Cable management box hidden below shelf
- Soft-close drawer or pouch for devices
- Small basket for charging cables
- Magnetic notepad or mini whiteboard
- Wall anchors and electrical planning if hardwired
- Non-slip mat for devices on shelf
- LED indicator light or smart plug
- Cleaning cloth for screens and shelf surfaces
How to Achieve This Look
- Choose a charging station that suits household device count.
- Plan location near an outlet or consider hardwiring during renovation.
- Mount the charging station centered at comfortable height.
- Add a slim shelf above for mail and a catchall tray.
- Route cables through a cable management box below.
- Add a small basket for cable extras and earbuds.
- Label drawers or pouches for each family member if desired.
- Use a smart plug to schedule device charging overnight.
- Keep the surface clutter-free for quick grab-and-go mornings.
- Wipe screens and shelf weekly to remove fingerprints.
How to Style / Use It
Use a simple color palette to keep the tech discreet.
Pair with a small plant for warmth and to hide cords.
Switch to wireless chargers for even cleaner surfaces.
Teach family to place devices in the same spot daily.
This setup works great next to the main entry door.
21. Seasonal Rotating Display with Clipboards and Baskets
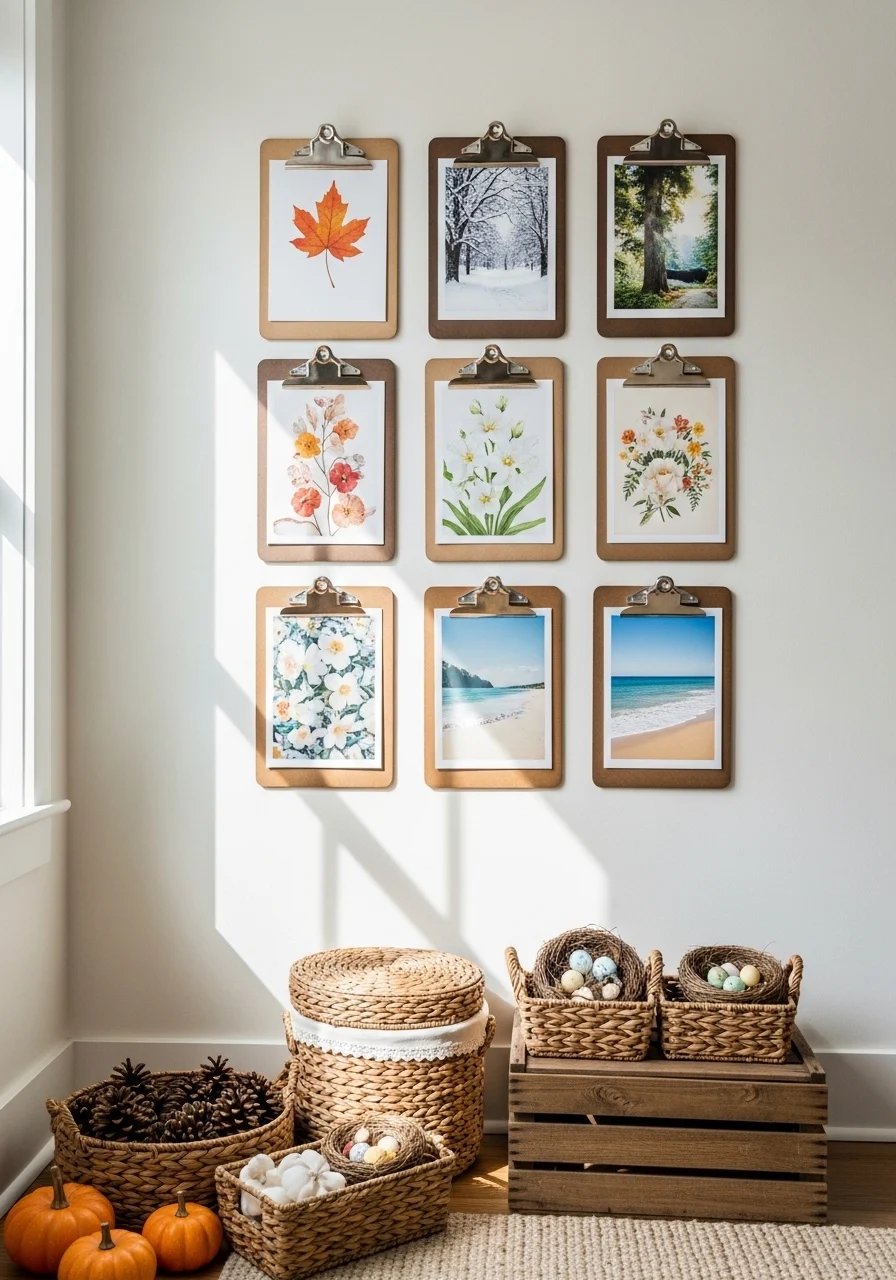
A rotating seasonal display keeps your hall feeling fresh year-round. Clipboards make swapping art simple and quick. Baskets below store seasonal gear like scarves or sunglasses. This idea suits people who love to refresh their decor often. You’ll enjoy the minimal effort for maximum personality.
Key Elements
- 6–9 wall clipboards mounted in a grid
- Seasonal prints, kids’ artwork, or postcards
- Wicker baskets or crates for seasonal storage
- Small bench or shelf beneath for staging
- Adhesive hooks or screws for clipboards
- Binder clips and clear sleeves for protection
- Seasonal labels or tags for baskets
- A small stool for clipboard changes
- Dust cloth and mild cleaner for baskets
- A printed schedule for rotation reminders
How to Achieve This Look
- Plan clipboard grid layout and mark mounting points.
- Install clipboards at even spacing with a level.
- Insert seasonal prints or artwork into clips.
- Place baskets or crates underneath for items related to current season.
- Add a bench for seating while rotating items.
- Swap prints monthly or quarterly for variety.
- Store next season’s items in labeled bins for quick access.
- Use protective sleeves for delicate artworks.
- Teach family members how to add notes or art to clips.
- Keep the area tidy for a clean, curated look.
How to Style / Use It
Use clipboards for quick reminders and rotating art.
Swap baskets’ contents with the weather or holidays.
Keep one clipboard reserved for a family calendar.
Use colorful prints in spring and cozy artwork in winter.
This system makes seasonal decorating easy and fun.
You now have 21 distinctive hall wall decor ideas that add personality and function to a commonly overlooked space. Try one that fits your lifestyle, or mix elements from several ideas for a custom look. Pin the ones you love for later and save them as quick weekend projects. Which idea are you most excited to try in your hallway? Share this with a friend who’s redoing their entry — they’ll thank you for the inspiration.